원격 모니터링 솔루션 가속기에 Raspberry Pi 디바이스 연결(Node.js)
이 자습서에서는 원격 모니터링 솔루션 가속기에 다음과 같은 원격 분석을 보내는 냉각기 디바이스를 구현합니다.
- 온도
- 압력
- 습도
간단히 하기 위해 코드는 냉각기에 대한 샘플 원격 분석 값을 생성합니다. 실제 센서를 디바이스에 연결하고 실제 원격 분석을 보내 샘플을 확장할 수 있습니다.
샘플 디바이스는 또한:
- 솔루션에 메타데이터를 보내 해당 기능을 설명합니다.
- 솔루션의 디바이스 페이지에서 트리거된 작업에 응답합니다.
- 솔루션의 디바이스 페이지에서 보내는 구성 변경 내용에 응답합니다.
이 자습서를 완료하려면 활성 Azure 계정이 필요합니다. 계정이 없는 경우 몇 분 만에 평가판 계정을 만들 수 있습니다. 자세한 내용은 Azure 평가판을 참조하세요.
시작하기 전에
디바이스에 대한 코드를 작성하기 전에 원격 모니터링 솔루션 가속기를 배포하고 이 솔루션에 새 실제 디바이스를 추가합니다.
원격 모니터링 솔루션 가속기 배포
이 자습서에서 만드는 냉각기 디바이스는 원격 모니터링 솔루션 가속기의 인스턴스에 데이터를 전송합니다. Azure 계정에서 원격 모니터링 솔루션 가속기를 미리 프로비전하지 않은 경우 원격 모니터링 솔루션 가속기 배포를 참조하세요.
원격 모니터링 솔루션의 배포 프로세스가 완료되면 시작을 클릭하여 브라우저에서 솔루션 대시보드를 엽니다.

디바이스를 원격 모니터링 솔루션에 추가
참고
솔루션에 디바이스가 이미 추가되어 있으면 이 단계를 건너뜁니다. 그러나 다음 단계에서는 디바이스 연결 문자열이 필요합니다. Azure Portal에서 검색하거나 az iot CLI 도구를 사용하여 디바이스 연결 문자열을 검색할 수 있습니다.
솔루션 가속기에 연결하는 디바이스는 유효한 자격 증명을 사용하여 IoT Hub에 자신을 식별할 수 있어야 합니다. 솔루션에 디바이스를 추가할 때 자격 증명이 포함된 디바이스 연결 문자열을 저장할 기회가 있습니다. 이 자습서의 뒷부분에서는 클라이언트 애플리케이션에 디바이스 연결 문자열을 포함시킵니다.
원격 모니터링 솔루션에 디바이스를 추가하려면 솔루션의 Device Explorer 페이지에서 다음 단계를 완료합니다.
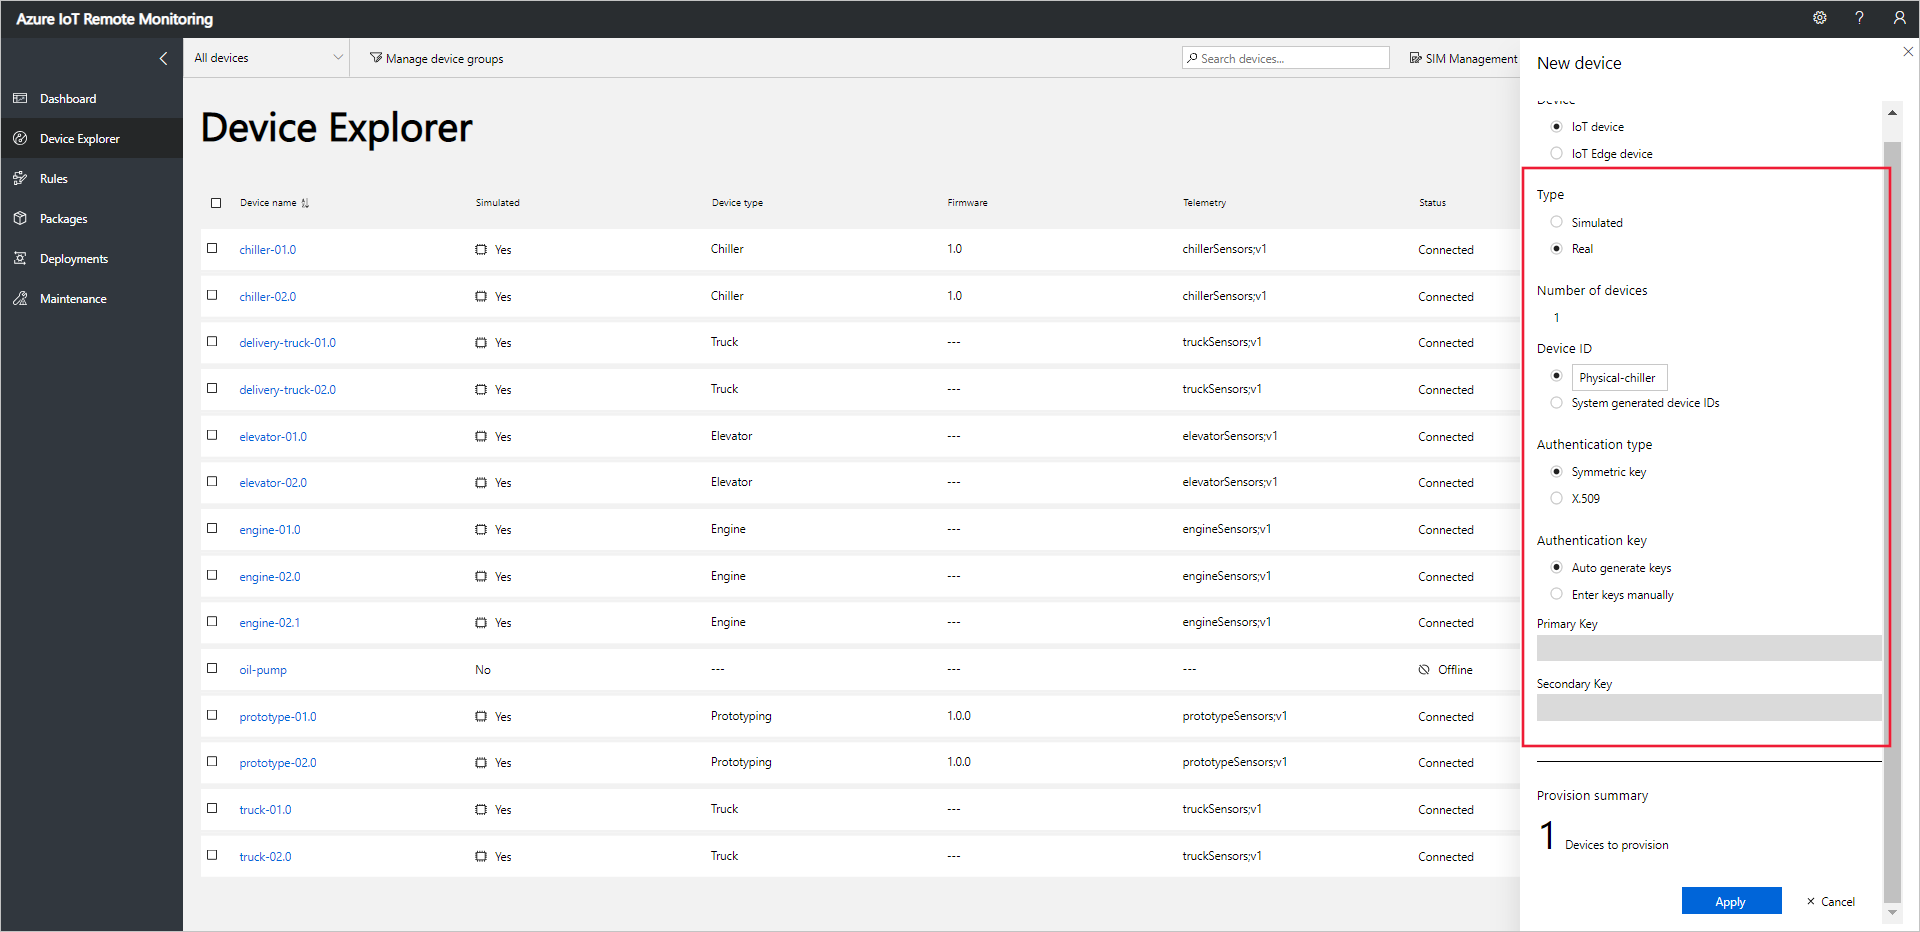
+ 새 디바이스를 선택한 다음, 디바이스 유형으로 실제를 선택합니다.
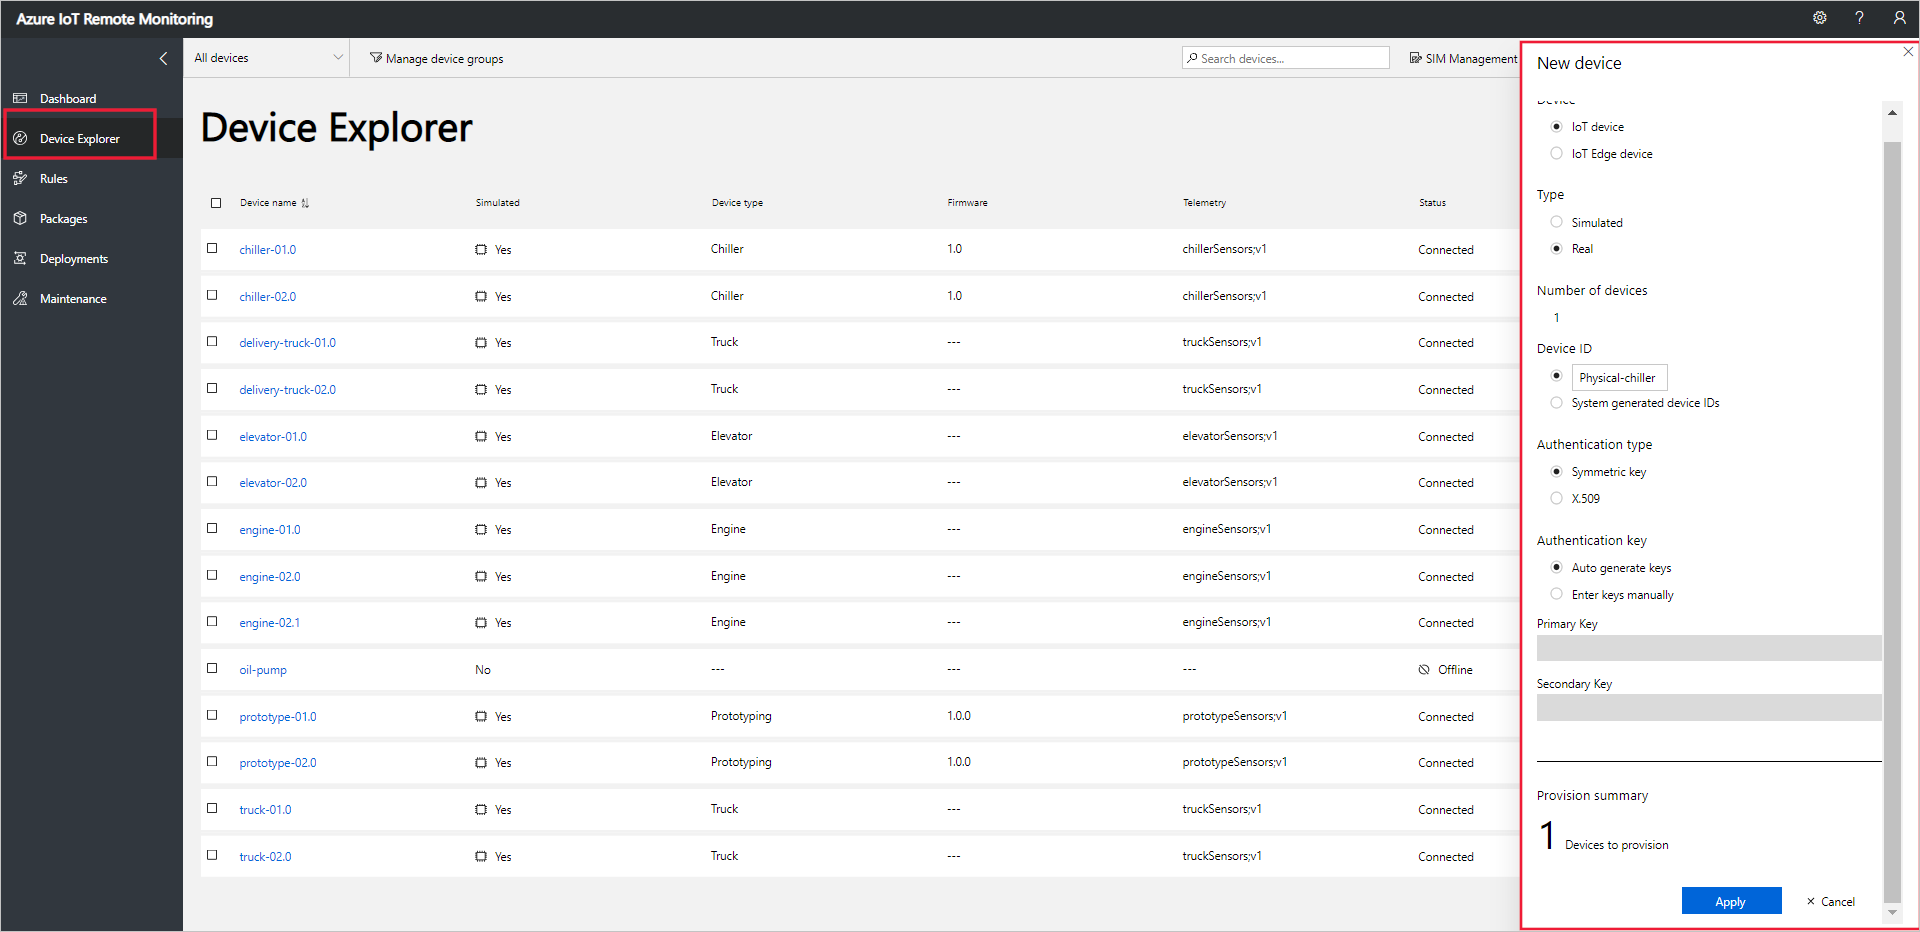
디바이스 ID로 물리적 냉각기를 입력합니다. 대칭 키 및 자동 생성 키 옵션을 선택합니다.
적용을 선택합니다. 그런 다음, 디바이스 ID, 기본 키, 연결 문자열 기본 키 값을 메모합니다.
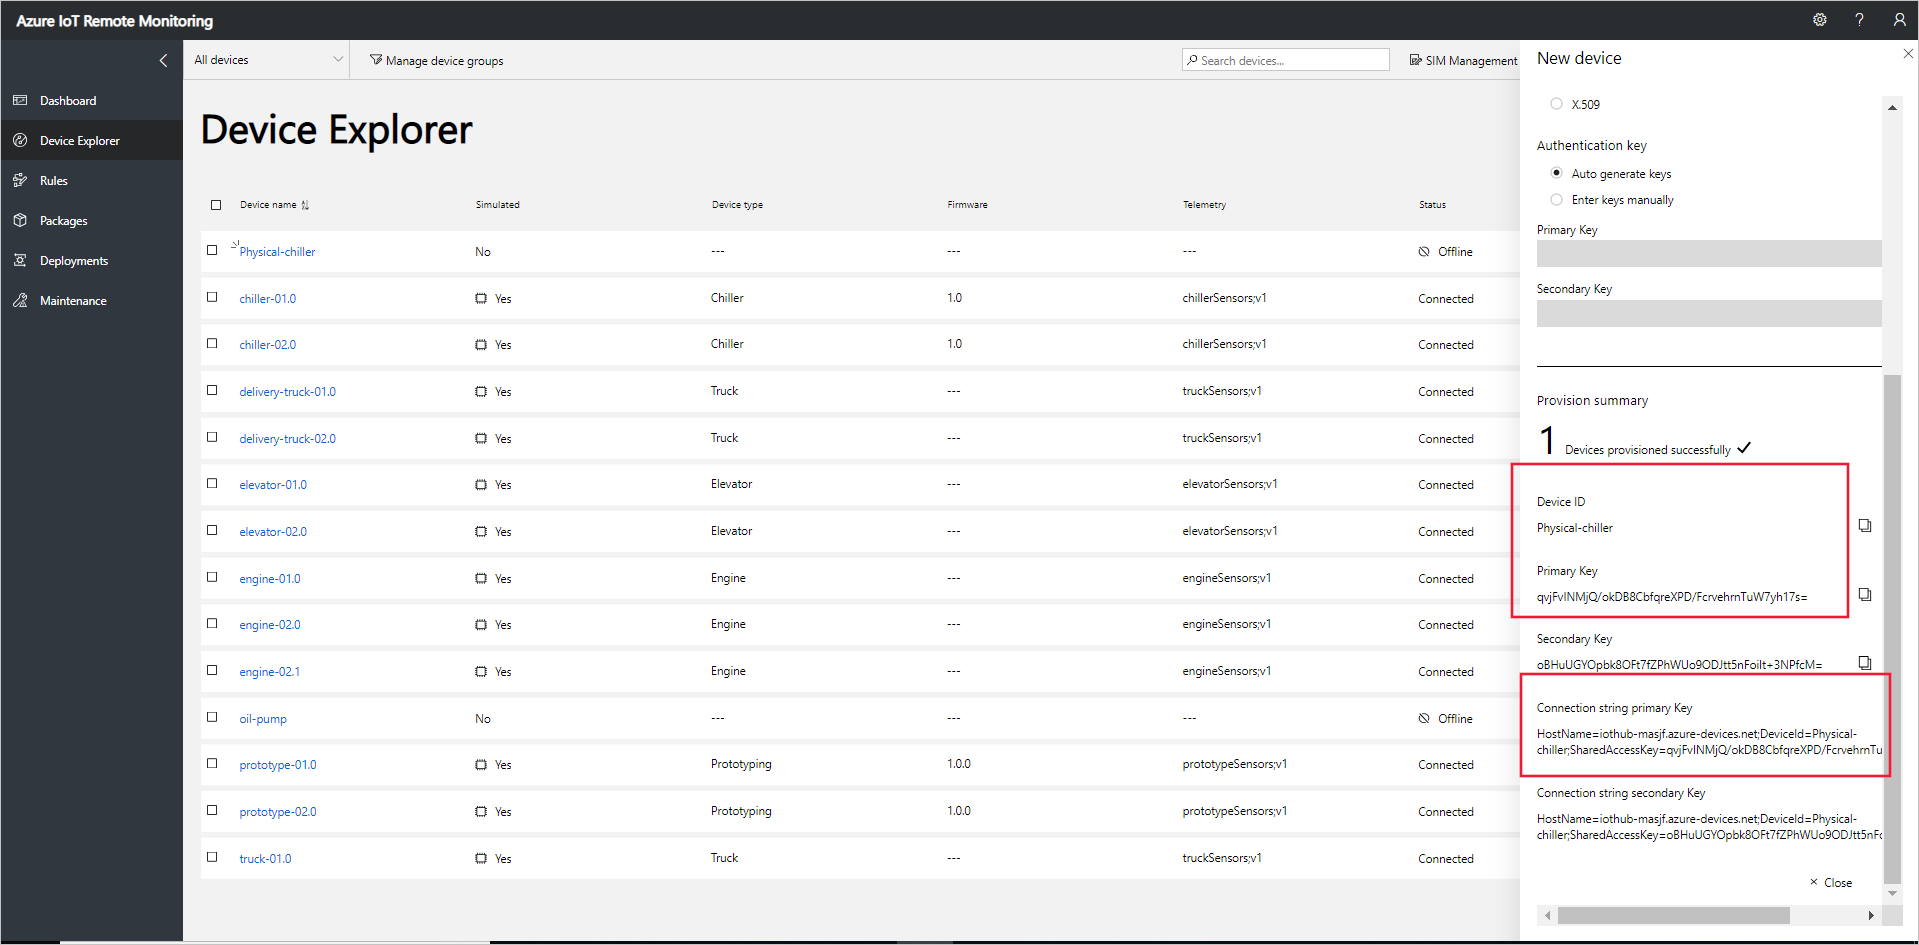
이제 실제 디바이스를 원격 모니터링 솔루션 가속기에 추가하고 해당 디바이스 연결 문자열을 적어 두었습니다. 다음 섹션에서는 디바이스 연결 문자열을 사용하여 솔루션에 연결하는 클라이언트 애플리케이션을 구현합니다.
클라이언트 애플리케이션은 기본 제공 냉각기 디바이스 모델을 구현합니다. 솔루션 가속기 디바이스 모델은 디바이스에 대해 다음을 지정합니다.
- 디바이스가 솔루션에 보고하는 속성 예를 들어, 냉각기 디바이스는 해당 펌웨어 및 위치에 대한 정보를 보고합니다.
- 디바이스가 솔루션에 보내는 원격 분석의 유형 예를 들어, 냉각기 디바이스는 온도, 습도 및 압력 값을 보냅니다.
- 디바이스에서 실행되도록 솔루션에서 예약할 수 있는 메서드 예를 들어, 냉각기 디바이스는 Reboot, FirmwareUpdate, EmergencyValveRelease 및 IncreasePressure 메서드를 구현해야 합니다.
이 자습서는 원격 모니터링 솔루션 가속기에 실제 디바이스를 연결하는 방법을 보여 줍니다. 이 자습서에서는 최소한의 리소스 제약 조건으로 환경에 적합한 옵션인 Node.js를 사용합니다.
디바이스를 시뮬레이션하려면 새 시뮬레이션된 디바이스 만들기 및 테스트를 참조하세요.
필수 하드웨어
Raspberry Pi의 명령줄에 원격으로 연결할 수 있는 데스크톱 컴퓨터이며
Raspberry Pi 3용 Microsoft IoT 시작 키트 또는 동등한 구성 요소입니다. 이 자습서에서는 키트에서 다음 항목을 사용합니다.
- Raspberry Pi 3
- MicroSD 카드(NOOBS 포함)
- USB 미니 케이블
- 이더넷 케이블
필수 데스크톱 소프트웨어
Raspberry Pi의 명령줄에 원격으로 액세스할 수 있도록 데스크톱 컴퓨터에 SSH 클라이언트가 필요합니다.
- Windows에서는 SSH 클라이언트를 포함하지 않습니다. PuTTY를 사용하는 것이 좋습니다.
- 대부분의 Linux 배포판 및 Mac OS는 명령줄 SSH 유틸리티를 포함합니다. 자세한 내용은 Linux 또는 Mac OS를 사용하는 SSH를 참조하세요.
필수 Raspberry Pi 소프트웨어
아직 그렇게 하지 않은 경우 Raspberry Pi에 Node.js 버전 4.0.0 이상을 설치합니다. 다음 단계에서는 Raspberry Pi에 Node.js v6을 설치하는 방법을 보여 줍니다.
ssh를 사용하여 Raspberry Pi에 연결합니다. 자세한 내용은 Raspberry Pi 웹 사이트에서 SSH(Secure Shell)를 참조하세요.다음 명령을 사용하여 Raspberry Pi를 업데이트합니다.
sudo apt-get update다음 명령을 사용하여 Raspberry Pi에서 Node.js의 기존 설치를 제거합니다.
sudo apt-get remove nodered -y
sudo apt-get remove nodejs nodejs-legacy -y
sudo apt-get remove npm  -y
다음 명령을 사용하여 Raspberry Pi에 Node.js v6을 다운로드하고 설치합니다.
curl -sL https://deb.nodesource.com/setup_6.x | sudo bash -
sudo apt-get install nodejs npm
다음 명령을 사용하여 Node.js v6.11.4를 성공적으로 설치했는지 확인합니다.
node --version
Node.js 솔루션 만들기
Raspberry Pi에 ssh 연결을 사용하여 다음 단계를 완료합니다.
Raspberry Pi의 홈 폴더에
remotemonitoring이라는 폴더를 만듭니다. 명령줄에서 이 폴더로 이동합니다.cd ~ mkdir remotemonitoring cd remotemonitoring샘플 앱을 완료하는 데 필요한 패키지를 다운로드하고 설치하려면 다음 명령을 실행합니다.
npm install async azure-iot-device azure-iot-device-mqttremotemonitoring폴더에 remote_monitoring.js라는 파일을 만듭니다. 텍스트 편집기에서 이 파일을 엽니다. Raspberry Pi에서nano또는vi텍스트 편집기를 사용할 수 있습니다.remote_monitoring.js 파일에서 다음
require문을 추가합니다.var Protocol = require('azure-iot-device-mqtt').Mqtt; var Client = require('azure-iot-device').Client; var Message = require('azure-iot-device').Message; var async = require('async');다음 변수 선언을
require문 뒤에 추가합니다. 자리 표시자 값{device connection string}을 원격 모니터링 솔루션에서 프로비전한 디바이스에 대해 기록한 값으로 바꿉니다.var connectionString = '{device connection string}';기본 원격 분석 데이터를 정의하려면 다음 변수를 추가합니다.
var temperature = 50;
var temperatureUnit = 'F';
var humidity = 50;
var humidityUnit = '%';
var pressure = 55;
var pressureUnit = 'psig';
속성 값을 정의하려면 다음 변수를 추가합니다.
var schema = "real-chiller;v1";
var deviceType = "RealChiller";
var deviceFirmware = "1.0.0";
var deviceFirmwareUpdateStatus = "";
var deviceLocation = "Building 44";
var deviceLatitude = 47.638928;
var deviceLongitude = -122.13476;
var deviceOnline = true;
다음 변수를 추가하여 솔루션에 보내는 reported 속성을 정의합니다. 이러한 속성에는 웹 UI에 표시할 메타데이터가 포함됩니다.
var reportedProperties = {
  "SupportedMethods": "Reboot,FirmwareUpdate,EmergencyValveRelease,IncreasePressure",
  "Telemetry": {
    [schema]: ""
  },
  "Type": deviceType,
  "Firmware": deviceFirmware,
  "FirmwareUpdateStatus": deviceFirmwareUpdateStatus,
  "Location": deviceLocation,
  "Latitude": deviceLatitude,
  "Longitude": deviceLongitude,
  "Online": deviceOnline
}
작업 결과를 출력하려면 다음 도우미 함수를 추가합니다.
function printErrorFor(op) {
    return function printError(err) {
        if (err) console.log(op + ' error: ' + err.toString());
    };
}
다음 도우미 함수를 추가하여 원격 분석 값을 임의로 지정하는 데 사용합니다.
function generateRandomIncrement() {
    return ((Math.random() * 2) - 1);
}
다음 제네릭 함수를 추가하여 솔루션에서 직접 메서드 호출을 처리합니다. 함수는 호출된 직접 메서드에 대한 정보를 표시하지만, 이 샘플에서는 어떤 방식으로도 디바이스를 수정하지 않습니다. 솔루션은 직접 메서드를 사용하여 디바이스에서 작동합니다.
function onDirectMethod(request, response) {
  // Implement logic asynchronously here.
  console.log('Simulated ' + request.methodName);

  // Complete the response
  response.send(200, request.methodName + ' was called on the device', function (err) {
    if (err) console.error('Error sending method response :\n' + err.toString());
    else console.log('200 Response to method \'' + request.methodName + '\' sent successfully.');
  });
}
다음 함수를 추가하여 솔루션에서 FirmwareUpdate 직접 메서드 호출을 처리합니다. 함수는 직접 메서드 페이로드에 전달된 매개 변수를 확인한 다음, 펌웨어 업데이트 시뮬레이션을 비동기적으로 실행합니다.
function onFirmwareUpdate(request, response) {
  // Get the requested firmware version from the JSON request body
  var firmwareVersion = request.payload.Firmware;
  var firmwareUri = request.payload.FirmwareUri;

  // Ensure we got a firmware values
  if (!firmwareVersion || !firmwareUri) {
    response.send(400, 'Missing firmware value', function(err) {
      if (err) console.error('Error sending method response :\n' + err.toString());
      else console.log('400 Response to method \'' + request.methodName + '\' sent successfully.');
    });
  } else {
    // Respond the cloud app for the device method
    response.send(200, 'Firmware update started.', function(err) {
      if (err) console.error('Error sending method response :\n' + err.toString());
      else {
        console.log('200 Response to method \'' + request.methodName + '\' sent successfully.');

        // Run the simulated firmware update flow
        runFirmwareUpdateFlow(firmwareVersion, firmwareUri);
      }
    });
  }
}
다음 함수를 추가하여 진행 상태를 솔루션에 다시 보고하는 장기 실행 펌웨어 업데이트 흐름을 시뮬레이션합니다.
// Simulated firmwareUpdate flow
function runFirmwareUpdateFlow(firmwareVersion, firmwareUri) {
  console.log('Simulating firmware update flow...');
  console.log('> Firmware version passed: ' + firmwareVersion);
  console.log('> Firmware URI passed: ' + firmwareUri);
  async.waterfall([
    function (callback) {
      console.log("Image downloading from " + firmwareUri);
      var patch = {
        FirmwareUpdateStatus: 'Downloading image..'
      };
      reportUpdateThroughTwin(patch, callback);
      sleep(10000, callback);
    },
    function (callback) {
      console.log("Downloaded, applying firmware " + firmwareVersion);
      deviceOnline = false;
      var patch = {
        FirmwareUpdateStatus: 'Applying firmware..',
        Online: false
      };
      reportUpdateThroughTwin(patch, callback);
      sleep(8000, callback);
    },
    function (callback) {
      console.log("Rebooting");
      var patch = {
        FirmwareUpdateStatus: 'Rebooting..'
      };
      reportUpdateThroughTwin(patch, callback);
      sleep(10000, callback);
    },
    function (callback) {
      console.log("Firmware updated to " + firmwareVersion);
      deviceOnline = true;
      var patch = {
        FirmwareUpdateStatus: 'Firmware updated',
        Online: true,
        Firmware: firmwareVersion
      };
      reportUpdateThroughTwin(patch, callback);
      callback(null);
    }
  ], function(err) {
    if (err) {
      console.error('Error in simulated firmware update flow: ' + err.message);
    } else {
      console.log("Completed simulated firmware update flow");
    }
  });

  // Helper function to update the twin reported properties.
  function reportUpdateThroughTwin(patch, callback) {
    console.log("Sending...");
    console.log(JSON.stringify(patch, null, 2));
    client.getTwin(function(err, twin) {
      if (!err) {
        twin.properties.reported.update(patch, function(err) {
          if (err) callback(err);
        });
      } else {
        if (err) callback(err);
      }
    });
  }

  function sleep(milliseconds, callback) {
    console.log("Simulate a delay (milleseconds): " + milliseconds);
    setTimeout(function () {
      callback(null);
    }, milliseconds);
  }
}
다음 코드를 추가하여 솔루션에 원격 분석 데이터를 보냅니다. 클라이언트 앱은 메시지 스키마를 식별하기 위해 메시지에 속성을 추가합니다.
function sendTelemetry(data, schema) {
  if (deviceOnline) {
    var d = new Date();
    var payload = JSON.stringify(data);
    var message = new Message(payload);
    message.properties.add('iothub-creation-time-utc', d.toISOString());
    message.properties.add('iothub-message-schema', schema);

    console.log('Sending device message data:\n' + payload);
    client.sendEvent(message, printErrorFor('send event'));
  } else {
    console.log('Offline, not sending telemetry');
  }
}
다음 코드를 추가하여 클라이언트 인스턴스를 만듭니다.
var client = Client.fromConnectionString(connectionString, Protocol);다음 코드를 추가하여:
연결을 엽니다.
desired 속성에 대한 처리기를 설정합니다.
reported 속성을 보냅니다.
직접 메서드에 대한 처리기를 등록합니다. 샘플은 펌웨어 업데이트 직접 메서드에 대한 별도 처리기를 사용합니다.
원격 분석 보내기를 시작합니다.
client.open(function (err) {
if (err) {
  printErrorFor('open')(err);
} else {
  // Create device Twin
  client.getTwin(function (err, twin) {
    if (err) {
      console.error('Could not get device twin');
    } else {
      console.log('Device twin created');

      twin.on('properties.desired', function (delta) {
        // Handle desired properties set by solution
        console.log('Received new desired properties:');
        console.log(JSON.stringify(delta));
      });

      // Send reported properties
      twin.properties.reported.update(reportedProperties, function (err) {
        if (err) throw err;
        console.log('Twin state reported');
      });

      // Register handlers for all the method names we are interested in.
      // Consider separate handlers for each method.
      client.onDeviceMethod('Reboot', onDirectMethod);
      client.onDeviceMethod('FirmwareUpdate', onFirmwareUpdate);
      client.onDeviceMethod('EmergencyValveRelease', onDirectMethod);
      client.onDeviceMethod('IncreasePressure', onDirectMethod);
    }
  });

  // Start sending telemetry
  var sendDeviceTelemetry = setInterval(function () {
    temperature += generateRandomIncrement();
    pressure += generateRandomIncrement();
    humidity += generateRandomIncrement();
    var data = {
      'temperature': temperature,
      'temperature_unit': temperatureUnit,
      'humidity': humidity,
      'humidity_unit': humidityUnit,
      'pressure': pressure,
      'pressure_unit': pressureUnit
    };
    sendTelemetry(data, schema)
  }, 5000);

  client.on('error', function (err) {
    printErrorFor('client')(err);
    if (sendTemperatureInterval) clearInterval(sendTemperatureInterval);
    if (sendHumidityInterval) clearInterval(sendHumidityInterval);
    if (sendPressureInterval) clearInterval(sendPressureInterval);
    client.close(printErrorFor('client.close'));
  });
}
});
remote_monitoring.js 파일에 변경 내용을 저장합니다.
샘플 애플리케이션을 시작하려면 Raspberry Pi의 명령 프롬프트에서 다음 명령을 실행합니다.
node remote_monitoring.js
디바이스 원격 분석 보기
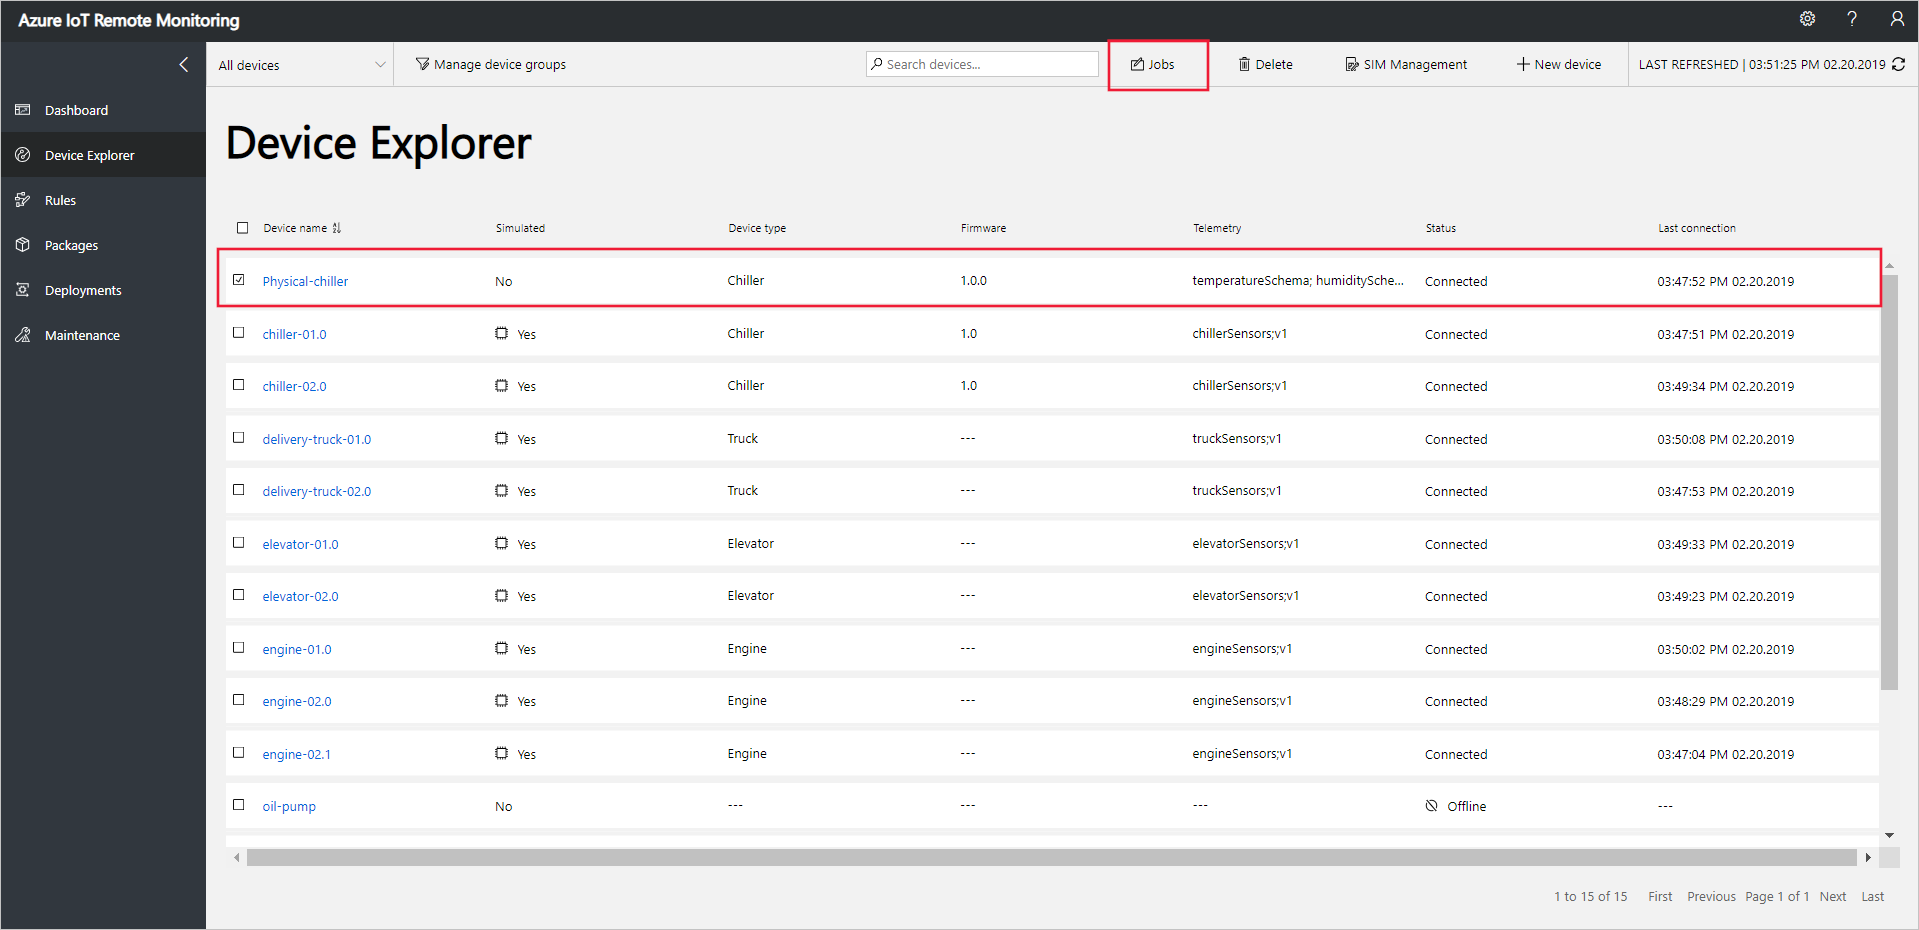
솔루션의 Device Explorer 페이지에서는 디바이스에서 보낸 원격 분석을 볼 수 있습니다.
Device Explorer 페이지의 디바이스 목록에서 프로비저닝한 디바이스를 선택합니다. 패널은 디바이스 원격 분석의 그림을 포함한 디바이스에 대한 정보를 표시합니다.

압력을 선택하여 원격 분석 표시를 변경합니다.

디바이스에 대한 진단 정보를 보려면 진단 아래로 스크롤합니다.

디바이스에서 작동
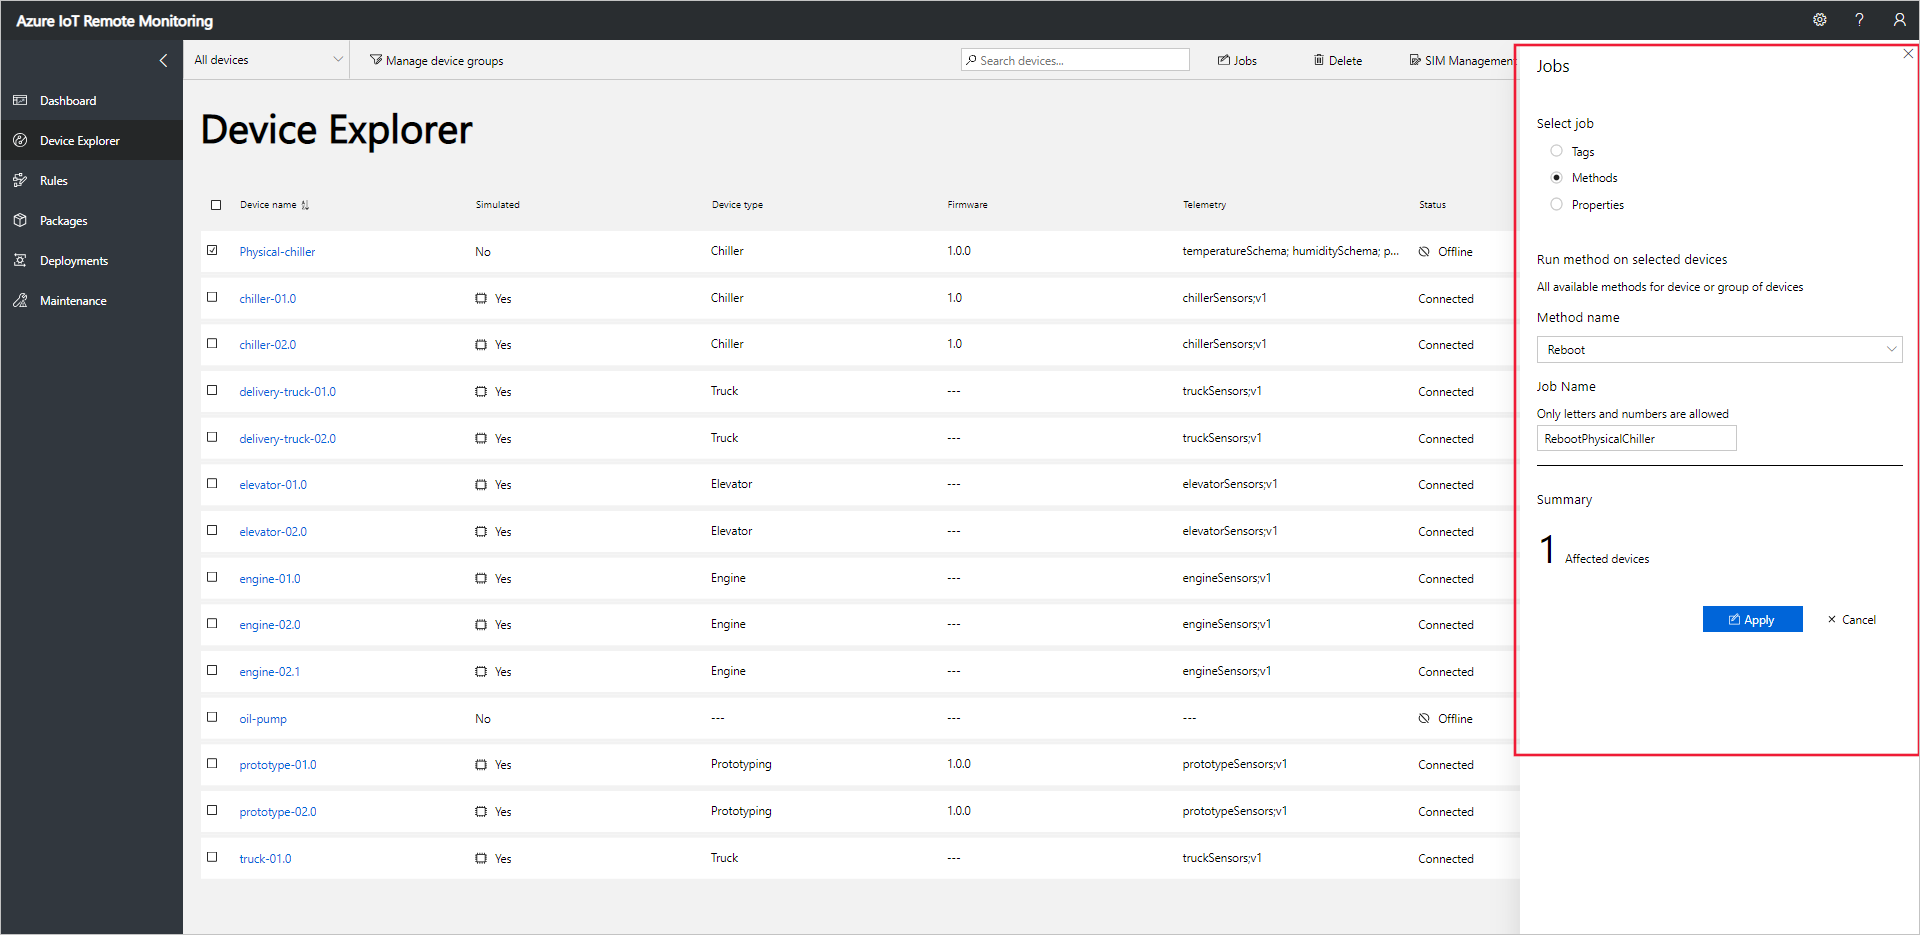
디바이스에서 메서드를 호출하려면 원격 모니터링 솔루션의 Device Explorer 페이지를 사용합니다. 예를 들어, 원격 모니터링 솔루션에서 냉각기 디바이스는 Reboot 메서드를 구현합니다.
디바이스를 선택하여 솔루션의 Device Explorer 페이지로 이동합니다.
Device Explorer 페이지의 디바이스 목록에서 프로비저닝한 디바이스를 선택합니다.
디바이스에서 호출할 수 있는 메서드의 목록을 표시하려면 작업을 선택한 다음, 메서드를 선택합니다. 여러 디바이스에서 작업이 실행되도록 예약하려면 목록에서 여러 디바이스를 선택하면 됩니다. 작업 패널에 선택한 모든 디바이스에 공통된 메서드 형식이 표시됩니다.
Reboot를 선택하고, 작업 이름을 RebootPhysicalChiller로 설정하고, 적용을 선택합니다.
시뮬레이션된 디바이스가 메서드를 처리하는 동안 디바이스 코드를 실행하는 콘솔에 메시지 시퀀스가 표시됩니다.
참고
솔루션에서 작업의 상태를 추적하려면 작업 상태 보기를 선택합니다.
다음 단계
원격 모니터링 솔루션 가속기 사용자 지정 문서에서는 솔루션 가속기를 사용자 지정하는 몇 가지 방법에 대해 설명합니다.