Note
Visual Studio App Center supports end to end and integrated services central to mobile app development. Developers can use Build, Test and Distribute services to set up Continuous Integration and Delivery pipeline. Once the app is deployed, developers can monitor the status and usage of their app using the Analytics and Diagnostics services, and engage with users using the Push service. Developers can also leverage Auth to authenticate their users and Data service to persist and sync app data in the cloud. If you are looking to integrate cloud services in your mobile application, sign up with App Center today.
Azure Mobile Apps SDK for Unity
Note
This is a Sandbox project. The content in this article is unsupported, and therefore may be out of date or not in a working state. That said, we still think it was awesome enough to include here. Enjoy!
Azure Mobile Apps for Gaming
Azure Mobile Apps contains a variety of features for building cross-platform mobile titles. This SDK currently supports working with Easy Tables. Easy Tables are a great way to read, write, and query data in a simple table format. While more features exist in the service, they are not yet supported by this SDK, but will be evaluated for future releases.
Important
This is an experimental Unity SDK for Azure Mobile Apps. As such, please note that this SDK is not supported and is not provided by the Azure Mobile Apps team. If you run into problems, please let us know using the GitHub Issues page for the SDK.


Requirements
- Unity 2018.1, .2, or .3
- Unity 2018.2 (or greater) is required for proper SSL support.
- If you are using Unity 2017, please check out our Unity 2017 SDK.
- Unity 2019.x and greater are not supported and will not work with these SDKs.
- An Azure Mobile Apps account (Sign up for free!)
Compatibility
This has been tested with the following Unity exporters. Others wil likely work, however we haven't tested every possible platform and combination. Please let us know if you've had success!
- Windows/Mac Standalone
- iOS
- Android
- UWP (IL2CPP)
- Unity Editor
Import the SDK
To import the SDK into your own project, make sure you have downloaded the latest .unitypackage from GitHub. Then, do the following:
Open Unity and select Edit > Project Settings > Player to open the PlayerSettings panel.
Select .NET 4.x Equivalent from the Scripting Runtime Version dropdown and .NET Standard 2.0 from the Api Compatibility Level dropdown in the Configuration section.

Add the .unitypackage you downloaded in the first step to Unity by using the Assets > Import Package > Custom Package menu option.
In the Import Unity Package box that pops up, you can select which things you'd like to import. By default everything will be selected. If you don't care to use the sample, you can uncheck that box.
Click the Import button to add the items to your project.
With the package added, you can now use the normal API in your scripts as you would in any other application. Please take a look at the corresponding sample (also included in each .unitypackage) which demonstrates how to use each of the services to perform simple tasks.
Please refer to the Azure Mobile Apps Docs for even more samples and tutorials on using the API.
Unity 2018.1 and SSL support
Due to a Unity 2018.1 limitation (fixed in 2018.2), HTTPS requests using the standard .NET networking stack (i.e. not using UnityWebRequest) will fail. To workaround this, you will need to use the http version of the Mobile Apps endpoint instead of https. This means your data will not be encrypted to and from the server. Here's an example: http://mymobileapp.azurewebsites.net/. We highly recommend upgrading your project to Unity 2018.2 if possible.
Try the Sample
To use the sample, you will need to have an Azure Mobile Apps account setup along with a valid connection string. You can learn more about that here.
To use the sample, do the following:
Download the Unity SDKs repo from GitHub (or import it from the .unitypackage and continue to step 4).
Unzip to a location on your hard drive.
Open Unity 2018.1 (or greater) and point it to the MobileApps directory inside the unzipped package.
In the Project window, double-click the AzureMobileApps scene inside the Assets\AzureSamples\MobileApps directory to open the main scene for the sample.
In this scene, select the MobileAppsObject item in the Hierarchy window.
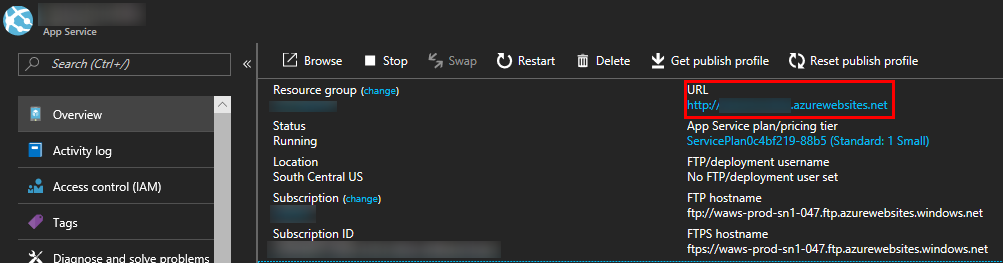
With MobileAppsObject selected, you'll notice that there is a blank entry named Mobile App Uri in the Inspector window. Fill in this entry with the valid URI as shown on the Azure portal, but remember to change the endpoint to use http as described above. The URI will be http://<yourAppName>.azurewebsites.net/.
Run the project from within the editor by clicking the Play button. Alternatively, you can export to the platform of your choosing and run there.
At this point, you can click the button for any of the four Mobile Apps types and watch the output window. If things are setup and working, you will see the sample test a standard workflow.
The code for the sample is broken out into four separate scripts, one for each Mobile Apps type. Take a look at each to learn more about how it works.