적응형 타일 만들기
적응형 타일 템플릿은 Windows 10의 새로운 기능으로, 다양한 화면 밀도에 맞게 조정되는 간단하고 유연한 마크업 언어를 사용하여 고유한 타일 알림 콘텐츠를 디자인할 수 있습니다. 이 문서에서는 Windows 앱의 적응형 라이브 타일을 만드는 방법을 설명합니다. 적응형 요소 및 특성의 전체 목록은 적응형 타일 스키마를 참조하세요.
(원하는 경우 Windows 10에 대한 알림을 디자인할 때 Windows 8 타일 템플릿 카탈로그의 미리 설정된 템플릿을 계속 사용할 수 있습니다.)
시작하기
알림 라이브러리를 설치합니다. XML 대신 C#을 사용하여 알림을 생성하려면 Microsoft.Toolkit.Uwp.Notifications라는 NuGet 패키지를 설치합니다("알림 uwp" 검색). 이 문서에서 제공하는 C# 샘플은 NuGet 패키지 버전 1.0.0을 사용합니다.
알림 시각화 도우미를 설치합니다. 이 무료 Windows 앱은 Visual Studio의 XAML 편집기/디자인 뷰와 비슷하게 타일을 편집할 때 시각적 미리 보기를 곧바로 제공하여 적응형 라이브 타일을 디자인하는 데 도움이 됩니다. 자세한 내용은 알림 비주얼라이저를 참조하거나 Microsoft Store에서 알림 비주얼라이저를 다운로드하세요.
타일 알림을 보내는 방법
로컬 타일 알림 보내기에 대한 빠른 시작을 읽어보세요. 아래 설명서에서는 적응형 타일에 사용할 수 있는 모든 시각적 UI를 설명합니다.
사용 지침
적응형 템플릿은 다양한 폼 팩터 및 알림 유형에서 작동하도록 설계되었습니다. 그룹 및 하위 그룹과 같은 요소는 콘텐츠를 함께 연결하며 특정 시각적 동작을 자체적으로 의미하지는 않습니다. 알림의 최종 모양은 휴대폰, 태블릿, 데스크톱 또는 다른 디바이스 등 표시될 특정 디바이스를 기반으로 해야 합니다.
힌트는 특정 시각적 동작을 달성하기 위해 요소에 추가할 수 있는 선택적 특성입니다. 힌트는 디바이스별 또는 알림별일 수 있습니다.
기본 예제
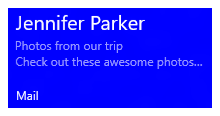
이 예제에서는 적응형 타일 템플릿이 무엇을 생성할 수 있는지 보여 줍니다.
<tile>
  <visual>

    <binding template="TileMedium">
      ...
    </binding>

    <binding template="TileWide">
      <text hint-style="subtitle">Jennifer Parker</text>
      <text hint-style="captionSubtle">Photos from our trip</text>
      <text hint-style="captionSubtle">Check out these awesome photos I took while in New Zealand!</text>
    </binding>

    <binding template="TileLarge">
      ...
    </binding>

  </visual>
</tile>
TileContent content = new TileContent()
{
    Visual = new TileVisual()
    {
        TileMedium = ...

        TileWide = new TileBinding()
        {
            Content = new TileBindingContentAdaptive()
            {
                Children =
                {
                    new AdaptiveText()
                    {
                        Text = "Jennifer Parker",
                        HintStyle = AdaptiveTextStyle.Subtitle
                    },

                    new AdaptiveText()
                    {
                        Text = "Photos from our trip",
                        HintStyle = AdaptiveTextStyle.CaptionSubtle
                    },

                    new AdaptiveText()
                    {
                        Text = "Check out these awesome photos I took while in New Zealand!",
                        HintStyle = AdaptiveTextStyle.CaptionSubtle
                    }
                }
            }
        },

        TileLarge = ...
    }
};
결과:
타일 크기
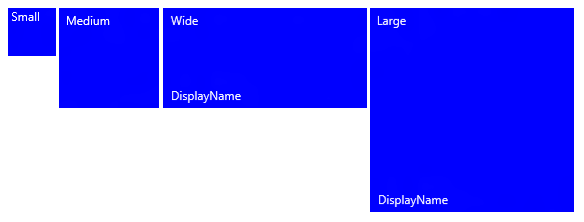
각 타일 크기에 대한 콘텐츠는 XML 페이로드 내에서 별도의 TileBinding 요소에 개별적으로 지정합니다. 템플릿 특성을 다음 값 중 하나로 설정하여 대상 크기를 선택합니다.
- TileSmall
- TileMedium
- TileWide
- TileLarge(데스크톱에만 해당)
단일 타일 알림 XML 페이로드의 경우 다음 예제와 같이 지원하려는 각 타일 크기에 대한 <바인딩> 요소를 제공합니다.
<tile>
  <visual>

    <binding template="TileSmall">
      <text>Small</text>
    </binding>

    <binding template="TileMedium">
      <text>Medium</text>
    </binding>

    <binding template="TileWide">
      <text>Wide</text>
    </binding>

    <binding template="TileLarge">
      <text>Large</text>
    </binding>

  </visual>
</tile>
TileContent content = new TileContent()
{
    Visual = new TileVisual()
    {
        TileSmall = new TileBinding()
        {
            Content = new TileBindingContentAdaptive()
            {
                Children =
                {
                    new AdaptiveText() { Text = "Small" }
                }
            }
        },

        TileMedium = new TileBinding()
        {
            Content = new TileBindingContentAdaptive()
            {
                Children =
                {
                    new AdaptiveText() { Text = "Medium" }
                }
            }
        },

        TileWide = new TileBinding()
        {
            Content = new TileBindingContentAdaptive()
            {
                Children =
                {
                    new AdaptiveText() { Text = "Wide" }
                }
            }
        },

        TileLarge = new TileBinding()
        {
            Content = new TileBindingContentAdaptive()
            {
                Children =
                {
                    new AdaptiveText() { Text = "Large" }
                }
            }
        }
    }
};
결과:
브랜딩
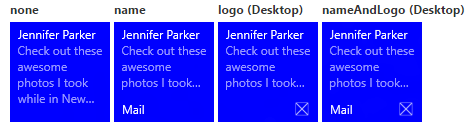
알림 페이로드의 브랜딩 특성을 사용하여 라이브 타일(표시 이름 및 모서리 로고)의 맨 아래에 있는 브랜딩을 제어할 수 있습니다. "none", "name", "logo" 또는 "nameAndLogo"를 개별적으로 또는 모두 표시하도록 선택할 수 있습니다.
참고 Windows Mobile은 모서리 로고를 지원하지 않으므로 "logo" 및 "nameAndLogo"는 기본적으로 Mobile에서 "name"으로 설정됩니다.
<visual branding="logo">
  ...
</visual>
new TileVisual()
{
    Branding = TileBranding.Logo,
    ...
}
결과:
브랜딩은 다음 두 가지 방법 중 하나인 특정 타일 크기에 적용할 수 있습니다.
- TileBinding 요소에 특성 적용
- 전체 알림 페이로드에 영향을 주는 TileVisual 요소에 특성을 적용하며, 바인딩에 대한 브랜딩을 지정하지 않으면 시각적 요소에 제공된 브랜딩이 사용됩니다.
<tile>
  <visual branding="nameAndLogo">

    <binding template="TileMedium" branding="logo">
      ...
    </binding>

    <!--Inherits branding from visual-->
    <binding template="TileWide">
      ...
    </binding>

  </visual>
</tile>
TileContent content = new TileContent()
{
    Visual = new TileVisual()
    {
        Branding = TileBranding.NameAndLogo,

        TileMedium = new TileBinding()
        {
            Branding = TileBranding.Logo,
            ...
        },

        // Inherits branding from Visual
        TileWide = new TileBinding()
        {
            ...
        }
    }
};
기본 브랜딩 결과:
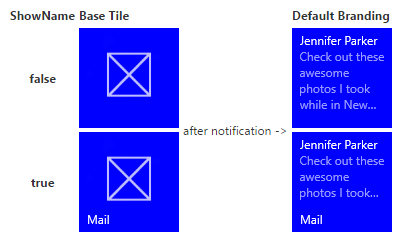
알림 페이로드에서 브랜딩을 지정하지 않으면 기본 타일의 속성에 따라 브랜딩이 결정됩니다. 기본 타일에 표시 이름이 표시되면 브랜딩은 기본적으로 "name"으로 설정됩니다. 표시 이름이 표시되지 않으면 브랜딩은 기본적으로 "none"으로 설정됩니다.
참고 기본 브랜딩이 "로고"인 Windows 8.x의 변경 내용입니다.
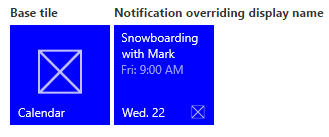
표시 이름
displayName 특성으로 선택한 텍스트 문자열을 입력하여 알림의 표시 이름을 재정의할 수 있습니다. 브랜딩과 마찬가지로 표시 이름은 전체 알림 페이로드에 적용되는 TileVisual 요소나 개별 타일에만 적용되는 TileBinding 요소에 지정할 수 있습니다.
알려진 문제 Windows Mobile에서 타일에 ShortName을 지정하면 알림에 제공된 표시 이름이 사용되지 않습니다(ShortName은 항상 표시됨).
<tile>
  <visual branding="nameAndLogo" displayName="Wednesday 22">

    <binding template="TileMedium" displayName="Wed. 22">
      ...
    </binding>

    <!--Inherits displayName from visual-->
    <binding template="TileWide">
      ...
    </binding>

  </visual>
</tile>
TileContent content = new TileContent()
{
    Visual = new TileVisual()
    {
        Branding = TileBranding.NameAndLogo,
        DisplayName = "Wednesday 22",

        TileMedium = new TileBinding()
        {
            DisplayName = "Wed. 22",
            ...
        },

        // Inherits DisplayName from Visual
        TileWide = new TileBinding()
        {
            ...
        }
    }
};
결과:
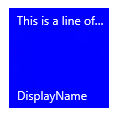
Text
AdaptiveText 요소는 텍스트를 표시하는 데 사용됩니다. 힌트를 사용하여 텍스트가 표시되는 방식을 수정할 수 있습니다.
<text>This is a line of text</text>
new AdaptiveText()
{
    Text = "This is a line of text"
};
결과:
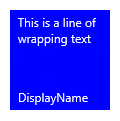
텍스트 배치
기본적으로 텍스트는 줄 바꿈되지 않으며 타일 가장자리를 벗어나 계속됩니다. hint-wrap 특성을 사용하여 텍스트 요소에 텍스트 줄 바꿈을 설정합니다. hint-minLines 및 hint-maxLines를 사용하여 최소 및 최대 줄 수를 제어할 수도 있습니다, 둘 다 양의 정수를 허용합니다.
<text hint-wrap="true">This is a line of wrapping text</text>
new AdaptiveText()
{
    Text = "This is a line of wrapping text",
    HintWrap = true
};
결과:
텍스트 스타일
스타일은 텍스트 요소의 글꼴 크기, 색 및 두께를 제어합니다. 불투명도를 60%로 설정하는 각 스타일의 "미묘한" 변형을 포함하여 사용 가능한 다양한 스타일이 있으며, 이는 일반적으로 텍스트 색을 연한 회색 음영으로 만듭니다.
<text hint-style="base">Header content</text>
<text hint-style="captionSubtle">Subheader content</text>
new AdaptiveText()
{
    Text = "Header content",
    HintStyle = AdaptiveTextStyle.Base
},

new AdaptiveText()
{
    Text = "Subheader content",
    HintStyle = AdaptiveTextStyle.CaptionSubtle
}
결과:
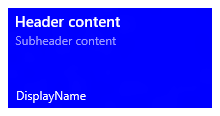
참고 hint-style을 지정하지 않으면 스타일이 캡션으로 기본 설정됩니다.
기본 텍스트 스타일
| <text hint-style="*" /> | 글꼴 높이 | 글자 두께 |
|---|---|---|
| caption | 유효 픽셀 수: 12epx | 주기적 |
| 본문 | 15epx | 주기적 |
| base | 15epx | 약간 굵게 |
| 부제목 | 20epx | 주기적 |
| title | 24epx | Semilight |
| subheader | 34epx | 밝게 |
| 헤더 | 46epx | 밝게 |
숫자 텍스트 스타일 변형
이러한 변형은 줄 높이를 줄여 위와 아래의 콘텐츠가 텍스트에 훨씬 더 가까워지도록 합니다.
titleNumeral
subheaderNumeral
headerNumeral
미묘한 텍스트 스타일 변형
각 스타일은 텍스트에 60% 불투명도를 제공하는 미묘한 변형을 가지며, 일반적으로 텍스트 색을 연한 회색 음영으로 만듭니다.
captionSubtle
bodySubtle
baseSubtle
subtitleSubtle
titleSubtle
titleNumeralSubtle
subheaderSubtle
subheaderNumeralSubtle
headerSubtle
headerNumeralSubtle
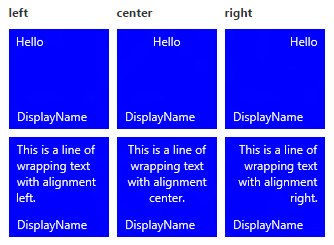
Text alignment
텍스트는 왼쪽, 가운데 또는 오른쪽으로 가로로 정렬할 수 있습니다. 영어와 같은 왼쪽에서 오른쪽으로 쓰는 언어에서는 텍스트가 왼쪽 맞춤으로 기본 설정됩니다. 아랍어와 같은 오른쪽에서 왼쪽으로 쓰는 언어에서 텍스트는 오른쪽 맞춤으로 기본 설정됩니다. 요소에서 hint-align 특성을 사용하여 맞춤을 수동으로 설정할 수 있습니다.
<text hint-align="center">Hello</text>
new AdaptiveText()
{
    Text = "Hello",
    HintAlign = AdaptiveTextAlign.Center
};
결과:
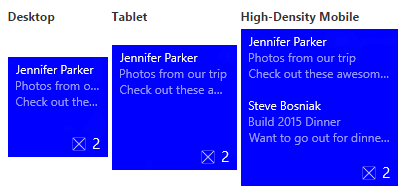
그룹 및 하위 그룹
그룹을 사용하면 그룹 내의 콘텐츠가 관련되어 있음을 의미상 선언할 수 있으며 이해할 수 있는 콘텐츠가 되려면 전체적으로 표시되어야 합니다. 예를 들어 머리글과 하위 헤더라는 두 개의 텍스트 요소가 있을 수 있으며 머리글만 표시하는 것은 의미가 없습니다. 하위 그룹 내에서 해당 요소를 그룹화하면 요소가 모두 표시되거나(맞을 수 있는 경우) 전혀 표시되지 않습니다(맞지 않기 때문).
디바이스 및 화면에서 최상의 환경을 제공하려면 여러 그룹을 제공합니다. 여러 그룹이 있으면 타일이 더 큰 화면에 적응할 수 있습니다.
참고 그룹의 유효한 자식은 하위 그룹뿐입니다.
<binding template="TileWide" branding="nameAndLogo">
  <group>
    <subgroup>
      <text hint-style="subtitle">Jennifer Parker</text>
      <text hint-style="captionSubtle">Photos from our trip</text>
      <text hint-style="captionSubtle">Check out these awesome photos I took while in New Zealand!</text>
    </subgroup>
  </group>

  <text />

  <group>
    <subgroup>
      <text hint-style="subtitle">Steve Bosniak</text>
      <text hint-style="captionSubtle">Build 2015 Dinner</text>
      <text hint-style="captionSubtle">Want to go out for dinner after Build tonight?</text>
    </subgroup>
  </group>
</binding>
TileWide = new TileBinding()
{
    Branding = TileBranding.NameAndLogo,
    Content = new TileBindingContentAdaptive()
    {
        Children =
        {
            CreateGroup(
                from: "Jennifer Parker",
                subject: "Photos from our trip",
                body: "Check out these awesome photos I took while in New Zealand!"),

            // For spacing
            new AdaptiveText(),

            CreateGroup(
                from: "Steve Bosniak",
                subject: "Build 2015 Dinner",
                body: "Want to go out for dinner after Build tonight?")
        }
    }
}

...

private static AdaptiveGroup CreateGroup(string from, string subject, string body)
{
    return new AdaptiveGroup()
    {
        Children =
        {
            new AdaptiveSubgroup()
            {
                Children =
                {
                    new AdaptiveText()
                    {
                        Text = from,
                        HintStyle = AdaptiveTextStyle.Subtitle
                    },
                    new AdaptiveText()
                    {
                        Text = subject,
                        HintStyle = AdaptiveTextStyle.CaptionSubtle
                    },
                    new AdaptiveText()
                    {
                        Text = body,
                        HintStyle = AdaptiveTextStyle.CaptionSubtle
                    }
                }
            }
        }
    };
}
결과:
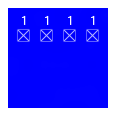
하위 그룹(열)
하위 그룹을 사용하면 데이터를 그룹 내의 의미 체계 섹션으로 나눌 수도 있습니다. 라이브 타일의 경우 시각적으로 열로 변환됩니다.
hint-weight 특성을 사용하면 열의 너비를 제어할 수 있습니다. hint-weight 값은 GridUnitType.Star 동작과 동일한 사용 가능한 공간의 가중 비율로 표현됩니다. 너비가 같은 열의 경우 각 가중치를 1로 지정합니다.
| hint-weight | 너비 백분율 |
| 1 | 25% |
| 1 | 25% |
| 1 | 25% |
| 1 | 25% |
| 총 중량: 4 |
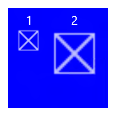
한 열을 다른 열보다 두 배 크게 만들려면 더 작은 열에 가중치 1과 더 큰 열에 가중치 2를 할당합니다.
| hint-weight | 너비 백분율 |
| 1 | 33.3% |
| 2 | 66.7% |
| 총 중량: 3 |
첫 번째 열이 전체 너비의 20%를 차지하도록 하고 두 번째 열이 전체 너비의 80%를 차지하도록 하려면 첫 번째 가중치를 20으로, 두 번째 가중치를 80으로 할당합니다. 총 가중치가 100이면 백분율로 작동합니다.
| hint-weight | 너비 백분율 |
| 20 | 20% |
| 80 | 80% |
| 총 중량: 100 |
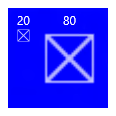
참고 열 사이에 8픽셀 여백이 자동으로 추가됩니다.
두 개 이상의 하위 그룹이 있는 경우 양의 정수만 허용하는 hint-weight를 지정해야 합니다. 첫 번째 하위 그룹에 대한 hint-weight를 지정하지 않으면 가중치 50이 할당됩니다. 지정된 힌트 가중치가 없는 다음 하위 그룹에는 이전 가중치의 합계를 뺀 100과 같은 가중치가 할당되고 결과가 0이면 1이 할당됩니다. hint-weight를 지정하지 않은 기본 하위 그룹에는 가중치 1이 할당됩니다.
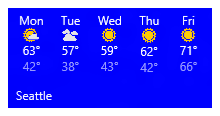
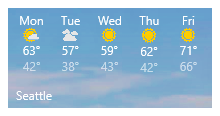
다음은 너비가 같은 열이 5개인 타일을 구현하는 방법을 보여 주는 날씨 타일의 샘플 코드입니다.
<binding template="TileWide" displayName="Seattle" branding="name">
  <group>
    <subgroup hint-weight="1">
      <text hint-align="center">Mon</text>
      <image src="Assets\Weather\Mostly Cloudy.png" hint-removeMargin="true"/>
      <text hint-align="center">63°</text>
      <text hint-align="center" hint-style="captionsubtle">42°</text>
    </subgroup>
    <subgroup hint-weight="1">
      <text hint-align="center">Tue</text>
      <image src="Assets\Weather\Cloudy.png" hint-removeMargin="true"/>
      <text hint-align="center">57°</text>
      <text hint-align="center" hint-style="captionsubtle">38°</text>
    </subgroup>
    <subgroup hint-weight="1">
      <text hint-align="center">Wed</text>
      <image src="Assets\Weather\Sunny.png" hint-removeMargin="true"/>
      <text hint-align="center">59°</text>
      <text hint-align="center" hint-style="captionsubtle">43°</text>
    </subgroup>
    <subgroup hint-weight="1">
      <text hint-align="center">Thu</text>
      <image src="Assets\Weather\Sunny.png" hint-removeMargin="true"/>
      <text hint-align="center">62°</text>
      <text hint-align="center" hint-style="captionsubtle">42°</text>
    </subgroup>
    <subgroup hint-weight="1">
      <text hint-align="center">Fri</text>
      <image src="Assets\Weather\Sunny.png" hint-removeMargin="true"/>
      <text hint-align="center">71°</text>
      <text hint-align="center" hint-style="captionsubtle">66°</text>
    </subgroup>
  </group>
</binding>
TileWide = new TileBinding()
{
    DisplayName = "Seattle",
    Branding = TileBranding.Name,
    Content = new TileBindingContentAdaptive()
    {
        Children =
        {
            new AdaptiveGroup()
            {
                Children =
                {
                    CreateSubgroup("Mon", "Mostly Cloudy.png", "63°", "42°"),
                    CreateSubgroup("Tue", "Cloudy.png", "57°", "38°"),
                    CreateSubgroup("Wed", "Sunny.png", "59°", "43°"),
                    CreateSubgroup("Thu", "Sunny.png", "62°", "42°"),
                    CreateSubgroup("Fri", "Sunny.png", "71°", "66°")
                }
            }
        }
    }
}

...

private static AdaptiveSubgroup CreateSubgroup(string day, string image, string highTemp, string lowTemp)
{
    return new AdaptiveSubgroup()
    {
        HintWeight = 1,
        Children =
        {
            new AdaptiveText()
            {
                Text = day,
                HintAlign = AdaptiveTextAlign.Center
            },
            new AdaptiveImage()
            {
                Source = "Assets/Weather/" + image,
                HintRemoveMargin = true
            },
            new AdaptiveText()
            {
                Text = highTemp,
                HintAlign = AdaptiveTextAlign.Center
            },
            new AdaptiveText()
            {
                Text = lowTemp,
                HintAlign = AdaptiveTextAlign.Center,
                HintStyle = AdaptiveTextStyle.CaptionSubtle
            }
        }
    };
}
결과:
이미지
<이미지> 요소는 타일 알림에 이미지를 표시하는 데 사용됩니다. 이미지는 타일 콘텐츠(기본값) 내에 인라인으로 배치하거나, 콘텐츠 뒤의 배경 이미지로, 또는 알림 위쪽에서 애니메이션 효과를 주는 피킹 이미지로 배치할 수 있습니다.
참고 항목
앱의 패키지, 앱의 로컬 저장소 또는 웹에서 이미지를 사용할 수 있습니다. Fall Creators Update에서 일반 연결의 경우 웹 이미지는 최대 3MB이고 데이터 통신 연결의 경우 1MB입니다. Fall Creators Update를 아직 실행하지 않는 디바이스에서 웹 이미지는 200KB 이하여야 합니다.
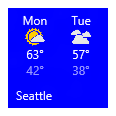
추가 동작을 지정하지 않으면 이미지가 균일하게 축소되거나 확장되어 사용 가능한 너비를 채웁니다. 이 예제는 두 열과 인라인 이미지를 사용하는 타일을 보여줍니다. 인라인 이미지가 확장되어 열 너비를 채웁니다.
<binding template="TileMedium" displayName="Seattle" branding="name">
  <group>
    <subgroup>
      <text hint-align="center">Mon</text>
      <image src="Assets\Apps\Weather\Mostly Cloudy.png" hint-removeMargin="true"/>
      <text hint-align="center">63°</text>
      <text hint-style="captionsubtle" hint-align="center">42°</text>
    </subgroup>
    <subgroup>
      <text hint-align="center">Tue</text>
      <image src="Assets\Apps\Weather\Cloudy.png" hint-removeMargin="true"/>
      <text hint-align="center">57°</text>
      <text hint-style="captionSubtle" hint-align="center">38°</text>
    </subgroup>
  </group>
</binding>
TileMedium = new TileBinding()
{
    DisplayName = "Seattle",
    Branding = TileBranding.Name,
    Content = new TileBindingContentAdaptive()
    {
        Children =
        {
            new AdaptiveGroup()
            {
                Children =
                {
                    CreateSubgroup("Mon", "Mostly Cloudy.png", "63°", "42°"),
                    CreateSubgroup("Tue", "Cloudy.png", "57°", "38°")
                }
            }
        }
    }
}
...
private static AdaptiveSubgroup CreateSubgroup(string day, string image, string highTemp, string lowTemp)
{
    return new AdaptiveSubgroup()
    {
        Children =
        {
            new AdaptiveText()
            {
                Text = day,
                HintAlign = AdaptiveTextAlign.Center
            },
            new AdaptiveImage()
            {
                Source = "Assets/Weather/" + image,
                HintRemoveMargin = true
            },
            new AdaptiveText()
            {
                Text = highTemp,
                HintAlign = AdaptiveTextAlign.Center
            },
            new AdaptiveText()
            {
                Text = lowTemp,
                HintAlign = AdaptiveTextAlign.Center,
                HintStyle = AdaptiveTextStyle.CaptionSubtle
            }
        }
    };
}
결과:
<binding> 루트 또는 첫 번째 그룹에 배치된 이미지도 사용 가능한 높이에 맞게 확장됩니다.
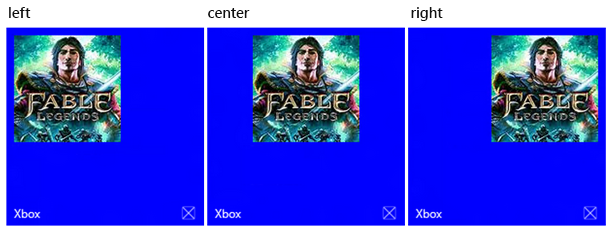
이미지 정렬
hint-align 특성을 사용하여 이미지를 왼쪽, 가운데 또는 오른쪽으로 정렬하도록 설정할 수 있습니다. 따라서 이미지가 너비를 채우기 위해 늘어나지 않고 네이티브 해상도로 표시됩니다.
<binding template="TileLarge">
  <image src="Assets/fable.jpg" hint-align="center"/>
</binding>
TileLarge = new TileBinding()
{
    Content = new TileBindingContentAdaptive()
    {
        Children =
        {
            new AdaptiveImage()
            {
                Source = "Assets/fable.jpg",
                HintAlign = AdaptiveImageAlign.Center
            }
        }
    }
}
결과:
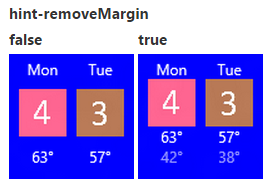
이미지 여백
기본적으로 인라인 이미지는 이미지 위 또는 아래의 콘텐츠 간에 8픽셀 여백이 있습니다. hint-removeMargin 특성을 사용하여 이 여백을 제거할 수 있습니다. 그러나 이미지는 항상 타일 가장자리에서 8픽셀 여백을 유지하고 하위 그룹(열)은 항상 열 간의 8픽셀 안쪽 여백을 유지합니다.
<binding template="TileMedium" branding="none">
  <group>
    <subgroup>
      <text hint-align="center">Mon</text>
      <image src="Assets\Numbers\4.jpg" hint-removeMargin="true"/>
      <text hint-align="center">63°</text>
      <text hint-style="captionsubtle" hint-align="center">42°</text>
    </subgroup>
    <subgroup>
      <text hint-align="center">Tue</text>
      <image src="Assets\Numbers\3.jpg" hint-removeMargin="true"/>
      <text hint-align="center">57°</text>
      <text hint-style="captionsubtle" hint-align="center">38°</text>
    </subgroup>
  </group>
</binding>
TileMedium = new TileBinding()
{
    Branding = TileBranding.None,
    Content = new TileBindingContentAdaptive()
    {
        Children =
        {
            new AdaptiveGroup()
            {
                Children =
                {
                    CreateSubgroup("Mon", "4.jpg", "63°", "42°"),
                    CreateSubgroup("Tue", "3.jpg", "57°", "38°")
                }
            }
        }
    }
}

...

private static AdaptiveSubgroup CreateSubgroup(string day, string image, string highTemp, string lowTemp)
{
    return new AdaptiveSubgroup()
    {
        HintWeight = 1,
        Children =
        {
            new AdaptiveText()
            {
                Text = day,
                HintAlign = AdaptiveTextAlign.Center
            },
            new AdaptiveImage()
            {
                Source = "Assets/Numbers/" + image,
                HintRemoveMargin = true
            },
            new AdaptiveText()
            {
                Text = highTemp,
                HintAlign = AdaptiveTextAlign.Center
            },
            new AdaptiveText()
            {
                Text = lowTemp,
                HintAlign = AdaptiveTextAlign.Center,
                HintStyle = AdaptiveTextStyle.CaptionSubtle
            }
        }
    };
}
이미지 자르기
현재 "none"(기본값) 또는 "원" 값만 지원하는 hint-crop 특성을 사용하여 이미지를 원으로 잘라낼 수 있습니다.
<binding template="TileLarge" hint-textStacking="center">
  <group>
    <subgroup hint-weight="1"/>
    <subgroup hint-weight="2">
      <image src="Assets/Apps/Hipstame/hipster.jpg" hint-crop="circle"/>
    </subgroup>
    <subgroup hint-weight="1"/>
  </group>

  <text hint-style="title" hint-align="center">Hi,</text>
  <text hint-style="subtitleSubtle" hint-align="center">MasterHip</text>
</binding>
TileLarge = new TileBinding()
{
    Content = new TileBindingContentAdaptive()
    {
        TextStacking = TileTextStacking.Center,
        Children =
        {
            new AdaptiveGroup()
            {
                Children =
                {
                    new AdaptiveSubgroup() { HintWeight = 1 },
                    new AdaptiveSubgroup()
                    {
                        HintWeight = 2,
                        Children =
                        {
                            new AdaptiveImage()
                            {
                                Source = "Assets/Apps/Hipstame/hipster.jpg",
                                HintCrop = AdaptiveImageCrop.Circle
                            }
                        }
                    },
                    new AdaptiveSubgroup() { HintWeight = 1 }
                }
            },
            new AdaptiveText()
            {
                Text = "Hi,",
                HintStyle = AdaptiveTextStyle.Title,
                HintAlign = AdaptiveTextAlign.Center
            },
            new AdaptiveText()
            {
                Text = "MasterHip",
                HintStyle = AdaptiveTextStyle.SubtitleSubtle,
                HintAlign = AdaptiveTextAlign.Center
            }
        }
    }
}
결과:

배경 이미지
배경 이미지를 설정하려면 <binding>의 루트에 이미지 요소를 배치하고 배치 특성을 "background"로 설정합니다.
<binding template="TileWide">
  <image src="Assets\Mostly Cloudy-Background.jpg" placement="background"/>
  <group>
    <subgroup hint-weight="1">
      <text hint-align="center">Mon</text>
      <image src="Assets\Weather\Mostly Cloudy.png" hint-removeMargin="true"/>
      <text hint-align="center">63°</text>
      <text hint-align="center" hint-style="captionsubtle">42°</text>
    </subgroup>
    ...
  </group>
</binding>
TileWide = new TileBinding()
{
    Content = new TileBindingContentAdaptive()
    {
        BackgroundImage = new TileBackgroundImage()
        {
            Source = "Assets/Mostly Cloudy-Background.jpg"
        },

        Children =
        {
            new AdaptiveGroup()
            {
                Children =
                {
                    CreateSubgroup("Mon", "Mostly Cloudy.png", "63°", "42°")
                    ...
                }
            }
        }
    }
}

...

private static AdaptiveSubgroup CreateSubgroup(string day, string image, string highTemp, string lowTemp)
{
    return new AdaptiveSubgroup()
    {
        HintWeight = 1,
        Children =
        {
            new AdaptiveText()
            {
                Text = day,
                HintAlign = AdaptiveTextAlign.Center
            },
            new AdaptiveImage()
            {
                Source = "Assets/Weather/" + image,
                HintRemoveMargin = true
            },
            new AdaptiveText()
            {
                Text = highTemp,
                HintAlign = AdaptiveTextAlign.Center
            },
            new AdaptiveText()
            {
                Text = lowTemp,
                HintAlign = AdaptiveTextAlign.Center,
                HintStyle = AdaptiveTextStyle.CaptionSubtle
            }
        }
    };
}
결과:
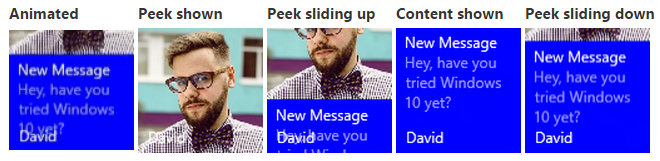
피킹 이미지
타일의 위쪽에서 "피킹"하는 이미지를 지정할 수 있습니다. 미리 보기 이미지는 애니메이션을 사용하여 타일의 위쪽에서 아래로/위로 밀고, 보기를 피킹한 다음, 나중에 다시 밀어 타일에 기본 콘텐츠를 표시합니다. 피킹 이미지를 설정하려면 <binding>의 루트에 이미지 요소를 배치하고 배치 특성을 "peek"로 설정합니다.
<binding template="TileMedium" branding="name">
  <image placement="peek" src="Assets/Apps/Hipstame/hipster.jpg"/>
  <text>New Message</text>
  <text hint-style="captionsubtle" hint-wrap="true">Hey, have you tried Windows 10 yet?</text>
</binding>
TileWide = new TileBinding()
{
    Branding = TileBranding.Name,
    Content = new TileBindingContentAdaptive()
    {
        PeekImage = new TilePeekImage()
        {
            Source = "Assets/Apps/Hipstame/hipster.jpg"
        },
        Children =
        {
            new AdaptiveText()
            {
                Text = "New Message"
            },
            new AdaptiveText()
            {
                Text = "Hey, have you tried Windows 10 yet?",
                HintStyle = AdaptiveTextStyle.CaptionSubtle,
                HintWrap = true
            }
        }
    }
}
미리 보기 및 배경 이미지에 대한 원 자르기
피킹 및 배경 이미지에서 hint-crop 특성을 사용하여 원 자르기를 수행합니다.
<image placement="peek" hint-crop="circle" src="Assets/Apps/Hipstame/hipster.jpg"/>
new TilePeekImage()
{
    HintCrop = TilePeekImageCrop.Circle,
    Source = "Assets/Apps/Hipstame/hipster.jpg"
}
결과는 다음과 같을 것입니다.

미리 보기 및 배경 이미지 둘 다 사용
타일 알림에 미리 보기 및 배경 이미지를 모두 사용하려면 알림 페이로드에 미리 보기 이미지와 배경 이미지를 모두 지정합니다.
결과는 다음과 같을 것입니다.

피킹 및 배경 이미지 오버레이
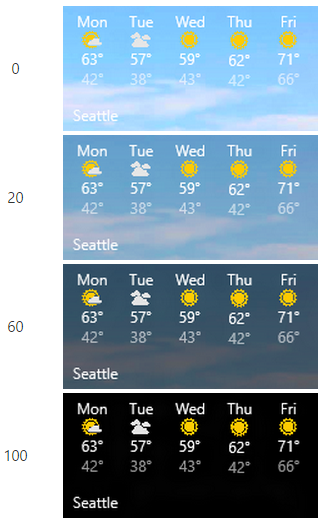
배경에 검은색 오버레이를 설정하고 hint-overlay를 사용하여 이미지를 피킹할 수 있습니다. 이 오버레이는 0에서 100까지의 정수를 허용하며 0은 오버레이가 없고 100은 전체 검정 오버레이입니다. 오버레이를 사용하여 타일의 텍스트를 읽을 수 있게 할 수 있습니다.
배경 이미지에 hint-overlay 사용
페이로드에 일부 텍스트 요소가 있는 한 배경 이미지는 기본적으로 20% 오버레이로 설정됩니다(그렇지 않으면 기본값은 0% 오버레이).
<binding template="TileWide">
  <image placement="background" hint-overlay="60" src="Assets\Mostly Cloudy-Background.jpg"/>
  ...
</binding>
TileWide = new TileBinding()
{
    Content = new TileBindingContentAdaptive()
    {
        BackgroundImage = new TileBackgroundImage()
        {
            Source = "Assets/Mostly Cloudy-Background.jpg",
            HintOverlay = 60
        },

        ...
    }
}
hint-overlay 결과:
미리 보기 이미지에 hint-overlay 사용
Windows 10 버전 1511에서는 배경 이미지와 마찬가지로 미리 보기 이미지에 대한 오버레이도 지원합니다. 피킹 이미지 요소의 hint-overlay를 0-100의 정수로 지정합니다. 미리 보기 이미지의 기본 오버레이는 0(오버레이 없음)입니다.
<binding template="TileMedium">
  <image hint-overlay="20" src="Assets\Map.jpg" placement="peek"/>
  ...
</binding>
TileMedium = new TileBinding()
{
    Content = new TileBindingContentAdaptive()
    {
        PeekImage = new TilePeekImage()
        {
            Source = "Assets/Map.jpg",
            HintOverlay = 20
        },
        ...
    }
}
이 예제에서는 불투명도 20%(왼쪽)와 불투명도 0%(오른쪽)의 피킹 이미지를 보여 줍니다.

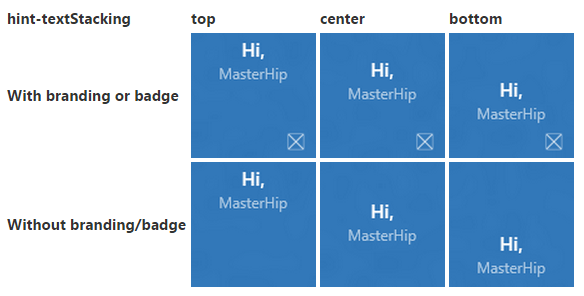
세로 맞춤(텍스트 누적)
TileBinding 요소와 AdaptiveSubgroup 요소 모두에서 hint-textStacking 특성을 사용하여 타일에서 콘텐츠의 세로 맞춤을 제어할 수 있습니다. 기본적으로 모든 항목은 위쪽에 맞춰 세로로 정렬되지만 콘텐츠를 아래쪽 또는 가운데에 맞출 수도 있습니다.
바인딩 요소의 텍스트 스택
TileBinding 수준에서 적용하는 경우 텍스트 스택은 알림 콘텐츠 전체의 세로 맞춤을 설정하며, 브랜딩/배지 영역 위의 사용 가능한 세로 공간에서 맞춥니다.
<binding template="TileMedium" hint-textStacking="center" branding="logo">
  <text hint-style="base" hint-align="center">Hi,</text>
  <text hint-style="captionSubtle" hint-align="center">MasterHip</text>
</binding>
TileMedium = new TileBinding()
{
    Branding = TileBranding.Logo,
    Content = new TileBindingContentAdaptive()
    {
        TextStacking = TileTextStacking.Center,
        Children =
        {
            new AdaptiveText()
            {
                Text = "Hi,",
                HintStyle = AdaptiveTextStyle.Base,
                HintAlign = AdaptiveTextAlign.Center
            },

            new AdaptiveText()
            {
                Text = "MasterHip",
                HintStyle = AdaptiveTextStyle.CaptionSubtle,
                HintAlign = AdaptiveTextAlign.Center
            }
        }
    }
}
하위 그룹 요소의 텍스트 스택
AdaptiveSubgroup 수준에서 적용하는 경우 텍스트 스택은 하위 그룹(열) 콘텐츠의 세로 맞춤을 설정하며, 전체 그룹 내의 사용 가능한 세로 공간에서 맞춥니다.
<binding template="TileWide" branding="nameAndLogo">
  <group>
    <subgroup hint-weight="33">
      <image src="Assets/Apps/Hipstame/hipster.jpg" hint-crop="circle"/>
    </subgroup>
    <subgroup hint-textStacking="center">
      <text hint-style="subtitle">Hi,</text>
      <text hint-style="bodySubtle">MasterHip</text>
    </subgroup>
  </group>
</binding>
TileWide = new TileBinding()
{
    Branding = TileBranding.NameAndLogo,
    Content = new TileBindingContentAdaptive()
    {
        Children =
        {
            new AdaptiveGroup()
            {
                Children =
                {
                    // Image column
                    new AdaptiveSubgroup()
                    {
                        HintWeight = 33,
                        Children =
                        {
                            new AdaptiveImage()
                            {
                                Source = "Assets/Apps/Hipstame/hipster.jpg",
                                HintCrop = AdaptiveImageCrop.Circle
                            }
                        }
                    },

                    // Text column
                    new AdaptiveSubgroup()
                    {
                        // Vertical align its contents
                        TextStacking = TileTextStacking.Center,
                        Children =
                        {
                            new AdaptiveText()
                            {
                                Text = "Hi,",
                                HintStyle = AdaptiveTextStyle.Subtitle
                            },

                            new AdaptiveText()
                            {
                                Text = "MasterHip",
                                HintStyle = AdaptiveTextStyle.BodySubtle
                            }
                        }
                    }
                }
            }
        }
    }
}
관련 항목

Windows developer
피드백
출시 예정: 2024년 내내 콘텐츠에 대한 피드백 메커니즘으로 GitHub 문제를 단계적으로 폐지하고 이를 새로운 피드백 시스템으로 바꿀 예정입니다. 자세한 내용은 다음을 참조하세요. https://aka.ms/ContentUserFeedback
다음에 대한 사용자 의견 제출 및 보기