Features in Configuration Manager technical preview version 2004
Applies to: Configuration Manager (technical preview branch)
This article introduces the features that are available in the technical preview for Configuration Manager, version 2004. Install this version to update and add new features to your technical preview site.
Review the technical preview article before installing this update. That article familiarizes you with the general requirements and limitations for using a technical preview, how to update between versions, and how to provide feedback.
The following sections describe the new features to try out in this version:
Tenant attach: ConfigMgr client details in the admin center
You can now see client details including collections, boundary group membership, and real-time client information for a specific device in the Microsoft Intune admin center.
Important
- This is a preview experience. The final location will be the devices blade in Microsoft Intune admin center.
- The boundary groups tab functions only for stand alone sites. The tab will be empty in the admin center for anything other than a standalone primary site.
Try it out!
Try to complete the tasks. Then send Feedback with your thoughts on the feature.
Prerequisites
- An environment that's tenant attached with uploaded devices.
- One of the following browsers:
- Microsoft Edge, version 77 and later
- Google Chrome
- The user account has been discovered with both Microsoft Entra user discovery and Active Directory user discovery.
- Meaning the user account needs to be a synced user object in Azure.
Permissions
The user account needs the following permissions:
- The Read permission for the device's Collection in Configuration Manager.
- The Admin User role for the Configuration Manager Microservice application in Microsoft Entra ID.
- Add the role in Microsoft Entra ID from Enterprise applications > Configuration Manager Microservice > Users and groups > Add user. Groups are supported if you have Microsoft Entra ID P1 or P2.
View ConfigMgr client details
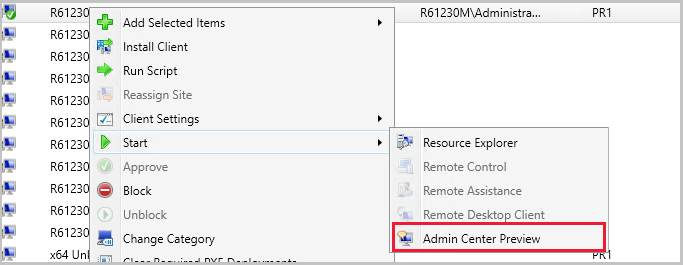
In the Configuration Manager console, go to the Assets and Compliance workspace and select the Devices node.
Right-click on a device that's been uploaded to Microsoft Intune.
In the right-click menu, select Start > Admin Center Preview to open the preview in your browser.
- This launch is a preview experience. The final location will be in Microsoft Intune admin center.

Note
Note the following behaviors for some of the client details:
The primary site updates the following fields once an hour: Last policy request, Last active time, and Last management point
To populate the Logged on user field, at least one user needs to sign in to the device after you install the Configuration Manager client
Troubleshoot client details
One of the most common issues is with the administrative user account:
Make sure that Configuration Manager has discovered the administrative user account you're using. In the Configuration Manager console, go to the Assets and Compliance workspace. Select the Users node, and find your user account.
If your account isn't listed in the Users node, check the configuration of the site's Active Directory User discovery.
Verify the discovery data. Select your user account. In the ribbon, on the Home tab select Properties. In the properties window, confirm the following discovery data:
- Microsoft Entra tenant ID: This value should be a GUID for the Microsoft Entra tenant.
- Microsoft Entra user ID: This value should be a GUID for this account in Microsoft Entra ID.
- User Principal Name: The format of this value is user@domain. For example,
jqpublic@contoso.com.
If the Microsoft Entra properties are empty, check the configuration of the site's Microsoft Entra user discovery.
Use the same account to sign in to the admin center preview portal. The on-premises identity has to be synchronized with and match the cloud identity.
Notifications from Microsoft
You can now choose to receive notifications from Microsoft in the Configuration Manager console. These notifications help you stay informed about new or updated features, changes to Configuration Manager and attached services, and issues that require action to remediate.
Note
Technical preview customers may occasionally get test notifications from Microsoft after enabling this feature.
Try it out!
Try to complete the tasks. Then send Feedback with your thoughts on the feature.
Configure notification settings
- Navigate to Administration > Site Configuration > Sites.
- Right-click on a site and select Properties.
- In the Alerts tab, enable the notifications by selecting Receive messages from Microsoft. You can deselect any of the following notifications if you prefer not to receive them:
Prevent/fix: Known issues affecting your organization that may require you to take action.
Plan for change: Changes to Configuration Manager that may require you to take action.
Stay informed: Informs you of new or updated features that are available.


Copy discovery data from the console
Based on your feedback, you can now copy discovery data from devices and users in the console. Copy the details to the clipboard, or export them all to a file. These new actions make it easier for you to quickly get this data from the console. For example, copy the MAC address of a device before you reimage it.
Try it out!
Try to complete the tasks. Then send Feedback with your thoughts on the feature.
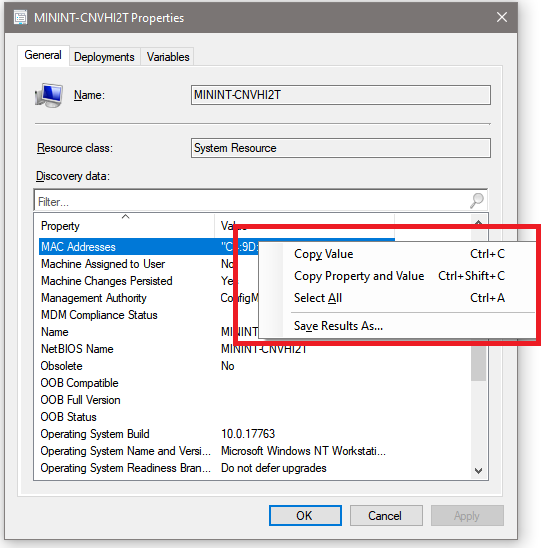
In the Configuration Manager console, go to the Assets and Compliance workspace. Open the properties for a user or device.
On the General tab, in the Discovery data list, select one or more properties.
Right-click the selection, and choose one of the following actions:
Copy value: Copies just the value. You can also use the keyboard shortcut Ctrl + C.
Copy property and value: Copies both the property name and the corresponding value. You can also use the keyboard shortcut Ctrl + Shift + C.
Select all: Selects all properties and values. You can also use the keyboard shortcut Ctrl + A.
Save results as: Saves all properties and values to a comma-separated values (CSV) file that you specify.
Improvements to CMPivot
We've added the ability to run CMPivot from an individual device or multiple devices from the devices node without needing to select a device collection. This improvement makes it easier for people, such as those working as the Helpdesk persona, to create CMPivot queries for specific devices outside a pre-created collection.
Additionally, upon returning devices within a query list view, you can select Device Pivot on one or more devices and then pivot and query on just those devices to drill in further. This change allows you to drill in without querying the larger set of devices from the original collection.
We've also converged CMPivot standalone and CMPivot launched from the admin console. When you launch CMPivot from the admin console, it uses the same underlying technology as CMPivot standalone to give you scenario parity.
Support for PowerShell version 7
The Configuration Manager PowerShell cmdlet library now offers preliminary support for PowerShell 7. PowerShell 7 support is in preview, and isn't intended for use in production environments. If you have any problems using Configuration Manager cmdlets with PowerShell 7, send feedback from the Configuration Manager console to report it.
For more information on PowerShell 7, including directions on how to download and install it, see Install PowerShell on Windows.
Tip
PowerShell 7 runs as pwsh.exe. Earlier versions of PowerShell run as powershell.exe.
Known issues
You currently can't launch PowerShell 7 directly from the Configuration Manager console. Manually start PowerShell 7, and then import the Configuration Manager module.
Configuration Manager cmdlets with Import- and Export- verbs may not function as expected.
This release only supports the Configuration Manager cmdlets. Other features of Configuration Manager that rely on PowerShell may not support version 7. For example, Run Scripts, CMPivot, or the Run PowerShell Script task sequence step.
Improvement to Format and Partition Disk task sequence step
Based on your feedback, you can use a task sequence variable to specify the target of the Format and Partition Disk step. This new variable option supports more complex task sequences with dynamic behaviors. For example, a custom script can detect the disk and set the variable based on the hardware type. Then you can use multiple instances of this step to configure different hardware types and partitions.
The following mock steps show one example:
Run PowerShell Script: a custom script to collect target disks
- Sets
myOSDiskto1 - Sets
myDataDiskto2
- Sets
Format and Partition Disk for OS disk: specifies
myOSDiskvariable- Configures disk 1 as the system disk
Format and Partition Disk for data disk: specifies
myDataDiskvariable- Configures disk 2 for raw storage
A variation of this example uses disk numbers and partitioning plans for different hardware types.
Note
You can still use the existing task sequence variable OSDDiskIndex. However, each instance of the Format and Partition Disk step uses the same value. If you want to programmatically set the disk number for multiple instances of this step, use this new option.
To configure this new option on the Format and Partition Disk step, select Variable name to store disk number, and then enter a custom variable name. Add an earlier step in the task sequence to set the value of this custom variable to an integer value for the physical disk.
Management insight rules for OS deployment
This release includes additional management insight rules to help you manage the policy size of task sequences. When the size of the task sequence policy exceeds 32 MB, the client fails to process the large policy. The client then fails to run the task sequence deployment.
Large task sequences may contribute to exceeding maximum policy size: If you deploy these task sequences, clients may not be able to process the large policy objects. Reduce the size of the task sequence policy to prevent potential policy processing issues.
Total policy size for task sequences exceeds policy limit: Clients can't process the policy for these task sequences because it's too large. Reduce the size of the task sequence policy to allow the deployment to run on clients.
Tip
These rules are in a new group for Operating System Deployment. The existing rule for Unused boot images is now in this group too.
How to reduce the size of task sequence policy
The following actions can help reduce the overall size of policy of a task sequence deployment:
Separate functional segments into child task sequences, and use the Run Task Sequence step. Each task sequence has a separate 32-MB limit on its policy size.
Note
Reducing the total number of steps and groups in a task sequence has minimal impact on the policy size. Each step is generally a couple of KB in policy. Moving groups of steps to a child task sequence is more impactful.
Reduce the number of software updates in deployments to the same collection as the task sequence.
Instead of entering a script in the Run PowerShell Script step, reference it via a package.
There's an 8-KB limit on the size of the task sequence environment when it runs. Review the usage of custom task sequence variables, which can also contribute to the policy size.
As a last resort, split a complex, dynamic task sequence into separate task sequences with distinct deployments to different collections.
PowerShell cmdlets for task sequence deployment types
You can now use PowerShell to create and configure task sequences as an app model deployment type.
Add-CMTaskSequenceDeploymentType
Set-CMTaskSequenceDeploymentType
These new cmdlets have similar syntax as the MSI deployment type cmdlets: Add-CMMsiDeploymentType and Set-CMMsiDeploymentType. The primary differences are the following new parameters:
-InstallTaskSequenceId <string>(required): the ID of the task sequence to install the app-UninstallTaskSequenceId <string>(optional): the ID of the task sequence to uninstall the app
These two parameters relate to the Deployment type Task Sequence options. They replace the -InstallCommand and -UninstallCommand parameters on the MSI cmdlets.
Add-CMTaskSequenceDeploymentType example
Add-CMTaskSequenceDeploymentType -ApplicationName "CBI" -DeploymentTypeName "Complex install" -Comment "New Deployment Type" -InstallTaskSequenceId "ABC001EB" -UninstallTaskSequenceId "ABC00378" -ScriptLanguage "PowerShell" -ScriptText "dir"
Next steps
For more information about installing or updating the technical preview branch, see Technical preview.
For more information about the different branches of Configuration Manager, see Which branch of Configuration Manager should I use?.
Feedback
Coming soon: Throughout 2024 we will be phasing out GitHub Issues as the feedback mechanism for content and replacing it with a new feedback system. For more information see: https://aka.ms/ContentUserFeedback.
Submit and view feedback for