Debug add-ins using developer tools in Microsoft Edge Legacy
This article shows how to debug the client-side code (JavaScript or TypeScript) of your add-in when the following conditions are met.
- You can't, or don't wish to, debug using tools built into your IDE; or you are encountering a problem that only occurs when the add-in is run outside the IDE.
- Your computer is using a combination of Windows and Office versions that use the original Edge webview control, EdgeHTML.
Tip
For information about debugging with Edge Legacy inside Visual Studio Code, see Microsoft Office Add-in Debugger Extension for Visual Studio Code.
To determine which browser or webview you're using, see Browsers and webview controls used by Office Add-ins.
Tip
In recent versions of Office, one way to identify the webview control that Office is using is through the personality menu on any add-in where it's available. (The personality menu isn't supported in Outlook.) Open the menu and select Security Info. In the Security Info dialog on Windows, the Runtime reports Microsoft Edge, Microsoft Edge Legacy, or Internet Explorer. The runtime isn't included on the dialog in older versions of Office.
Note
To install a version of Office that uses the Edge legacy webview or to force your current version of Office to use Edge Legacy, see Switch to the Edge Legacy webview.
Debug a task pane add-in using Microsoft Edge DevTools Preview
Install the Microsoft Edge DevTools Preview. (The word "Preview" is in the name for historical reasons. There isn't a more recent version.)
Note
If your add-in has an add-in command that executes a function, the function runs in a hidden browser runtime process that the Microsoft Edge DevTools cannot detect or attach to, so the technique described in this article cannot be used to debug code in the function.
Sideload and run the add-in.
Run the Microsoft Edge DevTools.
In the tools, open the Local tab. Your add-in will be listed by its name. (Only processes that are running in EdgeHTML appear on the tab. The tool can't attach to processes that are running in other browsers or webviews, including Microsoft Edge (WebView2) and Internet Explorer (Trident).)
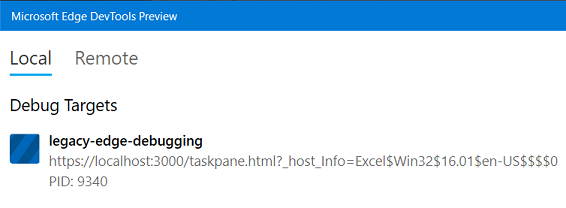
Select the add-in name to open it in the tools.
Open the Debugger tab.
Open the file that you want to debug with the following steps.
- On the debugger task bar, select Show find in files. This will open a search window.
- Enter a line of code from the file you want to debug in the search box. It should be something that's not likely to be in any other file.
- Select the refresh button.
- In the search results, select the line to open the code file in the pane above the search results.
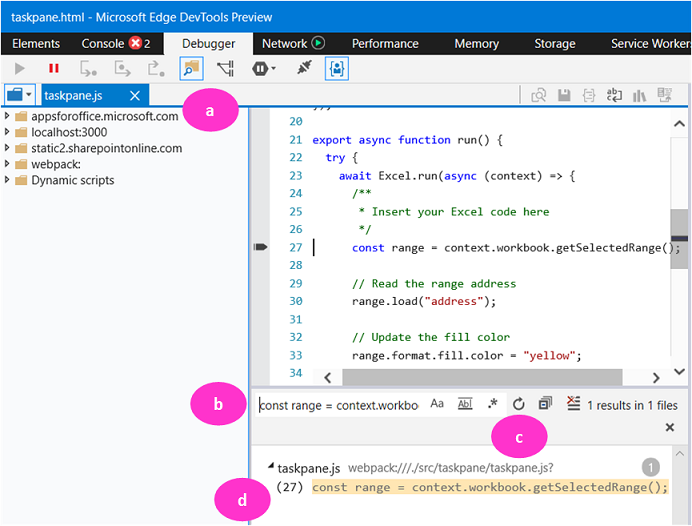
To set a breakpoint, select the line in the code file. The breakpoint is registered in the Call stack (bottom right) pane. There may also be a red dot by the line in the code file, but this doesn't appear reliably.
Execute functions in the add-in as needed to trigger the breakpoint.
Tip
For more information about using the tools, see Microsoft Edge (EdgeHTML) Developer Tools.
Debug a dialog in an add-in
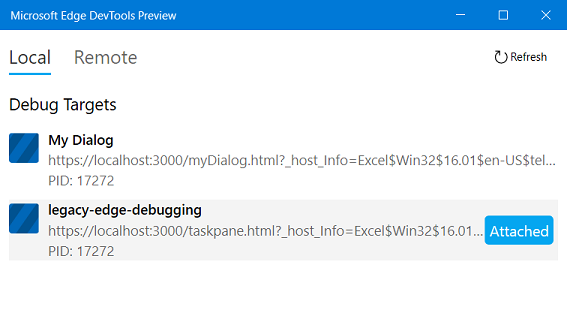
If your add-in uses the Office Dialog API, the dialog runs in a separate process from the task pane (if any) and the tools must attach to that process. Follow these steps.
Run the add-in and the tools.
Open the dialog and then select the Refresh button in the tools. The dialog process is shown. Its name comes from the
<title>element in the HTML file that is open in the dialog.Select the process to open it and debug just as described in the section Debug a task pane add-in using Microsoft Edge DevTools Preview.
Switch to the Edge Legacy webview
There are two ways to switch the Edge Legacy webview. You can run a simple command in a command prompt, or you can install a version of Office that uses Edge Legacy by default. We recommend the first method. But you should use the second in the following scenarios.
- Your project was developed with Visual Studio and IIS. It isn't Node.js based.
- You want to be absolutely robust in your testing.
- If for any reason the command line tool doesn't work.
Switch via the command line
If your project is Node.js-based (that is, not developed with Visual Studio and Internet Information server (IIS)), you can force Office on Windows to use either the EdgeHTML webview control that is provided by Edge Legacy or the Trident webview control that is provided by Internet Explorer to run add-ins, even if you have a combination of Windows and Office versions that would normally use a more recent webview. For more information about which browsers and webviews are used by various combinations of Windows and Office versions, see Browsers and webview controls used by Office Add-ins.
Note
The tool that's used to force the change in webview is supported only in the Beta subscription channel of Microsoft 365. Join the Microsoft 365 Insider program and select the Beta Channel option to access Office Beta builds. See also About Office: What version of Office am I using?.
Strictly, it's the webview switch of this tool (see Step 2) that requires the Beta channel. The tool has other switches that don't have this requirement.
If your project was not created with the Yeoman generator for Office Add-ins tool, you need to install the office-addin-dev-settings tool. Run the following command in a command prompt.
npm install office-addin-dev-settings --save-devImportant
The office-addin-dev-settings tool is not supported on Mac.
Specify the webview that you want Office to use with the following command in a command prompt in the root of the project. Replace
<path-to-manifest>with the relative path, which is just the manifest filename if it's in the root of the project. Replace<webview>with eitherieoredge-legacy. Note that the options are named after the browsers in which the webviews originated. Theieoption means "Trident" and theedge-legacyoption means "EdgeHTML".npx office-addin-dev-settings webview <path-to-manifest> <webview>The following is an example.
npx office-addin-dev-settings webview manifest.xml ieYou should see a message in the command line that the webview type is now set to IE (or Edge Legacy).
When you're finished, set Office to resume using the default webview for your combination of Windows and Office versions with the following command.
npx office-addin-dev-settings webview <path-to-manifest> default
Install a version of Office that uses Edge Legacy
Use the following procedure to install either a version of Office (downloaded from a Microsoft 365 subscription) that uses the Microsoft Edge Legacy webview (EdgeHTML) to run add-ins or a version that uses Internet Explorer (Trident).
In any Office application, open the File tab on the ribbon, and then select Office Account or Account. Select the About host-name button (for example, About Word).
On the dialog that opens, find the full xx.x.xxxxx.xxxxx build number and make a copy of it somewhere.
Download the Office Deployment Tool.
Run the downloaded file to extract the tool. You are prompted to choose where to install the tool.
In the folder where you installed the tool (where the
setup.exefile is located), create a text file with the nameconfig.xmland add the following contents.<Configuration> <Add OfficeClientEdition="64" Channel="SemiAnnual" Version="16.0.xxxxx.xxxxx"> <Product ID="O365ProPlusRetail"> <Language ID="en-us" /> </Product> </Add> </Configuration>Change the
Versionvalue.- To install a version that uses EdgeHTML, change it to
16.0.11929.20946. - To install a version that uses Trident, change it to
16.0.10730.20348.
- To install a version that uses EdgeHTML, change it to
Optionally, change the value of
OfficeClientEditionto"32"to install 32-bit Office, and change theLanguage IDvalue as needed to install Office in a different language.Open a command prompt as an administrator.
Navigate to the folder with the
setup.exeandconfig.xmlfiles.Run the following command.
setup.exe /configure config.xmlThis command installs Office. The process may take several minutes.
Important
After installation, be sure that you turn off automatic updating of Office, so that Office isn't updated to a version that doesn't use webview you want to work with before you've completed using it. This can happen within minutes of installation. Follow these steps.
- Start any Office application and open a new document.
- Open the File tab on the ribbon, and then select Office Account or Account.
- In the Product Information column, select Update Options, and then select Disable Updates. If that option isn't available, then Office is already configured to not update automatically.
When you are finished using the old version of Office, reinstall your newer version by editing the config.xml file and changing the Version to the build number that you copied earlier. Then repeat the setup.exe /configure config.xml command in an administrator command prompt. Optionally, re-enable automatic updates.
Office Add-ins
Feedback
Coming soon: Throughout 2024 we will be phasing out GitHub Issues as the feedback mechanism for content and replacing it with a new feedback system. For more information see: https://aka.ms/ContentUserFeedback.
Submit and view feedback for