Tutorial: Share code between both a VSTO Add-in and an Office Add-in with a shared code library
Visual Studio Tools for Office (VSTO) Add-ins are great for extending Office to provide solutions for your business or others. They've been around for a long time and there are thousands of solutions built with VSTO. However, they only run on Office on Windows. You can't run VSTO Add-ins on Mac, on the web, or on mobile platforms.
Important
COM and VSTO add-ins aren't supported in the new Outlook on Windows that's currently in preview. These add-ins are still supported in the classic Outlook on Windows desktop client. To learn more, see Develop Outlook add-ins for new Outlook on Windows (preview).
Office Add-ins use HTML, JavaScript, and additional web technologies to build Office solutions on all platforms. Migrating your existing VSTO Add-in to an Office Add-in is a great way to make your solution available across all platforms.
You may want to maintain both your VSTO Add-in and a new Office Add-in that both have the same functionality. This enables you to continue servicing your customers that use the VSTO Add-in on Office on Windows. This also enables you to provide the same functionality in an Office Add-in for customers across all platforms. You can also Make your Office Add-in compatible with the existing VSTO Add-in.
However, it's best to avoid rewriting all the code from your VSTO Add-in for the Office Add-in. This tutorial shows how to avoid rewriting code by using a shared code library for both add-ins.
Shared code library
This tutorial walks you through the steps of identifying and sharing common code between your VSTO Add-in and a modern Office Add-in. It uses a very simple VSTO Add-in example for the steps so that you can focus on the skills and techniques you'll need to work with your own VSTO Add-ins.
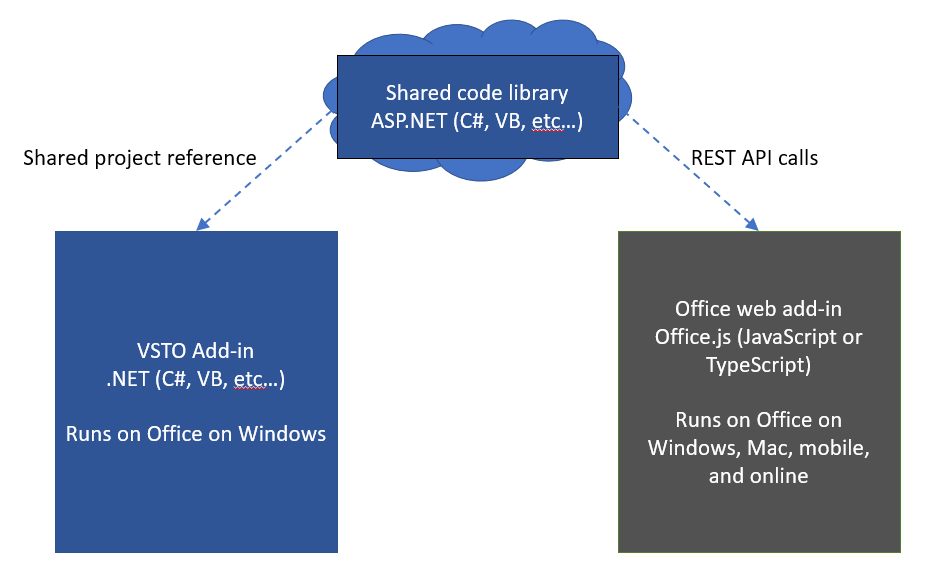
The following diagram shows how the shared code library works for migration. Common code is refactored into a new shared code library. The code can remain written in its original language, such as C# or VB. This means you can continue using the code in the existing VSTO Add-in by creating a project reference. When you create the Office Add-in, it will also use the shared code library by calling into it through REST APIs.
Skills and techniques in this tutorial:
- Create a shared class library by refactoring code into a .NET class library.
- Create a REST API wrapper using ASP.NET Core for the shared class library.
- Call the REST API from the Office Add-in to access shared code.
Prerequisites
To set up your development environment:
- Install Visual Studio 2019.
- Install the following workloads.
- ASP.NET and web development
- .NET Core cross-platform development
- Office/SharePoint development
- The following Individual components.
- Visual Studio Tools for Office (VSTO)
- .NET Core 3.0 Runtime
You also need the following:
- A Microsoft 365 account. You might qualify for a Microsoft 365 E5 developer subscription, which includes Office apps, through the Microsoft 365 Developer Program; for details, see the FAQ. Alternatively, you can sign up for a 1-month free trial or purchase a Microsoft 365 plan.
- A Microsoft Azure Tenant. A trial subscription can be acquired here: Microsoft Azure.
The Cell analyzer VSTO Add-in
This tutorial uses the VSTO Add-in shared library for Office Add-in PnP solution. The /start folder contains the VSTO Add-in solution that you'll migrate. Your goal is to migrate the VSTO Add-in to a modern Office Add-in by sharing code when possible.
Note
The sample uses C#, but you can apply the techniques in this tutorial to a VSTO Add-in written in any .NET language.
- Download the VSTO Add-in shared library for Office Add-in PnP solution to a working folder on your computer.
- Start Visual Studio 2019 and open the /start/Cell-Analyzer.sln solution.
- On the Debug menu, choose Start Debugging.
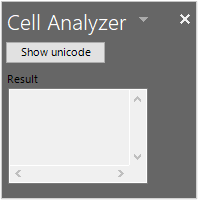
The add-in is a custom task pane for Excel. You can select any cell with text, and then choose the Show unicode button. In the Result section, the add-in will display a list of each character in the text along with its corresponding Unicode number.
Analyze types of code in the VSTO Add-in
The first technique to apply is to analyze the add-in for which parts of code can be shared. In general, project will break down into three types of code.
UI code
UI code interacts with the user. In VSTO UI code works through Windows Forms. Office Add-ins use HTML, CSS, and JavaScript for UI. Because of these differences, you can't share UI code with the Office Add-in. UI will need to be recreated in JavaScript.
Document code
In VSTO, code interacts with the document through .NET objects, such as Microsoft.Office.Interop.Excel.Range. However, Office Add-ins use the Office.js library. Although these are similar, they aren't exactly the same. So again, you can't share document interaction code with the Office Add-in.
Logic code
Business logic, algorithms, helper functions, and similar code often make up the heart of a VSTO Add-in. This code works independently of the UI and document code to perform analysis, connect to backend services, run calculations, and more. This is the code that can be shared so that you don't have to rewrite it in JavaScript.
Let's examine the VSTO Add-in. In the following code, each section is identified as DOCUMENT, UI, or ALGORITHM code.
// *** UI CODE ***
private void btnUnicode_Click(object sender, EventArgs e)
{
    // *** DOCUMENT CODE ***
    Microsoft.Office.Interop.Excel.Range rangeCell;
    rangeCell = Globals.ThisAddIn.Application.ActiveCell;

    string cellValue = "";

    if (null != rangeCell.Value)
    {
        cellValue = rangeCell.Value.ToString();
    }

    // *** ALGORITHM CODE ***
    //convert string to Unicode listing
    string result = "";
    foreach (char c in cellValue)
    {
        int unicode = c;

        result += $"{c}: {unicode}\r\n";
    }

    // *** UI CODE ***
    //Output the result
    txtResult.Text = result;
}
Using this approach, you can see that one section of code can be shared with the Office Add-in. The following code needs to be refactored into a separate class library.
// *** ALGORITHM CODE ***
//convert string to Unicode listing
string result = "";
foreach (char c in cellValue)
{
    int unicode = c;

    result += $"{c}: {unicode}\r\n";
}
Create a shared class library
VSTO Add-ins are created in Visual Studio as .NET projects, so we'll reuse .NET as much as possible to keep things simple. Our next technique is to create a class library and refactor shared code into that class library.
If you haven't already, start Visual Studio 2019 and open the \start\Cell-Analyzer.sln solution.
Right-click the solution in Solution Explorer and choose Add > New Project.
In the Add a new project dialog, choose Class Library (.NET Framework), and choose Next.
Note
Don't use the .NET Core class library because it won't work with your VSTO project.
In the Configure your new project dialog, set the following fields.
- Set the Project name to CellAnalyzerSharedLibrary.
- Leave the Location at its default value.
- Set the Framework to 4.7.2.
Choose Create.
After the project is created, rename the Class1.cs file to CellOperations.cs. A prompt to rename the class appears. Rename the class name so that it matches the file name.
Add the following code to the
CellOperationsclass to create a method namedGetUnicodeFromText.public class CellOperations { static public string GetUnicodeFromText(string value) { string result = ""; foreach (char c in value) { int unicode = c; result += $"{c}: {unicode}\r\n"; } return result; } }
Use the shared class library in the VSTO Add-in
Now you need to update the VSTO Add-in to use the class library. This is important that both the VSTO Add-in and Office Add-in use the same shared class library so that future bug fixes or features are made in one location.
In Solution Explorer, right-click the Cell-Analyzer project, and choose Add Reference.
Select CellAnalyzerSharedLibrary, and choose OK.
In Solution Explorer, expand the Cell-Analyzer project, right-click the CellAnalyzerPane.cs file, and choose View Code.
In the
btnUnicode_Clickmethod, delete the following lines of code.//Convert to Unicode listing string result = ""; foreach (char c in cellValue) { int unicode = c; result += $"{c}: {unicode}\r\n"; }Update the line of code under the
//Output the resultcomment to read as follows://Output the result txtResult.Text = CellAnalyzerSharedLibrary.CellOperations.GetUnicodeFromText(cellValue);On the Debug menu, choose Start Debugging. The custom task pane should work as expected. Enter some text in a cell, and then test that you can convert it to a Unicode list with the add-in.
Create a REST API wrapper
The VSTO Add-in can use the shared class library directly since they are both .NET projects. However the Office Add-in won't be able to use .NET since it uses JavaScript. Next, you'll create a REST API wrapper. This enables the Office Add-in to call a REST API, which then passes the call along to the shared class library.
In Solution Explorer, right-click the Cell-Analyzer project, and choose Add > New Project.
In the Add a new project dialog, choose ASP.NET Core Web Application, and choose Next.
In the Configure your new project dialog, set the following fields.
- Set the Project name to CellAnalyzerRESTAPI.
- In the Location field, leave the default value.
Choose Create.
In the Create a new ASP.NET Core web application dialog, select ASP.NET Core 3.1 for the version, and select API in the list of projects.
Leave all other fields at default values and choose the Create button.
After the project is created, expand the CellAnalyzerRESTAPI project in Solution Explorer.
Right-click Dependencies, and choose Add Reference.
Select CellAnalyzerSharedLibrary, and choose OK.
Right-click the Controllers folder, and choose Add > Controller.
In the Add New Scaffolded Item dialog, choose API Controller - Empty, then choose Add.
In the Add Empty API Controller dialog, name the controller AnalyzeUnicodeController, then choose Add.
Open the AnalyzeUnicodeController.cs file and add the following code as a method to the
AnalyzeUnicodeControllerclass.[HttpGet] public ActionResult<string> AnalyzeUnicode(string value) { if (value == null) { return BadRequest(); } return CellAnalyzerSharedLibrary.CellOperations.GetUnicodeFromText(value); }Right-click the CellAnalyzerRESTAPI project, and choose Set as Startup Project.
On the Debug menu, choose Start Debugging.
A browser will launch. Enter the following URL to test that the REST API is working:
https://localhost:<ssl port number>/api/analyzeunicode?value=test. You can reuse the port number from the URL in the browser that Visual Studio launched. You should see a string returned with Unicode values for each character.
Create the Office Add-in
When you create the Office Add-in, it will make a call to the REST API. But first, you need to get the port number of the REST API server and save it for later.
Save the SSL port number
- If you haven't already, start Visual Studio 2019, and open the \start\Cell-Analyzer.sln solution.
- In the CellAnalyzerRESTAPI project, expand Properties, and open the launchSettings.json file.
- Find the line of code with the sslPort value, copy the port number, and save it somewhere.
Add the Office Add-in project
To keep things simple, keep all the code in one solution. Add the Office Add-in project to the existing Visual Studio solution. However, if you're familiar with the Yeoman generator for Office Add-ins and Visual Studio Code, you can also run yo office to build the project. The steps are very similar.
- In Solution Explorer, right-click the Cell-Analyzer solution, and choose Add > New Project.
- In the Add a new project dialog, choose Excel Web Add-in, and choose Next.
- In the Configure your new project dialog, set the following fields.
- Set the Project name to CellAnalyzerOfficeAddin.
- Leave the Location at its default value.
- Set the Framework to 4.7.2 or later.
- Choose Create.
- In the Choose the add-in type dialog, select Add new functionalities to Excel, and choose Finish.
Two projects will be created:
- CellAnalyzerOfficeAddin - This project configures the manifest XML files that describes the add-in so Office can load it correctly. It contains the ID, name, description, and other information about the add-in.
- CellAnalyzerOfficeAddinWeb - This project contains web resources for your add-in, such as HTML, CSS, and scripts. It also configures an IIS Express instance to host your add-in as a web application.
Add UI and functionality to the Office Add-in
In Solution Explorer, expand the CellAnalyzerOfficeAddinWeb project.
Open the Home.html file, and replace the
<body>contents with the following HTML.<button id="btnShowUnicode" onclick="showUnicode()">Show Unicode</button> <p>Result:</p> <div id="txtResult"></div>Open the Home.js file, and replace the entire contents with the following code.
(function () {
  "use strict";
  // The initialize function must be run each time a new page is loaded.
  Office.initialize = function (reason) {
    $(document).ready(function () {
    });
  };
})();

function showUnicode() {
  Excel.run(function (context) {
    const range = context.workbook.getSelectedRange();
    range.load("values");
    return context.sync(range).then(function (range) {
      const url = "https://localhost:<ssl port number>/api/analyzeunicode?value=" + range.values[0][0];
      $.ajax({
        type: "GET",
        url: url,
        success: function (data) {
          let htmlData = data.replace(/\r\n/g, '<br>');
          $("#txtResult").html(htmlData);
        },
        error: function (data) {
            $("#txtResult").html("error occurred in ajax call.");
        }
      });
    });
  });
}
In the previous code, enter the sslPort number you saved previously from the launchSettings.json file.
In the previous code, the returned string will be processed to replace carriage return line feeds with <br> HTML tags. You may occasionally run into situations where a return value that works perfectly fine for .NET in the VSTO Add-in will need to be adjusted on the Office Add-in side to work as expected. In this case, the REST API and shared class library are only concerned with returning the string. The showUnicode() function is responsible for formatting return values correctly for presentation.
Allow CORS from the Office Add-in
The Office.js library requires CORS on outgoing calls, such as the one made from the ajax call to the REST API server. Use the following steps to allow calls from the Office Add-in to the REST API.
In Solution Explorer, select the CellAnalyzerOfficeAddinWeb project.
From the View menu, choose Properties Window, if the window isn't already displayed.
In the properties window, copy the value of the SSL URL, and save it somewhere. This is the URL that you need to allow through CORS.
In the CellAnalyzerRESTAPI project, open the Startup.cs file.
Add the following code to the top of the
ConfigureServicesmethod. Be sure to substitute the URL SSL you copied previously for thebuilder.WithOriginscall.services.AddCors(options => { options.AddPolicy(MyAllowSpecificOrigins, builder => { builder.WithOrigins("<your URL SSL>") .AllowAnyMethod() .AllowAnyHeader(); }); });Note
Leave the trailing
/from the end of the URL when you use it in thebuilder.WithOriginsmethod. For example, it should appear similar tohttps://localhost:44000. Otherwise, you'll get a CORS error at runtime.Add the following field to the
Startupclass.readonly string MyAllowSpecificOrigins = "_myAllowSpecificOrigins";Add the following code to the
configuremethod just before the line of code forapp.UseEndpoints.app.UseCors(MyAllowSpecificOrigins);
When done, your Startup class should look similar to the following code (your localhost URL may be different).
public class Startup
{
  public Startup(IConfiguration configuration)
    {
      Configuration = configuration;
    }

    readonly string MyAllowSpecificOrigins = "_myAllowSpecificOrigins";

    public IConfiguration Configuration { get; }

    // NOTE: The following code configures CORS for the localhost:44397 port.
    // This is for development purposes. In production code, you should update this to
    // use the appropriate allowed domains.
    public void ConfigureServices(IServiceCollection services)
    {
        services.AddCors(options =>
        {
            options.AddPolicy(MyAllowSpecificOrigins,
            builder =>
            {
                builder.WithOrigins("https://localhost:44397")
                .AllowAnyMethod()
                .AllowAnyHeader();
            });
        });
        services.AddControllers();
    }

    // This method gets called by the runtime. Use this method to configure the HTTP request pipeline.
    public void Configure(IApplicationBuilder app, IWebHostEnvironment env)
    {
        if (env.IsDevelopment())
        {
            app.UseDeveloperExceptionPage();
        }

        app.UseHttpsRedirection();

        app.UseRouting();

        app.UseAuthorization();

        app.UseCors(MyAllowSpecificOrigins);

        app.UseEndpoints(endpoints =>
        {
            endpoints.MapControllers();
        });
    }
}
Run the add-in
In Solution Explorer, right-click the top node Solution 'Cell-Analyzer', and choose Set Startup Projects.
In the Solution 'Cell-Analyzer' Property Pages dialog, select Multiple startup projects.
Set the Action property to Start for each of the following projects.
- CellAnalyzerRESTAPI
- CellAnalyzerOfficeAddin
- CellAnalyzerOfficeAddinWeb
Choose OK.
From the Debug menu, choose Start Debugging.
Excel will run and sideload the Office Add-in. You can test that the localhost REST API service is working correctly by entering a text value into a cell, and choosing the Show Unicode button in the Office Add-in. It should call the REST API and display the unicode values for the text characters.
Publish to an Azure App Service
You eventually want to publish the REST API project to the cloud. In the following steps you'll see how to publish the CellAnalyzerRESTAPI project to a Microsoft Azure App Service. See Prerequisites for information on how to get an Azure account.
- In Solution Explorer, right-click the CellAnalyzerRESTAPI project, and choose Publish.
- In the Pick a publish target dialog, select Create New, and choose Create Profile.
- In the App Service dialog, select the correct account, if it isn't already selected.
- The fields for the App Service dialog will be set to defaults for your account. Generally, the defaults work fine, but you can change them if you prefer different settings.
- In the App Service dialog, choose Create.
- The new profile will be displayed in a Publish page. Choose Publish to build and deploy the code to the App Service.
You can now test the service. Open a browser and enter a URL that goes directly to the new service. For example, use https://<myappservice>.azurewebsites.net/api/analyzeunicode?value=test, where myappservice is the unique name you created for the new App Service.
Use the Azure App Service from the Office Add-in
The final step is to update the code in the Office Add-in to use the Azure App Service instead of localhost.
In Solution Explorer, expand the CellAnalyzerOfficeAddinWeb project, and open the Home.js file.
Change the
urlconstant to use the URL for your Azure App Service as shown in the following line of code. Replace<myappservice>with the unique name you created for the new App Service.const url = "https://<myappservice>.azurewebsites.net/api/analyzeunicode?value=" + range.values[0][0];In Solution Explorer, right-click the top node Solution 'Cell-Analyzer', and choose Set Startup Projects.
In the Solution 'Cell-Analyzer' Property Pages dialog, select Multiple startup projects.
Enable the Start action for each of the following projects.
- CellAnalyzerOfficeAddinWeb
- CellAnalyzerOfficeAddin
Choose OK.
From the Debug menu, choose Start Debugging.
Excel will run and sideload the Office Add-in. To test that the App Service is working correctly, enter a text value into a cell, and choose Show Unicode in the Office Add-in. It should call the service and display the unicode values for the text characters.
Conclusion
In this tutorial, you learned how to create an Office Add-in that uses shared code with the original VSTO add-in. You learned how to maintain both VSTO code for Office on Windows, and an Office Add-in for Office on other platforms. You refactored VSTO C# code into a shared library and deployed it to an Azure App Service. You created an Office Add-in that uses the shared library, so that you don't have to rewrite the code in JavaScript.
Office Add-ins
Feedback
Coming soon: Throughout 2024 we will be phasing out GitHub Issues as the feedback mechanism for content and replacing it with a new feedback system. For more information see: https://aka.ms/ContentUserFeedback.
Submit and view feedback for