Convert CSV files to Excel workbooks
Many services export data as comma-separated value (CSV) files. This solution automates the process of converting those CSV files to Excel workbooks in the .xlsx file format. It uses a Power Automate flow to find files with the .csv extension in a OneDrive folder and an Office Script to copy the data from the .csv file into a new Excel workbook.
Solution
- Store the .csv files and a blank "Template" .xlsx file in a OneDrive folder.
- Create an Office Script to parse the CSV data into a range.
- Create a Power Automate flow to read the .csv files and pass their contents to the script.
Sample files
Download convert-csv-example.zip to get the Template.xlsx file and two sample .csv files. Extract the files into a folder in your OneDrive. This sample assumes the folder is named "output".
Add the following script to the sample workbook. In Excel, use Automate > New Script to paste the code and save the script. Save it as Convert CSV and try the sample yourself!
Sample code: Insert comma-separated values into a workbook
/**
 * Convert incoming CSV data into a range and add it to the workbook.
 */
function main(workbook: ExcelScript.Workbook, csv: string) {
  let sheet = workbook.getWorksheet("Sheet1");

  // Remove any Windows \r characters.
  csv = csv.replace(/\r/g, "");

  // Split each line into a row.
  // NOTE: This will split values that contain new line characters.
  let rows = csv.split("\n");

  /*
   * For each row, match the comma-separated sections.
   * For more information on how to use regular expressions to parse CSV files,
   * see this Stack Overflow post: https://stackoverflow.com/a/48806378/9227753
   */
  const csvMatchRegex = /(?:,|\n|^)("(?:(?:"")*[^"]*)*"|[^",\n]*|(?:\n|$))/g
  rows.forEach((value, index) => {
    if (value.length > 0) {
      let row = value.match(csvMatchRegex);

      // Check for blanks at the start of the row.
      if (row[0].charAt(0) === ',') {
        row.unshift("");
      }

      // Remove the preceding comma and surrounding quotation marks.
      row.forEach((cell, index) => {
        cell = cell.indexOf(",") === 0 ? cell.substring(1) : cell;
        row[index] = cell.indexOf("\"") === 0 && cell.lastIndexOf("\"") === cell.length - 1 ? cell.substring(1, cell.length - 1) : cell;
      });

      // Create a 2D array with one row.
      let data: string[][] = [];
      data.push(row);

      // Put the data in the worksheet.
      let range = sheet.getRangeByIndexes(index, 0, 1, data[0].length);
      range.setValues(data);
    }
  });

  // Add any formatting or table creation that you want.
}
Power Automate flow: Create new .xlsx files
Sign into Power Automate and create a new Scheduled cloud flow.
Set the flow to Repeat every "1" "Day" and select Create.
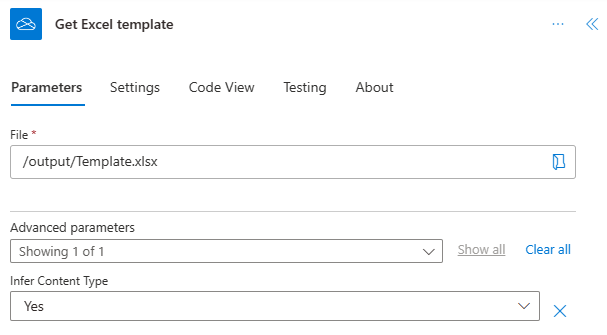
Get the template Excel file. This is the basis for all the converted .csv files. In the flow builder, select the + button and Add an action. Select the OneDrive for Business connector's Get file content action. Provide the file path to the "Template.xlsx" file.
- File: /output/Template.xlsx
Rename the Get file content step. Select the current title, "Get file content", in the action task pane. Change the name to "Get Excel template".
Add an action that gets all the files in the "output" folder. Choose the OneDrive for Business connector's List files in folder action. Provide the folder path that contains the .csv files.
- Folder: /output

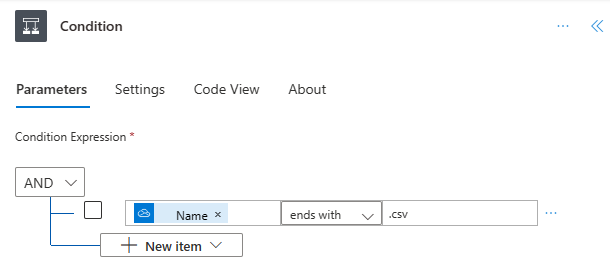
Add a condition so that the flow only operates on .csv files. Add the Condition control action. Use the following values for the Condition.
- Choose a value: Name (dynamic content from List files in folder). Note that this dynamic content has multiple results, so a For each control surrounds the Condition.
- ends with (from the dropdown list)
- Choose a value: .csv
The rest of the flow is under the If yes section, since we only want to act on .csv files. Get an individual .csv file by adding an action that uses the OneDrive for Business connector's Get file content action. Use the Id from the dynamic content from List files in folder.
- File: Id (dynamic content from the List files in folder step)
Rename the new Get file content step to "Get .csv file". This helps distinguish this file from the Excel template.

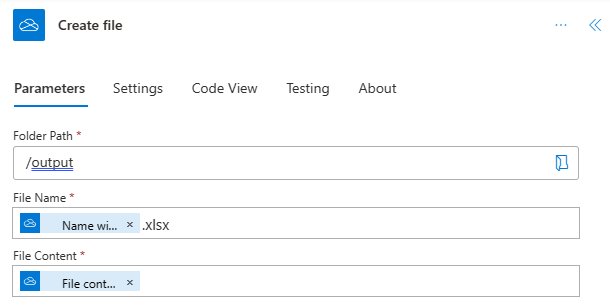
Make the new .xlsx file, using the Excel template as the base content. Add an action that uses the OneDrive for Business connector's Create file action. Use the following values.
- Folder Path: /output
- File Name: Name without extension.xlsx (choose the Name without extension dynamic content from the List files in folder and manually type ".xlsx" after it)
- File Content: File content (dynamic content from Get Excel template)
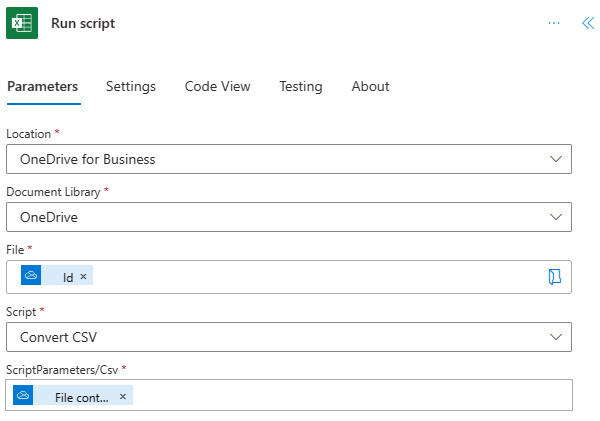
Run the script to copy data into the new workbook. Add the Excel Online (Business) connector's Run script action. Use the following values for the action.
- Location: OneDrive for Business
- Document Library: OneDrive
- File: Id (dynamic content from Create file)
- Script: Convert CSV
- csv: File content (dynamic content from Get .csv file)
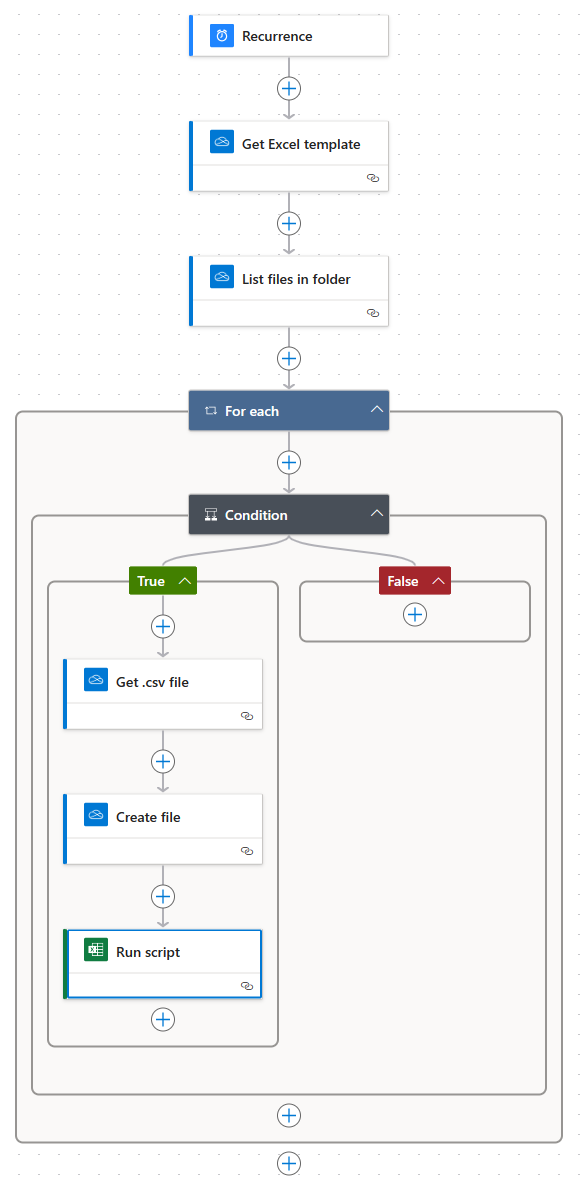
Save the flow. The flow designer should look like the following image.
Use the Test button on the flow editor page or run the flow through your My flows tab. Be sure to allow access when prompted.
You should find new .xlsx files in the "output" folder, alongside the original .csv files. The new workbooks contain the same data as the CSV files.
Troubleshooting
Script testing
To test the script without using Power Automate, assign a value to csv before using it. Add the following code as the first line of the main function and select Run.
  csv = `1, 2, 3
         4, 5, 6
         7, 8, 9`;
Semicolon-separated files and other alternative separators
Some regions use semicolons (';') to separate cell values instead of commas. In this case, you need to change the following lines in the script.
Replace the commas with semicolons in the regular expression statement. This starts with
let row = value.match.let row = value.match(/(?:;|\n|^)("(?:(?:"")*[^"]*)*"|[^";\n]*|(?:\n|$))/g);Replace the comma with a semicolon in the check for the blank first cell. This starts with
if (row[0].charAt(0).if (row[0].charAt(0) === ';') {Replace the comma with a semicolon in the line that removes the separation character from the displayed text. This starts with
row[index] = cell.indexOf.row[index] = cell.indexOf(";") === 0 ? cell.substr(1) : cell;
Note
If your file uses tabs or any other character to separate the values, replace the ; in the above substitutions with \t or whatever character is being used.
Large CSV files
If your file has hundreds of thousands of cells, you could reach the Excel data transfer limit. You'll need to force the script to synchronize with Excel periodically. The easiest way to do this is to call console.log after a batch of rows has been processed. Add the following lines of code to make this happen.
Before
rows.forEach((value, index) => {, add the following line.let rowCount = 0;After
range.setValues(data);, add the following code. Note that depending on the number of columns, you may need to reduce5000to a lower number.rowCount++; if (rowCount % 5000 === 0) { console.log("Syncing 5000 rows."); }
Warning
If your CSV file is very large, you may have problems timing out in Power Automate. You'll need to divide the CSV data into multiple files before converting them into Excel workbooks.
Accents and other unicode characters
Files with unicode-specific characters, such as accented vowels like é, need to be saved with the correct encoding. Power Automate's OneDrive connector file creation defaults to ANSI for .csv files. If you're creating the .csv files in Power Automate, you'll need to add the byte order mark (BOM) before the comma-separated values. For UTF-8, replace the file contents for the write .csv file operation with the expression concat(uriComponentToString('%EF%BB%BF'), <CSV Input>) (where <CSV Input> is your original CSV data).
Note that this sample doesn't create the .csv files in the flow, so this change needs to happen in your custom part of the flow. You could also read and rewrite the .csv files with the BOM, if you don't control how those files are created.
Surrounding quotation marks
This sample removes any quotation marks ("") that surround values. These are typically added to comma-separated values to prevent commas in the data from being treated as separation tokens. A .csv file that is opened in Excel, then saved as a .xlsx file, will never have the those quotation marks shown to the reader. If you wish to keep the quotation marks and have them be displayed in the final spreadsheets, replace lines 27-30 of the script with the following code.
// Remove the preceding comma.
row.forEach((cell, index) => {
  row[index] = cell.indexOf(",") === 0 ? cell.substring(1) : cell;
});
Office Scripts
Feedback
Coming soon: Throughout 2024 we will be phasing out GitHub Issues as the feedback mechanism for content and replacing it with a new feedback system. For more information see: https://aka.ms/ContentUserFeedback.
Submit and view feedback for