Migrate multi-customer applications to the service principal profiles model
This article describes how you can get better scalability by migrating your Power BI embedded analytics multi-customer apps to the service principal profiles model.
Service principal profiles make it easier to manage organizational content in Power BI and use your capacities more efficiently.
Note
This article is aimed at organizations that already have an app that supports multiple customers from a single Power BI tenant.
Not all apps benefit from the service principal model. For example, the following apps shouldn't migrate:
- Small apps that maintain one service principal with a small number of objects.
- Apps that use one multiple service principal per customer
Prerequisites
It's important to read about service principal profiles before you start the migration.
You also need to do the following steps:
- Set up the service principal by following the first three steps of Embed Power BI content with service principal.
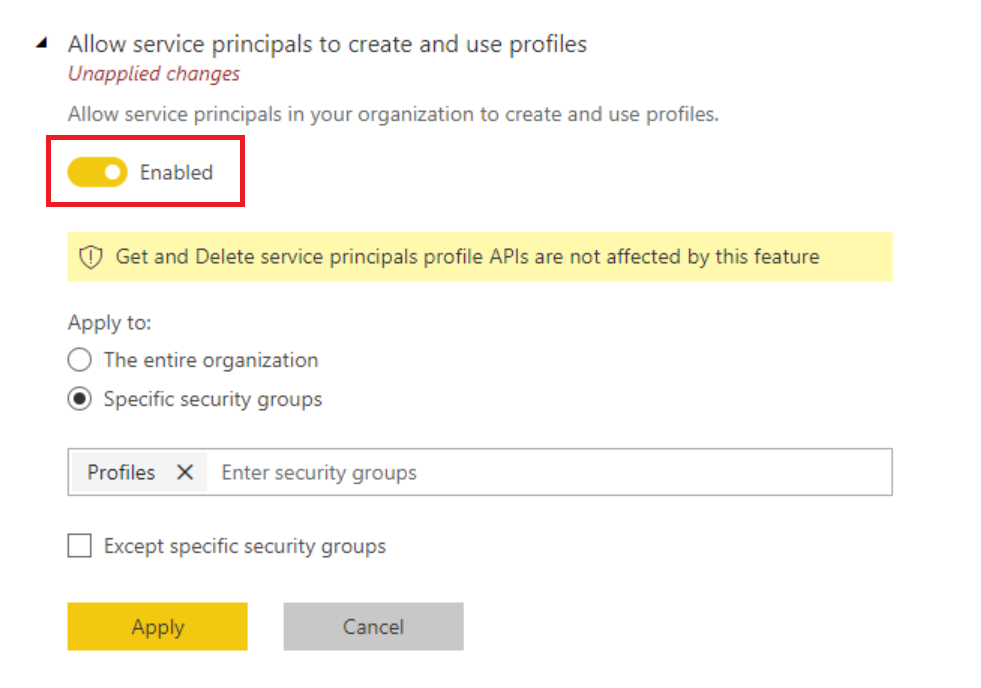
- From a Power BI tenant admin account, enable creating profiles in the tenant.
Migrate to service principal profiles
Migrating to service principal profiles involves the following steps:
- Create profiles, one profile per customer.
- Organize your workspaces.
- Change the application code to use profiles.
- Test your application with the profiles model.
- Clean up redundant permissions.
Create Profiles (Required)
Use Profiles REST API with the service principal you created to create one profile for each customer.
It's a good idea to save a mapping of each data customer ID with its corresponding profile ID in your database. You'll need this mapping later to make API calls with the tenant profile.
Organize your workspaces
The easiest way to manage your data is by maintaining one workspace per customer. If your app already uses this model, you don't need to create new workspaces. However, you still have to provide each profile with Admin access to the corresponding workspace using the Add Group User API.
If you don't have one workspace per customer, use the corresponding profile to call Create Group User API to create a new workspace for each customer.
Organize items in workspaces
You should now have a profile and a workspace for each customer. If you created new workspaces in the previous step, you need to import items (like reports and semantic models) into these workspaces. The semantic models you import depend on your current solution:
If your app uses a separate semantic model for each customer, the semantic model design can work as it is.
If your app uses one semantic model with row level security (RLS) to provide different data to different customers, you can get better scalability by creating a separate semantic model for each customer and using profiles as described in this article.
After overcoming scalability limitations by using profiles and separate data sources, you can get even more data separation by using RLS with profiles.
- If you rely on Dynamic RLS, the name of the profile will be returned in the DAX function
UserName(). - If you use static RLS and override roles when generating the embed token, you can continue doing this.
- If you rely on Dynamic RLS, the name of the profile will be returned in the DAX function
Once the items are ready, import them into the relevant workspaces. To automate the process, consider using the Import API.
Change the application codes to use profiles
Once you have profiles with Admin access to the relevant workspaces, and a database with mapping that shows you which profile represents which customer, you can make the necessary code changes. We recommend that you keep two code flows side by side and gradually expose the profiles code flow to your customers.
Make the following code changes:
Authorization code change
- If you're using a master user in the Microsoft Entra ID app, change the acquire token code. Read embed with service principal to learn about creating an app-only Microsoft Entra token.
- If you're using a service principal and you created a new one for profiles, adjust the code to use the correct service principal ID and secrets.
Management code change
Some apps have management code that automates onboarding a new customer upon registration. Often, the management code uses Power BI REST APIs to create workspaces and import content. Most of this code should remain the same, but you may need to adapt the following details:
- Each time you create a new customer tenant, create a new service profile to be the creator and administrator of the workspace for that tenant.
- If you decide to reorganize your Power BI content, edit the code to reflect the changes.
Embed token code change
Replace the API caller. Make sure a profile calls the GenerateToken API because in the profiles model, only the specific profile has access to the customer's content.
Validate
It's best practice to test your app thoroughly before moving it to the profiles model. Reports may load even if there are bugs in the SaaS application code because you didn't delete the older permissions on the workspaces.
Clean up after migration
Now that you finished the migration and validated the results, remove what you don't need anymore.
- Clean up code: You might want to disable old code paths to ensure that you're only running new code that relies on profiles.
- Clean up workspaces and permissions in Power BI: If you created new workspaces, you can delete the old workspaces that are no longer in use. If you reused the same workspaces, you may want to delete the older permissions (such as master user permissions) on the workspace.
Related content
More questions? Try asking the Power BI Community
Feedback
Coming soon: Throughout 2024 we will be phasing out GitHub Issues as the feedback mechanism for content and replacing it with a new feedback system. For more information see: https://aka.ms/ContentUserFeedback.
Submit and view feedback for