Integrar-se com um aplicativo cliente usando o SDK de Fala
Importante
Os Comandos Personalizados serão desativados em 30 de abril de 2026. A partir de 30 de outubro de 2023, não será possível criar aplicativos dos Comandos Personalizados no Speech Studio. Relacionado a essa alteração, o LUIS será desativado em 1º de outubro de 2025. A partir de 1º de abril de 2023, não será possível criar recursos do LUIS.
Neste artigo, você aprenderá a fazer solicitações para um aplicativo de Comandos Personalizados publicados por meio do SDK de Fala em execução em um aplicativo UWP. Para estabelecer uma conexão com o aplicativo de Comandos Personalizados, você precisa:
- Publicar um aplicativo de Comandos Personalizados e obter uma ID do Aplicativo (identificador de aplicativo)
- Criar um aplicativo cliente da UWP (Plataforma Universal do Windows) usando o SDK de Fala para permitir que você se comunique com o seu aplicativo de Comandos Personalizados
Pré-requisitos
Um aplicativo de Comandos Personalizados é necessário para concluir este artigo. Experimente um início rápido para criar um aplicativo com comandos personalizados:
Você também precisará de:
- Visual Studio 2019 ou superior. Este guia se baseia no Visual Studio 2019.
- Uma chave e uma região do recurso Fala de IA do Azure: como criar um recurso de Fala no portal do Azure. Para obter mais informações, confira Criar um recurso multisserviço.
- Habilitar o dispositivo para desenvolvimento
Etapa 1: Publicar o aplicativo de Comandos Personalizados
Abra seu aplicativo de Comandos Personalizados criado anteriormente.
Acesse Configurações, selecione Recurso LUIS.
Se o Recurso de previsão não estiver atribuído, selecione uma chave de previsão de consulta ou crie uma nova.
A chave de previsão de consulta sempre é necessária antes de publicar um aplicativo. Para obter mais informações sobre os recursos do LUIS, confira Criar Recurso do LUIS
Volte para edição de Comandos e selecione Publicar.
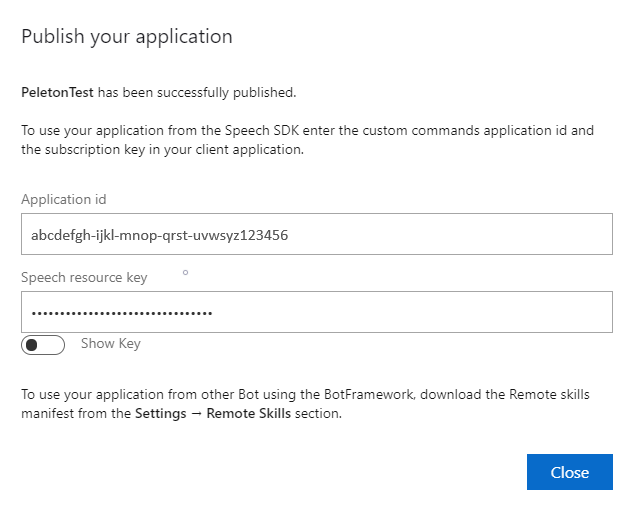
Copie a ID do Aplicativo da notificação "publicar" para uso posterior.
Copie a Chave do Recurso de Fala para uso posterior.
Etapa 2: Criar um projeto do Visual Studio
Criar um projeto do Visual Studio para desenvolvimento de UWP e instale o SDK de Fala.
Etapa 3: Adicionar um código de exemplo
Nesta etapa, adicione o código XAML que define a interface do usuário do aplicativo e adicione a implementação code-behind do C#.
Código XAML
Crie a interface do usuário do aplicativo adicionando o código XAML.
No Gerenciador de Soluções, abra
MainPage.xamlNa exibição XAML do designer, substitua todo o conteúdo pelo seguinte snippet de código:
<Page
    x:Class="helloworld.MainPage"
    xmlns="http://schemas.microsoft.com/winfx/2006/xaml/presentation"
    xmlns:x="http://schemas.microsoft.com/winfx/2006/xaml"
    xmlns:local="using:helloworld"
    xmlns:d="http://schemas.microsoft.com/expression/blend/2008"
    xmlns:mc="http://schemas.openxmlformats.org/markup-compatibility/2006"
    mc:Ignorable="d"
    Background="{ThemeResource ApplicationPageBackgroundThemeBrush}">

    <Grid>
        <StackPanel Orientation="Vertical" HorizontalAlignment="Center"
                    Margin="20,50,0,0" VerticalAlignment="Center" Width="800">
            <Button x:Name="EnableMicrophoneButton" Content="Enable Microphone"
                    Margin="0,10,10,0" Click="EnableMicrophone_ButtonClicked"
                    Height="35"/>
            <Button x:Name="ListenButton" Content="Talk"
                    Margin="0,10,10,0" Click="ListenButton_ButtonClicked"
                    Height="35"/>
            <StackPanel x:Name="StatusPanel" Orientation="Vertical"
                        RelativePanel.AlignBottomWithPanel="True"
                        RelativePanel.AlignRightWithPanel="True"
                        RelativePanel.AlignLeftWithPanel="True">
                <TextBlock x:Name="StatusLabel" Margin="0,10,10,0"
                           TextWrapping="Wrap" Text="Status:" FontSize="20"/>
                <Border x:Name="StatusBorder" Margin="0,0,0,0">
                    <ScrollViewer VerticalScrollMode="Auto"
                                  VerticalScrollBarVisibility="Auto" MaxHeight="200">
                        <!-- Use LiveSetting to enable screen readers to announce
                             the status update. -->
                        <TextBlock
                            x:Name="StatusBlock" FontWeight="Bold"
                            AutomationProperties.LiveSetting="Assertive"
                            MaxWidth="{Binding ElementName=Splitter, Path=ActualWidth}"
                            Margin="10,10,10,20" TextWrapping="Wrap"  />
                    </ScrollViewer>
                </Border>
            </StackPanel>
        </StackPanel>
        <MediaElement x:Name="mediaElement"/>
    </Grid>
</Page>
O modo de exibição de Design é atualizado para mostrar a interface do usuário do aplicativo.
Origem code-behind em C#
Adicione a origem code-behind para que o aplicativo funcione conforme o esperado. A origem code-behind inclui:
- As instruções
usingsão exigidas para os namespacesSpeecheSpeech.Dialog. - Uma implementação simples para garantir o acesso ao microfone, conectado a um manipulador de botão.
- Auxiliares básicos de interface do usuário para apresentar erros e mensagens no aplicativo.
- Um ponto de aterrissagem para o caminho do código de inicialização.
- Um auxiliar para reproduzir a conversão de texto em fala (sem suporte para streaming).
- Um manipulador de botão vazio para começar a escutar.
Adicione a origem code-behind da seguinte maneira:
No Gerenciador de Soluções, abra o arquivo de origem code-behind
MainPage.xaml.cs(agrupado emMainPage.xaml)Substitua o conteúdo do arquivo pelo seguinte código:
using Microsoft.CognitiveServices.Speech;
using Microsoft.CognitiveServices.Speech.Audio;
using Microsoft.CognitiveServices.Speech.Dialog;
using System;
using System.IO;
using System.Text;
using Windows.UI.Xaml;
using Windows.UI.Xaml.Controls;
using Windows.UI.Xaml.Media;

namespace helloworld
{
    public sealed partial class MainPage : Page
    {
        private DialogServiceConnector connector;

        private enum NotifyType
        {
            StatusMessage,
            ErrorMessage
        };

        public MainPage()
        {
            this.InitializeComponent();
        }

        private async void EnableMicrophone_ButtonClicked(
            object sender, RoutedEventArgs e)
        {
            bool isMicAvailable = true;
            try
            {
                var mediaCapture = new Windows.Media.Capture.MediaCapture();
                var settings =
                    new Windows.Media.Capture.MediaCaptureInitializationSettings();
                settings.StreamingCaptureMode =
                    Windows.Media.Capture.StreamingCaptureMode.Audio;
                await mediaCapture.InitializeAsync(settings);
            }
            catch (Exception)
            {
                isMicAvailable = false;
            }
            if (!isMicAvailable)
            {
                await Windows.System.Launcher.LaunchUriAsync(
                    new Uri("ms-settings:privacy-microphone"));
            }
            else
            {
                NotifyUser("Microphone was enabled", NotifyType.StatusMessage);
            }
        }

        private void NotifyUser(
            string strMessage, NotifyType type = NotifyType.StatusMessage)
        {
            // If called from the UI thread, then update immediately.
            // Otherwise, schedule a task on the UI thread to perform the update.
            if (Dispatcher.HasThreadAccess)
            {
                UpdateStatus(strMessage, type);
            }
            else
            {
                var task = Dispatcher.RunAsync(
                    Windows.UI.Core.CoreDispatcherPriority.Normal,
                    () => UpdateStatus(strMessage, type));
            }
        }

        private void UpdateStatus(string strMessage, NotifyType type)
        {
            switch (type)
            {
                case NotifyType.StatusMessage:
                    StatusBorder.Background = new SolidColorBrush(
                        Windows.UI.Colors.Green);
                    break;
                case NotifyType.ErrorMessage:
                    StatusBorder.Background = new SolidColorBrush(
                        Windows.UI.Colors.Red);
                    break;
            }
            StatusBlock.Text += string.IsNullOrEmpty(StatusBlock.Text)
                ? strMessage : "\n" + strMessage;

            if (!string.IsNullOrEmpty(StatusBlock.Text))
            {
                StatusBorder.Visibility = Visibility.Visible;
                StatusPanel.Visibility = Visibility.Visible;
            }
            else
            {
                StatusBorder.Visibility = Visibility.Collapsed;
                StatusPanel.Visibility = Visibility.Collapsed;
            }
            // Raise an event if necessary to enable a screen reader
            // to announce the status update.
            var peer = Windows.UI.Xaml.Automation.Peers.FrameworkElementAutomationPeer.FromElement(StatusBlock);
            if (peer != null)
            {
                peer.RaiseAutomationEvent(
                    Windows.UI.Xaml.Automation.Peers.AutomationEvents.LiveRegionChanged);
            }
        }

        // Waits for and accumulates all audio associated with a given
        // PullAudioOutputStream and then plays it to the MediaElement. Long spoken
        // audio will create extra latency and a streaming playback solution
        // (that plays audio while it continues to be received) should be used --
        // see the samples for examples of this.
        private void SynchronouslyPlayActivityAudio(
            PullAudioOutputStream activityAudio)
        {
            var playbackStreamWithHeader = new MemoryStream();
            playbackStreamWithHeader.Write(Encoding.ASCII.GetBytes("RIFF"), 0, 4); // ChunkID
            playbackStreamWithHeader.Write(BitConverter.GetBytes(UInt32.MaxValue), 0, 4); // ChunkSize: max
            playbackStreamWithHeader.Write(Encoding.ASCII.GetBytes("WAVE"), 0, 4); // Format
            playbackStreamWithHeader.Write(Encoding.ASCII.GetBytes("fmt "), 0, 4); // Subchunk1ID
            playbackStreamWithHeader.Write(BitConverter.GetBytes(16), 0, 4); // Subchunk1Size: PCM
            playbackStreamWithHeader.Write(BitConverter.GetBytes(1), 0, 2); // AudioFormat: PCM
            playbackStreamWithHeader.Write(BitConverter.GetBytes(1), 0, 2); // NumChannels: mono
            playbackStreamWithHeader.Write(BitConverter.GetBytes(16000), 0, 4); // SampleRate: 16kHz
            playbackStreamWithHeader.Write(BitConverter.GetBytes(32000), 0, 4); // ByteRate
            playbackStreamWithHeader.Write(BitConverter.GetBytes(2), 0, 2); // BlockAlign
            playbackStreamWithHeader.Write(BitConverter.GetBytes(16), 0, 2); // BitsPerSample: 16-bit
            playbackStreamWithHeader.Write(Encoding.ASCII.GetBytes("data"), 0, 4); // Subchunk2ID
            playbackStreamWithHeader.Write(BitConverter.GetBytes(UInt32.MaxValue), 0, 4); // Subchunk2Size

            byte[] pullBuffer = new byte[2056];

            uint lastRead = 0;
            do
            {
                lastRead = activityAudio.Read(pullBuffer);
                playbackStreamWithHeader.Write(pullBuffer, 0, (int)lastRead);
            }
            while (lastRead == pullBuffer.Length);

            var task = Dispatcher.RunAsync(
                Windows.UI.Core.CoreDispatcherPriority.Normal, () =>
            {
                mediaElement.SetSource(
                    playbackStreamWithHeader.AsRandomAccessStream(), "audio/wav");
                mediaElement.Play();
            });
        }

        private void InitializeDialogServiceConnector()
        {
            // New code will go here
        }

        private async void ListenButton_ButtonClicked(
            object sender, RoutedEventArgs e)
        {
            // New code will go here
        }
    }
}
Observação
Se você vir o erro: "O tipo 'Object' é definido em um assembly que não é referenciado"
- Clique com o botão direito do mouse na sua solução.
- Escolha Gerenciar Pacotes NuGet para a Solução e selecione Atualizações
- Se você vir Microsoft.NETCore.UniversalWindowsPlatform na lista de atualizações, atualize Microsoft.NETCore.UniversalWindowsPlatform para a versão mais recente
Adicione o código a seguir ao corpo do método de
InitializeDialogServiceConnector// This code creates the `DialogServiceConnector` with your resource information. // create a DialogServiceConfig by providing a Custom Commands application id and Speech resource key // The RecoLanguage property is optional (default en-US); note that only en-US is supported in Preview const string speechCommandsApplicationId = "YourApplicationId"; // Your application id const string speechSubscriptionKey = "YourSpeechSubscriptionKey"; // Your Speech resource key const string region = "YourServiceRegion"; // The Speech resource region. var speechCommandsConfig = CustomCommandsConfig.FromSubscription(speechCommandsApplicationId, speechSubscriptionKey, region); speechCommandsConfig.SetProperty(PropertyId.SpeechServiceConnection_RecoLanguage, "en-us"); connector = new DialogServiceConnector(speechCommandsConfig);Substitua as cadeias de caracteres
YourApplicationId,YourSpeechSubscriptionKey, eYourServiceRegionpelos próprios valores do aplicativo, da chave da API de fala e da regiãoAcrescente o snippet de código a seguir ao final do corpo do método de
InitializeDialogServiceConnector// // This code sets up handlers for events relied on by `DialogServiceConnector` to communicate its activities, // speech recognition results, and other information. // // ActivityReceived is the main way your client will receive messages, audio, and events connector.ActivityReceived += (sender, activityReceivedEventArgs) => { NotifyUser( $"Activity received, hasAudio={activityReceivedEventArgs.HasAudio} activity={activityReceivedEventArgs.Activity}"); if (activityReceivedEventArgs.HasAudio) { SynchronouslyPlayActivityAudio(activityReceivedEventArgs.Audio); } }; // Canceled will be signaled when a turn is aborted or experiences an error condition connector.Canceled += (sender, canceledEventArgs) => { NotifyUser($"Canceled, reason={canceledEventArgs.Reason}"); if (canceledEventArgs.Reason == CancellationReason.Error) { NotifyUser( $"Error: code={canceledEventArgs.ErrorCode}, details={canceledEventArgs.ErrorDetails}"); } }; // Recognizing (not 'Recognized') will provide the intermediate recognized text // while an audio stream is being processed connector.Recognizing += (sender, recognitionEventArgs) => { NotifyUser($"Recognizing! in-progress text={recognitionEventArgs.Result.Text}"); }; // Recognized (not 'Recognizing') will provide the final recognized text // once audio capture is completed connector.Recognized += (sender, recognitionEventArgs) => { NotifyUser($"Final speech to text result: '{recognitionEventArgs.Result.Text}'"); }; // SessionStarted will notify when audio begins flowing to the service for a turn connector.SessionStarted += (sender, sessionEventArgs) => { NotifyUser($"Now Listening! Session started, id={sessionEventArgs.SessionId}"); }; // SessionStopped will notify when a turn is complete and // it's safe to begin listening again connector.SessionStopped += (sender, sessionEventArgs) => { NotifyUser($"Listening complete. Session ended, id={sessionEventArgs.SessionId}"); };Adicione o snippet de código a seguir ao método
ListenButton_ButtonClickedna classeMainPage// This code sets up `DialogServiceConnector` to listen, since you already established the configuration and // registered the event handlers. if (connector == null) { InitializeDialogServiceConnector(); // Optional step to speed up first interaction: if not called, // connection happens automatically on first use var connectTask = connector.ConnectAsync(); } try { // Start sending audio await connector.ListenOnceAsync(); } catch (Exception ex) { NotifyUser($"Exception: {ex.ToString()}", NotifyType.ErrorMessage); }Na barra de menus, escolha Arquivo>Salvar Tudo para salvar as suas alterações
Experimente
Na barra de menus, escolha Compilar>Compilar Solução para compilar o aplicativo. O código deve compilar sem erros.
Escolha Depurar>Iniciar Depuração (ou pressione F5) para iniciar o aplicativo. A janela helloworld é exibida.
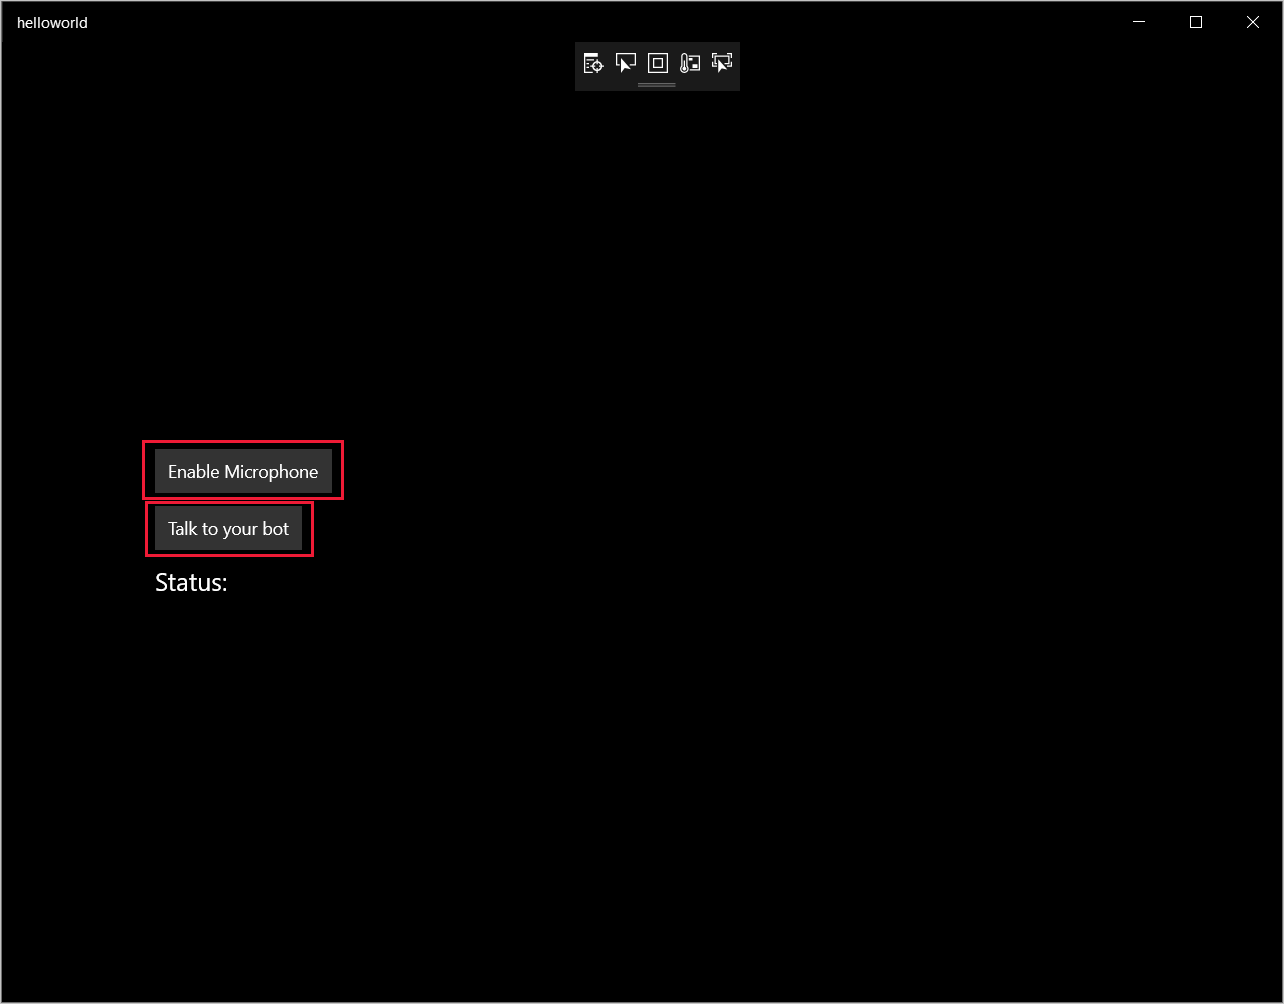
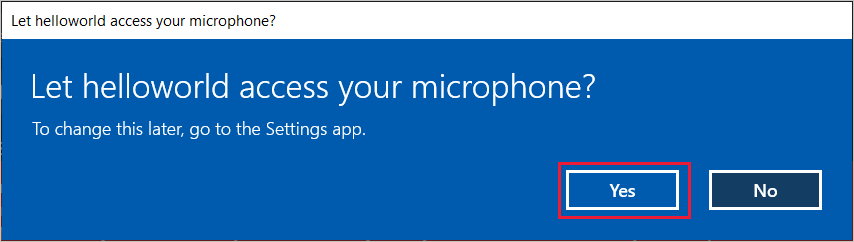
Selecione Habilitar Microfone. Se a solicitação de permissão de acesso for exibida, selecione Sim.
Selecione Falar e fale uma frase ou uma sentença em inglês no microfone do dispositivo. Sua fala será transmitida para o canal de Fala do Direct Line e transcrita em texto, que será exibida na janela.