Adicionar notificações push à sua app iOS
Descrição Geral
Neste tutorial, adiciona notificações push ao projeto de arranque rápido do iOS para que seja enviada uma notificação push para o dispositivo sempre que um registo é inserido.
Se não utilizar o projeto do servidor quickstart descarregado, necessitará do pacote de extensão de notificação push. Para obter mais informações, consulte Work with the .NET backend server SDK for Azure Mobile Apps guide.
O simulador iOS não suporta notificações push. Precisa de um dispositivo físico iOS e de um programa apple developer.
Centro de Notificação Configure
A funcionalidade de Aplicações Móveis de Serviço de Aplicações do Azure utiliza hubs de notificação Azure para enviar pushes, pelo que estará a configurar um centro de notificações para a sua aplicação móvel.
No portal do Azure, vá aos Serviços de Aplicações e, em seguida, selecione a sua app de volta. Em Definições, selecione Push.
Para adicionar um recurso de hub de notificação à aplicação, selecione Connect. Pode criar um hub ou ligar-se a um existente.
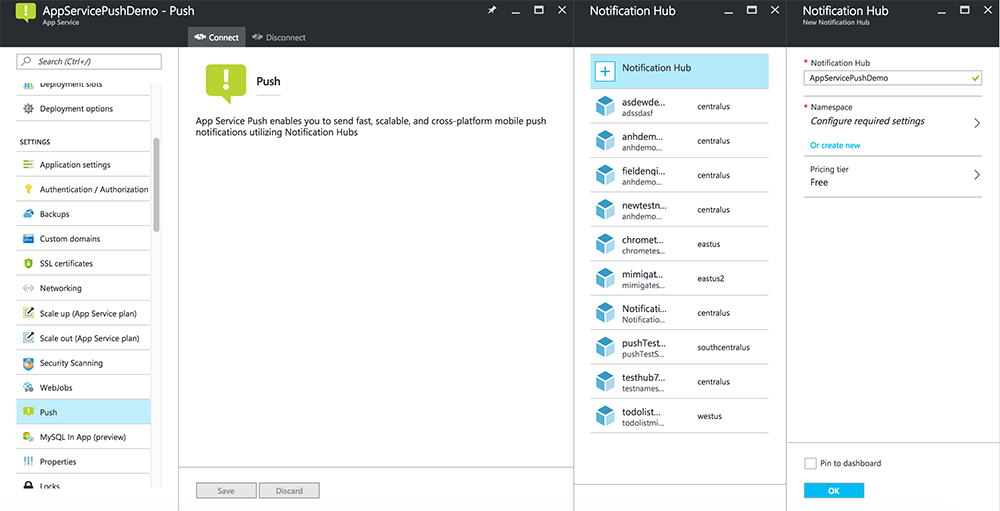
Agora ligou um centro de notificação ao seu projeto de back-end de Aplicações Móveis. Mais tarde, configura este centro de notificação para ligar a um sistema de notificação da plataforma (PNS) para empurrar para os dispositivos.
Registar aplicativo para notificações push
- Registe uma identificação de aplicativo para a sua aplicação. Crie um ID de aplicação explícito (não um ID de aplicativo wildcard) e, para o Bundle ID, use o ID do pacote exato que está no seu projeto quickstart Xcode. Também é crucial que selecione a opção 'Notificações push '.
- Em seguida, para preparar a configuração de notificações push, crie um certificado SSL de "Desenvolvimento" ou "Distribuição".
Configure Azure para enviar notificações push
- No seu Mac, lance o Keychain Access. Na barra de navegação à esquerda, na categoria, abra os Meus Certificados. Encontre o certificado SSL que descarregou na secção anterior e, em seguida, divulgue o seu conteúdo. Selecione apenas o certificado (não selecione a chave privada). Em seguida, exportá-lo.
- No portal do Azure, selecione Browse All>App Services. Em seguida, selecione as suas Aplicações Móveis de volta.
- Em Definições, selecione Serviço de Aplicações Push. Em seguida, selecione o nome do seu centro de notificação.
- Vá aoCertificado de Uploadde Serviços> de Notificação Apple Push. Faça o upload do ficheiro .p12, selecionando o modo correto (dependendo se o certificado SSL do seu cliente anteriormente é de produção ou caixa de areia). Guarde quaisquer alterações.
O seu serviço está agora configurado para trabalhar com notificações push no iOS.
Atualizar backend para enviar notificações push
.NET backend (C#):
No Estúdio Visual, clique com o botão direito no projeto do servidor e clique em Gerir Pacotes NuGet, procurar
Microsoft.Azure.NotificationHubse, em seguida, clicar em Instalar. Isto instala a biblioteca 'Centros de Notificação' para o envio de notificações do seu backend.No projeto do Backend Visual Studio, os controladores abertos>TodoItemController.cs. No topo do ficheiro, adicione a seguinte
usingdeclaração:using Microsoft.Azure.Mobile.Server.Config; using Microsoft.Azure.NotificationHubs;Substitua o método
PostTodoItempelo código abaixo:public async Task<IHttpActionResult> PostTodoItem(TodoItem item) { TodoItem current = await InsertAsync(item); // Get the settings for the server project. HttpConfiguration config = this.Configuration; MobileAppSettingsDictionary settings = this.Configuration.GetMobileAppSettingsProvider().GetMobileAppSettings(); // Get the Notification Hubs credentials for the Mobile App. string notificationHubName = settings.NotificationHubName; string notificationHubConnection = settings .Connections[MobileAppSettingsKeys.NotificationHubConnectionString].ConnectionString; // Create a new Notification Hub client. NotificationHubClient hub = NotificationHubClient .CreateClientFromConnectionString(notificationHubConnection, notificationHubName); // iOS payload var appleNotificationPayload = "{\"aps\":{\"alert\":\"" + item.Text + "\"}}"; try { // Send the push notification and log the results. var result = await hub.SendAppleNativeNotificationAsync(appleNotificationPayload); // Write the success result to the logs. config.Services.GetTraceWriter().Info(result.State.ToString()); } catch (System.Exception ex) { // Write the failure result to the logs. config.Services.GetTraceWriter() .Error(ex.Message, null, "Push.SendAsync Error"); } return CreatedAtRoute("Tables", new { id = current.Id }, current); }Republicar o projeto do servidor.
Back-end do Node.js:
Crie o seu projeto de backend.
Substitua o todoitem.js script da tabela pelo seguinte código:
var azureMobileApps = require('azure-mobile-apps'),
    promises = require('azure-mobile-apps/src/utilities/promises'),
    logger = require('azure-mobile-apps/src/logger');

var table = azureMobileApps.table();

// When adding record, send a push notification via APNS
table.insert(function (context) {
    // For details of the Notification Hubs JavaScript SDK,
    // see https://aka.ms/nodejshubs
    logger.info('Running TodoItem.insert');

    // Create a payload that contains the new item Text.
    var payload = "{\"aps\":{\"alert\":\"" + context.item.text + "\"}}";

    // Execute the insert; Push as a post-execute action when results are returned as a Promise.
    return context.execute()
        .then(function (results) {
            // Only do the push if configured
            if (context.push) {
                context.push.apns.send(null, payload, function (error) {
                    if (error) {
                        logger.error('Error while sending push notification: ', error);
                    } else {
                        logger.info('Push notification sent successfully!');
                    }
                });
            }
            return results;
        })
        .catch(function (error) {
            logger.error('Error while running context.execute: ', error);
        });
});

module.exports = table;
Ao editar o ficheiro no seu computador local, reebine o projeto do servidor.
Adicionar notificações push à app
Objetivo C:
No QSAppDeegate.m, importe o iOS SDK e qSTodoService.h:
#import <MicrosoftAzureMobile/MicrosoftAzureMobile.h>
#import "QSTodoService.h"
Em
didFinishLaunchingWithOptionsQSAppDeegate.m, insira as seguintes linhas imediatamente antesreturn YES;:UIUserNotificationSettings* notificationSettings = [UIUserNotificationSettings settingsForTypes:UIUserNotificationTypeAlert | UIUserNotificationTypeBadge | UIUserNotificationTypeSound categories:nil]; [[UIApplication sharedApplication] registerUserNotificationSettings:notificationSettings]; [[UIApplication sharedApplication] registerForRemoteNotifications];No QSAppDeegate.m, adicione os seguintes métodos de manipulador. A sua aplicação está agora atualizada para suportar notificações push.
// Registration with APNs is successful
- (void)application:(UIApplication *)application
didRegisterForRemoteNotificationsWithDeviceToken:(NSData *)deviceToken {

    QSTodoService *todoService = [QSTodoService defaultService];
    MSClient *client = todoService.client;

    [client.push registerDeviceToken:deviceToken completion:^(NSError *error) {
        if (error != nil) {
            NSLog(@"Error registering for notifications: %@", error);
        }
    }];
}

// Handle any failure to register
- (void)application:(UIApplication *)application didFailToRegisterForRemoteNotificationsWithError:
(NSError *)error {
    NSLog(@"Failed to register for remote notifications: %@", error);
}

// Use userInfo in the payload to display an alert.
- (void)application:(UIApplication *)application
        didReceiveRemoteNotification:(NSDictionary *)userInfo {
    NSLog(@"%@", userInfo);

    NSDictionary *apsPayload = userInfo[@"aps"];
    NSString *alertString = apsPayload[@"alert"];

    // Create alert with notification content.
    UIAlertController *alertController = [UIAlertController
                                    alertControllerWithTitle:@"Notification"
                                    message:alertString
                                    preferredStyle:UIAlertControllerStyleAlert];

    UIAlertAction *cancelAction = [UIAlertAction
                                    actionWithTitle:NSLocalizedString(@"Cancel", @"Cancel")
                                    style:UIAlertActionStyleCancel
                                    handler:^(UIAlertAction *action)
                                    {
                                        NSLog(@"Cancel");
                                    }];

    UIAlertAction *okAction = [UIAlertAction
                                actionWithTitle:NSLocalizedString(@"OK", @"OK")
                                style:UIAlertActionStyleDefault
                                handler:^(UIAlertAction *action)
                                {
                                    NSLog(@"OK");
                                }];

    [alertController addAction:cancelAction];
    [alertController addAction:okAction];

    // Get current view controller.
    UIViewController *currentViewController = [[[[UIApplication sharedApplication] delegate] window] rootViewController];
    while (currentViewController.presentedViewController)
    {
        currentViewController = currentViewController.presentedViewController;
    }

    // Display alert.
    [currentViewController presentViewController:alertController animated:YES completion:nil];

}
Rápido:
Adicione ficheiro ClienteManager.swift com os seguintes conteúdos. Substitua %AppUrl% pelo URL do backend da Aplicação Móvel Azure.
class ClientManager {
    static let sharedClient = MSClient(applicationURLString: "%AppUrl%")
}
No ToDoTableViewController.swift, substitua a
let clientlinha que inicializa umaMSClientcom esta linha:let client = ClientManager.sharedClientNo AppDeegate.swift, substitua o corpo da
func applicationseguinte forma:func application(application: UIApplication, didFinishLaunchingWithOptions launchOptions: [NSObject: AnyObject]?) -> Bool { application.registerUserNotificationSettings( UIUserNotificationSettings(forTypes: [.Alert, .Badge, .Sound], categories: nil)) application.registerForRemoteNotifications() return true }No AppDeegate.swift, adicione os seguintes métodos de manipulador. A sua aplicação está agora atualizada para suportar notificações push.
func application(application: UIApplication,
    didRegisterForRemoteNotificationsWithDeviceToken deviceToken: NSData) {
    ClientManager.sharedClient.push?.registerDeviceToken(deviceToken) { error in
        print("Error registering for notifications: ", error?.description)
    }
}

func application(application: UIApplication,
    didFailToRegisterForRemoteNotificationsWithError error: NSError) {
    print("Failed to register for remote notifications: ", error.description)
}

func application(application: UIApplication,
    didReceiveRemoteNotification userInfo: [NSObject: AnyObject]) {

    print(userInfo)

    let apsNotification = userInfo["aps"] as? NSDictionary
    let apsString       = apsNotification?["alert"] as? String

    let alert = UIAlertController(title: "Alert", message: apsString, preferredStyle: .Alert)
    let okAction = UIAlertAction(title: "OK", style: .Default) { _ in
        print("OK")
    }
    let cancelAction = UIAlertAction(title: "Cancel", style: .Default) { _ in
        print("Cancel")
    }

    alert.addAction(okAction)
    alert.addAction(cancelAction)

    var currentViewController = self.window?.rootViewController
    while currentViewController?.presentedViewController != nil {
        currentViewController = currentViewController?.presentedViewController
    }

    currentViewController?.presentViewController(alert, animated: true) {}

}
Teste notificações push
- No Xcode, prima Executar e inicie a aplicação num dispositivo iOS (note que o push não funcionará em simuladores). Clique em OK para aceitar notificações push; este pedido ocorre na primeira vez que a aplicação é executado.
- Na aplicação, adicione um novo item e clique +.
- Verifique se uma notificação é recebida e, em seguida, clique em OK para rejeitar a notificação. Já concluiu este tutorial com sucesso.
Mais
- Os modelos dão-lhe flexibilidade para enviar impulsos de plataforma cruzada e impulsos localizados. Como utilizar a biblioteca de clientes iOS para aplicações móveis Azure mostra-lhe como registar modelos.