Use column formatting to customize SharePoint
You can use column formatting to customize how fields in SharePoint lists and libraries are displayed. To do this, you construct a JSON object that describes the elements that are displayed when a field is included in a list view, and the styles to be applied to those elements. The column formatting doesn't change the data in the list item or file; it only changes how it’s displayed to users who browse the list. Anyone who can create and manage views in a list can use column formatting to configure how view fields are displayed.
For example, a list with the fields Title, Effort, Assigned To, and Status with no customizations applied might look like this:

A list with the appearance of the Effort, Assigned To, and Status fields customized via column formatting might look like this:

Tip
Samples demonstrated in this article and numerous other community samples are available from a GitHub repository dedicated for open-sourced column formatting definitions. You can find these samples from the sp-dev-column-formatting repository at SharePoint GitHub organization.
How is column formatting different than the Field Customizer?
Both column formatting and SharePoint Framework Field Customizer extensions enable you to customize how fields in SharePoint lists are displayed. The Field Customizer is more powerful because you can use it to write any code that you want to control how a field is displayed.
Column formatting is more easily and broadly applied. However, it's less flexible, because it doesn't allow for custom code; it only allows for certain predefined elements and attributes.
The following table compares column formatting and the Field Customizer.
| Field type | Column formatting | Field Customizer |
|---|---|---|
| Conditional formatting based on item values and value ranges | Supported | Supported |
| Action links | Support for static hyperlinks that don't launch script | Support for any hyperlink, including those that invoke custom script |
| Data visualizations | Support for simple visualizations that can be expressed using HTML and CSS | Support for arbitrary data visualizations |
If you can accomplish your scenario by using column formatting, it’s typically quicker and easier to do that than to use a Field Customizer. Anyone who can create and manage views in a list can use column formatting to create and publish customizations. Use a Field Customizer for more advanced scenarios that column formatting doesn't support.
Get started with column formatting
To open the column formatting pane, open the drop-down menu under a column. Under Column Settings, choose Format this column.
If no one has used column formatting on the column you selected, the pane will look like the following.
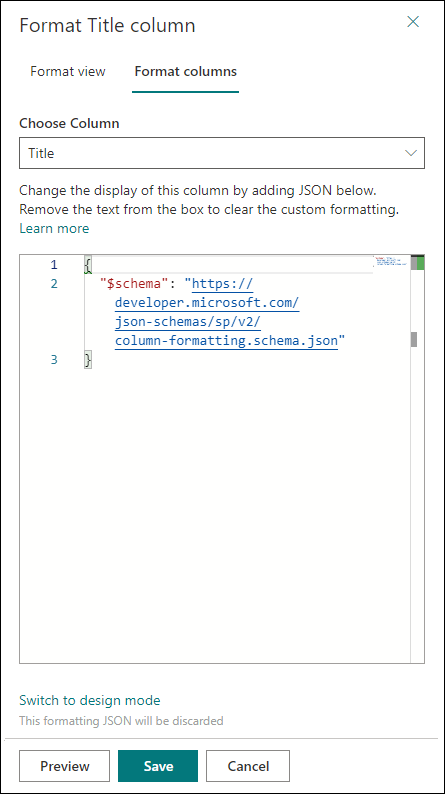
A field with no formatting specified uses the default rendering. To format a column, enter the column formatting JSON in the box.
To preview the formatting, select Preview. To commit your changes, select Save. When you save, anyone who views the list will see the customization that you applied.
The easiest way to use column formatting is to start from an example and edit it to apply to your specific field. The following sections contain examples that you can copy, paste, and edit for your scenarios. There are also several samples available in the SharePoint/sp-dev-column-formatting repository.
Note
All examples in this document refer to the JSON schema used in SharePoint Online and SharePoint Server Subscription Edition starting with the Version 22H2 feature update. To format columns in SharePoint 2019 or SharePoint Server Subscription Edition before the Version 22H2 feature update, please use https://developer.microsoft.com/json-schemas/sp/v1/column-formatting.schema.json as the schema.
Display field values (basic)
The simplest column formatting is one that places the value of the field inside a <div /> element. This example works for number, text, choice, and date fields:
{
   "$schema": "https://developer.microsoft.com/json-schemas/sp/v2/column-formatting.schema.json",
   "elmType": "div",
   "txtContent": "@currentField"
}
Some field types require a bit of extra work to retrieve their values. Person fields are represented in the system as objects, and a person’s display name is contained within that object’s title property. This is the same example, modified to work with the person field:
{
   "$schema": "https://developer.microsoft.com/json-schemas/sp/v2/column-formatting.schema.json",
   "elmType": "div",
   "txtContent": "@currentField.title"
}
Lookup fields are also represented as objects; the display text is stored in the lookupValue property. This example works with a lookup field:
{
   "$schema": "https://developer.microsoft.com/json-schemas/sp/v2/column-formatting.schema.json",
   "elmType": "div",
   "txtContent": "@currentField.lookupValue"
}
Apply conditional formatting
You can use column formatting to apply styles, classes, and icons to fields, depending on the value inside those fields.
Conditional formatting based on a number range (basic)
The following image shows an example of conditional formatting applied to a number range.
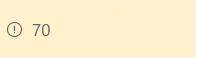
This example uses an Excel-style conditional expression (=if) to apply a class (sp-field-severity--warning) to the parent <div /> element when the value in the current field is less than or equal to 70. This causes the field to be highlighted when the value is less than or equal to 70, and appear normally if it's greater than 70.
{
  "$schema": "https://developer.microsoft.com/json-schemas/sp/v2/column-formatting.schema.json",
  "elmType": "div",
  "attributes": {
    "class": "=if(@currentField <= 70,'sp-field-severity--warning', '')"
  },
  "children": [
    {
      "elmType": "span",
      "style": {
        "display": "inline-block",
        "padding": "0 4px"
      },
      "attributes": {
        "iconName": "=if(@currentField <= 70,'Error', '')"
      }
    },
    {
      "elmType": "span",
      "txtContent": "@currentField"
    }
  ]
}
Conditional formatting based on the value in a text or choice field (advanced)
The following image shows an example of conditional formatting applied to a text or choice field:
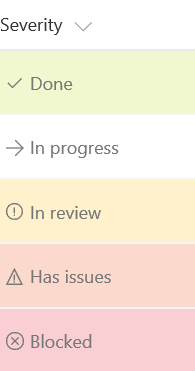
You can apply conditional formatting to text or choice fields that might contain a fixed set of values. The following example applies different classes depending on whether the value of the field is Done, In Review, Has Issues, or another value. This example applies a CSS class (sp-field-severity--low, sp-field-severity--good, sp-field-severity--warning, sp-field-severity--severeWarning, sp-field-severity--blocked) to the <div /> based on the field's value. It then outputs a <span /> element with an IconName attribute. This attribute automatically applies another CSS class to that <span /> that shows an Fluent UI icon inside that element. Finally, another <span /> element is output that contains the value inside the field.
This pattern is useful when you want different values to map to different levels of urgency or severity. You can start from this example and edit it to specify your own field values and the styles and icons that should map to those values.
{
  "$schema": "https://developer.microsoft.com/json-schemas/sp/v2/column-formatting.schema.json",
  "elmType": "div",
  "attributes": {
    "class": "=if(@currentField == 'Done', 'sp-field-severity--good', if(@currentField == 'In progress', 'sp-field-severity--low', if(@currentField == 'In review', 'sp-field-severity--warning', if(@currentField == 'Has issues', 'sp-field-severity--severeWarning', 'sp-field-severity--blocked')))) + ' ms-fontColor-neutralSecondary'"
  },
  "children": [
    {
      "elmType": "span",
      "style": {
        "display": "inline-block",
        "padding": "0 4px"
      },
      "attributes": {
        "iconName": "=if(@currentField == 'Done', 'CheckMark', if(@currentField == 'In progress', 'Forward', if(@currentField == 'In review', 'Error', if(@currentField == 'Has issues', 'Warning', 'ErrorBadge'))))"
      }
    },
    {
      "elmType": "span",
      "txtContent": "@currentField"
    }
  ]
}
Apply formatting based on date ranges
Because dates are often used to track deadlines and key project timelines, a common scenario is to apply formatting based on the value in a date/time field. To apply formatting based on the value in a date/time field, apply the following patterns.
Formatting an item when a date column is before or after today's date (advanced)
The following image shows a field with conditional date formatting applied:
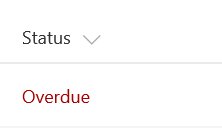
This example colors the current field red when the value inside an item's DueDate is before the current date/time. Unlike some of the previous examples, this example applies formatting to one field by looking at the value inside another field. Note that DueDate is referenced using the [$FieldName] syntax. FieldName is assumed to be the internal name of the field. This example also takes advantage of a special value that can be used in date/time fields - @now, which resolves to the current date/time, evaluated when the user loads the list view.
Note
If you have spaces in the field name, those are defined as _x0020_. For example, a field named "Due Date" should be referenced as $Due_x0020_Date.
{
  "$schema": "https://developer.microsoft.com/json-schemas/sp/v2/column-formatting.schema.json",
  "elmType": "div",
  "debugMode": true,
  "txtContent": "@currentField",
  "style": {
    "color": "=if([$DueDate] <= @now, '#ff0000', '')"
  }
}
Formatting items based on arbitrary dates (advanced)
To compare the value of a date/time field against a date that's not @now, follow the pattern in the following example. The following example colors the current field red if the due date was <= tomorrow. This is accomplished using date math. You can add milliseconds to any date and the result will be a new date. For example, to add a day to a date, you'd add (24*60*60*1000 = 86,400,000).
This example demonstrates an alternate syntax to express a conditional expression, using the ternary (?) operator inside an abstract syntax tree.
{
   "$schema": "https://developer.microsoft.com/json-schemas/sp/v2/column-formatting.schema.json",
   "elmType": "div",
   "txtContent": "@currentField",
   "style": {
      "color": {
         "operator": "?",
         "operands": [
            {
               "operator": "<=",
               "operands": [
                  "[$DueDate]",
                  {
                     "operator": "+",
                     "operands": [
                        "@now",
                        86400000
                     ]
                  }
               ]
            },
            "#ff0000",
            ""
         ]
      }
   }
}
Here's the same sample from above, using the Excel-style expression syntax:
{
   "$schema": "https://developer.microsoft.com/json-schemas/sp/v2/column-formatting.schema.json",
   "elmType": "div",
   "txtContent": "@currentField",
   "style": {
      "color": "=if([$DueDate] <= @now + 86400000, '#ff0000', '')"
   }
}
To compare a date/time field value against another date constant, use the Date() method to convert a string to a date. The following example colors the current field red if the value in the DueDate field is before 3/22/2017.
{
   "$schema": "https://developer.microsoft.com/json-schemas/sp/v2/column-formatting.schema.json",
   "elmType": "div",
   "txtContent": "@currentField",
   "style": {
      "color": {
         "operator": "?",
         "operands": [
            {
               "operator": "<=",
               "operands": [
                  "[$DueDate]",
                  {
                     "operator": "Date()",
                     "operands": [
                        "3/22/2017"
                     ]
                  }
               ]
            },
            "#ff0000",
            ""
         ]
      }
   }
}
Here's the same sample from above, using the Excel-style expression syntax:
{
   "$schema": "https://developer.microsoft.com/json-schemas/sp/v2/column-formatting.schema.json",
   "elmType": "div",
   "txtContent": "@currentField",
   "style": {
      "color": "=if([$DueDate] <= Date('3/22/2017'), '#ff0000', '')"
   }
}
Create clickable actions
You can use column formatting to provide hyperlinks that go to other webpages, or start custom functionality. This functionality is limited to static links that can be parameterized with values from fields in the list. You can't use column formatting to output links to protocols other than http://, https://, mailto: or tel:.
tel: protocol only allows digits, *+# special characters and .-/() visual separators.
Turn field values into hyperlinks (basic)
This example shows how to turn a text field that contains stock ticker symbols into a hyperlink that targets the Yahoo Finance real-time quotes page for that stock ticker. The example uses a + operator that appends the current field value to the static hyperlink http://finance.yahoo.com/quote/. You can extend this pattern to any scenario in which you want users to view contextual information related to an item, or you want to start a business process on the current item, as long as the information or process can be accessed via a hyperlink parameterized with values from the list item.

{
   "$schema": "https://developer.microsoft.com/json-schemas/sp/v2/column-formatting.schema.json",
   "elmType": "a",
   "txtContent": "@currentField",
   "attributes": {
      "target": "_blank",
      "href": "='http://finance.yahoo.com/quote/' + @currentField"
   }
}
Tip
In a List Web Part, the above anchor tag will navigate user to a new tab. In order to navigate within the same tab, add data-interception attribute and set it to on. More information about data-interception attibute.
Add an action button to a field (advanced)
The following image shows action buttons added to a field.

You can use column formatting to render quick action links next to fields. The following example, intended for a person field, renders two elements inside the parent <div /> element:
- A
<span />element that contains the person’s display name. - An
<a />element that opens a mailto: link that creates an email with a subject and body populated dynamically via item metadata. The<a />element is styled using thems-Icon,ms-Icon—Mail, andms-QuickActionFluent UI classes to make it look like a clickable email icon.
{
    "$schema": "https://developer.microsoft.com/json-schemas/sp/v2/column-formatting.schema.json",
    "elmType": "div",
    "children": [
        {
            "elmType": "span",
            "style": {
                "padding-right": "8px"
            },
            "txtContent": "@currentField.title"
        },
        {
            "elmType": "a",
            "style": {
                "text-decoration": "none"
            },
            "attributes": {
                "iconName": "Mail",
                "class": "sp-field-quickActions",
                "href": {
                    "operator": "+",
                    "operands": [
                        "mailto:",
                        "@currentField.email",
                        "?subject=Task status&body=Hey, how is your task coming along?.\r\n---\r\n",
                        "@currentField.title",
                        "\r\nClick this link for more info. http://contoso.sharepoint.com/sites/ConferencePrep/Tasks/Prep/DispForm.aspx?ID=",
                        "[$ID]"
                    ]
                }
            }
        }
    ]
}
Create simple data visualizations
Use column formatting to combine conditional and arithmetical operations to achieve basic data visualizations.
Format a number column as a data bar (advanced)
The following image shows a number column formatted as a data bar.
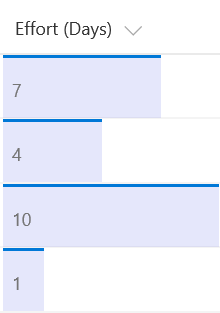
This example applies background-color and border-top styles to create a data bar visualization of @currentField, which is a number field. The bars are sized differently for different values based on the way the width attribute is set - it's set to 100% when the value is greater than 20, and (@currentField * 5)% otherwise. To fit this example to your number column, you can adjust the boundary condition (20) to match the maximum anticipated value inside the field, and change the equation to specify how much the bar should grow depending on the value inside the field.
{
  "$schema": "https://developer.microsoft.com/json-schemas/sp/v2/column-formatting.schema.json",
  "elmType": "div",
  "children": [
    {
      "elmType": "span",
      "txtContent": "@currentField",
      "style": {
        "padding-left": "8px",
        "white-space": "nowrap"
      }
    }
  ],
  "attributes": {
    "class": "sp-field-dataBars"
  },
  "style": {
    "padding": "0",
    "width": "=if(@currentField >= 20, '100%', (@currentField * 5) + '%')"
  }
}
Show trending up/trending down icons (advanced)
The following image shows a list with trending up/trending down icons added:
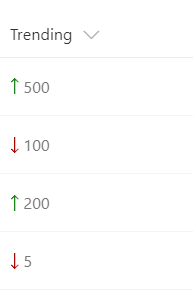
This example relies on two number fields, Before and After, for which the values can be compared. It shows the appropriate trending icon next to the After field, depending on that field's value compared to the value in Before. sp-field-trending--up is used when After's value is higher; sp-field-trending--down is used when After's value is lower.
{
    "$schema": "https://developer.microsoft.com/json-schemas/sp/v2/column-formatting.schema.json",
    "elmType": "div",
    "children": [
        {
            "elmType": "span",
            "attributes": {
                "class": {
                    "operator": "?",
                    "operands": [
                        {
                            "operator": ">",
                            "operands": [
                                "[$After]",
                                "[$Before]"
                            ]
                        },
                        "sp-field-trending--up",
                        "sp-field-trending--down"
                    ]
                },
                "iconName": {
                    "operator": "?",
                    "operands": [
                        {
                            "operator": ">",
                            "operands": [
                                "[$After]",
                                "[$Before]"
                            ]
                        },
                        "SortUp",
                        {
                            "operator": "?",
                            "operands": [
                                {
                                    "operator": "<",
                                    "operands": [
                                        "[$After]",
                                        "[$Before]"
                                    ]
                                },
                                "SortDown",
                                ""
                            ]
                        }
                    ]
                }
            }
        },
        {
            "elmType": "span",
            "txtContent": "[$After]"
        }
    ]
}
Here's the same sample from above, using the Excel-style expression syntax:
{
    "$schema": "https://developer.microsoft.com/json-schemas/sp/v2/column-formatting.schema.json",
    "elmType": "div",
    "children": [
        {
            "elmType": "span",
            "attributes": {
                "class": "=if([$After] > [$Before], 'sp-field-trending--up', 'sp-field-trending--down')",
                "iconName": "=if([$After] > [$Before], 'SortUp', if([$After] < [$Before], 'SortDown', ''))"
            }
        },
        {
            "elmType": "span",
            "txtContent": "[$After]"
        }
    ]
}
Formatting multi-value fields
You can use column formatting to apply styles to each member of a multi-value field of type Person, Lookup and Choice.
Basic text formatting
The following image shows an example of multi-value field formatting applied to a Person field.
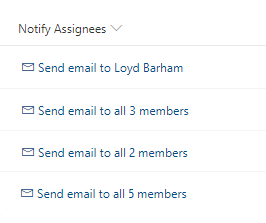
This example uses the length operator to detect the number of members of the field, and used join operator to concatenate the email addresses of all members. This example hides the button when no member is found, and takes care of plurals in the text.
{
    "$schema": "https://developer.microsoft.com/json-schemas/sp/v2/column-formatting.schema.json",
    "elmType": "a",
    "style": {
        "display": "=if(length(@currentField) > 0, 'flex', 'none')",
        "text-decoration": "none"
    },
    "attributes": {
        "href": {
            "operator": "+",
            "operands": [
                "mailto:",
                "=join(@currentField.email, ';')"
            ]
        }
    },
    "children": [
        {
            "elmType": "span",
            "style": {
                "display": "inline-block",
                "padding": "0 4px"
            },
            "attributes": {
                "iconName": "Mail"
            }
        },
        {
            "elmType": "span",
            "txtContent": {
                "operator": "+",
                "operands": [
                    "Send email to ",
                    {
                        "operator": "?",
                        "operands": [
                            "=length(@currentField) == 1",
                            "@currentField.title",
                            "='all ' + length(@currentField) + ' members'"
                        ]
                    }
                ]
            }
        }
    ]
}
Simple HTML elements formatting
The following image shows an example of constructing a simple sentence from the values of a multi-value Lookup field.
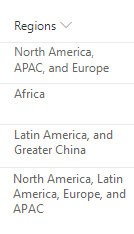
This example uses operator loopIndex and length to identify the last member of the field, and attribute forEach to duplicate HTML elements.
{
    "$schema": "https://developer.microsoft.com/json-schemas/sp/v2/column-formatting.schema.json",
    "elmType": "div",
    "style": {
        "display": "block"
    },
    "children": [
        {
            "elmType": "span",
            "forEach": "region in @currentField",
            "txtContent": {
               "operator": "?",
               "operands": [
                  "=loopIndex('region') == 0",
                  "[$region.lookupValue]",
                  {
                     "operator": "?",
                     "operands": [
                        "=loopIndex('region') + 1 == length(@currentField)",
                        "=', and ' + [$region.lookupValue]",
                        "=', ' + [$region.lookupValue]"
                     ]
                  }
               ]
            }
        }
    ]
}
Complex HTML elements formatting
The following image shows an example of building a list of users with pictures, email addresses and a simple counter for the number of members at the top.
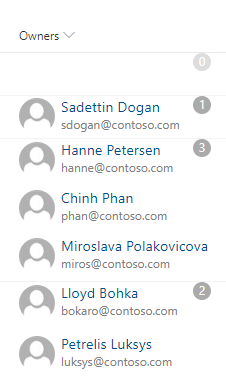
This example uses operator loopIndex to control the margins all rows but the first one, and attribute forEach to build the list of members.
{
    "$schema": "https://developer.microsoft.com/json-schemas/sp/v2/column-formatting.schema.json",
    "elmType": "div",
    "style": {
        "min-height": "1.5em",
        "flex-direction": "column",
        "align-items": "start"
    },
    "children": [
        {
            "elmType": "div",
            "txtContent": "=length(@currentField)",
            "style": {
                "border-radius": "1.5em",
                "height": "1.5em",
                "min-width": "1.5em",
                "color": "white",
                "text-align": "center",
                "position": "absolute",
                "top": "0",
                "right": "1em",
                "background-color": "=if(length(@currentField) == 0, '#ddd', '#aaa'"
            }
        },
        {
            "elmType": "div",
            "forEach": "person in @currentField",
            "style": {
                "justify-content": "center",
                "margin-top": "=if(loopIndex('person') == 0, '0', '1em')"
            },
            "children": [
                {
                    "elmType": "div",
                    "style": {
                        "display": "flex",
                        "flex-direction": "row",
                        "justify-content": "center"
                    },
                    "children": [
                        {
                            "elmType": "img",
                            "attributes": {
                                "src": "=getUserImage([$person.email], 'S')"
                            },
                            "style": {
                                "width": "3em",
                                "height": "3em",
                                "border-radius": "3em"
                            }
                        },
                        {
                            "elmType": "a",
                            "attributes": {
                                "href": "='mailto:' + [$person.email]"
                            },
                            "style": {
                                "margin-left": "0.5em"
                            },
                            "children": [
                                {
                                    "elmType": "div",
                                    "txtContent": "[$person.title]",
                                    "style": {
                                        "font-size": "1.2em"
                                    }
                                },
                                {
                                    "elmType": "div",
                                    "txtContent": "[$person.email]",
                                    "style": {
                                        "color": "gray"
                                    }
                                }
                            ]
                        }
                    ]
                }
            ]
        }
    ]
}
Supported column types
The following column types support column formatting:
- Calculated
- Choice
- ContentType
- Counter (ID)
- Currency
- Date/Time
- Hyperlink
- Image
- Location
- Lookup
- Multi-Choice
- Multi-Line Text
- Multi-Person
- Number
- Person or Group
- Picture
- Single line of text
- Title (in Lists)
- Yes/No
- Managed Metadata
- Average Rating
- Likes
- Approval Status
- Attachments
The following are currently not supported:
- Filename (in Document Libraries)
- Retention Label
- Sealed columns
- Multi-Line Text column with enhanced rich text
Style guidelines
Predefined classes
You can use the following predefined classes for several common scenarios.
| Class name | Screenshot |
|---|---|
| sp-field-customFormatBackground | Specifies the padding and margins for all classes that use backgrounds. |
| sp-field-severity--good |  |
| sp-field-severity--low |  |
| sp-field-severity--warning | 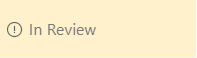 |
| sp-field-severity--severeWarning |  |
| sp-field-severity--blocked |  |
| sp-field-dataBars |  |
| sp-field-trending--up |  |
| sp-field-trending--down |  |
| sp-field-quickActions |  |
Note
The icons shown above for the sp-field-severity classes are NOT part of the class. Only the background color is included. Icons can be added by using the iconName attribute.
In addition to the classes listed above, the classes (such as the theme color, typography, grid system, etc.) defined by the Fluent UI can be used. For details, see the Fluent UI website.
Predefined icons
You can use predefined icons from Fluent UI. For details, see the Fluent UI website.
Creating custom JSON
Creating custom column formatting JSON from scratch is simple if user understands the schema, Monaco Editor is integrated in the formatting pane with pre-filled JSON column schema reference to help creation of column formatting, Monaco editor has validation and autocomplete to help in crafting right JSON. User can start adding JSON after the first line that defines the schema location.
Tip
At any point, select Ctrl+Space for property/value suggestions.
Tip
You can start from a HTML using formatter helper tool, which can convert HTML and CSS into formatter JSON with inline styles.
Tip
SharePoint Patterns and Practices provides a free web part, Column Formatter, that can be used to edit and apply formats directly in the browser.
See also
Feedback
Coming soon: Throughout 2024 we will be phasing out GitHub Issues as the feedback mechanism for content and replacing it with a new feedback system. For more information see: https://aka.ms/ContentUserFeedback.
Submit and view feedback for