Enable the Defender for Endpoint integration
Microsoft Defender for Cloud's integration with Microsoft Defender for Endpoint, provides a cloud-based endpoint security solution that offers a wide range of features. The integration provides risk-based vulnerability management and assessment, which helps identify and prioritize vulnerabilities that need to be addressed. The solution also includes attack surface reduction, which helps minimize the attack surface of endpoints, as well as behavioral-based and cloud-powered protection to detect and respond to threats. Additionally, Microsoft Defender for Endpoint offers endpoint detection and response (EDR), automatic investigation and remediation, and managed hunting services to help organizations quickly detect, investigate, and respond to security incidents.
Prerequisites
Before you can enable the Microsoft Defender for Endpoint integration with Defender for Cloud, you must confirm that your machine meets the necessary requirements for Defender for Endpoint:
Ensure the machine is connected to Azure and the internet as required:
Azure virtual machines (Windows or Linux) - Configure the network settings described in configure device proxy and internet connectivity settings: Windows or Linux.
On-premises machines - Connect your target machines to Azure Arc as explained in Connect hybrid machines with Azure Arc-enabled servers.
Enable Microsoft Defender for Servers. See Quickstart: Enable Defender for Cloud's enhanced security features.
Important
Defender for Cloud's integration with Microsoft Defender for Endpoint is enabled by default. So when you enable enhanced security features, you give consent for Microsoft Defender for Servers to access the Microsoft Defender for Endpoint data related to vulnerabilities, installed software, and alerts for your endpoints.
For Windows servers, make sure that your servers meet the requirements for onboarding Microsoft Defender for Endpoint.
For Linux servers, you must have Python installed. Python 3 is recommended for all distros, but is required for RHEL 8.x and Ubuntu 20.04 or higher. If needed, see Step-by-step Instructions for Installing Python on Linux.
If you've moved your subscription between Azure tenants, some manual preparatory steps are also required. For details, contact Microsoft support.
Enable the integration
Windows
The Defender for Endpoint unified solution doesn't use or require installation of the Log Analytics agent. The unified solution is automatically deployed for Azure Windows 2012 R2 and 2016 servers, Windows servers connected through Azure Arc, and Windows multicloud servers connected through the multicloud connectors.
You'll deploy Defender for Endpoint to your Windows machines in one of two ways - depending on whether you've already deployed it to your Windows machines:
- Users with Defender for Servers enabled and Microsoft Defender for Endpoint deployed
- Users who never enabled the integration with Microsoft Defender for Endpoint
Users with Defender for Servers enabled and Microsoft Defender for Endpoint deployed
If you've already enabled the integration with Defender for Endpoint, you have complete control over when and whether to deploy the Defender for Endpoint unified solution to your Windows machines.
To deploy the Defender for Endpoint unified solution, you need to use the REST API call or the Azure portal:
From Defender for Cloud's menu, select Environment settings and select the subscription with the Windows machines that you want to receive Defender for Endpoint.
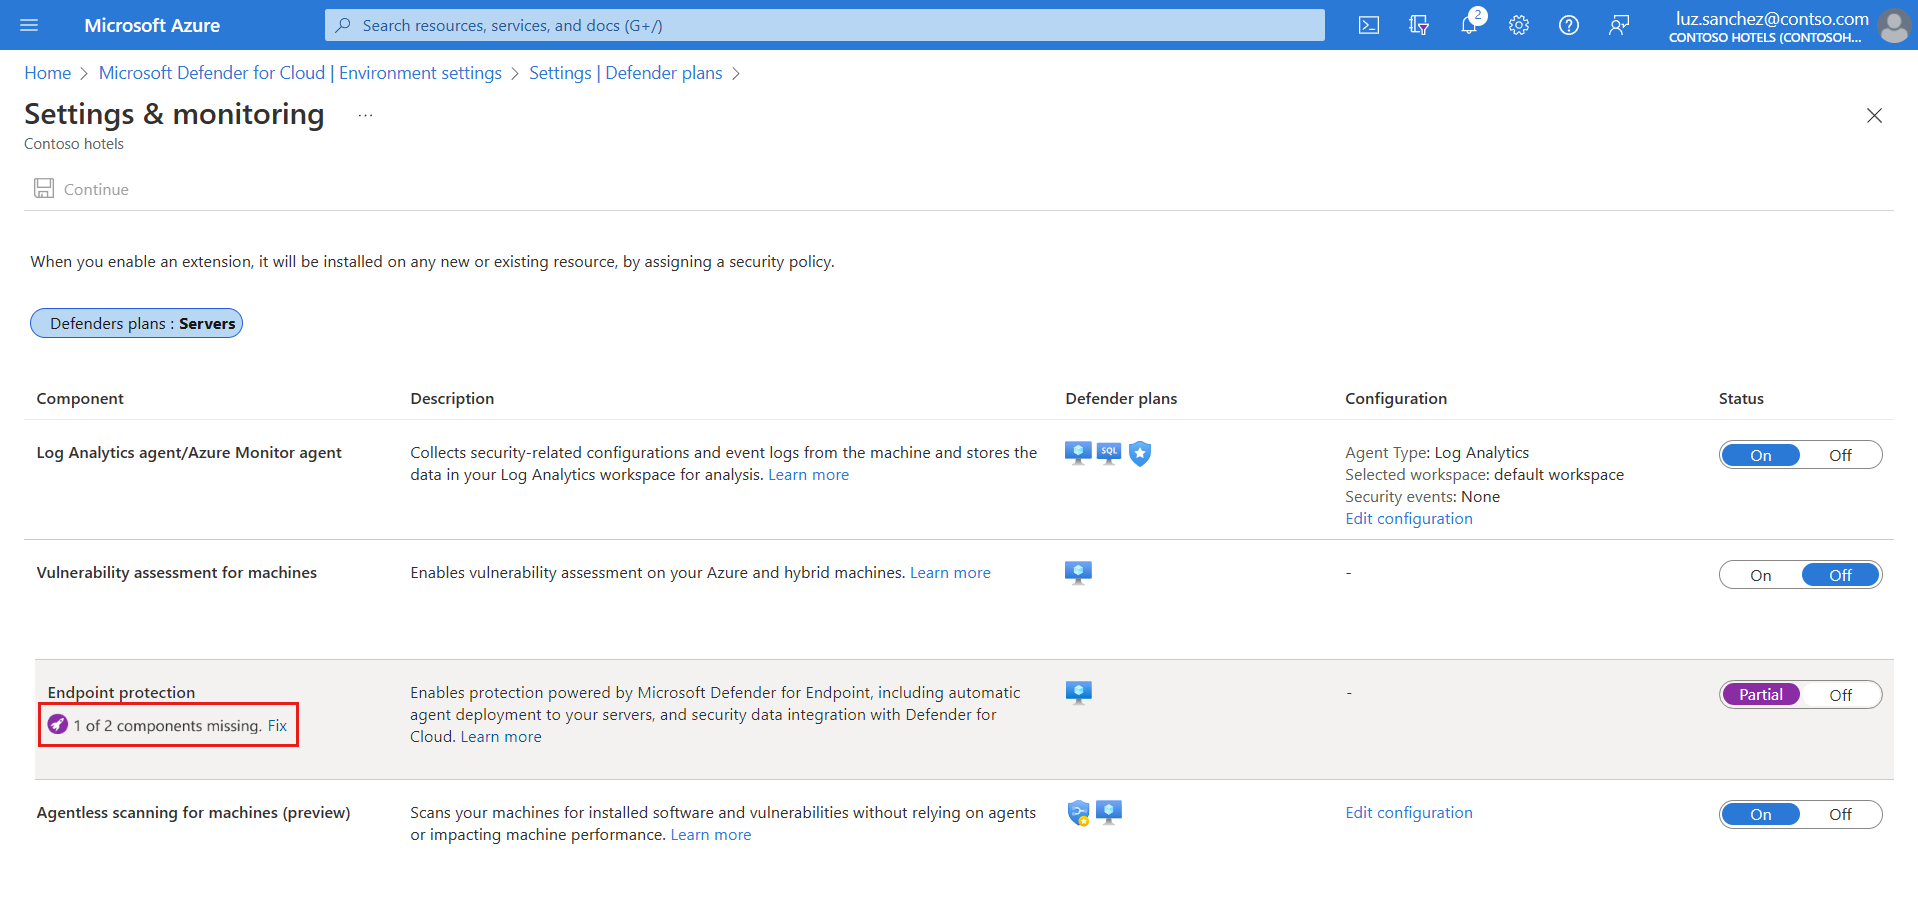
In the Monitoring coverage column of the Defender for Servers plan, select Settings.
The status of the Endpoint protections component is Partial, meaning that not all parts of the component are enabled.
Note
If the status is Off, use the instructions in Users who've never enabled the integration with Microsoft Defender for Endpoint for Windows.
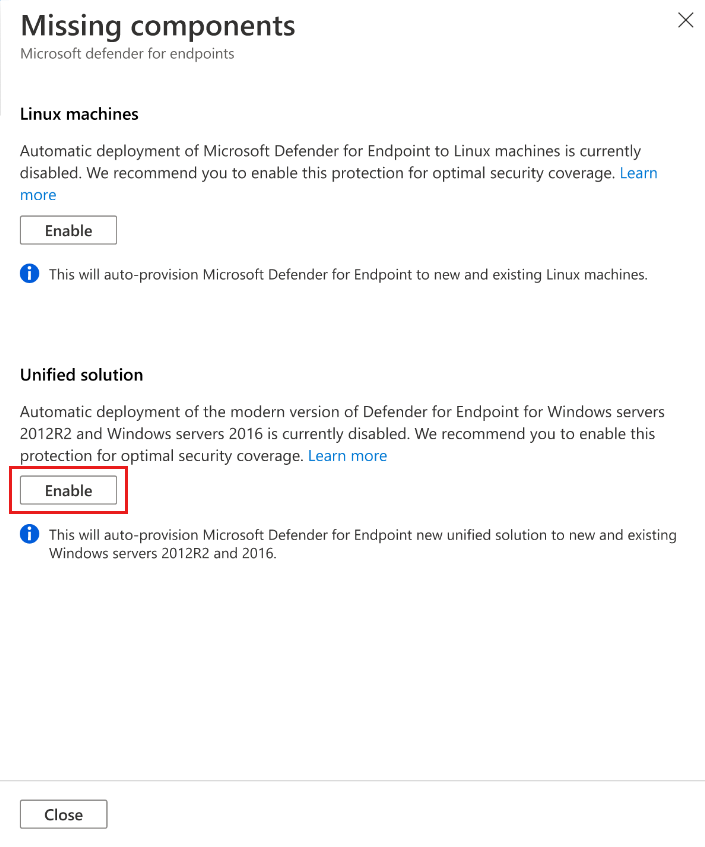
Select Fix to see the components that aren't enabled.
To enable the Unified solution for Windows Server 2012 R2 and 2016 machines, select Enable.
To save the changes, select Save at the top of the page and then select Continue in the Settings and monitoring page.
Microsoft Defender for Cloud will:
- Stop the existing Defender for Endpoint process in the Log Analytics agent that collects data for Defender for Servers.
- Install the Defender for Endpoint unified solution for all existing and new Windows Server 2012 R2 and 2016 machines.
Microsoft Defender for Cloud will automatically onboard your machines to Microsoft Defender for Endpoint. Onboarding might take up to 12 hours. For new machines created after the integration has been enabled, onboarding takes up to an hour.
Note
If you choose not to deploy the Defender for Endpoint unified solution to your Windows 2012 R2 and 2016 servers in Defender for Servers Plan 2 and then downgrade Defender for Servers to Plan 1, the Defender for Endpoint unified solution is not deployed to those servers so that your existing deployment is not changed without your explicit consent.
Users who never enabled the integration with Microsoft Defender for Endpoint for Windows
If you've never enabled the integration for Windows, Endpoint protection enables Defender for Cloud to deploy Defender for Endpoint to both your Windows and Linux machines.
To deploy the Defender for Endpoint unified solution, you'll need to use the REST API call or the Azure portal:
From Defender for Cloud's menu, select Environment settings and select the subscription with the machines that you want to receive Defender for Endpoint.
In the status of the Endpoint protection component, select On to enable the integration with Microsoft Defender for Endpoint.


The Defender for Endpoint agent unified solution is deployed to all of the machines in the selected subscription.
Linux
You'll deploy Defender for Endpoint to your Linux machines in one of these ways, depending on whether you've already deployed it to your Windows machines:
- Enable for a specific subscription in the Azure portal environment settings
- Enable for multiple subscriptions in the Azure portal dashboard
- Enable for multiple subscriptions with a PowerShell script
Note
When you enable automatic deployment, Defender for Endpoint for Linux installation will abort on machines with pre-existing running services using fanotify and other services that can also cause Defender for Endpoint to malfunction or might be affected by Defender for Endpoint, such as security services. After you validate potential compatibility issues, we recommend that you manually install Defender for Endpoint on these servers.
Existing users with Defender for Cloud's enhanced security features enabled and Microsoft Defender for Endpoint for Windows
If you've already enabled the integration with Defender for Endpoint for Windows, you have complete control over when and whether to deploy Defender for Endpoint to your Linux machines.
From Defender for Cloud's menu, select Environment settings and select the subscription with the Linux machines that you want to receive Defender for Endpoint.
In the Monitoring coverage column of the Defender for Server plan, select Settings.
The status of the Endpoint protections component is Partial, meaning that not all parts of the component are enabled.
Note
If the status is Off isn't selected, use the instructions in Users who've never enabled the integration with Microsoft Defender for Endpoint for Windows.
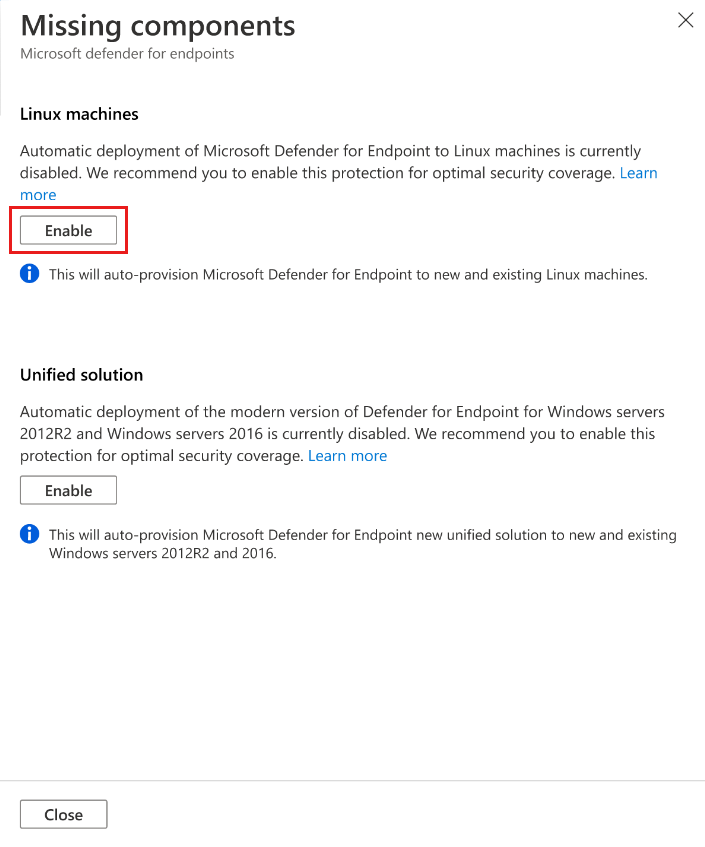
Select Fix to see the components that aren't enabled.
To enable deployment to Linux machines, select Enable.
To save the changes, select Save at the top of the page and then select Continue in the Settings and monitoring page.
Microsoft Defender for Cloud will:
- Automatically onboard your Linux machines to Defender for Endpoint
- Detect any previous installations of Defender for Endpoint and reconfigure them to integrate with Defender for Cloud
Microsoft Defender for Cloud will automatically onboard your machines to Microsoft Defender for Endpoint. Onboarding might take up to 12 hours. For new machines created after the integration has been enabled, onboarding takes up to an hour.
Note
The next time you return to this page of the Azure portal, the Enable for Linux machines button won't be shown. To disable the integration for Linux, you'll need to disable it for Windows too by turning the toggle off in Endpoint Protection, and selecting Continue.
To verify installation of Defender for Endpoint on a Linux machine, run the following shell command on your machines:
mdatp healthIf Microsoft Defender for Endpoint is installed, you'll see its health status:
healthy : truelicensed: trueAlso, in the Azure portal you'll see a new Azure extension on your machines called
MDE.Linux.
New users who never enabled the integration with Microsoft Defender for Endpoint for Windows
If you've never enabled the integration for Windows, endpoint protection enables Defender for Cloud to deploy Defender for Endpoint to both your Windows and Linux machines.
From Defender for Cloud's menu, select Environment settings and select the subscription with the Linux machines that you want to receive Defender for Endpoint.
In the Monitoring coverage column of the Defender for Server plan, select Settings.
In the status of the Endpoint protection component, select On to enable the integration with Microsoft Defender for Endpoint.
Microsoft Defender for Cloud will:
- Automatically onboard your Windows and Linux machines to Defender for Endpoint
- Detect any previous installations of Defender for Endpoint and reconfigure them to integrate with Defender for Cloud
Onboarding might take up to 1 hour.
Select Continue and Save to save your settings.
To verify installation of Defender for Endpoint on a Linux machine, run the following shell command on your machines:
mdatp healthIf Microsoft Defender for Endpoint is installed, you'll see its health status:
healthy : truelicensed: trueIn addition, in the Azure portal you'll see a new Azure extension on your machines called
MDE.Linux.
Enable on multiple subscriptions in the Azure portal dashboard
If one or more of your subscriptions don't have Endpoint protections enabled for Linux machines, you'll see an insight panel in the Defender for Cloud dashboard. The insight panel tells you about subscriptions that have Defender for Endpoint integration enabled for Windows machines, but not for Linux machines. You can use the insight panel to see the affected subscriptions with the number of affected resources in each subscription. Subscriptions that don't have Linux machines show no affected resources. You can then select the subscriptions to enable endpoint protection for Linux integration.
After you select Enable in the insight panel, Defender for Cloud:
- Automatically onboards your Linux machines to Defender for Endpoint in the selected subscriptions.
- Detects any previous installations of Defender for Endpoint and reconfigure them to integrate with Defender for Cloud.
Use the Defender for Endpoint status workbook to verify installation and deployment status of Defender for Endpoint on a Linux machine.
Enable on multiple subscriptions with a PowerShell script
Use our PowerShell script from the Defender for Cloud GitHub repository to enable endpoint protection on Linux machines that are in multiple subscriptions.
Manage automatic updates configuration for Linux
In Windows, Defender for Endpoint version updates are provided via continuous knowledge base updates; in Linux you need to update the Defender for Endpoint package. When you use Defender for Servers with the MDE.Linux extension, automatic updates for Microsoft Defender for Endpoint are enabled by default. If you wish to manage the Defender for Endpoint version updates manually, you can disable automatic updates on your machines. To do so, add the following tag for machines onboarded with the MDE.Linux extension.
- Tag name: 'ExcludeMdeAutoUpdate'
- Tag value: 'true'
This configuration is supported for Azure VMs and Azure Arc machines, where the MDE.Linux extension initiates auto-update.
Enable the Microsoft Defender for Endpoint unified solution at scale
You can also enable the Defender for Endpoint unified solution at scale through the supplied REST API version 2022-05-01. For full details, see the API documentation.
Here's an example request body for the PUT request to enable the Defender for Endpoint unified solution:
URI: https://management.azure.com/subscriptions/<subscriptionId>/providers/Microsoft.Security/settings/WDATP?api-version=2022-05-01
{
    "name": "WDATP",
    "type": "Microsoft.Security/settings",
    "kind": "DataExportSettings",
    "properties": {
        "enabled": true
    }
}
Track MDE deployment status
You can use the Defender for Endpoint deployment status workbook to track the Defender for Endpoint deployment status on your Azure VMs and non-Azure machines that are connected via Azure Arc. The interactive workbook provides an overview of machines in your environment showing their Microsoft Defender for Endpoint extension deployment status.
Access the Microsoft Defender for Endpoint portal
Ensure the user account has the necessary permissions. Learn more in Assign user access to Microsoft Defender Security Center.
Check whether you have a proxy or firewall that is blocking anonymous traffic. The Defender for Endpoint sensor connects from the system context, so anonymous traffic must be permitted. To ensure unhindered access to the Defender for Endpoint portal, follow the instructions in Enable access to service URLs in the proxy server.
Open the Microsoft Defender Portal. Learn about Microsoft Defender for Endpoint in Microsoft Defender XDR.
Send a test alert
To generate a benign test alert from Defender for Endpoint, select the tab for the relevant operating system of your endpoint:
Test on Windows
For endpoints running Windows:
Create a folder 'C:\test-MDATP-test'.
Use Remote Desktop to access your machine.
Open a command-line window.
At the prompt, copy and run the following command. The command prompt window will close automatically.
powershell.exe -NoExit -ExecutionPolicy Bypass -WindowStyle Hidden (New-Object System.Net.WebClient).DownloadFile('http://127.0.0.1/1.exe', 'C:\\test-MDATP-test\\invoice.exe'); Start-Process 'C:\\test-MDATP-test\\invoice.exe'
If the command is successful, you'll see a new alert on the workload protection dashboard and the Microsoft Defender for Endpoint portal. This alert might take a few minutes to appear.
To review the alert in Defender for Cloud, go to Security alerts > Suspicious PowerShell CommandLine.
From the investigation window, select the link to go to the Microsoft Defender for Endpoint portal.
Tip
The alert is triggered with Informational severity.
Test on Linux
For endpoints running Linux:
Download the test alert tool from: https://aka.ms/LinuxDIY
Extract the contents of the zip file and execute this shell script:
./mde_linux_edr_diyIf the command is successful, you'll see a new alert on the workload protection dashboard and the Microsoft Defender for Endpoint portal. This alert might take a few minutes to appear.
To review the alert in Defender for Cloud, go to Security alerts > Enumeration of files with sensitive data.
From the investigation window, select the link to go to the Microsoft Defender for Endpoint portal.
Tip
The alert is triggered with Low severity.
Remove Defender for Endpoint from a machine
To remove the Defender for Endpoint solution from your machines:
Disable the integration:
- From Defender for Cloud's menu, select Environment settings and select the subscription with the relevant machines.
- In the Defender plans page, select Settings & Monitoring.
- In the status of the Endpoint protection component, select Off to disable the integration with Microsoft Defender for Endpoint.
- Select Continue and Save to save your settings.
Remove the MDE.Windows/MDE.Linux extension from the machine.
Follow the steps in Offboard devices from the Microsoft Defender for Endpoint service from the Defender for Endpoint documentation.
Related content
Pripomienky
Pripravujeme: V priebehu roka 2024 postupne zrušíme službu Problémy v službe GitHub ako mechanizmus pripomienok týkajúcich sa obsahu a nahradíme ju novým systémom pripomienok. Ďalšie informácie nájdete na stránke: https://aka.ms/ContentUserFeedback.
Odoslať a zobraziť pripomienky pre