Quickstart: Deploy your first IoT Edge module to a virtual Linux device
Applies to: ![]() IoT Edge 1.5
IoT Edge 1.5 ![]() IoT Edge 1.4
IoT Edge 1.4
Important
IoT Edge 1.5 LTS and IoT Edge 1.4 LTS are supported releases. IoT Edge 1.4 LTS is end of life on November 12, 2024. If you are on an earlier release, see Update IoT Edge.
Test out Azure IoT Edge in this quickstart by deploying containerized code to a virtual Linux IoT Edge device. IoT Edge allows you to remotely manage code on your devices so that you can send more of your workloads to the edge. For this quickstart, we recommend using an Azure virtual machine for your IoT Edge device, which allows you to quickly create a test machine and then delete it when you're finished.
In this quickstart you learn how to:
- Create an IoT Hub.
- Register an IoT Edge device to your IoT hub.
- Install and start the IoT Edge runtime on a virtual device.
- Remotely deploy a module to an IoT Edge device.
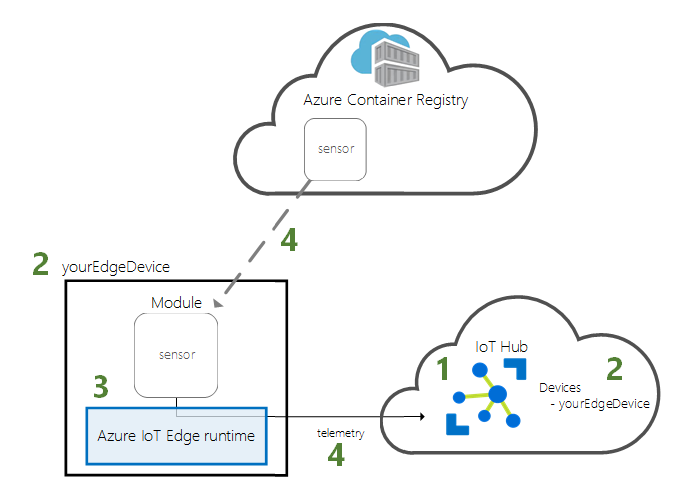
This quickstart walks you through creating a Linux virtual machine that's configured to be an IoT Edge device. Then, you deploy a module from the Azure portal to your device. The module used in this quickstart is a simulated sensor that generates temperature, humidity, and pressure data. The other Azure IoT Edge tutorials build upon the work you do here by deploying additional modules that analyze the simulated data for business insights.
If you don't have an active Azure subscription, create a free account before you begin.
Prerequisites
Prepare your environment for the Azure CLI.
Use the Bash environment in Azure Cloud Shell. For more information, see Quickstart for Bash in Azure Cloud Shell.

If you prefer to run CLI reference commands locally, install the Azure CLI. If you're running on Windows or macOS, consider running Azure CLI in a Docker container. For more information, see How to run the Azure CLI in a Docker container.
If you're using a local installation, sign in to the Azure CLI by using the az login command. To finish the authentication process, follow the steps displayed in your terminal. For other sign-in options, see Sign in with the Azure CLI.
When you're prompted, install the Azure CLI extension on first use. For more information about extensions, see Use extensions with the Azure CLI.
Run az version to find the version and dependent libraries that are installed. To upgrade to the latest version, run az upgrade.
Cloud resources:
A resource group to manage all the resources you use in this quickstart. We use the example resource group name IoTEdgeResources throughout this quickstart and the following tutorials.
az group create --name IoTEdgeResources --location westus2
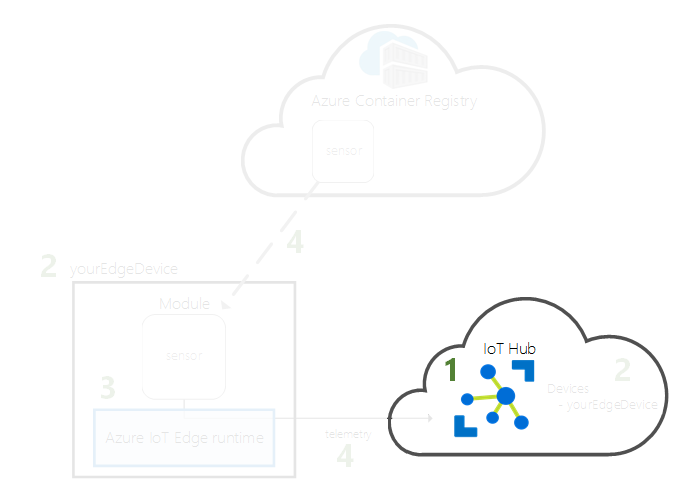
Create an IoT hub
Start the quickstart by creating an IoT hub with Azure CLI.
The free level of IoT Hub works for this quickstart. If you've used IoT Hub in the past and already have a hub created, you can use that IoT hub.
The following code creates a free F1 hub in the resource group IoTEdgeResources. Replace {hub_name} with a unique name for your IoT hub. It might take a few minutes to create an IoT Hub.
az iot hub create --resource-group IoTEdgeResources --name {hub_name} --sku F1 --partition-count 2
If you get an error because there's already one free hub in your subscription, change the SKU to S1. Each subscription can only have one free IoT hub. If you get an error that the IoT Hub name isn't available, it means that someone else already has a hub with that name. Try a new name.
Register an IoT Edge device
Register an IoT Edge device with your newly created IoT hub.
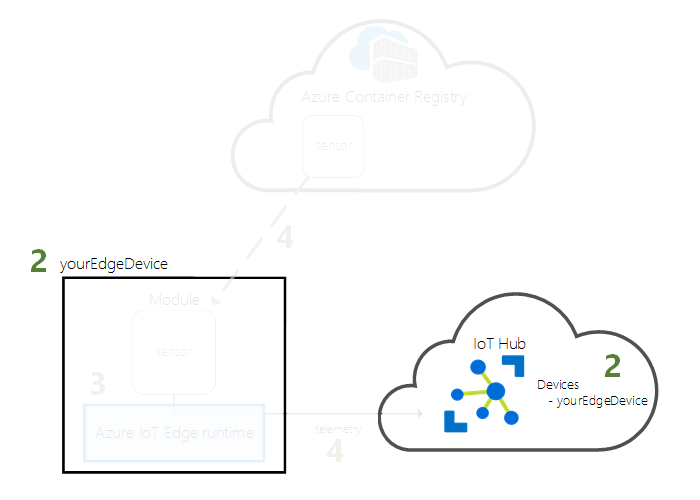
Create a device identity for your IoT Edge device so that it can communicate with your IoT hub. The device identity lives in the cloud, and you use a unique device connection string to associate a physical device to a device identity.
Since IoT Edge devices behave and can be managed differently than typical IoT devices, declare this identity to be for an IoT Edge device with the --edge-enabled flag.
In the Azure Cloud Shell, enter the following command to create a device named myEdgeDevice in your hub.
az iot hub device-identity create --device-id myEdgeDevice --edge-enabled --hub-name {hub_name}If you get an error about iothubowner policy keys, make sure that your Cloud Shell is running the latest version of the azure-iot extension.
View the connection string for your device, which links your physical device with its identity in IoT Hub. It contains the name of your IoT hub, the name of your device, and then a shared key that authenticates connections between the two. We'll refer to this connection string again in the next section when you set up your IoT Edge device.
az iot hub device-identity connection-string show --device-id myEdgeDevice --hub-name {hub_name}For example, your connection string should look similar to
HostName=contoso-hub.azure-devices.net;DeviceId=myEdgeDevice;SharedAccessKey=<DEVICE_SHARED_ACCESS_KEY>.
Configure your IoT Edge device
Create a virtual machine with the Azure IoT Edge runtime on it.
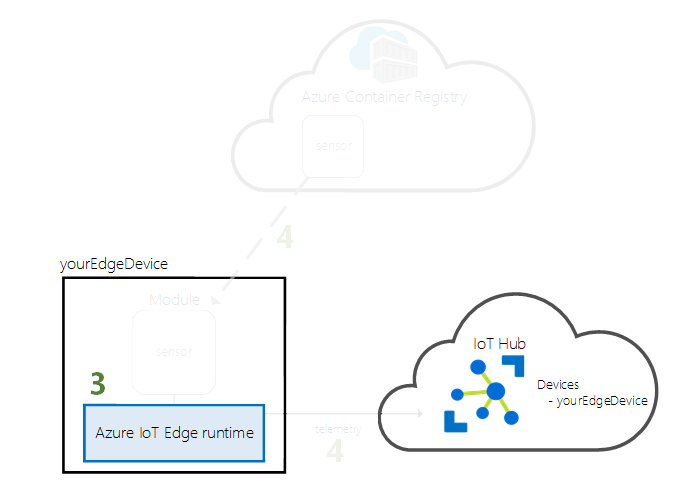
The IoT Edge runtime is deployed on all IoT Edge devices. It has three components. The IoT Edge security daemon starts each time an IoT Edge device boots and bootstraps the device by starting the IoT Edge agent. The IoT Edge agent facilitates deployment and monitoring of modules on the IoT Edge device, including the IoT Edge hub. The IoT Edge hub manages communications between modules on the IoT Edge device, and between the device and IoT Hub.
During the runtime configuration, you provide a device connection string. This is the string that you retrieved from the Azure CLI. This string associates your physical device with the IoT Edge device identity in Azure.
Deploy the IoT Edge device
This section uses an Azure Resource Manager template to create a new virtual machine and install the IoT Edge runtime on it. If you want to use your own Linux device instead, you can follow the installation steps in Manually provision a single Linux IoT Edge device, then return to this quickstart.
Use the Deploy to Azure button or the CLI commands to create your IoT Edge device based on the prebuilt iotedge-vm-deploy template.
Deploy using the IoT Edge Azure Resource Manager template.
For bash or Cloud Shell users, copy the following command into a text editor, replace the placeholder text with your information, then copy into your bash or Cloud Shell window:
az deployment group create \
--resource-group IoTEdgeResources \
--template-uri "https://raw.githubusercontent.com/Azure/iotedge-vm-deploy/main/edgeDeploy.json" \
--parameters dnsLabelPrefix='<REPLACE_WITH_VM_NAME>' \
--parameters adminUsername='azureUser' \
--parameters deviceConnectionString=$(az iot hub device-identity connection-string show --device-id myEdgeDevice --hub-name <REPLACE_WITH_HUB_NAME> -o tsv) \
--parameters authenticationType='password' \
--parameters adminPasswordOrKey="<REPLACE_WITH_PASSWORD>"
For PowerShell users, copy the following command into your PowerShell window, then replace the placeholder text with your own information:
az deployment group create `
--resource-group IoTEdgeResources `
--template-uri "https://raw.githubusercontent.com/Azure/iotedge-vm-deploy/main/edgeDeploy.json" `
--parameters dnsLabelPrefix='<REPLACE_WITH_VM_NAME>' `
--parameters adminUsername='azureUser' `
--parameters deviceConnectionString=$(az iot hub device-identity connection-string show --device-id myEdgeDevice --hub-name <REPLACE_WITH_HUB_NAME> -o tsv) `
--parameters authenticationType='password' `
--parameters adminPasswordOrKey="<REPLACE_WITH_PASSWORD>"
This template takes the following parameters:
| Parameter | Description |
|---|---|
| resource-group | The resource group in which the resources will be created. Use the default IoTEdgeResources that we've been using throughout this article or provide the name of an existing resource group in your subscription. |
| template-uri | A pointer to the Resource Manager template that we're using. |
| dnsLabelPrefix | A string that will be used to create the virtual machine's hostname. Replace the placeholder text with a name for your virtual machine. |
| adminUsername | A username for the admin account of the virtual machine. Use the example azureUser or provide a new username. |
| deviceConnectionString | The connection string from the device identity in IoT Hub, which is used to configure the IoT Edge runtime on the virtual machine. The CLI command within this parameter grabs the connection string for you. Replace the placeholder text with your IoT hub name. |
| authenticationType | The authentication method for the admin account. This quickstart uses password authentication, but you can also set this parameter to sshPublicKey. |
| adminPasswordOrKey | The password or value of the SSH key for the admin account. Replace the placeholder text with a secure password. Your password must be at least 12 characters long and have three of four of the following: lowercase characters, uppercase characters, digits, and special characters. |
Once the deployment is complete, you should receive JSON-formatted output in the CLI that contains the SSH information to connect to the virtual machine. Copy the value of the public SSH entry of the outputs section. For example, your SSH command should look similar to ssh azureUser@edge-vm.westus2.cloudapp.azure.com.
View the IoT Edge runtime status
The rest of the commands in this quickstart take place on your IoT Edge device itself, so that you can see what's happening on the device. If you're using a virtual machine, connect to that machine now using the admin username that you set up and the DNS name that was output by the deployment command. You can also find the DNS name on your virtual machine's overview page in the Azure portal. Use the following command to connect to your virtual machine. Replace {admin username} and {DNS name} with your own values.
ssh {admin username}@{DNS name}
Once connected to your virtual machine, verify that the runtime was successfully installed and configured on your IoT Edge device.
Check to see that IoT Edge is running. The following command should return a status of Ok if IoT Edge is running, or provide any service errors.
sudo iotedge system statusTip
You need elevated privileges to run
iotedgecommands. Once you sign out of your machine and sign back in the first time after installing the IoT Edge runtime, your permissions are automatically updated. Until then, usesudoin front of the commands.If you need to troubleshoot the service, retrieve the service logs.
sudo iotedge system logsView all the modules running on your IoT Edge device. Since the service just started for the first time, you should only see the edgeAgent module running. The edgeAgent module runs by default and helps to install and start any additional modules that you deploy to your device.
sudo iotedge list
Your IoT Edge device is now configured. It's ready to run cloud-deployed modules.
Deploy a module
Manage your Azure IoT Edge device from the cloud to deploy a module that will send telemetry data to IoT Hub.

One of the key capabilities of Azure IoT Edge is deploying code to your IoT Edge devices from the cloud. IoT Edge modules are executable packages implemented as containers. In this section, you'll deploy a pre-built module from the IoT Edge Modules section of Azure Marketplace directly from Azure IoT Hub.
The module that you deploy in this section simulates a sensor and sends generated data. This module is a useful piece of code when you're getting started with IoT Edge because you can use the simulated data for development and testing. If you want to see exactly what this module does, you can view the simulated temperature sensor source code.
Follow these steps to start the Set Modules wizard to deploy your first module from Azure Marketplace.
Sign in to the Azure portal and go to your IoT hub.
From the menu on the left, under Device Management, select Devices.
Select the device ID of the target IoT Edge device from the list.
When you create a new IoT Edge device, it will display the status code
417 -- The device's deployment configuration is not setin the Azure portal. This status is normal, and means that the device is ready to receive a module deployment.On the upper bar, select Set Modules.
Choose which modules you want to run on your device. You can choose from modules that you've already created, modules from Azure Marketplace, or modules that you've built yourself. In this quickstart, you'll deploy a module from Azure Marketplace.
Under IoT Edge Modules, open the Add drop-down menu, and then select Marketplace Module.
In IoT Edge Module Marketplace, search for and select the
Simulated Temperature Sensormodule. The module is added to the IoT Edge Modules section with the desired running status.Select Next: Routes to continue to configure routes.
A route named SimulatedTemperatureSensorToIoTHub was created automatically when you added the module from Azure Marketplace. This route sends all messages from the simulated temperature module to IoT Hub.
Select Next: Review + create.
Review the JSON file, and then select Create. The JSON file defines all of the modules that you deploy to your IoT Edge device.
Note
When you submit a new deployment to an IoT Edge device, nothing is pushed to your device. Instead, the device queries IoT Hub regularly for any new instructions. If the device finds an updated deployment manifest, it uses the information about the new deployment to pull the module images from the cloud then starts running the modules locally. This process can take a few minutes.
After you create the module deployment details, the wizard returns you to the device details page. View the deployment status on the Modules tab.
You should see three modules: $edgeAgent, $edgeHub, and SimulatedTemperatureSensor. If one or more of the modules has Yes under Specified in Deployment but not under Reported by Device, your IoT Edge device is still starting them. Wait a few minutes, and then refresh the page.

If you have issues deploying modules, see Troubleshoot IoT Edge devices from the Azure portal.
View generated data
In this quickstart, you created a new IoT Edge device and installed the IoT Edge runtime on it. Then, you used the Azure portal to deploy an IoT Edge module to run on the device without having to make changes to the device itself.
In this case, the module that you pushed generates sample environment data that you can use for testing later. The simulated sensor is monitoring both a machine and the environment around the machine. For example, this sensor might be in a server room, on a factory floor, or on a wind turbine. The message includes ambient temperature and humidity, machine temperature and pressure, and a timestamp. The IoT Edge tutorials use the data created by this module as test data for analytics.
Open the command prompt on your IoT Edge device again, or use the SSH connection from Azure CLI. Confirm that the module deployed from the cloud is running on your IoT Edge device:
sudo iotedge list

View the messages being sent from the temperature sensor module:
sudo iotedge logs SimulatedTemperatureSensor -f

Tip
IoT Edge commands are case-sensitive when referring to module names.
Clean up resources
If you want to continue on to the IoT Edge tutorials, you can use the device that you registered and set up in this quickstart. Otherwise, you can delete the Azure resources that you created to avoid charges.
If you created your virtual machine and IoT hub in a new resource group, you can delete that group and all the associated resources. Double check the contents of the resource group to make sure that there's nothing you want to keep. If you don't want to delete the whole group, you can delete individual resources instead.
Important
Deleting a resource group is irreversible.
Remove the IoTEdgeResources group. It might take a few minutes to delete a resource group.
az group delete --name IoTEdgeResources --yes
You can confirm the resource group is removed by viewing the list of resource groups.
az group list
Next steps
In this quickstart, you created an IoT Edge device and used the Azure IoT Edge cloud interface to deploy code onto the device. Now, you have a test device generating raw data about its environment.
In the next tutorial, you'll learn how to monitor the activity and health of your device from the Azure portal.
Pripomienky
Pripravujeme: V priebehu roka 2024 postupne zrušíme službu Problémy v službe GitHub ako mechanizmus pripomienok týkajúcich sa obsahu a nahradíme ju novým systémom pripomienok. Ďalšie informácie nájdete na stránke: https://aka.ms/ContentUserFeedback.
Odoslať a zobraziť pripomienky pre