This article describes several of the integration requirements for the Microsoft commercial marketplace to enable Azure customers to subscribe to SaaS offers.
Discovery experience
Once a SaaS offer is published, Azure users can discover it in Azure Marketplace. Your customers can filter offers based on product type (SaaS) and discover the SaaS services they're interested in.
Purchase experience
Once a user is interested in a specific SaaS service, the user can subscribe to it from Azure Marketplace.
What does it mean for an Azure user to subscribe to a SaaS offer in Azure Marketplace?
It means that a user can view the terms of use and privacy statement associated with the SaaS service, and agree to pay for it as per the billing terms set by you, the publisher of the SaaS offer, on Microsoft's invoice. Users can use their existing payment profile in Azure to pay for the SaaS service consumption.
This ability is beneficial in several ways. Customers can now discover and subscribe in one place using Microsoft Cloud Platform as a trusted source, without having to vet every independent software vendor (ISV) software it intends to use. Also, customers can use their existing payment profile without having to explicitly pay each ISV software independently.
Is the user charged automatically when the offer is subscribed?
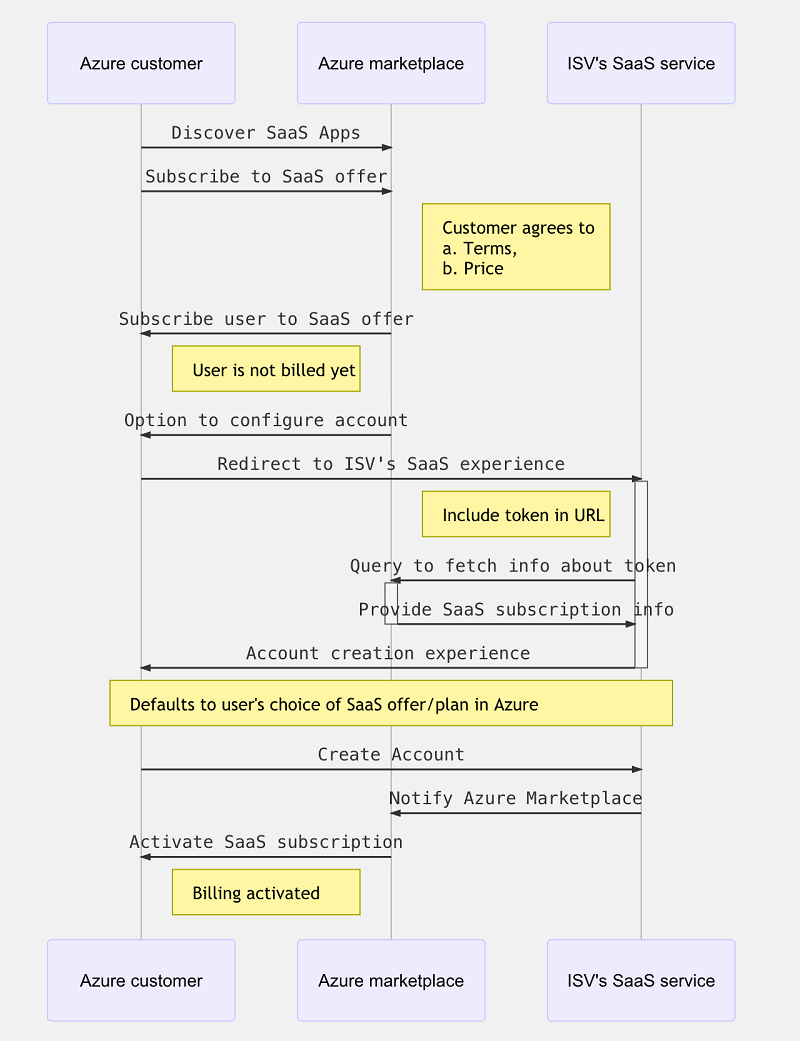
When subscribing to the SaaS offer, the user agrees to pay for consumption of the SaaS service through the Microsoft platform. However, charges only start when the offer is consumed. The user must go to your SaaS offer and confirm account creation to start consuming the offer. You'll then notify Microsoft to start billing for this customer SaaS subscription.
How are you notified when a user subscribes to your SaaS offer?
After subscribing to an offer, the Azure user can discover and manage all their offers in Azure. By default, the state of a newly subscribed SaaS offer is shown as Provisioning, fulfillment pending. In this state, the Azure user is prompted with an action to Configure Account, in order to browse to their SaaS subscription management experience in the Azure portal.
When the user selects Configure Account, they're redirected to the SaaS service website. The publisher configured the URL at the time of publishing the offer. This page is referred to as the publisher's landing page. Azure users sign in to the SaaS landing page based on their existing Microsoft Entra credentials in Azure.
Important
You must sign in the buying user using Microsoft Entra ID, Single Sign On (SSO) as directed by the policy. The mail property on the user resource retrieved from the Microsoft Graph API gives you the contact information for the case of Microsoft Entra ID and userPrincipalName for MSA. It's possible that the "mail" field is empty for Microsoft Entra ID, and the user might not have an email recorded. If so, we recommend you detect that and ask for a contact email. This is your only chance to get a contact email to reach a customer during or after the customer on-boarding process.
When the Azure user is redirected to the landing page, a token is added to the query URL. This token is short-lived, and valid for a time duration of 24 hours. You can then detect the presence of this token, and call the Microsoft API to get more context associated with the token.
For more information about the API contract for handling transact scenarios in the life cycle of a SaaS offer, see SaaS fulfillment API.
How do you know the SaaS offer to which the user subscribes in Azure?
The response to the Resolve API includes the offer and plan information associated with the SaaS subscription.
How can the Azure user change the plan associated with this Azure subscription?
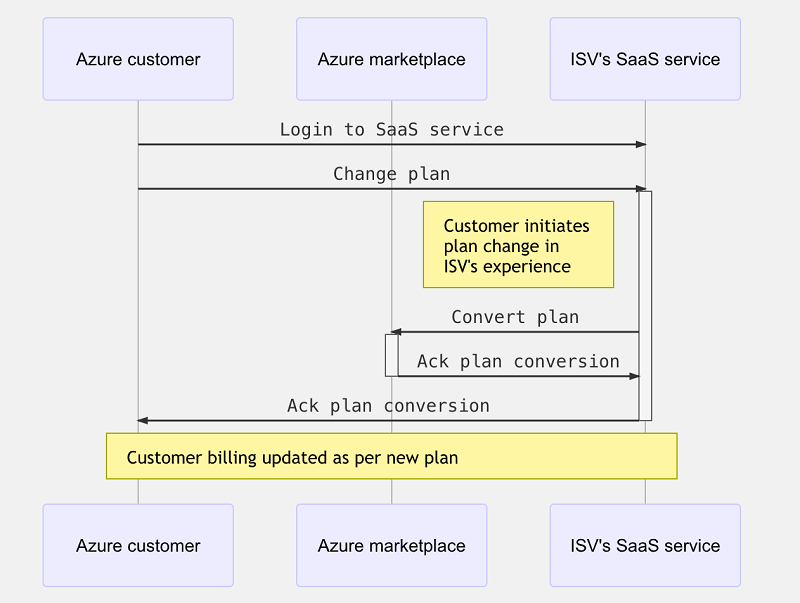
The Azure user can change the plan associated with the SaaS subscription directly in the SaaS experience, or through the Microsoft platform.
Conversions can be done at any time in the billing cycle. You're prompted to acknowledge any conversion, which becomes effective upon acknowledgment.
Prepaid plan (monthly or annual) rates are pro-rated. Any overage emitted up to the time of conversion will be charged in the next invoice. New overages will be emitted based on the new plan.
Note
You can block downgrades if you do not want to support specific conversion paths.
The sequence below captures the flow when an Azure customer changes a plan in the SaaS experience:
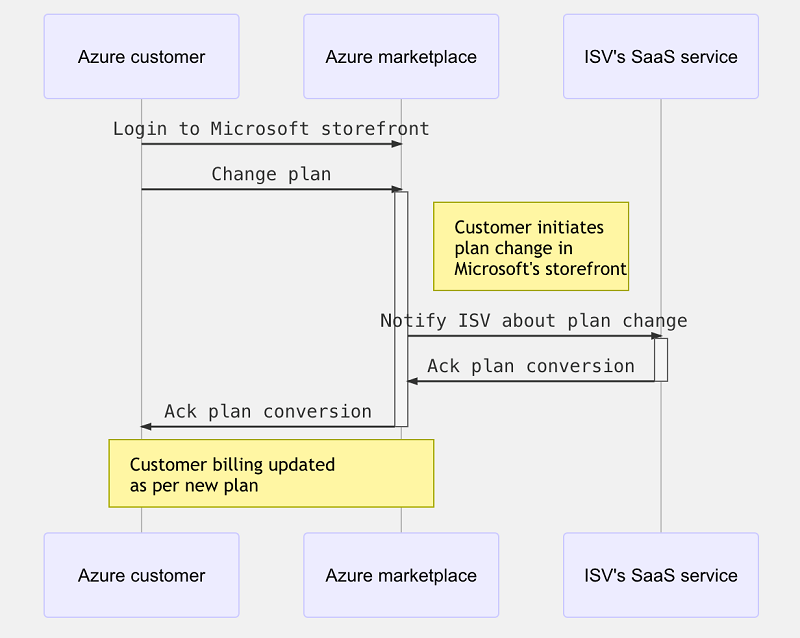
The sequence below captures the flow when an Azure customer changes a plan in Microsoft's online store:
How can the Azure user unsubscribe from the plan associated with Azure subscription?
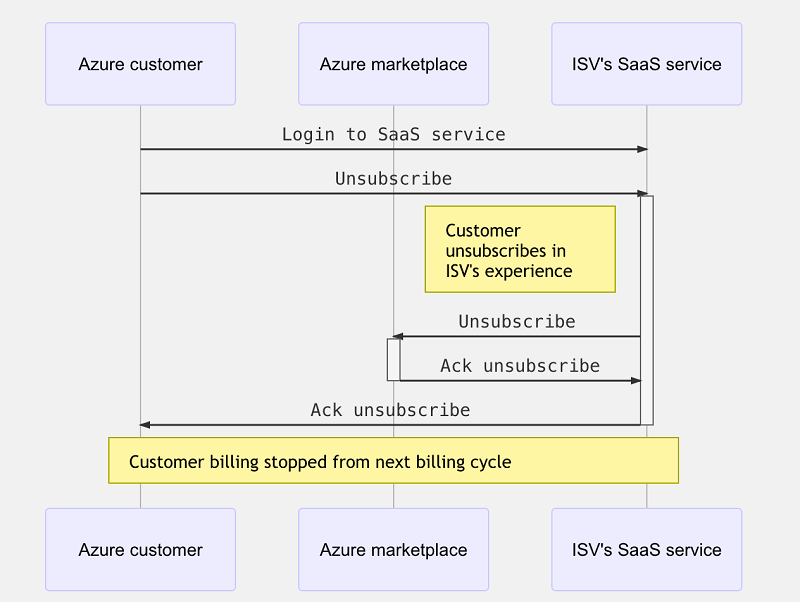
An Azure user can unsubscribe from a purchased SaaS offer either directly in the SaaS experience, or through the Microsoft platform. Once the user unsubscribes, they'll no longer be charged from next billing cycle.
The sequence below captures the flow when an Azure customer unsubscribes to the SaaS offer in the SaaS experience:
The sequence below captures the flow when Azure user unsubscribes in Microsoft's online store:
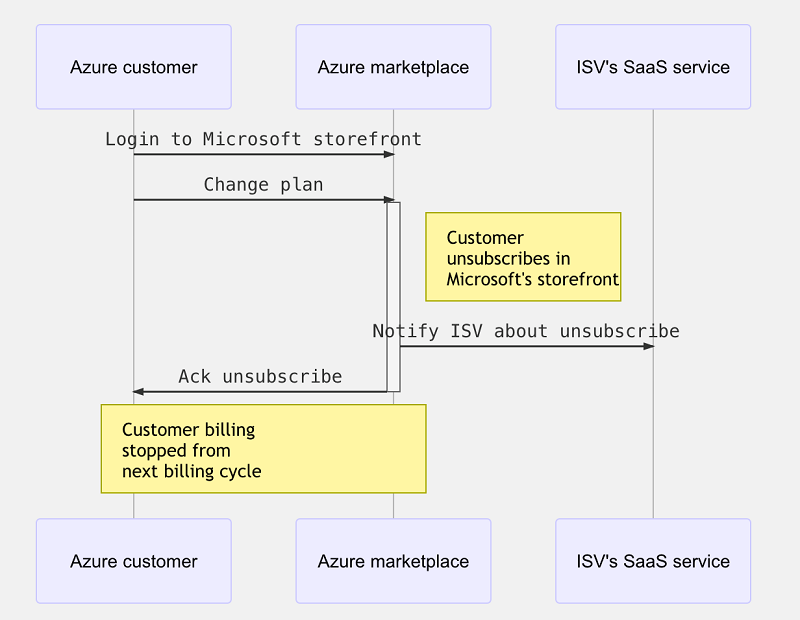
Manage experience
An ISV can manage the SaaS subscription of their customer and change plans.
For a plan to successfully convert to a different plan within the same offer, all of following should be true; otherwise, your change plan SaaS fulfillment API calls might not work:
- The target plan should be active.
- The target plan should be supported in the customer's region.
- If the target plan is a private plan, then the customer's tenantID should be added to the plan in Partner Center and republished before attempting the change plan.
- If the target plan is part of the private marketplace, then the customer should allowlist the plan in their private marketplace before change plan is done.
- For EA customers, if the BYOL setting is enabled (meaning they can only purchase free resources), then the target plan shouldn't be a paid plan.
How do I create a Service Principal for my Entra app?
Your Entra app Service Principal is the instance of your Entra app registration that you create for your SaaS offer. This app Service Principal must be created in the same tenant you use in Partner center technical configuration. These steps can help you determine if a Service Principal is created, and if not then how to create one.
Step 1: Identify the App Registration.
Navigate to each SaaS offer in Partner Center.
Navigate to its "Technical Configuration Page" and record the value for the "Entra application ID":


Step 2: Determine if the Service Principal is created or not.
Option 1: Using the Azure portal
Navigate to the Azure portal App Registrations page and find the App Registration with the ID that you copied from Partner Center.
Tip
You might have to switch to "All Applications" instead of "Owned Applications" in case you weren't the one creating the App Registration in the first place.
Tip
The app registration name ends with "FulfilmentAppReg" if it was created using the SaaS Accelerator deployment script.
Open the App Registration page. In case you see the link with the app registration name (instead of “Create Service Principal” link as shown in the next screenshot), it means you already have a service principal created.


Option 2: Using the Azure CLI
az ad sp list --filter "appId eq '<Your-App-ID>'"
If the Service Principal is created, you'll get accountEnabled as true (as shown in this image).

Learn more about this Service principal list command at az ad sp list.
Step 3: Creating and Associating a Service Principal
Option 1: Using the Azure portal
Navigate to the Azure portal App Registrations page and find the App Registration with the ID that you copied from Partner Center.
Tip
You might have to switch to "All Applications" instead of "Owned Applications" in case you weren't the one creating the App Registration in the first place.
Tip
The app registration name ends with "FulfilmentAppReg" if it was created using the SaaS Accelerator deployment script.
Open the App Registration page and select "Create Service Principal" link (as shown in this screenshot).


Option 2: Using the Azure CLI
az ad sp create --id <app_id>
If the Service Principal is created, you'll see accountEnabled as true (as shown in this image).

Learn more about this Service principal create command at az ad sp create.