Build and publish your environment
After you finish adding all your scene content, the next step is to build the scene as an Environment and then upload it to your chosen Collection in Mesh on the web. This is achieved by using the Mesh Uploader. Event producers with access to that Collection can then create an Event based on your Environment and invite attendees to come and share in it.
Configure your project settings
On the menu bar, select Mesh Toolkit > Configure > Apply Project Settings.
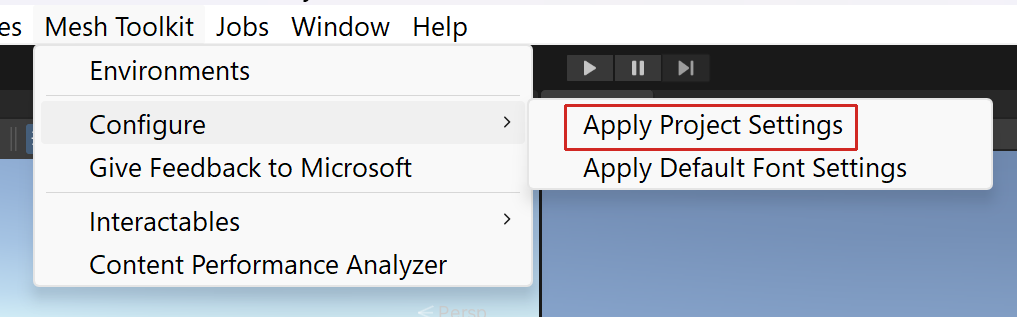
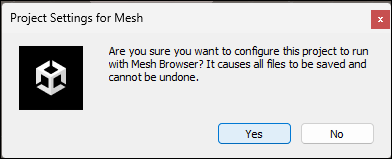
Select Yes to configure project settings for Mesh.
Using the Mesh Uploader
Mesh Uploader versions
As explained in the article named Add the Mesh toolkit package, there are two versions of the Mesh toolkit: the stable build and the preview build. Note that from time to time you may see minor differences between the two versions.
Sign in to the Mesh Uploader
On the menu bar, select Mesh Toolkit > Environments.
In the Mesh Environments window, select Sign In.
Sign in with your account.
Add your project details
Make sure you're in the Create Environment tab, and then fill in the Internal Name and Description fields.
Important
The Internal Name field has a maximum of 100 characters, and the Description field has a maximum of 200 characters.
To ensure you have the latest Collections that are available, select the Refresh Environment collections button.
Select the Environment collection drop down, and then select the Collection you want to upload your Environment to if it's not already selected.
Note
If the Environment Collection field shows No Environment collections available then no valid Collections for your account were found. If this is unexpected, try refreshing with the Refresh Environment Collections button. Otherwise, see Manage Mesh Collections to set up and manage your Collections.
In the Capacity field, enter the capacity for your Environment. The maximum is 16.
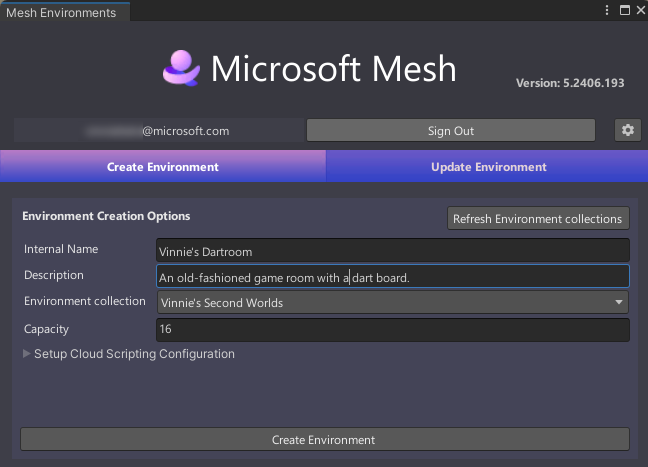
Add Mesh Clouding Scripting options
If your project uses Mesh Cloud Scripting, follow the steps in the Provide Cloud Scripting details in your project article to add the needed information, and then click the link at the end of that article to return here and continue on.
Create your environment
Select Create Environment to create the Environment that you'll be uploading.
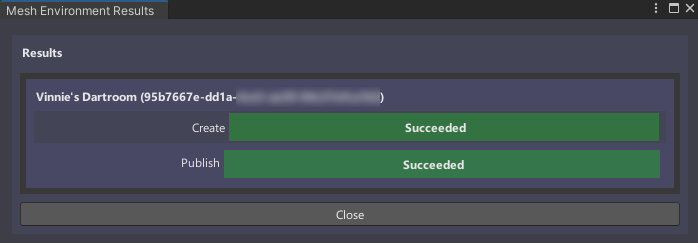
You'll receive a confirmation dialogue as shown below. Select Close.
Options in the Update Environment tab
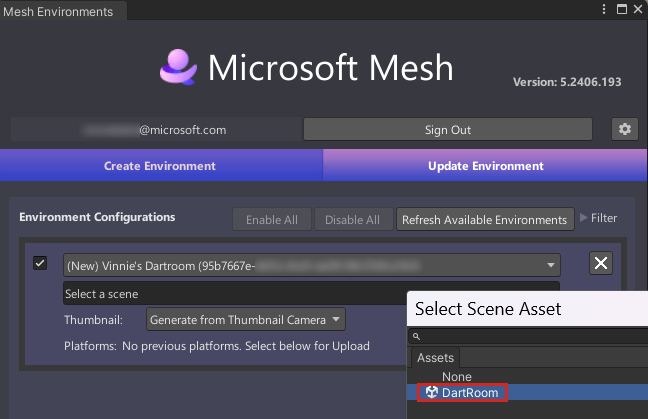
You should now be in the Update Environment tab of the Mesh Uploader.
![]()
Note that in the Environment Configurations section, you already have an Environment configuration created which displays the name you added in the Create Environment tab: Vinnie's Dartroom.
Configure the Environment for build and publish
Select the field that displays Select a Scene and then, in the Select SceneAsset window, double-click the scene in your project that you want as the Environment. In this example, we're using the Mesh sample project Dartroom, so our chosen scene will be the scene also named DartRoom.
In the Build for Platforms section, you choose which platforms to build for. Note that when a button background is gray, the button is "on"; when the background is black, the button is "off." Do one of the following:
To build for PC only, make sure that only the PC button ("Mesh app on PC", the button on the left) is "on."

To build for Android only, make sure that only the Android button ("Mesh app on Quest", the button on the right) is "on."
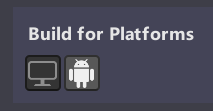
To build for both PC and Android, make sure that both buttons are "on."
If you create repeated builds of the same Environment but want to change the platform(s) they're being created for, make sure you choose the correct Build for Platforms buttons.
Build and publish the Environment
Select the Build and Publish button.

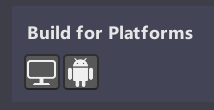
If your project includes Mesh Cloud Scripting, you'll see progress bars showing that the Cloud Scripting infrastructure is being being provisioned in Azure and published.
If the Environment builds and publishes successfully, the Build and Upload Results window appears and confirms the results.
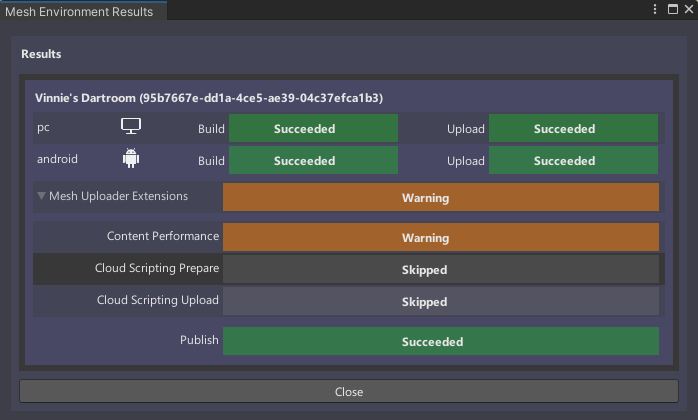
However, you may get Warning or even Failed indicators in this window. To learn more about what these mean and how to make needed corrections, see the article named Understanding your Build and Publish results.
Tip
If a build and publish process fails, look in the Console for clues about what might have happened.
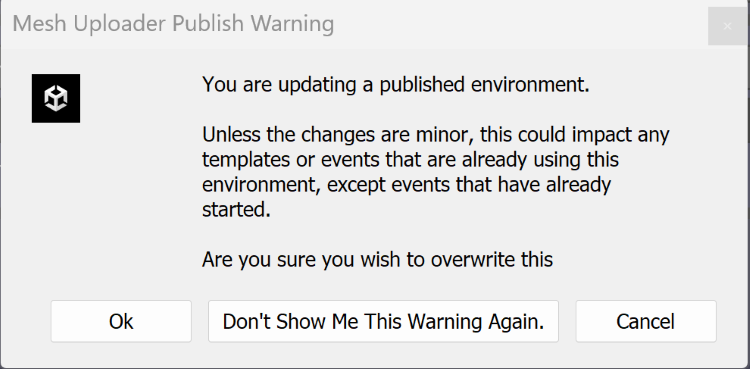
Important
Every time you update the Environment, it can affect future events that reference this Environment.
Environment thumbnails
You may want to add a custom thumbnail image that will be added to your Environment listings in Mesh on the web or the Mesh App. This comes in handy because it gives you a visual reminder of what the Environment looks like.
You can customize the thumbnails from your environment in two ways:
- You can add a MeshThumbnailCamera to your scene which will ensure that you always get the latest changes from your scene in the thumbnails.
- You can specify a folder containing the images you want to use for the thumbnails.
Option 1 - Adding the thumbnail camera
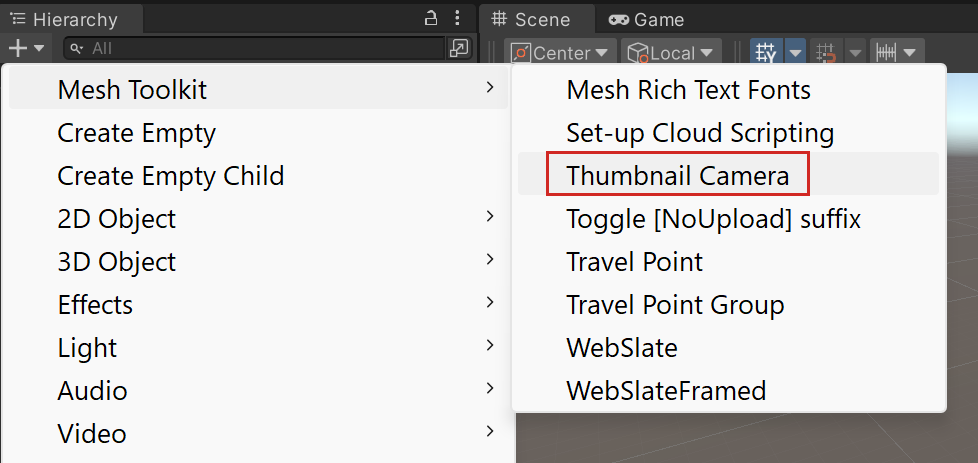
To add the thumbnail camera to the scene and set its view:
In the Scene window, adjust the view so that it shows what you want to display in the thumbnail (the Thumbnail Camera's view will be based on the Scene view).
Select the "+" drop-down located below the Hierarchy tab, and then select Mesh Toolkit > Thumbnail Camera.
To confirm that the view in the Thumbnail Camera is what you want, in the Hierarchy, select MeshThumbnailCamera, and then view the thumbnail in the small window in the lower right of the Scene view.
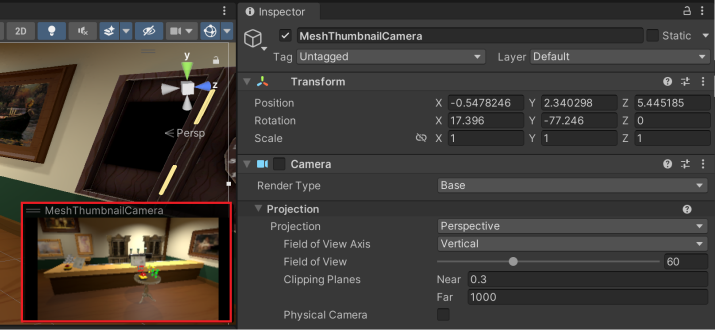
Note: If you decide you want a different view for the Thumbnail Camera, you can adjust it directly in the Scene view or change its Position and Rotation values in the Inspector prior to uploading your Environment to Mesh.
There are no set rules for how your thumbnail should look---it's totally up to you.
To upload the environment with your thumbnails:
On the menu bar, select Mesh Toolkit > Environments. This opens the Mesh Uploader.
In the Update Environment tab, make sure you have the correct Environment and scene selected. The Thumbnail option displays Generate from Thumbnail Camera. Keep this setting.
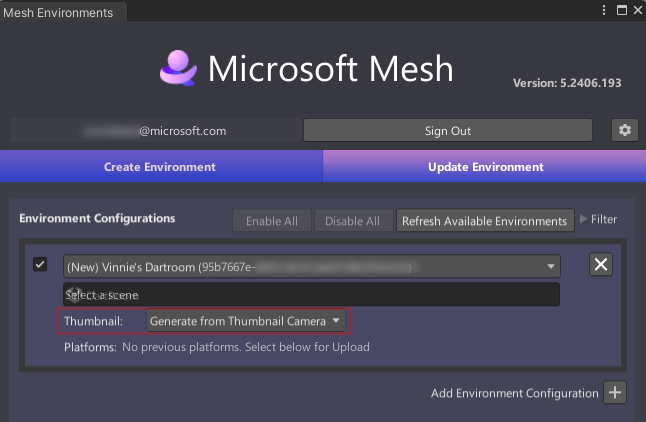
When you're ready to publish your environment, select Build & Publish. The thumbnail will be uploaded together with your environment.
Option 2 - Custom thumbnail folder
If you prefer, you can create a custom thumbnail, then save it in a designated "thumbnail folder", and then use that image as your thumbnail.
On the menu bar, select Mesh Toolkit > Environments. This opens the Mesh Uploader.
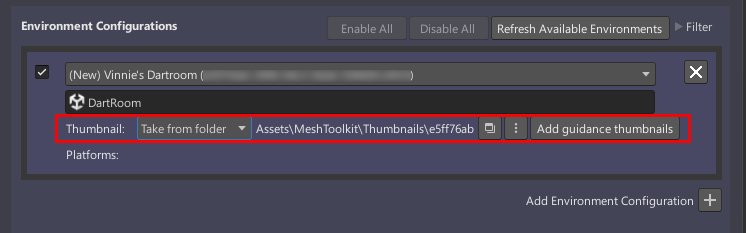
In the Update Environment tab, make sure you have the correct Environment and Scene selected.
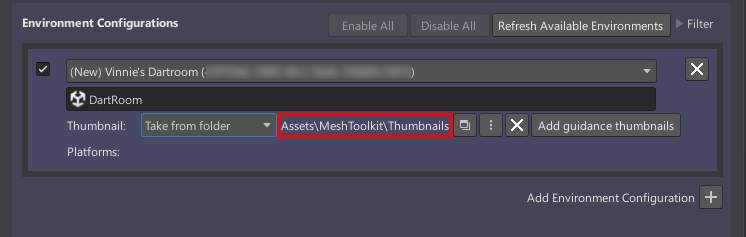
Click the Thumbnail drop-down and then select Take from folder.

Drag the right side of the Mesh Environments window to make it wider. This makes it easier to read all the thumbnail options.
Select the folder that will store your custom thumbnails: click the Select custom thumbnail folder button (the three-dot button). TIP: You may have to click it twice.
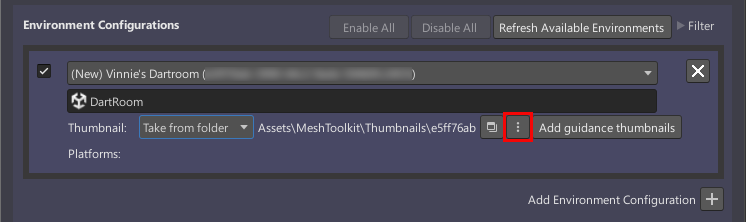
You can choose any folder you want or create a new one, but note that it must be located in the path of the Assets folder in your project. There's already a folder conveniently named Thumbnails in our current sample project so we'll use that.
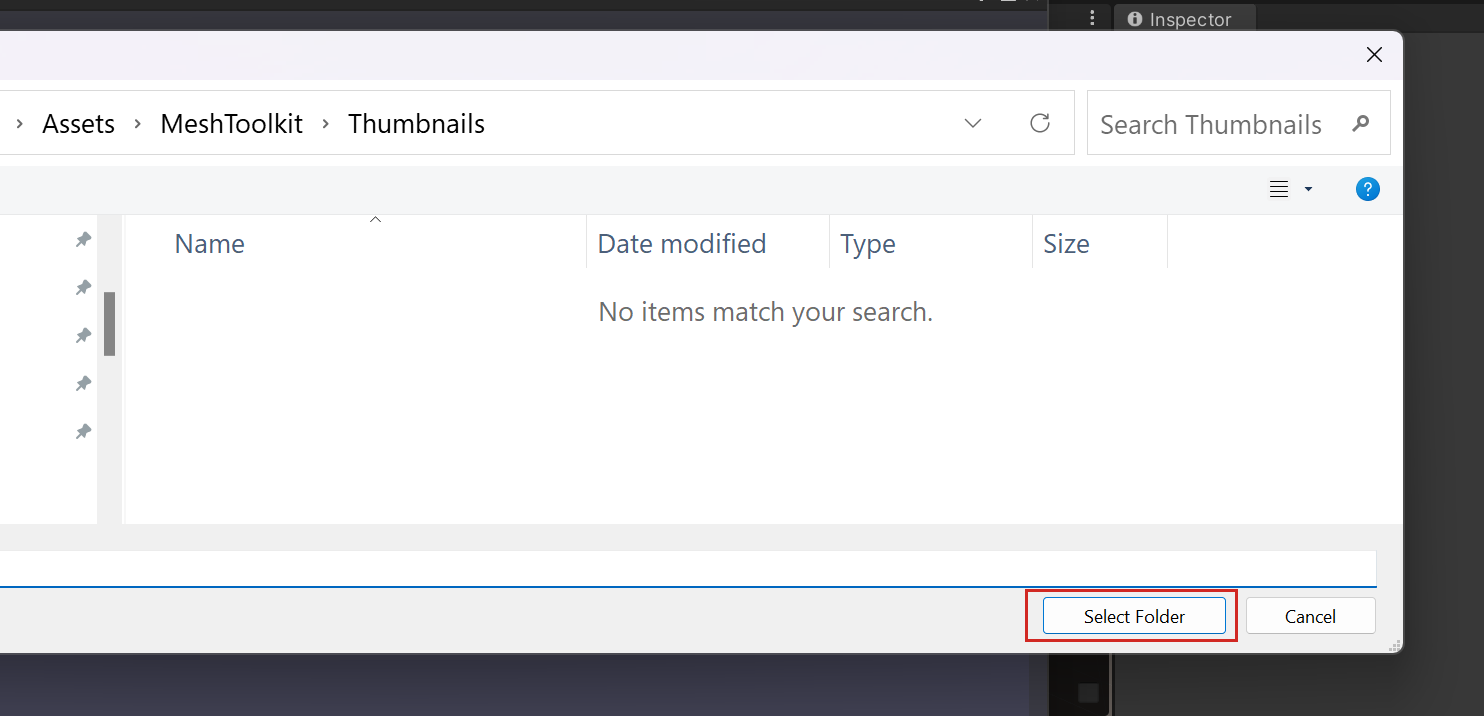
In the Thumbnail Images Folder dialog, navigate to Assets > MeshToolkit > Thumbnails, and then click the Select Folder button.
Note that in the Uploader, the thumbnail folder path has changed and now displays Assets/MeshToolkit/Thumbnails.
Click the Add guidance thumbnails button. A Success dialog appears telling you that thumbnails were generated successfully.
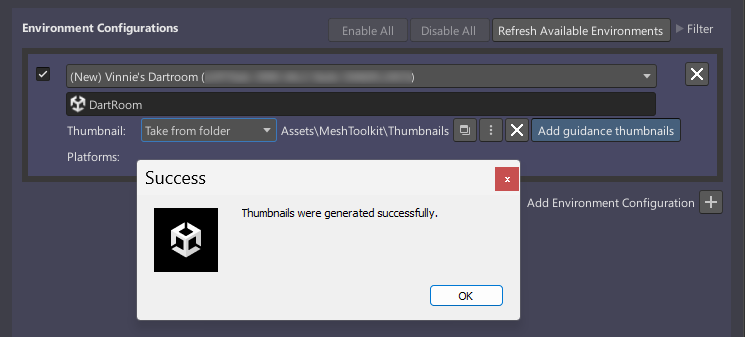
Navigate to the Thumbnails folder and confirm that three thumbnails were generated.

You can now create your custom thumbnails and save them in this folder. There are two guidelines you must follow:
Create three versions of your thumbnail: a "large" one, a "medium" one, and a "small" one. The sizes for each are:
Large = 1024 x 512 px
Medium = 512 x 256 px
Small = 256 x 128 pxHaving three versions of your thumbnail means that each device running Mesh can choose the best size for its user interface.
Give your thumbnails the same names as the provisional thumbnails:
thumbnail_large.png
thumbnail_medium.png
thumbnail_small.png(Your custom thumbnails will replace the provisional ones in your chosen thumbnails folder.)
Once you're ready to publish your environment, select Build & Publish. The thumbnails will be uploaded together with your environment.
Next steps
Povratne informacije
Kmalu na voljo: V letu 2024 bomo ukinili storitev Težave v storitvi GitHub kot mehanizem za povratne informacije za vsebino in jo zamenjali z novim sistemom za povratne informacije. Za več informacij si oglejte: https://aka.ms/ContentUserFeedback.
Pošlji in prikaži povratne informacije za