Snabbstart: Skapa en funktion i Azure med Python med Visual Studio Code
I den här artikeln använder du Visual Studio Code för att skapa en Python-funktion som svarar på HTTP-begäranden. När du har testat koden lokalt distribuerar du den till den serverlösa miljön i Azure Functions.
Den här artikeln använder programmeringsmodellen Python v2 för Azure Functions, som tillhandahåller en dekoratörsbaserad metod för att skapa funktioner. Mer information om python v2-programmeringsmodellen finns i referensguiden för utvecklare
Slutförande av den här snabbstarten medför en liten kostnad på några USD-cent eller mindre på ditt Azure-konto.
Det finns också en CLI-baserad version av den här artikeln.
Den här videon visar hur du skapar en Python-funktion i Azure med hjälp av Visual Studio Code.
Stegen i videon beskrivs också i följande avsnitt.
Konfigurera din miljö
Kontrollera att du har följande krav på plats innan du börjar:
Ett Azure-konto med en aktiv prenumeration. Skapa ett konto utan kostnad.
En Python-version som stöds av Azure Functions. Mer information finns i Installera Python.
Visual Studio Code på någon av plattformarna som stöds.
Azure Functions-tillägget för Visual Studio Code, version 1.8.1 eller senare.
Azurite V3-tilläggets lokala lagringsemulator. Även om du också kan använda ett verkligt Azure-lagringskonto förutsätter den här artikeln att du använder Azurite-emulatorn.
Installera eller uppdatera Core Tools
Azure Functions-tillägget för Visual Studio Code integreras med Azure Functions Core Tools så att du kan köra och felsöka dina funktioner lokalt i Visual Studio Code med hjälp av Azure Functions-körningen. Innan du kommer igång är det en bra idé att installera Core Tools lokalt eller uppdatera en befintlig installation för att använda den senaste versionen.
I Visual Studio Code väljer du F1 för att öppna kommandopaletten och söker sedan efter och kör kommandot Azure Functions: Install eller Update Core Tools.
Det här kommandot startar en paketbaserad installation av den senaste versionen av Core Tools.
Skapa ditt lokala projekt
I det här avsnittet använder du Visual Studio Code för att skapa ett lokalt Azure Functions-projekt i Python. Senare i den här artikeln publicerar du funktionskoden till Azure.
Välj Azure-ikonen i aktivitetsfältet. Välj sedan knappen i området + Arbetsyta (lokal) och välj Skapa funktion i listrutan. När du uppmanas till det väljer du Skapa nytt projekt.

Välj katalogplatsen för projektarbetsytan och välj Välj. Du bör antingen skapa en ny mapp eller välja en tom mapp för projektarbetsytan. Välj inte en projektmapp som redan är en del av en arbetsyta.
Ange följande information i meddelanderutorna:
Prompt Urval Välj ett språk Välj Python (Programming Model V2).Välj en Python-tolk för att skapa en virtuell miljö Välj önskad Python-tolk. Om ett alternativ inte visas skriver du in den fullständiga sökvägen till din Python-binärfil. Välj en mall för projektets första funktion Välj HTTP trigger.Namnet på den funktion som du vill skapa Ange HttpExample.Auktoriseringsnivå Välj ANONYMOUS, som låter vem som helst anropa funktionsslutpunkten. Mer information om auktoriseringsnivån finns i Auktoriseringsnycklar.Välj hur du vill öppna projektet Välj Open in current window.Visual Studio Code använder den angivna informationen och genererar ett Azure Functions-projekt med en HTTP-utlösare. Du kan visa de lokala projektfilerna i Utforskaren. Den genererade
function_app.pyprojektfilen innehåller dina funktioner.
Öppna local.settings.json-projektfilen och kontrollera att inställningen
AzureWebJobsFeatureFlagshar värdetEnableWorkerIndexing. Detta krävs för att Functions ska tolka projektet korrekt som Python v2-modellen när det körs lokalt.I filen local.settings.json uppdaterar
AzureWebJobsStoragedu inställningen som i följande exempel:"AzureWebJobsStorage": "UseDevelopmentStorage=true",Detta talar om för den lokala Functions-värden att använda lagringsemulatorn för den lagringsanslutning som för närvarande krävs av Python v2-modellen. När du publicerar projektet till Azure måste du i stället använda standardlagringskontot. Om du i stället använder ett Azure Storage-konto anger du ditt lagringskonto anslutningssträng här.
Starta emulatorn
I Visual Studio Code trycker du på F1 för att öppna kommandopaletten. I kommandopaletten söker du efter och väljer
Azurite: Start.Kontrollera det nedre fältet och kontrollera att Azurite-emuleringstjänster körs. I så fall kan du nu köra funktionen lokalt. ::: zone-end
Kör funktionen lokalt
Visual Studio Code integreras med Azure Functions Core-verktyg så att du kan köra det här projektet på din lokala utvecklingsdator innan du publicerar till Azure.
Starta funktionen lokalt genom att trycka på F5 eller ikonen Kör och felsöka i aktivitetsfältet till vänster. Panelen Terminal visar utdata från Core Tools. Appen startar i terminalpanelen . Du kan se URL-slutpunkten för din HTTP-utlösta funktion som körs lokalt.
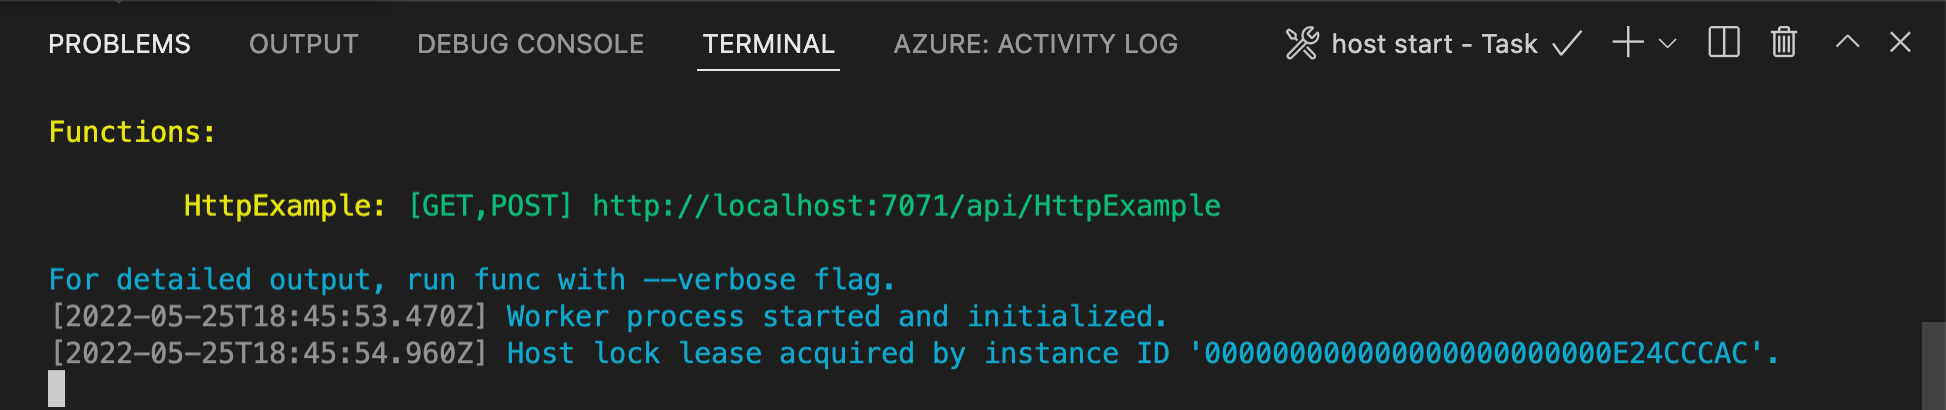
Om du har problem med att köra windows kontrollerar du att standardterminalen för Visual Studio Code inte är inställd på WSL Bash.
När Core Tools fortfarande körs i Terminal väljer du Azure-ikonen i aktivitetsfältet. I området Arbetsyta expanderar du Lokala projektfunktioner>. Högerklicka (Windows) eller Ctrl – klicka (macOS) på den nya funktionen och välj Kör funktion nu....

I Ange begärandetext visas brödtextvärdet för begärandemeddelandet på
{ "name": "Azure" }. Tryck på Retur för att skicka det här begärandemeddelandet till din funktion.När funktionen körs lokalt och returnerar ett svar genereras ett meddelande i Visual Studio Code. Information om funktionskörningen visas på terminalpanelen .
Med terminalpanelen fokuserad trycker du på Ctrl + C för att stoppa Core Tools och koppla från felsökningsprogrammet.
När du har kontrollerat att funktionen körs korrekt på den lokala datorn är det dags att använda Visual Studio Code för att publicera projektet direkt till Azure.
Logga in på Azure
Innan du kan skapa Azure-resurser eller publicera din app måste du logga in på Azure.
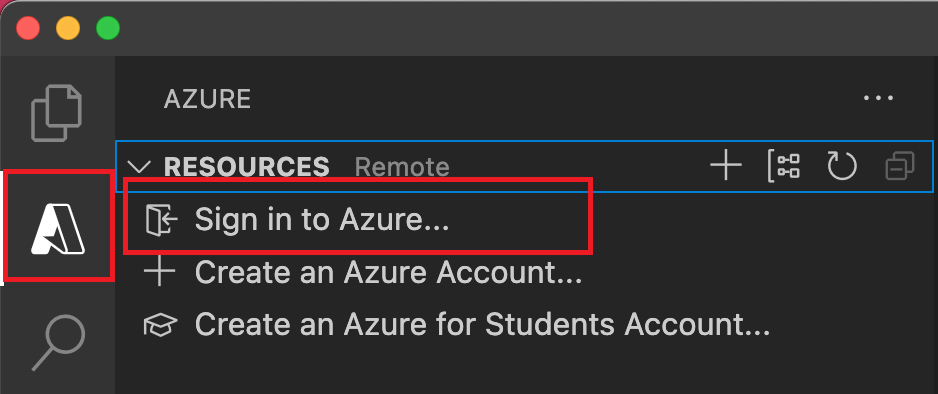
Om du inte redan är inloggad väljer du Azure-ikonen i aktivitetsfältet. I området Resurser väljer du Sedan Logga in på Azure....
Om du redan är inloggad och kan se dina befintliga prenumerationer går du till nästa avsnitt. Om du ännu inte har ett Azure-konto väljer du Skapa ett Azure-konto.... Eleverna kan välja Skapa ett Azure for Students-konto....
När du uppmanas till det i webbläsaren väljer du ditt Azure-konto och loggar in med dina autentiseringsuppgifter för Azure-kontot. Om du skapar ett nytt konto kan du logga in när ditt konto har skapats.
När du har loggat in kan du stänga det nya webbläsarfönstret. De prenumerationer som tillhör ditt Azure-konto visas i sidofältet.
Skapa funktionsappen i Azure
I det här avsnittet skapar du en funktionsapp och relaterade resurser i din Azure-prenumeration.
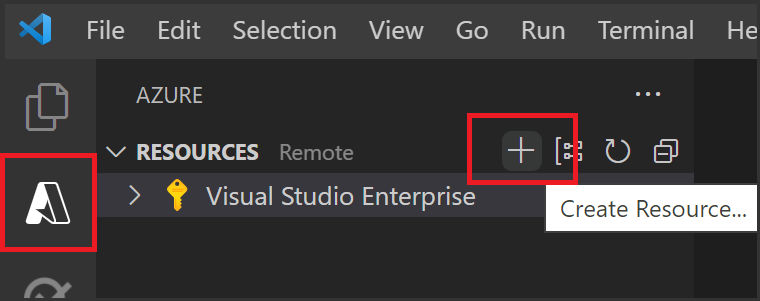
Välj Azure-ikonen i aktivitetsfältet. I området Resurser väljer du + sedan ikonen och väljer alternativet Skapa funktionsapp i Azure.
Ange följande information i meddelanderutorna:
Prompt Urval Välj prenumeration Välj den prenumeration som ska användas. Du ser inte den här uppmaningen när du bara har en prenumeration synlig under Resurser. Ange ett globalt unikt namn för funktionsappen Ange ett namn som är giltigt i en URL-sökväg. Namnet du skriver verifieras för att se till att det är unikt i Azure Functions. Välj en körningsstack Välj den språkversion som du har kört lokalt på. Välj en plats för nya resurser För bättre prestanda väljer du en region nära dig. Tillägget visar status för enskilda resurser när de skapas i Azure i panelen Azure: Aktivitetslogg .

När skapandet är klart skapas följande Azure-resurser i din prenumeration. Resurserna namnges baserat på funktionsappens namn:
- En resursgrupp, som är en logisk container för relaterade resurser.
- Ett Azure Storage-standardkonto som underhåller tillstånd och annan information om dina projekt.
- En funktionsapp som tillhandahåller miljön för att köra funktionskoden. Med en funktionsapp kan du gruppera funktioner som en logisk enhet för enklare hantering, distribution och delning av resurser inom samma värdplan.
- En App Service-plan som definierar den underliggande värden för din funktionsapp.
- En Application Insights-instans som är ansluten till funktionsappen, som spårar användningen av dina funktioner i appen.
Ett meddelande visas när funktionsappen har skapats och distributionspaketet har tillämpats.
Dricks
Som standard skapas de Azure-resurser som krävs av funktionsappen baserat på det funktionsappnamn du anger. Som standard skapas de också i samma nya resursgrupp med funktionsappen. Om du antingen vill anpassa namnen på dessa resurser eller återanvända befintliga resurser måste du publicera projektet med avancerade skapandealternativ i stället.
Distribuera projektet till Azure
Viktigt!
Distribution till en befintlig funktionsapp skriver alltid över innehållet i appen i Azure.
I området Resurser i Azure-aktiviteten letar du upp den funktionsappresurs som du nyss skapade, högerklickar på resursen och väljer Distribuera till funktionsapp....
När du uppmanas att skriva över tidigare distributioner väljer du Distribuera för att distribuera funktionskoden till den nya funktionsappresursen.
När distributionen är klar väljer du Visa utdata för att visa skapande- och distributionsresultatet, inklusive de Azure-resurser som du skapade. Om du missar meddelandet väljer du klockikonen i det nedre högra hörnet för att se det igen.

Kör funktionen i Azure
Tillbaka i området Resurser i sidofältet expanderar du din prenumeration, din nya funktionsapp och Functions. Högerklicka (Windows) eller Ctrl – klicka (macOS) på
HttpExamplefunktionen och välj Kör funktion nu....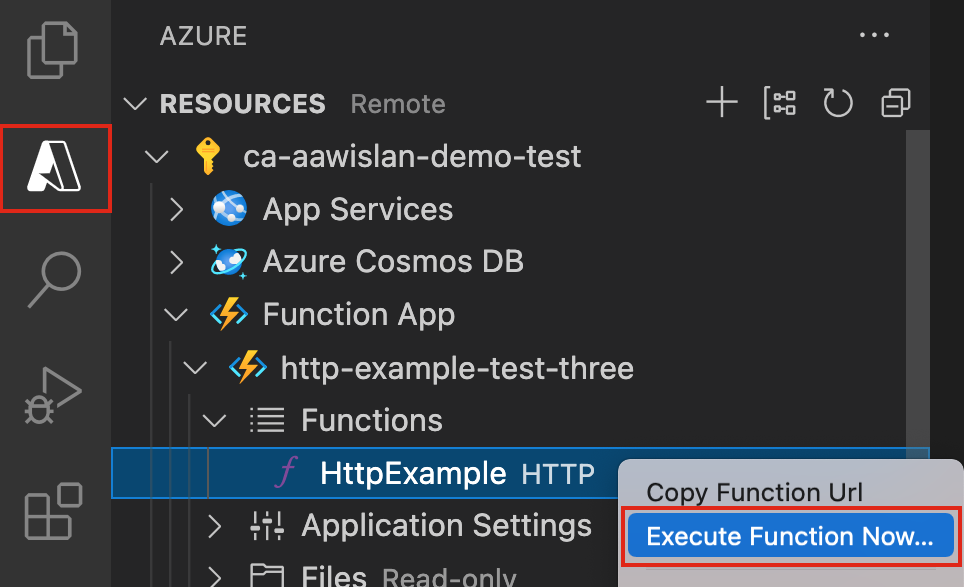
I Ange begärandetext visas brödtextvärdet för begärandemeddelandet på
{ "name": "Azure" }. Tryck på Retur för att skicka det här begärandemeddelandet till din funktion.När funktionen körs i Azure och returnerar ett svar genereras ett meddelande i Visual Studio Code.
Rensa resurser
När du fortsätter till nästa steg och lägger till en Azure Storage-köbindning till din funktion måste du behålla alla resurser på plats för att bygga vidare på det du redan har gjort.
Annars kan du använda följande steg för att ta bort funktionsappen och dess relaterade resurser för att undvika ytterligare kostnader.
I Visual Studio Code trycker du på F1 för att öppna kommandopaletten. I kommandopaletten söker du efter och väljer
Azure: Open in portal.Välj din funktionsapp och tryck på Retur. Funktionsappsidan öppnas i Azure-portalen.
På fliken Översikt väljer du den namngivna länken bredvid Resursgrupp.

På sidan Resursgrupp granskar du listan över inkluderade resurser och kontrollerar att det är de som du vill ta bort.
Välj Ta bort resursgrupp och följ instruktionerna.
Borttagningen kan ta några minuter. När du är färdig visas ett meddelande i några sekunder. Du kan även välja klockikonen högst upp på sidan för att se meddelandet.
Mer information om Functions-kostnader finns i Beräkna kostnader för förbrukningsplan.
Nästa steg
Du skapade och distribuerade en funktionsapp med en enkel HTTP-utlöst funktion. I nästa artiklar expanderar du funktionen genom att ansluta till en lagringstjänst i Azure. Mer information om hur du ansluter till andra Azure-tjänster finns i Lägga till bindningar till en befintlig funktion i Azure Functions.