Set up Double Key Encryption
Applies to: Microsoft Purview Double Key Encryption, Microsoft Purview, Azure Information Protection
Service description for: Microsoft Purview
Follow these general steps to set up DKE. Once you complete these steps, your end users can protect your highly sensitive data with Double Key Encryption.
Deploy the DKE service as described in this article. Ensure your environment meets the minimum system and licensing requirements. For more information, see System and licensing requirements for DKE.
Create a label with Double Key Encryption. In the Microsoft Purview compliance portal, navigate to Information protection and create a new label with Double Key Encryption. See Restrict access to content by using sensitivity labels to apply encryption.
Configure the registry on client devices so you can use Double Key Encryption labels. Next, protect your data by selecting the Double Key Encrypted label from the Sensitivity ribbon in Microsoft Office.
There are several ways you can complete some of the steps to deploy Double Key Encryption. This article provides detailed instructions so that less experienced admins successfully deploy the service. If you're comfortable doing so, you can choose to use your own methods.
Deploy DKE
This article and the deployment video use Azure as the deployment destination for the DKE service. If you're deploying to another location, you need to provide your own values.
Follow these general steps to set up Double Key Encryption for your organization.
- Install software prerequisites for the DKE service
- Clone the Double Key Encryption GitHub repository
- Modify application settings
- Generate test keys
- Build the project
- Deploy the DKE service and publish the key store
- Validate your deployment
- Register your key store
- Create sensitivity labels using DKE
- Migrate protected files from HYOK labels to DKE labels
When you're done, you can encrypt documents and files using DKE. For information, see Apply sensitivity labels to your files and email in Office.
Install software prerequisites for the DKE service
Install these prerequisites on the computer where you want to install the DKE service.
.NET Core 7.0 SDK. Download and install the SDK from Download .NET Core 7.0.
Visual Studio Code. Download Visual Studio Code from https://code.visualstudio.com/. Once installed, run Visual Studio Code and select View > Extensions. Install these extensions.
C# for Visual Studio Code
NuGet Package Manager
Git resources. Download and install one of the following.
OpenSSL You must have OpenSSL installed to generate test keys after you deploy DKE. Make sure you're invoking it correctly from your environment variables path. For example, see "Add the installation directory to PATH" at https://www.osradar.com/install-openssl-windows/ for details.
Clone the DKE GitHub repository
Microsoft supplies the DKE source files in a GitHub repository. You clone the repository to build the project locally for your organization's use. The DKE GitHub repository is located at https://github.com/Azure-Samples/DoubleKeyEncryptionService.
The following instructions are intended for inexperienced git or Visual Studio Code users:
In your browser, go to: https://github.com/Azure-Samples/DoubleKeyEncryptionService.
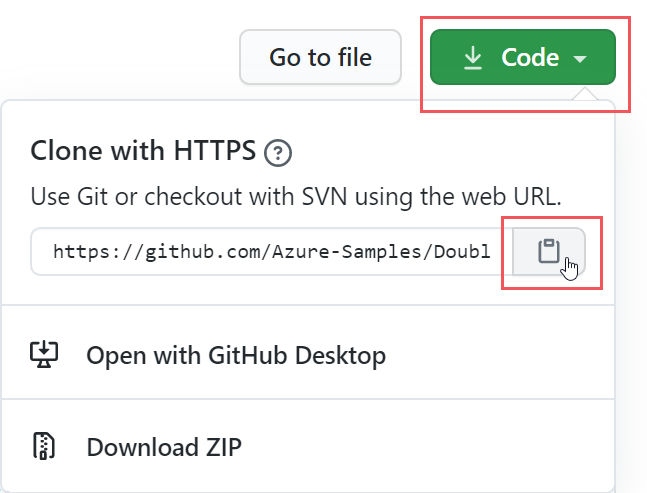
Towards the right side of the screen, select Code. Your version of the UI might show a Clone or download button. Then, in the dropdown that appears, select the copy icon to copy the URL to your clipboard.
For example:
In Visual Studio Code, select View > Command Palette and select Git: Clone. To jump to the option in the list, start typing
git: cloneto filter the entries, and then select it from the drop-down. For example:
In the text box, paste the URL that you copied from Git and select Clone from GitHub.
In the Select Folder dialog that appears, browse to and select a location to store the repository. Select Open.
The repository opens in Visual Studio Code, and displays the current Git branch at the bottom left. The branch should be main. For example:
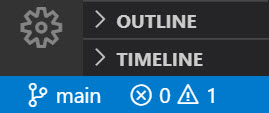
If you're not on the main branch, select it. In Visual Studio Code, select the branch and choose main from the list of branches that displays.
Important
Selecting the main branch ensures that you have the correct files to build the project. If you don't choose the correct branch your deployment will fail.
You now have your DKE source repository set up locally. Next, modify application settings for your organization.
Modify application settings
To deploy the DKE service, you must modify the following types of application settings:
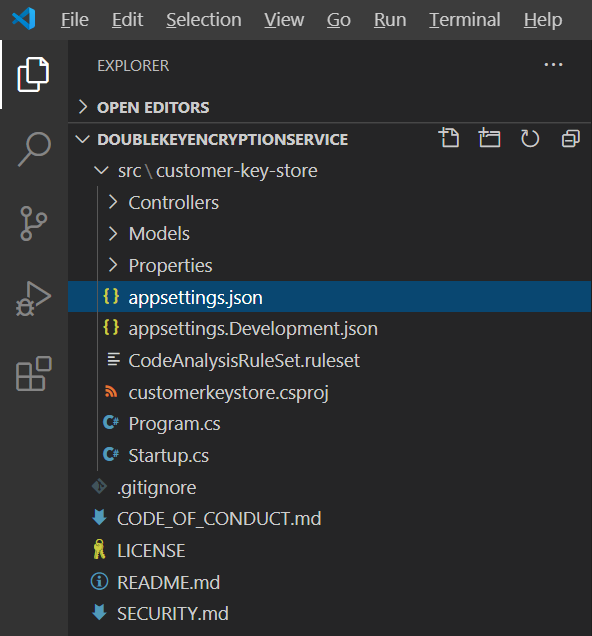
You modify application settings in the appsettings.json file. This file is located in the DoubleKeyEncryptionService repo you cloned locally under DoubleKeyEncryptionService\src\customer-key-store. For example, in Visual Studio Code, you can browse to the file as shown in the following picture.
Key access settings
Choose whether to use email or role authorization. DKE supports only one of these authentication methods at a time.
Email authorization. Allows your organization to authorize access to keys based on email addresses only.
Role authorization. Allows your organization to authorize access to keys based on Active Directory groups, and requires that the web service can query LDAP.
To set key access settings for DKE using email authorization
Open the appsettings.json file and locate the
AuthorizedEmailAddresssetting.Add the email address or addresses that you want to authorize. Separate multiple email addresses with double quotes and commas. For example:
"AuthorizedEmailAddress": ["email1@company.com", "email2@company.com ", "email3@company.com"]Locate the
LDAPPathsetting and remove the textIf you use role authorization (AuthorizedRoles) then this is the LDAP path.between the double quotes. Leave the double quotes in place. When you're finished, the setting should look like this."LDAPPath": ""Locate the
AuthorizedRolessetting and delete the entire line.
This image shows the appsettings.json file correctly formatted for email authorization.
To set key access settings for DKE using role authorization
Open the appsettings.json file and locate the
AuthorizedRolessetting.Add the Active Directory group names you want to authorize. Separate multiple group names with double quotes and commas. For example:
"AuthorizedRoles": ["group1", "group2", "group3"]Locate the
LDAPPathsetting and add the Active Directory domain. For example:"LDAPPath": "contoso.com"Locate the
AuthorizedEmailAddresssetting and delete the entire line.
This image shows the appsettings.json file correctly formatted for role authorization.
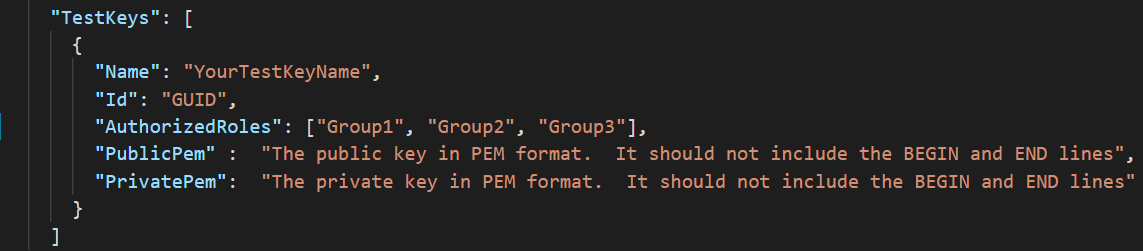
Tenant and key settings
DKE tenant and key settings are located in the appsettings.json file.
To configure tenant and key settings for DKE
Open the appsettings.json file.
Locate the
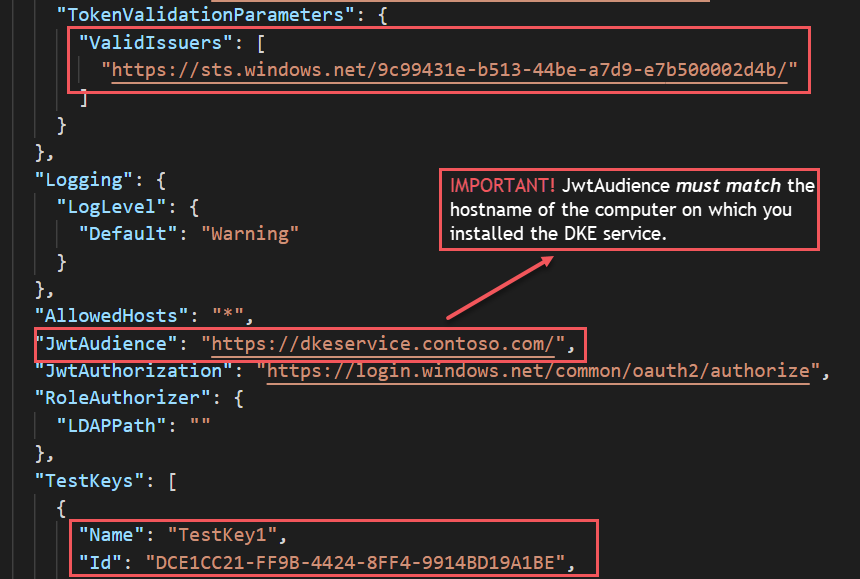
ValidIssuerssetting and replace<tenantid>with your tenant ID. You can locate your tenant ID by going to the Azure portal and viewing the tenant properties. For example:"ValidIssuers": [ "https://sts.windows.net/9c99431e-b513-44be-a7d9-e7b500002d4b/" ]
Note
If you want to enable external B2B access to your key store, you will also need to include these external tenants as part of the valid issuers' list.
Locate the JwtAudience. Replace <yourhostname> with the hostname of the machine where you want to run the DKE service. For example: "https://dkeservice.contoso.com"
Important
The value for JwtAudience must match the name of your host exactly.
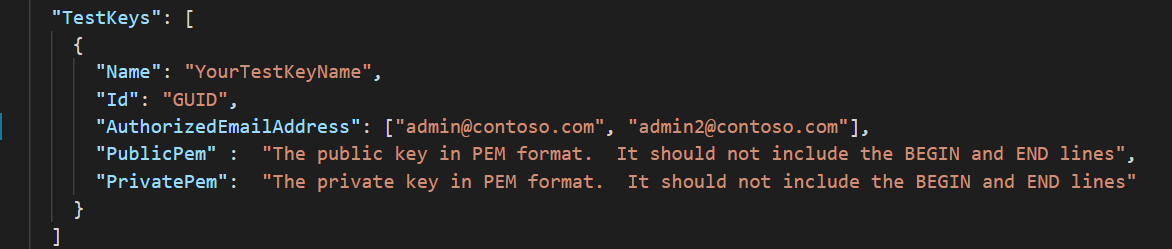
TestKeys:Name. Enter a name for your key. For example:TestKey1TestKeys:Id. Create a GUID and enter it as theTestKeys:IDvalue. For example,DCE1CC21-FF9B-4424-8FF4-9914BD19A1BE. You can use a site like Online GUID Generator to randomly generate a GUID.
This image shows the correct format for tenant and keys settings in appsettings.json. LDAPPath is configured for role authorization.
Generate test keys
Once you have your application settings defined, you're ready to generate public and private test keys.
To generate keys:
From the Windows Start menu, run the OpenSSL Command Prompt.
Change to the folder where you want to save the test keys. The files you create by completing the steps in this task are stored in the same folder.
Generate the new test key.
openssl req -x509 -newkey rsa:2048 -keyout key.pem -out cert.pem -days 365Generate the private key.
If you installed OpenSSL version 3 or later, run the following command:
openssl rsa -in key.pem -out privkeynopass.pem -outform PEM -traditionalOtherwise, run the following command:
openssl rsa -in key.pem -out privkeynopass.pem -outform PEMGenerate the public key.
openssl rsa -in key.pem -pubout > pubkeyonly.pemIn a text editor, open pubkeyonly.pem. Copy all of the content in the pubkeyonly.pem file, except the first and last lines, into the
PublicPemsection of the appsettings.json file.In a text editor, open privkeynopass.pem. Copy all of the content in the privkeynopass.pem file, except the first and last lines, into the
PrivatePemsection of the appsettings.json file.Remove all blank spaces and newlines in both the
PublicPemandPrivatePemsections.Important
When you copy this content, do not delete any of the PEM data.
In Visual Studio Code, browse to the Startup.cs file. This file is located in the DoubleKeyEncryptionService repo you cloned locally under DoubleKeyEncryptionService\src\customer-key-store.
Locate the following lines:
    #if USE_TEST_KEYS
    #error !!!!!!!!!!!!!!!!!!!!!! Use of test keys is only supported for testing,
    DO NOT USE FOR PRODUCTION !!!!!!!!!!!!!!!!!!!!!!!!!!!!!
    services.AddSingleton<ippw.IKeyStore, ippw.TestKeyStore>();
    #endif
Replace these lines with the following text:
services.AddSingleton<ippw.IKeyStore, ippw.TestKeyStore>();The end results should look similar to the following.

Now you're ready to build your DKE project.
Build the project
Use the following instructions to build the DKE project locally:
In Visual Studio Code, in the DKE service repository, select View > Command Palette and then type build at the prompt.
From the list, choose Tasks: Run build task.
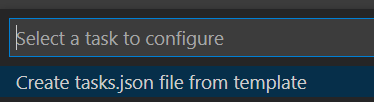
If there are no build tasks found, select Configure Build Task and create one for .NET core as follows.

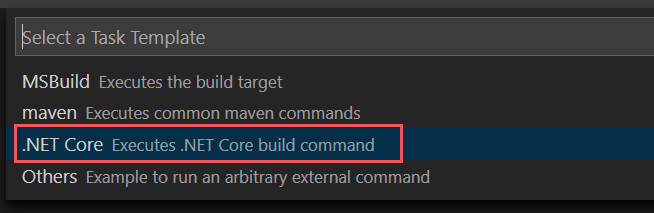
Choose Create tasks.json from template.
From the list of template types, select .NET Core.
In the build section, locate the path to the customerkeystore.csproj file. If it's not there, add the following line:
"${workspaceFolder}/src/customer-key-store/customerkeystore.csproj",Run the build again.
Verify that there are no red errors in the output window.
If there are red errors, check the console output. Ensure that you completed all the previous steps correctly and the correct build versions are present.
Your setup is now complete. Before you publish the keystore, in appsettings.json, for the JwtAudience setting, ensure the value for hostname exactly matches your App Service host name.
Deploy the DKE service and publish the key store
For production deployments, deploy the service either in a third-party cloud or publish to an on-premises system.
You may prefer other methods to deploy your keys. Select the method that works best for your organization.
For pilot deployments, you can deploy in Azure and get started right away.
To create an Azure Web App instance to host your DKE deployment
To publish the key store, create an Azure App Service instance to host your DKE deployment. Next, publish your generated keys to Azure.
In your browser, sign in to the Microsoft Azure portal, and go to App Services > Add.
Select your subscription and resource group and define your instance details.
Enter the hostname of the computer where you want to install the DKE service. Make sure it's the same name as the one defined for the JwtAudience setting in the appsettings.json file. The value you provide for the name is also the WebAppInstanceName.
For Publish, select code, and for Runtime stack, select .NET Core 3.1.
For example:
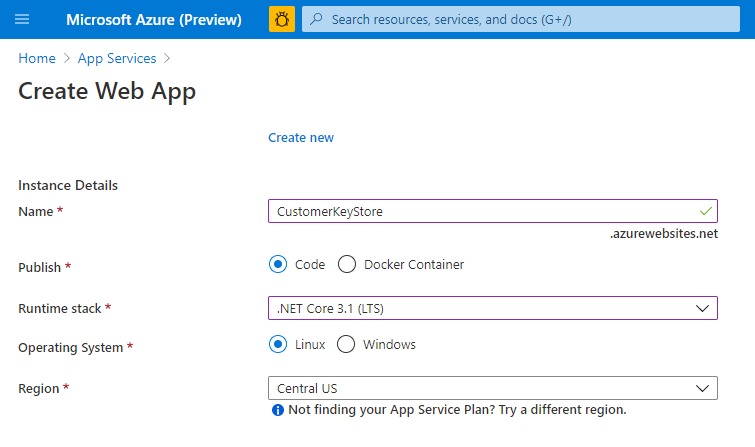
At the bottom of the page, select Review + create, and then select Add.
Do one of the following to publish your generated keys:
Publish via ZipDeployUI
Go to
https://<WebAppInstanceName>.scm.azurewebsites.net/ZipDeployUI.For example:
https://dkeservice.contoso.scm.azurewebsites.net/ZipDeployUIIn the codebase for the key store, go to the customer-key-store\src\customer-key-store folder, and verify that this folder contains the customerkeystore.csproj file.
Run: dotnet publish
The output window displays the directory where the publish was deployed.
For example:
customer-key-store\src\customer-key-store\bin\Debug\netcoreapp3.1\publish\Send all files in the publish directory to a .zip file. When creating the .zip file, make sure that all files in the directory are at the root level of the .zip file.
Drag and drop the .zip file you created to the ZipDeployUI site you opened before. For example:
https://dkeservice.scm.azurewebsites.net/ZipDeployUI
DKE is deployed and you can browse to the test keys you created. Continue to Validate your deployment in this article.
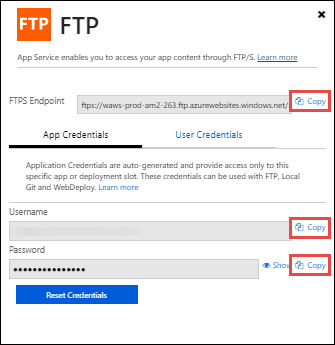
Publish via FTP
Connect to the App Service you created before.
In your browser, go to: Azure portal > App Service > Deployment Center > Manual Deployment > FTP > Dashboard.
Copy the connection strings displayed to a local file. Use these strings to connect to the Web App Service and upload files via FTP.
For example:
In the codebase for the key storage, go to the customer-key-store\src\customer-key-store directory.
Verify that this directory contains the customerkeystore.csproj file.
Run: dotnet publish
The output contains the directory where the publish was deployed.
For example:
customer-key-store\src\customer-key-store\bin\Debug\netcoreapp3.1\publish\Send all files in the publish directory to a zip file. When creating the .zip file, make sure that all files in the directory are at the root level of the .zip file.
From your FTP client, use the connection information you copied to connect to your App Service. Upload the .zip file you created in the previous step to the root directory of your Web App.
DKE is deployed and you can browse to the test keys you'd created. Next, Validate your deployment.
Validate your deployment
After deploying DKE using one of the methods described in this article, validate the deployment and the key store settings.
Run:
src\customer-key-store\scripts\key_store_tester.ps1 dkeserviceurl/mykey
For example:
key_store_tester.ps1 https://dkeservice.contoso.com/TestKey1
Ensure that no errors appear in the output. When you're ready, register your key store.
The key name is case-sensitive. Enter the key name as it appears in the appsettings.json file.
Register your key store
The following steps enable you to register your DKE service. Registering your DKE service is the last step in deploying DKE before you can start creating labels.
To register the DKE service:
In your browser, open the Microsoft Azure portal, and go to All Services > Identity > App Registrations.
Select New registration, and enter a meaningful name.
Select an account type from the options displayed.
For example:
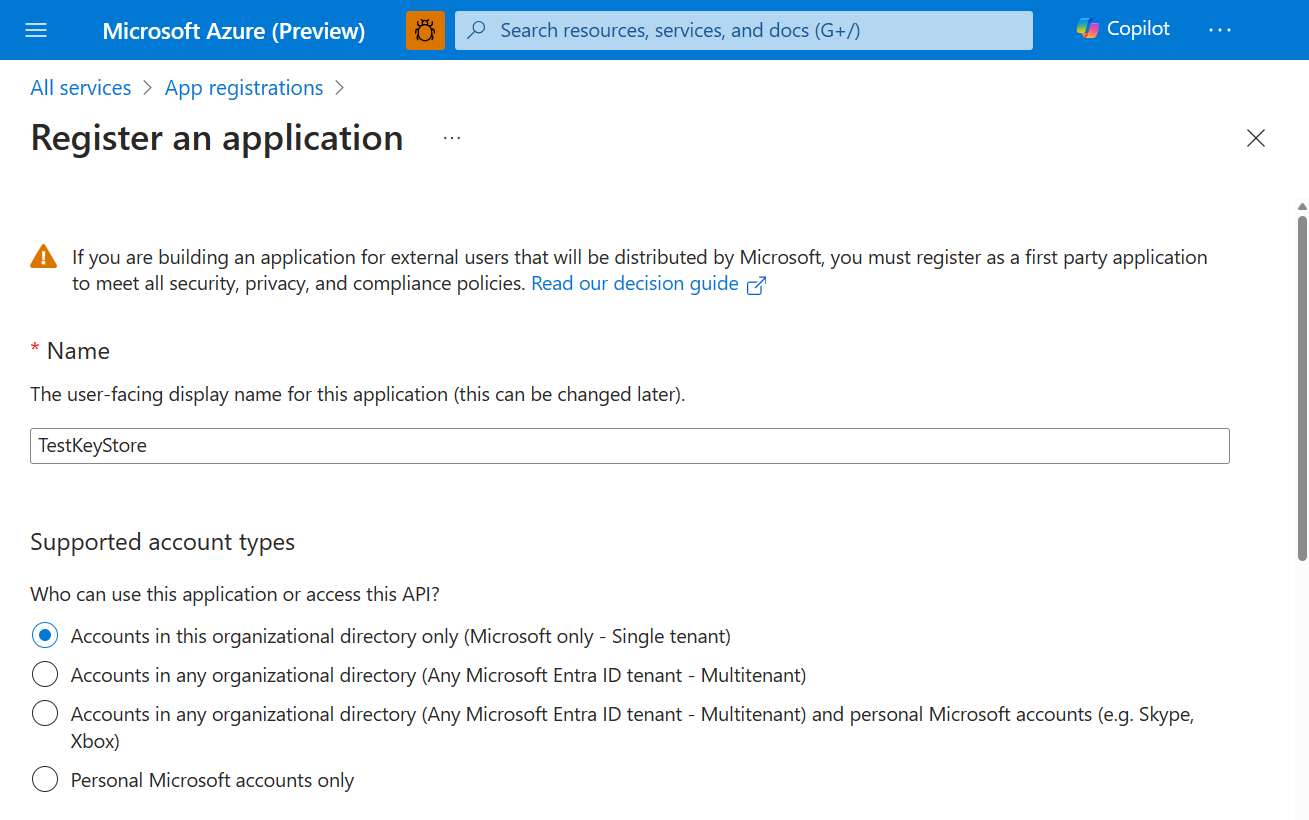
At the bottom of the page, select Register to create the new App Registration.
In your new App Registration, in the left pane, under Manage, select Authentication.
Select Add a platform.
On the Configure platforms popup, select Web.
Under Redirect URIs, enter the URI of your double key encryption service. Enter the App Service URL, including both the hostname and domain.
For example:
https://mydkeservicetest.com- The URL you enter must match the hostname where your DKE service is deployed.
- The domain must be a verified domain.
- In all cases, the scheme must be https.
Ensure the hostname exactly matches your App Service hostname.
Under Implicit grant, select the ID tokens checkbox.
Select Save to save your changes.
On the left pane, select Expose an API, next to Application ID URI, enter your App Service URL, including both hostname and domain, and then select Set.
Still on the Expose an API page, in the Scopes defined by this API area, select Add a scope. In the new scope:
Define the scope name as user_impersonation.
Select the administrators and users who can consent.
Define any remaining values required.
Select Add scope.
Select Save at the top to save your changes.
Still on the Expose an API page, in the Authorized client applications area, select Add a client application.
In the new client application:
Define the Client ID as
d3590ed6-52b3-4102-aeff-aad2292ab01c. This value is the Microsoft Office client ID, and enables Office to obtain an access token for your key store.Under Authorized scopes, select the user_impersonation scope.
Select Add application.
Select Save at the top to save your changes.
Repeat these steps, but this time, define the client ID as
c00e9d32-3c8d-4a7d-832b-029040e7db99. This value is the information protection client ID.
Your DKE service is now registered. Continue by creating labels using DKE.
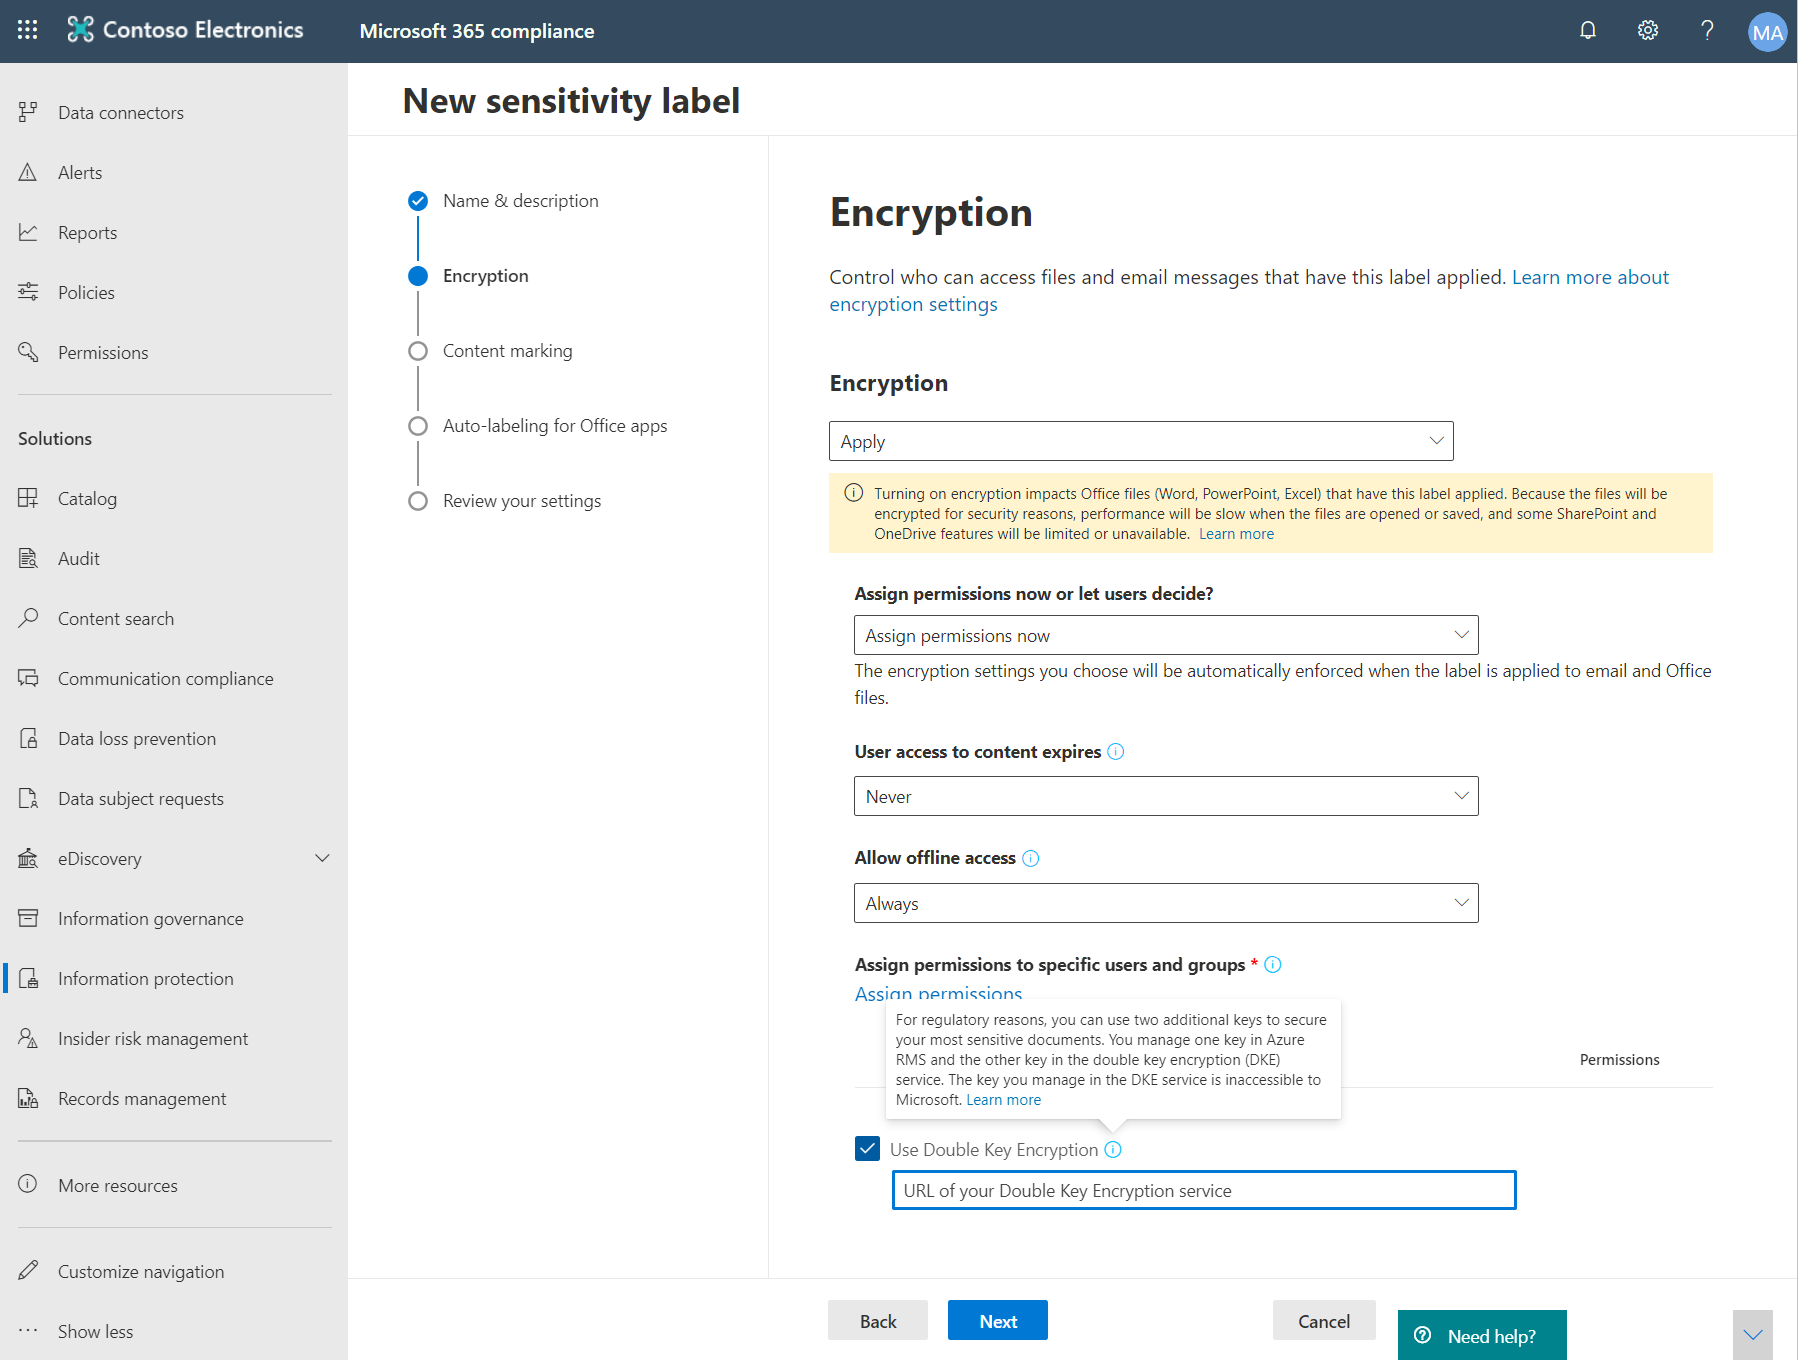
Create sensitivity labels using DKE
In the Microsoft Purview compliance portal, create a new sensitivity label and apply encryption as you would otherwise. Select Use Double Key Encryption and enter the endpoint URL for your key. You need to include the key name you provided in the "TestKeys" section of the appsettings.json file in the URL.
For example: https://testingdke1.azurewebsites.net/KEYNAME
Any DKE labels you add appear for users in the latest versions of Microsoft 365 Apps for enterprise.
Note
It may take up to 24 hours for the clients to refresh with the new labels.
Migrate protected files from HYOK labels to DKE labels
If you want, once you finish setting up DKE, you can migrate content that you protected using HYOK labels to DKE labels. To migrate, use the Microsoft Purview Information Protection scanner. To get started using the scanner, see Understand the information protection scanner.
If you don't migrate content, your HYOK protected content remains unaffected.
Other deployment options
We realize that for some customers in highly regulated industries, this standard reference implementation using software-based keys might not be sufficient to meet their enhanced compliance obligations and needs. We partner with third-party hardware security module (HSM) vendors to support enhanced key management options in the DKE service, including:
Reach out directly to these vendors for more information and guidance on their in-market DKE HSM solutions.
Set up clients to apply DKE sensitivity labels
On each client device, complete this task.
- Ensure the following registry values are defined on each client. Create registry keys that aren't already there:
[HKEY_LOCAL_MACHINE\SOFTWARE\WOW6432Node\Microsoft\MSIPC\flighting]
"DoubleKeyProtection"=dword:00000001
[HKEY_LOCAL_MACHINE\SOFTWARE\Microsoft\MSIPC\flighting]
"DoubleKeyProtection"=dword:00000001
Feedback
Kommer snart: Under hela 2024 kommer vi att fasa ut GitHub-problem som feedbackmekanism för innehåll och ersätta det med ett nytt feedbacksystem. Mer information finns i: https://aka.ms/ContentUserFeedback.
Skicka och visa feedback för