Holographic remoting — MRTK2
Holographic remoting streams holographic content from a PC to your Microsoft HoloLens in real-time, using a Wi-Fi or USB cable connection. This feature can significantly increase developer productivity when developing mixed reality applications.
XR SDK as mentioned below refers to Unity's new XR pipeline in Unity 2019.3 and beyond. See here for more information on using XR SDK with MRTK. Legacy XR refers to the existing XR pipeline that is included in Unity 2018, deprecated in Unity 2019.3 and removed in Unity 2020.
Initial setup
To enable remoting to a HoloLens, it is important to ensure that the project is using the latest remoting components.
- Open Window > Package Manager
- If using legacy XR: Verify that latest version of the Windows Mixed Reality package is installed.
- If using XR SDK: Verify that latest version of the Windows XR Plugin package is installed.
- Ensure the latest Holographic Remoting application is installed, on the HoloLens, via the Microsoft Store.
Please continue to Legacy XR setup instructions or XR SDK setup instructions depending on which pipeline is used in the project.
Legacy XR setup instructions
The instructions below only apply to remoting with HoloLens 2. If you only perform remoting with HoloLens (1st Gen), skip to Connecting to the HoloLens with Wi-Fi.
When using a HoloLens 2, support for remoting articulated hand and eye tracking data has been added to MRTK. To enable these features, please follow the steps documented in Import DotNetWinRT into the project.
Once imported, the next step is to select Mixed Reality > Toolkit > Utilities > Windows Mixed Reality > Check Configuration. This step adds a scripting define that enables the DotNetWinRT dependency.
Note
When using Unity 2019.4 and newer, it is not necessary to run the Check Configuration utility.
To enable tracking of hand joints and eye tracking, follow the steps in the Debugging HoloLens 2 remoting via Unity package import and related sections.
Debugging HoloLens 2 remoting via Unity package import
If HoloLens 2 hand joints and eye tracking aren't working over remoting, there are a few common points of potential issues. They're listed below in the order they should be checked.
These issues are particularly relevant when running on Unity 2019.3 or later.
Import DotNetWinRT into the project
Download the Mixed Reality Feature Tool
In the Discover features view, select Mixed Reality WinRT Projections

Click Get Features and continue to import the package.
DOTNETWINRT_PRESENT define written into player settings
Note
When using Unity 2019.4 and newer, the DOTNETWINRT_PRESENT define is contained within the appropriate .asmdef files and not the Unity Player Settings. The Check Configuration step is not required.
Beginning with MRTK version 2.5.0, for performance reasons, this #define is no longer automatically set. To enable this flag, please use the Mixed Reality Toolkit > Utilities > Windows Mixed Reality > Check Configuration menu item.
Note
The Check Configuration item does not display a confirmation. To confirm that the define has been set, please navigate to the Unity Player Settings. From there, under the UWP tab, check under Other Settings for the Scripting Define Symbols. Make sure DOTNETWINRT_PRESENT is properly written in that list. If that's there, this step succeeded.

Removing HoloLens 2-specific remoting support
If you're running into conflicts or other issues due to the presence of the DotNetWinRT adapter, please reach out on one of our help resources.
XR SDK setup instructions
Follow the Windows Mixed Reality setup instructions on the Getting started with MRTK and XR SDK page and make sure to perform the step required for in-editor HoloLens Remoting.
Connecting to the HoloLens with Wi-Fi
Once the project has been configured, a connection can be established to the HoloLens.
In File > Build Settings, ensure that the project build type is set to Universal Windows Platform
On the HoloLens, launch the Holographic Remoting application.
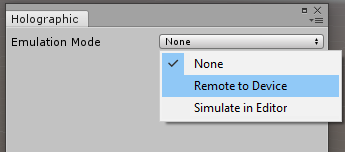
In Unity, select Mixed Reality > Remoting > Holographic Remoting for Play Mode.

Set Emulation Mode to Remote to Device.
(Only applies to legacy XR) Select the Device Version.

Using the IP Address displayed by the Holographic Remoting Player application, set the Remote Machine field.
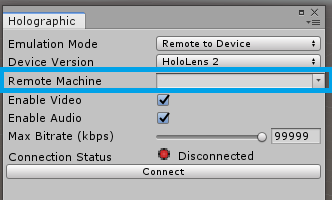
Click Connect.
Note
If you cannot connect, make sure your HoloLens 2 is not plugged in to your PC and restart Unity.
Connecting to the HoloLens with USB cable
USB cable connection gives better rendering quality and stability. To use USB cable connection, disconnect from the HoloLens from Wi-Fi in HoloLens's Settings and launch Holographic Remoting Player app. It will display an IP address that starts with 169. Use this IP address in Unity's Holographic Emulation setting to connect. Once the IP address for USB cable has been identified, it is safe to connect the HoloLens to Wi-Fi again.
Starting a remoting session
With Unity connected to the HoloLens, enter play mode in the editor.
When the session is complete, exit play mode.
Note
There is a known issue with some versions of Unity where the editor may hang upon entering play mode during a remoting session. This issue may manifest if the Holographic window is open when the project is loaded. To ensure this issue does not occur, always close the Holographic dialog prior to exiting Unity.
See also
คำติชม
เร็วๆ นี้: ตลอดปี 2024 เราจะขจัดปัญหา GitHub เพื่อเป็นกลไกคำติชมสำหรับเนื้อหา และแทนที่ด้วยระบบคำติชมใหม่ สำหรับข้อมูลเพิ่มเติม ให้ดู: https://aka.ms/ContentUserFeedback
ส่งและดูข้อคิดเห็นสำหรับ