Exercise: Build a canvas app
In this unit, you generate a canvas app where the data source is a Microsoft Excel workbook that is stored in Microsoft OneDrive. This Excel workbook has a table of different buildings owned by Contoso Manufacturing. Today, they must email the shared workbook between people as they travel to different locations to make updates. With a Power Apps canvas app, they're able to view the buildings directly from their phones. In addition, they're also able to edit the information and even add new buildings.
This example uses Excel, but keep in mind that you can use data from many other sources such as:
- Microsoft Dataverse
- Microsoft SharePoint
- cloud services like Salesforce
- on-premises sources like Microsoft SQL Server
This gives you the flexibility to build your app from your data no matter where it lives. You can also combine data sources within Power Apps to easily create associations between different data source. If you don't have a Power Apps account available, you can sign up for a free Power Apps Community Plan. This allows you to learn and explore Power Apps in your own environment. For more information and to sign up, go to https://powerapps.microsoft.com/communityplan/
Build a basic canvas app
Connect to a data source
To connect to a data source, use the following procedure:
Download the Contoso-Site-Tracking.zip file, extract all of the files, and save them to your OneDrive.
Go to https://make.powerapps.com and sign in with your organizational account.
In the left pane, select Create.
In the Start from data section, select Excel.
Under Connections, choose OneDrive. If you don't have the connection available, click New connection to create one.
For Choose an Excel file on the right select the Contoso Site Tracking.xlsx file.
For Choose a table click SiteInspector and click Connect.
Power Apps generates the app by inspecting your data and matching it with Power Apps capabilities so that you get a working app as a starting point. Generated apps are always based on a single list or table, but you can add more data to the app later.
Explore the generated app
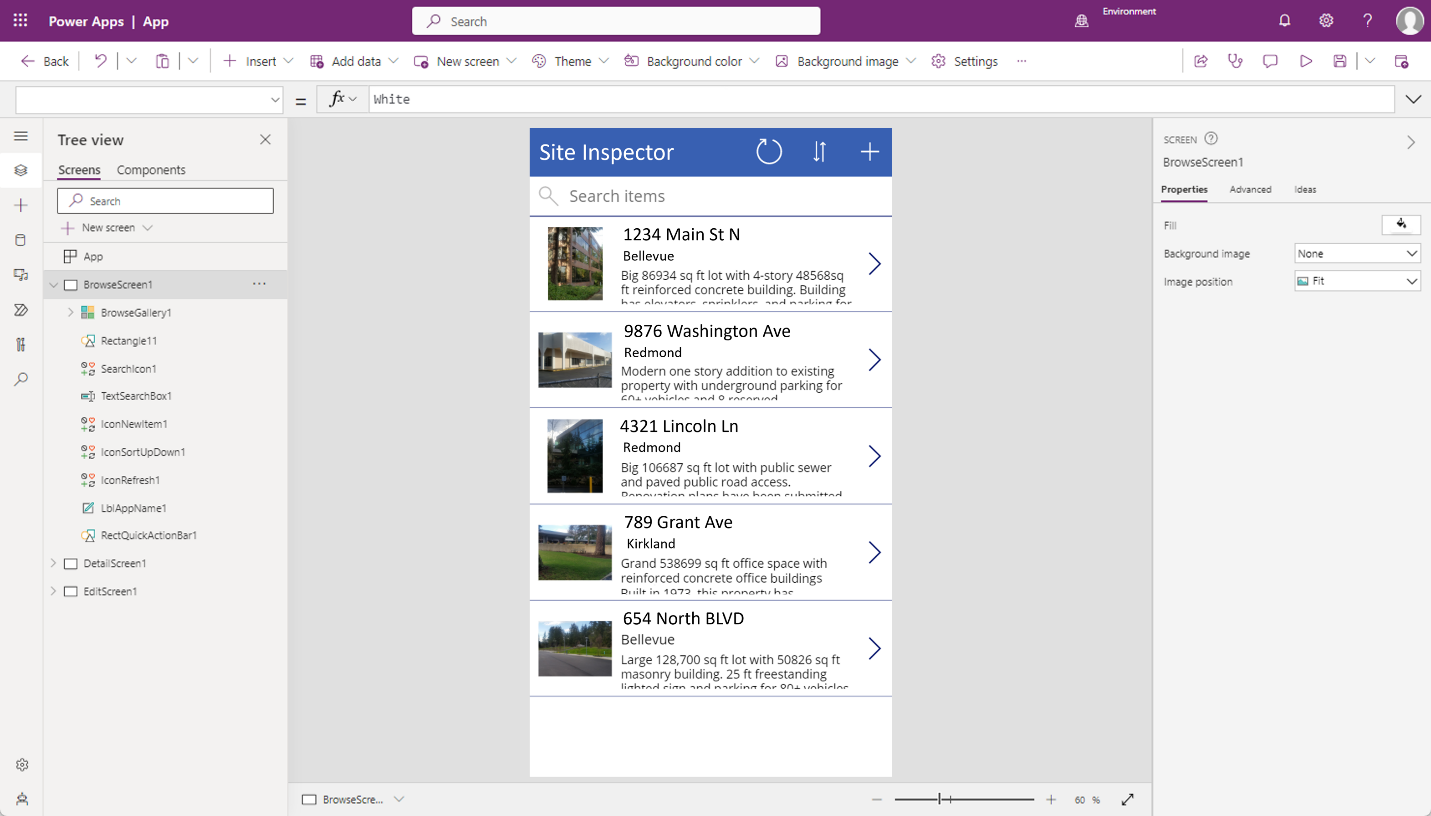
Your new three-screen app now opens in Power Apps Studio. All apps that are generated from data have the same set of screens that you can view from the Screens pane:
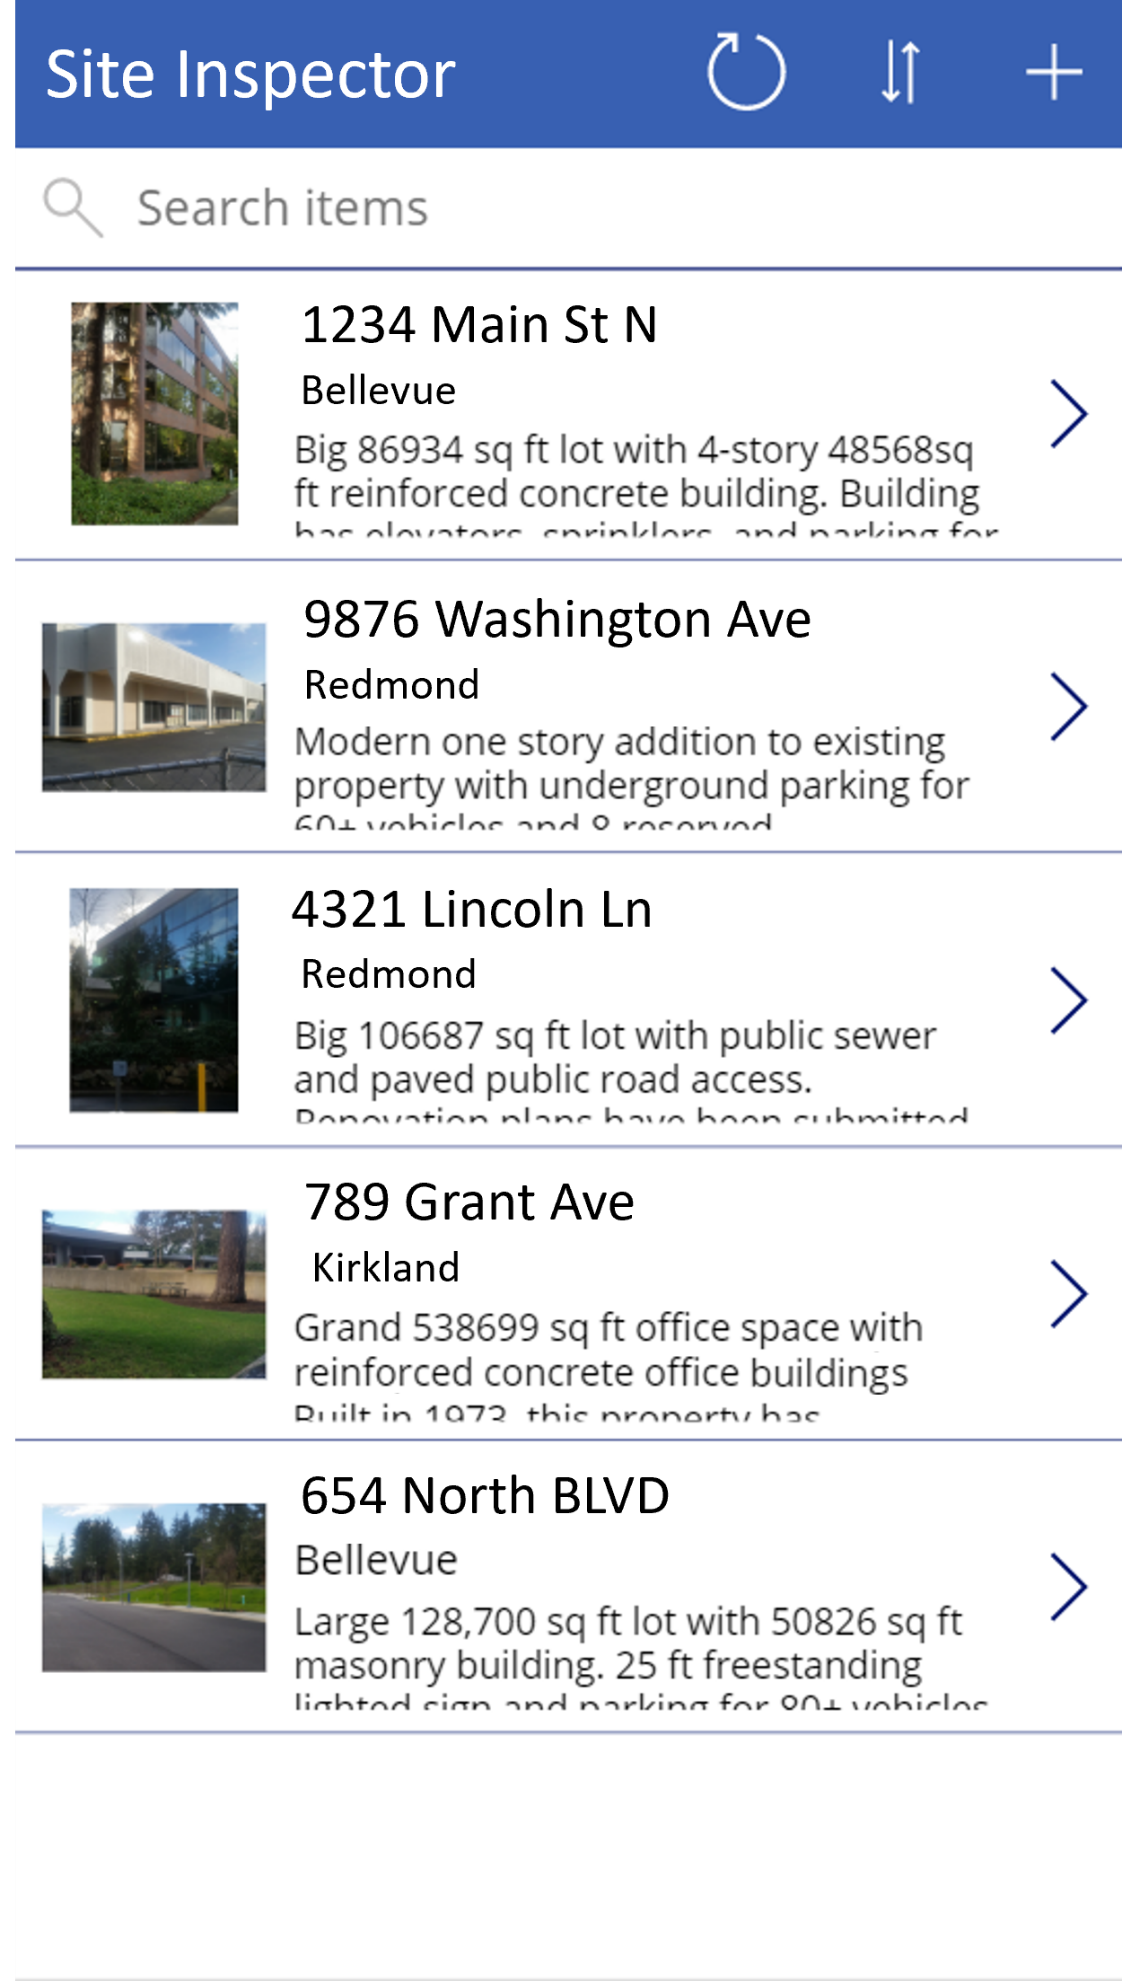
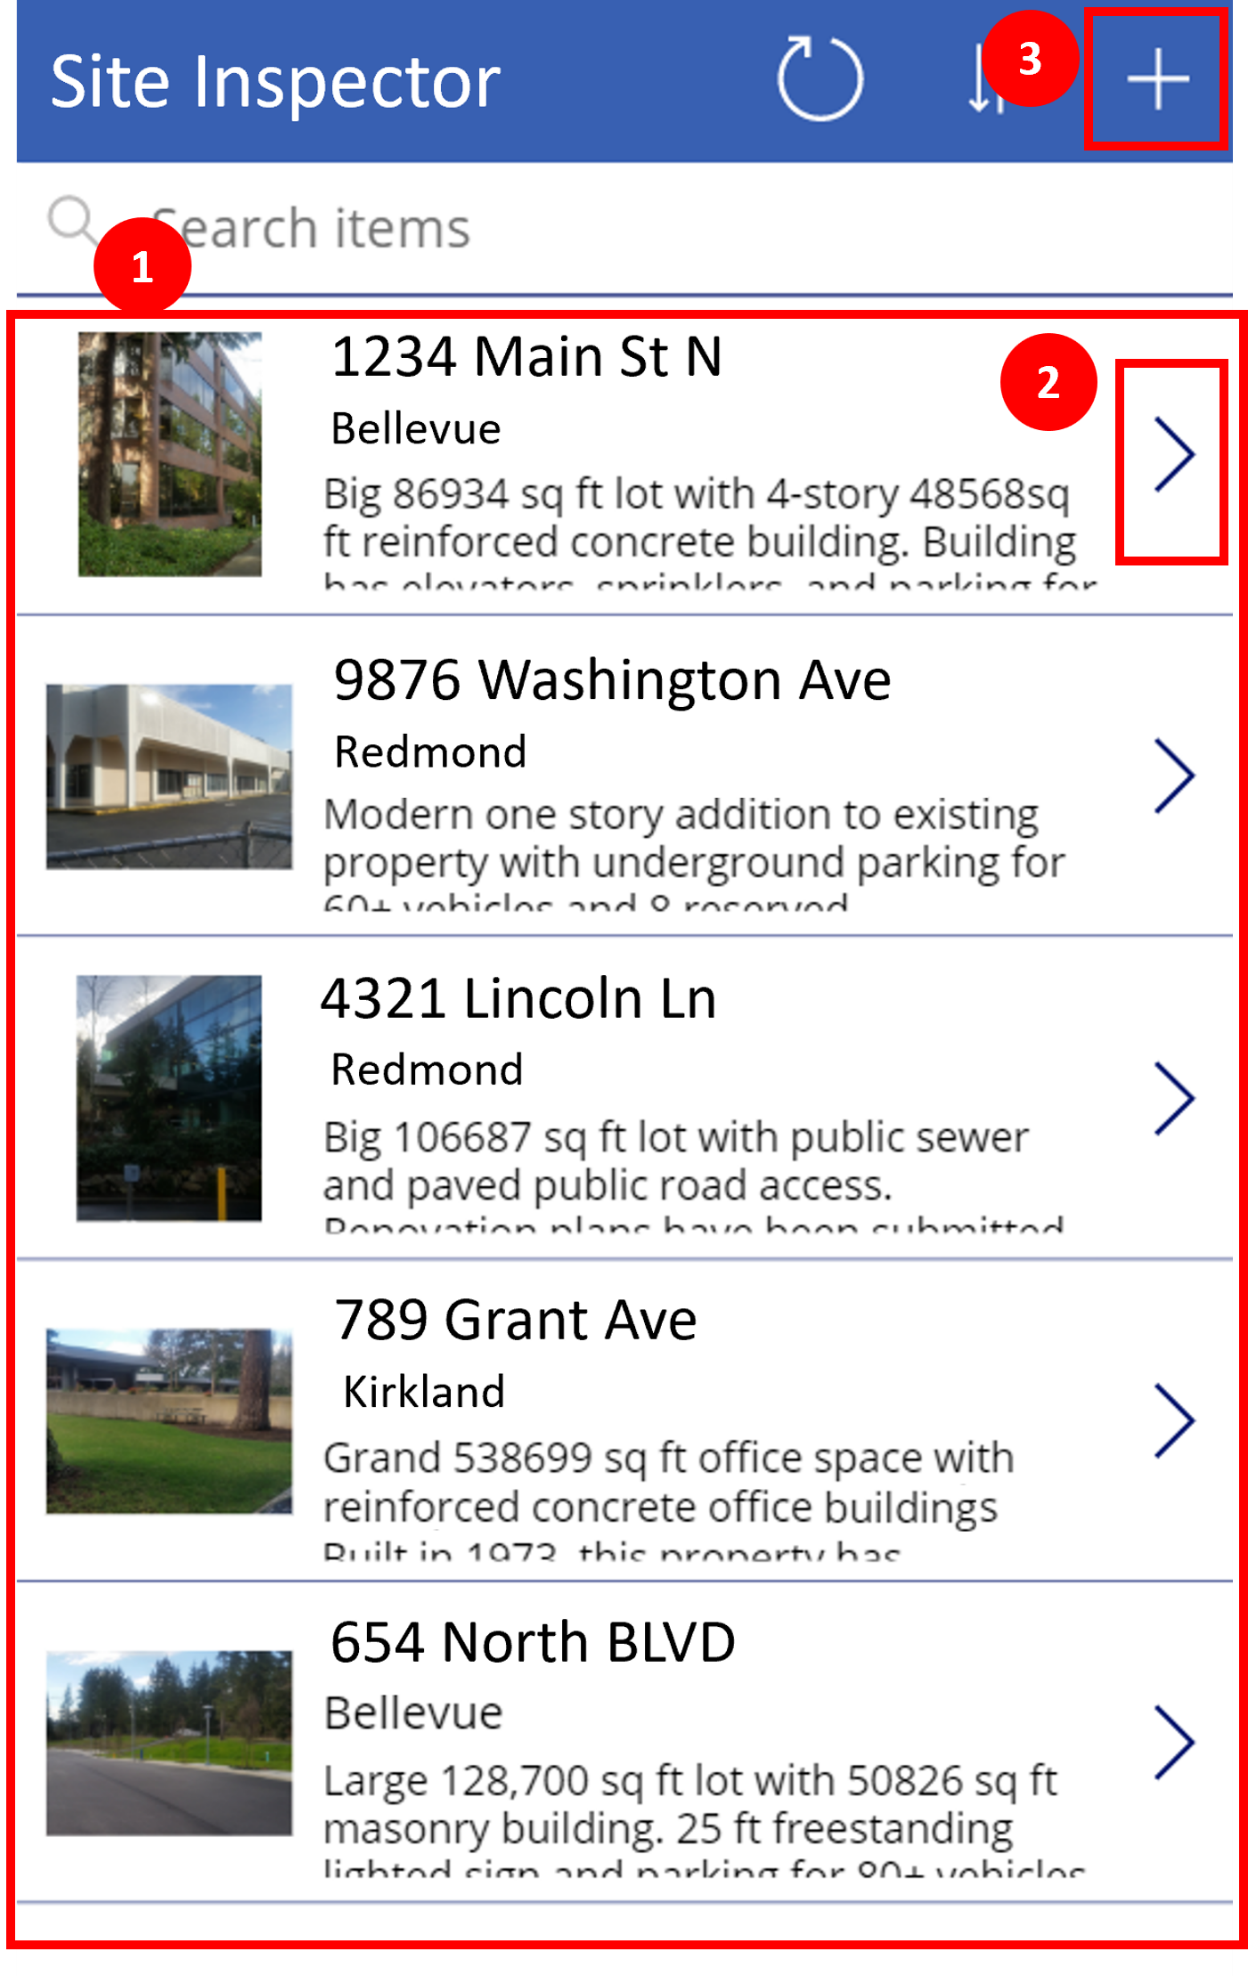
Browse screen – This screen appears by default. In it, you can browse, sort, search, and refresh the data from the data source. In the browse screen, you can add items to the data source by selecting the plus sign (+).
Note
It will be listed as BrowseScreen1 in the UI.
Details screen - The details screen shows all the information about a single item. In this screen, you can open an item to edit or delete it.
Note
It will be listed as DetailScreen1 in the UI.
Edit/create screen - In this screen, you can edit an existing item or create a new one.
Note
It will be listed as EditScreen1 in the UI.
The image shows what your three-screen app looks like in the App Studio.
Select Play
 in the upper-right corner to practice using the app. Notice that it includes all the data from the table and provides a good default experience.
Now that you generated the Contoso Site Tracking app, you should take a few minutes to click through the app and explore its design. Take note of how you use a Gallery to browse the records from the Excel file. When you click on a record, you're taken to a different screen where a Form control displays the other details. The app also includes the ability to edit those rows or even make a new row. You created a functional app you can now build upon.
Once you finished exploring the app, close out of preview mode by selecting the "X" in the upper-right corner. To make your app visible on the phone, it needs to be saved.
Saving your app
To save your app, select the Save button, which is right next to the Play button. Replace the current title "App" with Contoso Site Tracking app, and then select Save. You see a green check mark when all changes are successfully saved. You can now open the app on your phone. We walk through accessing an app on your phone later.

Controls in Power Apps
A control is a UI element that produces an action or shows information. Many controls in Power Apps are like controls that you used in other apps: labels, text-input boxes, drop-down lists, navigation elements, and so on. By using controls, you can provide the user experience that best reflects what you want to deliver.
You can access Power Apps controls on the Insert tab.

A few common controls that can add interest and impact to your apps include:
Galleries - These controls are layout containers that hold a set of controls that show rows from a data source. These are commonly used when you want to display multiple records at a single time.
Forms - These controls show details about your data and let you create and edit records.
Media - These controls let you add background images, include a camera button (so that users can take pictures from the app), a barcode reader for quickly capturing identification information, and more.
Charts - These controls let you add charts so that users can perform instant analysis while they're on the road.
To see what controls are available, select the Insert tab, and then select each option in turn.
Explore the browse screen (BrowseScreen1)
Now that we examined some of the controls available, let's examine how they're being used in our Site Inspection app. The first screen in the app is the browse screen, which is named BrowseScreen1 by default.
The browse screen has multiple controls. Controls in the browse screen that you want to become familiar with include:
BrowseGallery1 - This Gallery control takes up most of the screen and shows data from your data source.
NextArrow1 - When this Icon control is selected, it opens the details screen.
IconNewItem1 - Another Icon control that When selected, opens the edit/create screen.
Explore the details screen
The details screen is named DetailScreen1 by default. Some of its controls are as follows:
DetailForm1 - This control contains other controls and contains a data card for each column of the row that is being displayed.
Address_DataCard1 - This is a card control. Each card represents a single column of the row. In this case, it shows the Address from the Site Inspector table, as shown in the previous unit.
IconEdit1 - When this control is selected, it opens the edit/create screen so that the user can edit the current item.
Explore the edit/create screen
The third screen in the app is EditScreen1. Some of its controls include:
EditForm1 - This control contains other controls and contains a data card for each column of the row that is being edited.
Address_DataCard2 - This is a card control that shows the address from the Site Inspector table, as shown in the previous unit.
IconAccept1 - When this control is selected, it saves the user's changes.
Install the app on your device
Power Apps can be used on mobile devices with the Power Apps mobile application. If you want to experience what it looks like on a mobile device, install the Power Apps Mobile app on your phone.
Download Power Apps Mobile from the app store for the platform that you want to use.
Sign in by using your username and password.
On your phone or tablet, run the Contoso Site Tracking app in Power Apps Mobile. If you don't want to install the app, you can run it in a browser.
If the app you're creating is to be used on a mobile device, then it's a good idea to check how the Power App looks and runs on mobile so you can give your users the best experience.