How to: Specify build events (C#)
Applies to: ![]() Visual Studio
Visual Studio ![]() Visual Studio for Mac
Visual Studio for Mac
Note
This article applies to Visual Studio 2017. If you're looking for the latest Visual Studio documentation, see Visual Studio documentation. We recommend upgrading to the latest version of Visual Studio. Download it here
Use build events to specify commands that run before the build starts or after the build finishes.
When a project is built, pre-build events are added to a file named PreBuildEvent.bat and post-build events are added to a file named PostBuildEvent.bat. If you want to ensure error checking, add your own error-checking commands to the build steps.
Specify a build event
The build event syntax can include any command that is valid at a command prompt or in a .bat file. The name of a batch file should be preceded by call to ensure that all subsequent commands are executed.
Note
If your pre-build or post-build event does not complete successfully, you can terminate the build by having your event action exit with a code other than zero (0), which indicates a successful action.
Macros
Commonly available "macros" (actually MSBuild properties) are listed at MSBuild common properties. For .NET SDK projects (.NET Core or .NET 5 and later), additional properties are listed at MSBuild properties for Microsoft.NET.Sdk.
In your scripts for build events, you might want to reference the values of some project-level variables such as the name of the project or the location of the output folder. In prior versions of Visual Studio, these were called macros. The equivalent to macros in recent versions of Visual Studio are MSBuild properties. MSBuild is the build engine that Visual Studio uses to process your project file when it performs a build. A build event in the IDE results in an MSBuild target in the project file. You can use any MSBuild property that is available in the target in your project file (for example, $(OutDir) or $(Configuration)) . The MSBuild properties that are available to you in these events depend on the files implicitly or explicitly imported in a project file, such .props and .targets files, and properties set in your project file, such as in PropertyGroup elements. Be careful to use the exact spelling of each property. No error is reported if you misspell a property; instead, an undefined property evaluates to an empty string.
For example, suppose you specify a pre-build event as follows:
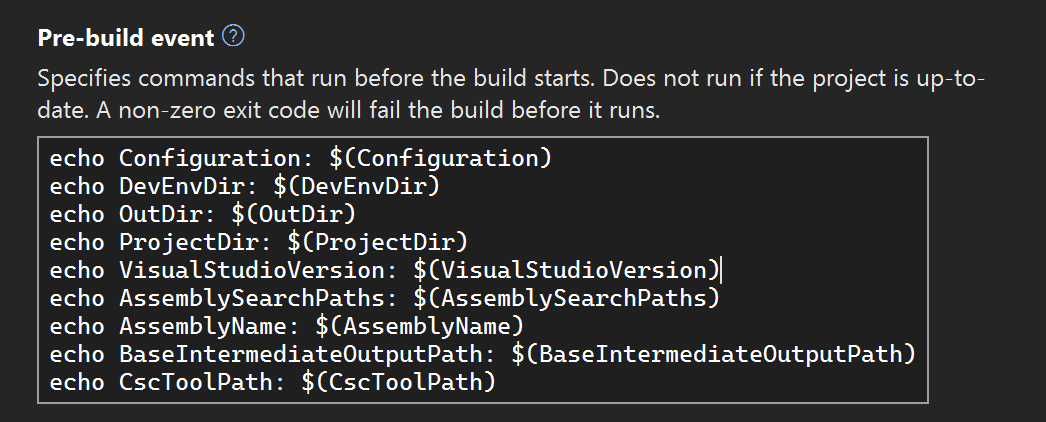
That pre-build event results in the following entry, called a Target in your project file:
<Target Name="PreBuild" BeforeTargets="PreBuildEvent">
<Exec Command="echo Configuration: $(Configuration)
echo DevEnvDir: $(DevEnvDir)
echo OutDir: $(OutDir)
echo ProjectDir: $(ProjectDir)
echo VisualStudioVersion: $(VisualStudioVersion)
echo AssemblySearchPaths: $(AssemblySearchPaths)
echo AssemblyName: $(AssemblyName)
echo BaseIntermediateOutputPath: $(BaseIntermediateOutputPath)
echo CscToolPath: $(CscToolPath)" />
</Target>
The build event appears as a target that includes the Exec task with the input you specified as the Command. Newlines are encoded in the XML.
When you build the project in this example, the pre-build event prints the values of some properties. In this example, $(CscToolPath) doesn't produce any output, because it's not defined. It is an optional property that you can define in your project file to give the path to a customized instance of the C# compiler (for example, if you were testing a different version of csc.exe, or an experimental compiler).
Output from your build events is written to the build output, which can be found in the Output window. In the Show output from dropdown, choose Build.
Build started...
1>------ Build started: Project: ConsoleApp4, Configuration: Debug Any CPU ------
1>You are using a preview version of .NET. See: https://aka.ms/dotnet-core-preview
1>Configuration: Debug
1>DevEnvDir: C:\Program Files\Microsoft Visual Studio\2022\Preview\Common7\IDE\
1>OutDir: bin\Debug\net6.0\
1>ProjectDir: C:\source\repos\ConsoleApp4\ConsoleApp4\
1>VisualStudioVersion: 17.0
1>ALToolsPath:
1>AssemblySearchPaths: {CandidateAssemblyFiles};{HintPathFromItem};{TargetFrameworkDirectory};{RawFileName}
1>AssemblyName: ConsoleApp4
1>BaseIntermediateOutputPath: obj\
1>CscToolsPath:
1>Skipping analyzers to speed up the build. You can execute 'Build' or 'Rebuild' command to run analyzers.
1>ConsoleApp4 -> C:\Users\ghogen\source\repos\ConsoleApp4\ConsoleApp4\bin\Debug\net6.0\ConsoleApp4.dll
Example
The following procedure shows how to set the minimum operating system version in the application manifest by using an .exe command that is called from a post-build event (the .exe.manifest file in the project directory). The minimum operating system version is a four-part number such as 4.10.0.0. To set the minimum operating system version, the command will change the <dependentOS> section of the manifest:
<dependentOS>
   <osVersionInfo>
      <os majorVersion="4" minorVersion="10" buildNumber="0" servicePackMajor="0" />
   </osVersionInfo>
</dependentOS>
Create an .exe command to change the application manifest
Create a new Console App project for the command. Name the project ChangeOSVersionCS.
In Program.cs, add the following line to the other
usingdirectives at the top of the file:using System.Xml;In the
ChangeOSVersionCSnamespace, replace theProgramclass implementation with the following code:class Program { /// <summary> /// This function sets the minimum operating system version for a ClickOnce application. /// </summary> /// <param name="args"> /// Command Line Arguments: /// 0 - Path to application manifest (.exe.manifest) /// 1 - Version of OS ///</param> static void Main(string[] args) { string applicationManifestPath = args[0]; Console.WriteLine("Application Manifest Path: " + applicationManifestPath); // Get version name. Version osVersion = null; if (args.Length >=2 ){ osVersion = new Version(args[1]); }else{ throw new ArgumentException("OS Version not specified."); } Console.WriteLine("Desired OS Version: " + osVersion.ToString()); XmlDocument document; XmlNamespaceManager namespaceManager; namespaceManager = new XmlNamespaceManager(new NameTable()); namespaceManager.AddNamespace("asmv1", "urn:schemas-microsoft-com:asm.v1"); namespaceManager.AddNamespace("asmv2", "urn:schemas-microsoft-com:asm.v2"); document = new XmlDocument(); document.Load(applicationManifestPath); string baseXPath; baseXPath = "/asmv1:assembly/asmv2:dependency/asmv2:dependentOS/asmv2:osVersionInfo/asmv2:os"; // Change minimum required operating system version. XmlNode node; node = document.SelectSingleNode(baseXPath, namespaceManager); node.Attributes["majorVersion"].Value = osVersion.Major.ToString(); node.Attributes["minorVersion"].Value = osVersion.Minor.ToString(); node.Attributes["buildNumber"].Value = osVersion.Build.ToString(); node.Attributes["servicePackMajor"].Value = osVersion.Revision.ToString(); document.Save(applicationManifestPath); } }The command takes two arguments: the path of the application manifest (that is, the folder in which the build process creates the manifest, typically Projectname.publish), and the new operating system version.
Build the project.
Copy the .exe file to a directory such as C:\TEMP\ChangeOSVersionVB.exe.
Next, invoke this command in a post-build event to modify the application manifest.
Invoke a post-build event to modify the application manifest
Create a new Windows Forms App project and name it CSWinApp.
With the project selected in Solution Explorer, on the Project menu, choose Properties.
In the Project Designer, locate the Publish page and set Publishing location to C:\TEMP.
Publish the project by clicking Publish Now.
The manifest file is built and saved to C:\TEMP\CSWinApp_1_0_0_0\CSWinApp.exe.manifest. To view the manifest, right-click the file, click Open with, select Select the program from a list, and then click Notepad.
Search in the file for the
<osVersionInfo>element. For example, the version might be:<os majorVersion="4" minorVersion="10" buildNumber="0" servicePackMajor="0" />Back in the Project Designer, click the Build Events tab.
In the Post-build event section, enter the following command:
C:\TEMP\ChangeOSVersionCS.exe "$(TargetPath).manifest" 5.1.2600.0When you build the project, this command changes the minimum operating system version in the application manifest to 5.1.2600.0.
Because the
$(TargetPath)macro expresses the full path for the executable being created,$(TargetPath).manifestspecifies the application manifest created in the bin directory. Publishing copies this manifest to the publishing location that you set earlier.Publish the project again.
The manifest version should now read:
<os majorVersion="5" minorVersion="1" buildNumber="2600" servicePackMajor="0" />
Note
Some scenarios may require more intelligent build actions than the build events are capable of. For example, for many common code-generation scenarios, you need to handle clean and rebuild operations, and you might want to enable incremental build for code-generation steps, so that the step only runs if the output is out-of-date with respect to the inputs. For such scenarios, consider creating a custom target that specifies AfterTargets or BeforeTargets to run during a specific point in the build process, and for further control in advanced scenarios, consider creating a custom task.