Sharks Cove hardware development board
Warning
The Sharks Cove hardware development board is no longer supported for Windows IoT Core. For a list of currently supported boards, see SoCs and custom boards.
Sharks Cove is a hardware development board that you can use to develop hardware and drivers for Windows.
The Intel Sharks Cove board supports driver development for devices that use a variety of interfaces, including GPIO, I2C, I2S, UART, SDIO, and USB. You can also use the Sharks Cove board to develop drivers for cameras and touch screens.
Before you start
The instructions given here require that you are running Windows 10, Windows 8.1, or Windows 7. These instructions do not work if you are running Windows 8.
If you are running Windows 7, you need to install PowerShell 4.0 and the Download and install the Windows ADK. Then on the Start menu, go to All Programs > Windows Kits > Windows ADK > Deployment and Imaging Tools Environment. Open this Command Prompt window as Administrator. Use this Command Prompt window when you enter the commands given in these instructions.
Step 1: Get the board and related hardware
You will need this hardware:
- Sharks Cove board with included power cord and adapter.
- USB hub
- USB keyboard
- USB mouse
- USB network adapter
- Monitor and HDMI cable (and possibly adapters)
You can get a Sharks Cove board at RCS Components or Kynix.
Step 2: Download kits and tools
A driver development environment has two computers: the host computer and the target computer. The target computer is also called the test computer. You develop and build your driver in Microsoft Visual Studio on the host computer. The debugger runs on the host computer and is available in the Visual Studio user interface. When you test and debug a driver, the driver runs on the target computer. In this case, the Sharks Cove board is the target computer.
To develop hardware and drivers for the Sharks Cove board, you need these kits and tools on the host computer:
On the host computer, first download Visual Studio, then download the WDK, and then download the WDK Test Pack. You do not need to download Debugging Tools for Windows separately, because it is included in the WDK.
Documentation
The online documentation for the WDK.
The online documentation for Debugging Tools for Windows.
The documentation for Debugging Tools for Windows is also available as a CHM file in the installation directory. Example: C:\Program Files (x86)\Windows Kits\10\Debuggers\x64\debugger.chm.
Step 3: Install Windows on the Sharks Cove board
You can install one of these versions of Windows on your Sharks Cove board:
| Term | Description |
|---|---|
| Windows Embedded 8.1 Industry Pro Evaluation | This is a 180-day free trial. We will refer to this as the evaluation version. |
| Windows Embedded 8.1 Industry Pro with Update (x86) - DVD | This requires a subscription. We will refer to this as the full version. |
If you intend to install the evaluation version, read this amendment to the license agreement:
Evaluation Software License Terms Amendment for the Hardware Developer Program
If the use of this software is in support of the Hardware Developer Program the following terms shall apply:
- You agree to the terms of the Microsoft Evaluation Software License Terms for Windows Embedded 8.1 Industry Pro ("Evaluation Software License Terms") in its entirety except for:
- Section 1.b. (Demonstration Rights) of the Evaluation Software License Terms is amended in part, as: - You may demonstrate or deliver for demonstration use to potential customers, a number reasonably necessary for demonstration purposes, Windows Embedded 8.1 Industry Pro devices developed by you through your use of the software ("Demonstration Device"). You may demonstrate and deliver Demonstration Devices to customers that are not under non-disclosure obligations.
- All provisions in Section 1.b. that do not directly conflict with the amended section above, shall apply.
- By using the software, you accept these terms. If you do not accept and comply with these terms, you may not use the software or its features.
Download Windows Embedded 8.1 Industry (x86) Pro Evaluation or Windows Embedded 8.1 Industry Pro with Update (x86) - DVD. Locate the downloaded file. For example,
9600.17050.WINBLUE_REFRESH...X86FRE_EN-US_DV9.ISO.
Create a folder that will be the root for your Sharks Cove setup files (for example, C:\SharksCoveWindows). We will call this folder Root. In Root, create these subfolders:
- Setup
- SharksCoveBsp
Double click your ISO file, and copy these files to Root\Setup.
- Boot
- Efi
- Sources
- Support
- Autorun.inf
- Bootmgr
- Bootmgr.efi
- Setup.exe
Note
If you are running Windows 7, right-click the ISO file, and choose Burn disk image . Burn the image to a recordable DVD. Then copy the files from the DVD to Root\Setup.
Get the Sharks Cove board support package (BSP). Copy all the files in the package to Root\SharksCoveBsp.
Get the WDK Development Boards Add-on Kit. Open the SourceCode tab. Click Download (not the Downloads tab) to get the kit scripts. Open the Scripts folder, and copy these two items to Root.
- Create-DevboardImage.ps1
- DevBoard folder
Note
The DevBoard folder contains several scripts and modules (DevboardImage.ps1, Devboard.psm1, enable-telnet.ps1, and others).
Open a Command Prompt window as Administrator, and enter Powershell. Navigate to Root. To add the BSP to your Windows image, enter one of these commands:
If you are using the evaluation version of Windows, enter this command:
.\Create-DevboardImage -SourcePath Setup\sources\install.wim -Index 2 -BspManifest SharksCoveBsp\SharksCoveBsp.xml
If you are using the full version of Windows, enter this command:
.\Create-DevboardImage -SourcePath Setup\sources\install.wim -Index 1 -BspManifest SharksCoveBsp\SharksCoveBsp.xml
Note You might need to set your execution policy before you run the Create-DevboardImage script. For example:
Set-ExecutionPolicy -ExecutionPolicy Unrestricted
Now that you have added the BSP to your Windows image, copy these folders and files from Root\Setup to a USB flash drive (FAT32).
- Boot
- Efi
- Sources
- Support
- Autorun.inf
- Bootmgr
- Bootmgr.efi
- Setup.exe
Set up your Sharks Cove hardware as shown here:
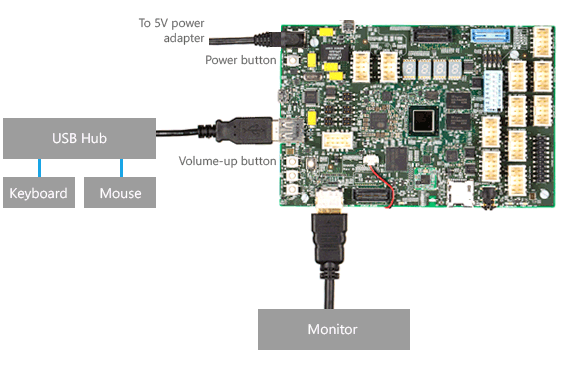
Plug the flash drive into the hub that is connected to the Sharks Cove board. Hold the volume-up button as you start or restart the Sharks Cove board. The volume-up button is the top button in the set of three buttons on the left side of the board as shown in the preceding diagram. (If the board is already started, you can turn it off by holding the Power button for several seconds.) When the board starts, you will see the EFI shell on the screen.
Note
You might need to navigate to the EFI Shell. Go to Boot Manager > EFI Internal Shell.
Note the name of the USB flash drive (for example, fs1:).
(Here we will use fs1: for the name of the USB flash drive.) At the Shell> prompt, enter these commands:
fs1: cd efi\boot dir Verify that bootia32.efi is in the directory. Enter this command:
bootia32.efi Follow the Windows setup instructions on the screen.
Step 4: Provision the Sharks Cove board for driver deployment and testing
Provisioning is the process of configuring a computer for automatic driver deployment, testing, and debugging.
Set up your hardware as shown here.
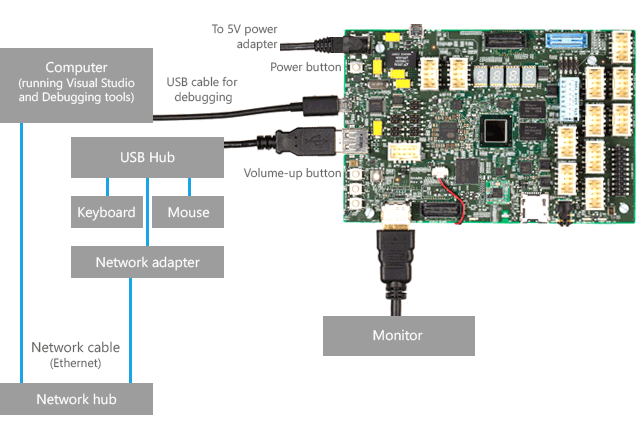
Provisioning the Sharks Cove board is similar to provisioning any other computer. To provision the Sharks Cove board, follow the instructions in this topic:
and this topic, which is available on line and in debugger.chm.
Note
Before you provision the Sharks Cove board, you need to disable Secure Boot. Restart the Sharks Cove board. As the board restarts, hold the Volume-up button. Go to Device Manager > System Setup > Boot. Set UEFI Security Boot to Disabled.
Step 5: Write a software driver for the Sharks Cove board
Before you write a device driver for the Sharks Cove board, it is helpful to familiarize yourself with the driver development tools by writing a software driver. The procedure is similar to writing a software driver for any other target computer. To get started, follow the hands-on exercises here:
Step 6: Alter the Secondary System Description Table (SSDT)
If you are writing a driver for a driver for a device that connects to a simple peripheral bus (SPB) on the Sharks Cove board, you need to update the Secondary System Description Table (SSDT) in the Sharks Cove firmware. An example of this is writing a driver for an accelerometer that transfers data over an I2C bus and generates interrupts through a general-purpose I/O (GPIO) pin. For more information, see Simple Peripheral Buses.
Here's an example of altering the SSDT. We will add a table entry for the ADXL345 accelerometer.
Note
See the SpbAccelerometer driver cookbook for a step-by-step guide to the SpbAccelerometer sample driver and the ADXL345 accelerometer.
Copy the x86 version of ASL.exe to the Sharks Cove board. ASL.exe is included in the WDK.
Example: C:\Program Files (x86)\Windows Kits\8.1\Tools\x86\ACPIVerify\ASL.exe
Open a Command Prompt windows as Administrator. Decompile the SSDT by entering this command:
asl /tab=ssdt
This creates the file Ssdt.asl.
Open Ssdt.asl (for example, in Notepad).
DefinitionBlock("SSDT.AML", "SSDT", 0x01, "Intel_", "ADebTabl", 0x00001000)
{
    Scope()
    {
        Name(DPTR, 0x3bf2d000)
        Name(EPTR, 0x3bf3d000)
        Name(CPTR, 0x3bf2d010)
        Mutex(MMUT, 0x0)
        Method(MDBG, 0x1, Serialized)
        {
            Store(Acquire(MMUT, 0x3e8), Local0)
            If(LEqual(Local0, Zero))
            {
                OperationRegion(ABLK, SystemMemory, CPTR, 0x10)
                Field(ABLK, ByteAcc, NoLock, Preserve)
                {
                    AAAA, 128
                }
                Store(Arg0, AAAA)
                Add(CPTR, 0x10, CPTR)
                If(LNot(LLess(CPTR, EPTR)))
                {
                    Add(DPTR, 0x10, CPTR)
                }
                Release(MMUT)
            }
            Return(Local0)
        }
    }

    // Insert a Scope(_SB_) and a Device entry here.

}
Insert a Scope(_SB_) entry. Inside your scope entry, insert your own Device entry. For example, here's a scope(_SB_) entry and a Device entry for the ADXL345 accelerometer.
    Scope(_SB_)
    {
        Device(SPBA)
        {
            Name(_HID, "SpbAccelerometer")
            Name(_UID, 1)


        Method(_CRS, 0x0, NotSerialized)
        {
            Name(RBUF, ResourceTemplate()
            {
                I2CSerialBus(0x53, ControllerInitiated, 400000, AddressingMode7Bit, "\\_SB.I2C3", 0, ResourceConsumer)
                GpioInt(Edge, ActiveHigh, Exclusive, PullDown, 0, "\\_SB.GPO2") {0x17}
            })

            Return(RBUF)
        }


        Method(_DSM, 0x4, NotSerialized)
        {
            If(LEqual(Arg0, Buffer(0x10)
            {
                0x1e, 0x54, 0x81, 0x76, 0x27, 0x88, 0x39, 0x42, 0x8d, 0x9d, 0x36, 0xbe, 0x7f, 0xe1, 0x25, 0x42
            }))
            {
                If(LEqual(Arg2, Zero))
                {
                    Return(Buffer(One)
                    {
                        0x03
                    })
                }

                If(LEqual(Arg2, One))
                {
                    Return(Buffer(0x4)
                    {
                        0x00, 0x01, 0x02, 0x03
                    })
                }
            }
            Else
            {
                Return(Buffer(One)
                {
                    0x00
                })
            }
        } // Method(_DSM ...)

    } // Device(SPBA)

} // Scope(_SB_)
In this example, the entries under ResourceTemplate() specify that the accelerometer needs two hardware resources: a connection ID to a particular I2C bus controller (I2C3) and a GPIO interrupt. The interrupt uses pin 0x17 on the GPIO controller named GPO2.
After you have added your own Device entry to Ssdt.asl, compile Ssdt.asl by entering this command:
asl ssdt.asl
This puts the compiled output in a file named Ssdt.aml.
Verify that test signing is turned on for the Sharks Cove board.
Note
Test signing is turned on automatically during provisioning.
On the Sharks Cove board, open a Command Prompt window as Administrator. Enter this command.
bcdedit /enum {current}
Verify that you see testsigning Yes in the output.
Windows Boot Loader
-------------------
identifier              {current}
...
testsigning             Yes
...
If you need to turn on test signing manually, here are the steps:
Open a Command Prompt window as Administrator, and enter this command.
bcdedit /set TESTSIGNING ON
Restart the Sharks Cove board. As the board restarts, hold the Volume-up button. Go to Device Manager > System Setup > Boot. Set UEFI Security Boot to Disabled.
Save your changes and continue booting to Windows.
To load your updated SSDT, open a Command Prompt window as Administrator, and enter this command:
asl /loadtable ssdt.aml
Restart the Sharks Cove board.
Step 7: Connect your device to the Sharks Cove board
Use the specification to determine which pins to use for your device. For example, suppose you want to connect the ADXL345 accelerometer to an I2C bus. In the specification, you can see that the J1C1 header has the pins you need. Here are some, but not all, of the pins you would use on the J1C1 header.
| Pin | Pin name | Comments | ACPI object |
|---|---|---|---|
| 7 | GPIO_S5[23] | Accelerometer Interrupt signal | _SB.GPO2 {0x17} |
| 13 | SIO_I2C2_DATA | I2C Data line for I2C controller 2 | _SB.I2C3 |
| 15 | SIO_I2C2_CLK | I2C clock line for I2C controller 2 | _SB.I2C3 |
Notice the relationship to the Device entry in the SSDT.
I2CSerialBus(... "\\_SB.I2C3", , )
GpioInt(... "\\_SB.GPO2") {0x17}
Step 8: Write, build, and deploy a driver for your device
Writing a device driver for the Sharks Cove board is similar to writing a device driver for any other computer. In Visual Studio, you can start with a driver template or you can start with a driver sample.
When you are ready to test your driver on the Sharks Cove board, follow these steps:
On the host computer, in Visual Studio, right click your package project, and choose Properties. Go to Driver Install > Deployment. Check Enable Deployment and Remove previous driver versions before deployment. For Target Computer Name, select the name of your Sharks Cove board. Select Install and Verify.
Still in the property pages, go to Driver Signing > General. For Sign Mode, select Test Sign. Click OK.
In your driver project, open your INF file. Edit the hardware ID so that it matches the hardware ID (_HID) that you created in the SSDT. For example, suppose you put this Device entry in the SSDT.
Device(SPBA)
{
   Name(_HID, "SpbAccelerometer")
   ...
Then the hardware ID in you INF file would be ACPI\SpbAccelerometer.
[Standard.NT$ARCH$]
%KMDFDriver1.DeviceDesc%=KMDFDriver1_Device, ACPI\SpbAccelerometer
In Visual Studio, on the Debug menu, choose Start Debugging.
Microsoft Visual Studio first shows progress in the Output window. Then it opens the Debugger Immediate Window and continues to show progress.
Wait until your driver has been deployed, installed, and loaded on the Sharks Cove board. This might take a minute or two.
If the debugger does not automatically break in, choose Break All from the Debug menu. The debugger on the host computer will break into the target computer (kernel-mode) or to the correct instance of Wudfhost.exe (UMDF). In the Debugger Immediate Window, you'll see a debugger command prompt.
To view the loaded modules, enter lm. Verify that your driver appears in the list of loaded modules.
Using WinDbg to debug the Sharks Cove board
As an alternative to using Visual Studio to set up kernel-mode debugging, you can do the setup manually.
As an alternative to using Visual Studio for debugging, you can use WinDbg.
Regardless of whether you use Visual Studio or WinDbg, these hands-on guides are helpful for learning debugger commands:
Sample driver code
Understanding simple peripheral buses
To learn how Windows drivers work with simple peripheral buses, see Simple Peripheral Buses.
Related topics
Concepts for all driver developers
Developing, Testing, and Deploying Drivers
Feedback
Coming soon: Throughout 2024 we will be phasing out GitHub Issues as the feedback mechanism for content and replacing it with a new feedback system. For more information see: https://aka.ms/ContentUserFeedback.
Submit and view feedback for