Spice It Up
Sprinkle Some Pizzazz on Your Plain Vanilla Windows Forms Apps
Bill Wagner
This article discusses:
|
This article uses the following technologies: .NET, Windows Forms |
Code download available at:WindowsForms.exe (864 KB)
Browse the Code Online
Contents
Spiff Up Your Apps
Removing that Main Window Dependency
Notifying Users
Using GDI+
Fade In and Fade Out
Skinning Your Application
Conclusion
The Microsoft® .NET Framework makes it very easy to create Windows®-based applications: You simply create a form, add controls, connect the form to your business logic, and you're finished. But such applications don't always give users the interaction they really want. For example, they typically don't notify users when important external events happen. And the windows all look the same—the same battleship grey form, the same standard controls, the same feel. Boring!
With the .NET Framework and GDI+, you can easily add some style to your applications. You can use transparency, irregularly shaped windows, notification icons, " toast" pop-ups, different color schemes, and many other design elements. Designed well, these techniques can create a much more compelling interaction between your application and your users.
Spiff Up Your Apps
There are a variety of simple techniques you can apply in order to spruce up your applications. One of these is using notification windows to alert users to important events, making them stand out, while using less intrusive methods to inform the user of lower-priority occurrences. A number of applications apply this technique effectively. For example, MSN® Messenger uses toast pop-ups above the tray area to tell you when a friend has logged in or is trying to contact you, and Outlook® 2003 provides desktop alert notifications for new e-mail messages. (These alerts also let the user delete, flag, or open the item when it arrives.) The addition of appealing forms and windows with which the user can interact also enhance the application experience. For example, Windows Media Player lets you apply your own skins, and allows for window shapes beyond the standard rectangle. Obviously, you shouldn't use all these techniques on every application, but by judiciously applying some of them, you can create applications that will enhance the user's experience.
I'm going to show you how and when to apply these techniques by modifying a simple event monitor application. The initial application shows the most recent weather data for a chosen city (see Figure 1). This typical .NET-based desktop application retrieves data from a Web service and displays the results on a form using standard Windows controls. The service I use and a number of other Web services can be found at www.xmethods.net.
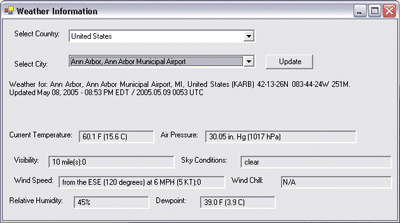
Figure 1** Standard Application Window **
This is not a particularly friendly application. You need to dedicate screen real estate to the weather report, and then you need to periodically press the Update button. I'll spend the rest of the article enhancing it to show you how to create a more compelling user experience. In the end, you'll have a weather alert center that you can leave running constantly. It will monitor particular cities and let you know when important weather changes occur. And it will break the mold of those dull grey applications. You'll modify the application to run as a Notify icon in the task bar, provide custom pop-up information when events occur, activate itself, and display its information using a custom window shape with a custom background.
Removing that Main Window Dependency
Your first task is to modify the application so that it no longer relies upon a main form, but rather creates a Notify icon when it starts. There's a reasonable amount of startup code, so it's best to create a new class to handle the application-level tasks. You'll be checking for multiple copies of the application, creating the Notify icon, adding menus and handlers, starting timers, starting the message loop, and handling some session events.
It's important to do all these small tasks when your app runs as a Notify icon because if you don't clean up properly, it's easy to end up with multiple copies of your Notify icon appearing in the notification area of the task bar. That makes it very hard to work with your app and will often confuse users trying to figure out which Notify icon is from which session of your application.
To alleviate that problem, begin by preventing multiple copies of your application from running in the first place. You typically do this by creating a global mutex that indicates your application is running (for a more detailed look at this problem, see the .NET Matters column in this issue of MSDN®Magazine). The first instance acquires a lock on the mutex and keeps it for the duration of the application. Subsequent copies attempt to acquire the lock, fail, and exit, as shown in the following:
Public Shared Sub Main()
    Dim appSingleton As New System.Threading.Mutex(False, _
        "SingleInstance WeatherAlert")
    If appSingleton.WaitOne(0, False) Then Application.Run()
    appSingleton.Close()
End Sub
Next, you're going to enable the Windows XP themes in your application. You've undoubtedly heard about EnableVisualStyles, but when using the .NET Framework 1.x you need to add a bit of extra code in order to enable backwards compatibility (this extra code is no longer necessary with the .NET Framework 2.0). Calling EnableVisualStyles while running on older operating systems will terminate your program, because your users will be missing uxtheme.dll. You need to test for the newer operating systems before applying themes, as shown here:
Private Shared Sub InitThemes()
  If (((Environment.OSVersion.Platform = PlatformID.Win32NT) _
    AndAlso (Environment.OSVersion.Version.Major >= 5)) _
    AndAlso (Environment.OSVersion.Version.Minor > 0)) Then
      If OSFeature.Feature.IsPresent(OSFeature.Themes) Then
        Application.EnableVisualStyles()
      End If
      Application.DoEvents()
    End If
End Sub
Your main application class also creates the Notify icon and runs your main message loop. Running an application without a main window is almost the same as running with a main window—there are only two changes you need to make. You need to change your call from Application.Run(FormName) to Application.Run() so that you start a message loop without any main form. If the user never creates the main window, you don't need to create it in an invisible state; just don't create it at all. The second change is to handle the SessionEnded event. If a user logs off Windows while your application is running, Windows will request that your application exit by raising the SessionEnded event. If you don't respond to this event, Windows will assume your application just crashed. Windows will tell your users that your application is not responding, and will request to terminate it. To fix this, just handle the event and close your application. Attach the handler in your main application like this:
AddHandler Microsoft.Win32.SystemEvents.SessionEnded, _
    New Microsoft.Win32.SessionEndedEventHandler(AddressOf _
    ApplicationMain.SystemEvents_SessionEnded)
And there clean up properly in that handler:
Private Shared Sub SystemEvents_SessionEnded(ByVal sender As Object, _
    ByVal e As Microsoft.Win32.SessionEndedEventArgs)
    If (Not _mainWindow Is Nothing) Then _mainWindow.Close()
    _icon.Visible = False
    Application.Exit()
End Sub
There are a couple of items in the exit code that are different from your standard Windows Forms application. First, you need to check if the main window was created before you close it. The user may not have even opened the main window. Second, you must hide the Notify icon. Have you ever had a program that ran as a tray icon go away and leave the ghostly tray icon around until you try and activate it? Some developer forgot to clean up the taskbar. You need to hide the Notify icon before your program exits. There is no Close method for the Notify icon; when you hide it, the icon will clean itself up.
Notifying Users
Now it's time to give feedback to your users when they run your app as an icon. You'll do that by creating a pop-up toast window. I don't like the standard balloon notification—I prefer something with style, such as the Outlook message notifications or the MSN Messenger contact sign-in notification. I want to control the notification to inform the user without interfering with regular tasks.
When Outlook 2003 is configured appropriately and you receive an email, a small window fades in at the bottom-right corner of your screen, showing you the sender and the subject of the message. From here you can click to read the message, delete the message immediately, or set the Follow-up flag. If you're busy and the message isn't time critical, you can ignore the pop-up, allowing it to fade out of view, leaving the message unread for later.
Creating a similar window for the weather alert application will make it easier for users to receive weather information updates. The notification window should display itself briefly, and then go away if the user ignores it. Don't create a form of notification that forces the user to dismiss it. If the user is away from his desk, or decides the message is not important enough to disrupt the current task, the notification should just disappear.
Figure 2** Notification Box **
I'll place the window in the lower-right corner of the desktop, directly above the notification icons. The toast window should fade in, show itself for a few seconds, then fade out. To make it easier to use, if the user moves the mouse over the window, it will change to opaque immediately, and not fade out until the user leaves the window. If the user wants to open the main application, she can click on the toast, and your application should show the main window. Finally, to add a little style, you can draw the background using a gradient brush, and hide all the usual window borders (see Figure 2). GDI+ makes this fairly simple.Chroma Keying, Alpha Blending, and Transparency
Graphics programmers developed chroma-keyed images to implement the transparency used in cel animation. Cel animations are the classic hand-drawn cartoons in films. An animation studio artist would draw a background scene on a single page. Then an animator would draw each frame for each character on a cel, a transparent sheet of acetate or nitrate. Using a transparent medium saved the animators and artists significant time. Artists drew one background, rather than a separate background for each frame. Then animators could concentrate on drawing the characters without having to worry about their exact position on the background.
Graphics programmers wanted to emulate this technique on screen. Of course, there is no transparency on a computer monitor, so developers designated one solid color to stand in for the transparent background. When drawing these images, called sprites, any pixels in the designated transparent color were skipped. Whatever background was beneath the sprite would still be seen. Artists drew backgrounds the size of the screen or window. Animators drew an animated series of images using the transparent color as the background. Graphics programs would compose the scene by drawing the background image, and then drawing the sprites, using the transparent key.
This technique has a number of limitations. First, transparency was an all or nothing proposition: a pixel was either transparent or not. There was no way to do any kind of translucent effects. Artists had much more work to do in order to create windows, fog, or other similar visual effects. Secondly, the transparent algorithms needed an exact color match, not simply a visual match. A green pixel of (R=0, G=255, B=0) does not match a green pixel of (R=0, G=254, B=0). It was easy to get a sprite that appeared correct, but did not have an exact color match. The result was an ugly sprite with blotches in a color that should have been transparent.
As PC graphics capabilities became more sophisticated, this simple algorithm was enhanced to provide translucency as well as transparency. This technique is called alpha blending. The transparency of a pixel is called the alpha component. The richer pixel formats, such as 32-bit ARGB, now devote one byte to transparency information. The alpha component ranges from 0 for completely transparent to 255 for opaque.
The Microsoft .NET Framework supports both techniques in its drawing library and its Windows Forms library. The System.Drawing.Bitmap class contains support for ARGB images. The MakeTransparent method keys an entire bitmap by modifying the alpha component on each pixel based on a single transparency key color. All the overloads for the System.Drawing.Graphics.DrawImage method obey transparency keying using the alpha component. The System.Windows.Forms.Opacity property specifies how Windows uses alpha blending to draw the form on the screen.
Using GDI+
Creating a transparent, nonrectangular window requires a few simple steps. First, change the Form Border Style in the designer to None. That removes all the normal non-client area objects from your toast window. There's no close box, system menu, or sizing handles. You should also turn off the "Show In Taskbar" setting. You don't want your toast window to show up in the task bar.
You accomplish transparency using a technique known as chroma keying. Chroma-keyed images assign one color as the transparent color. When the window is drawn, any pixel that matches the transparent color is not drawn. It's important to pick a color that is unlikely to be used in a normal application. Obviously, white, black, and grays are not good choices since they're used so frequently. Lime green or chartreuse might be much better. The Windows Form Properties in Visual Studio® .NET lets you set the colors that will be transparent via the TransparencyKey property. See the "Chroma Keying, Alpha Blending, and Transparency" sidebar for more information on chroma keying.
Once you've set the transparency, you need to add the code to paint the background. To implement rounded rectangle functionality with GDI+, you can use a graphics path. In fact, with a graphics path, you can create any irregular shape you want. The code in Figure 3 shows a method used to create a rounded rectangle path.
Figure 3 Creating a Rounded Rectangle Path
Public Shared Function CreateRoundedRectPath(
    ByVal rect As Rectangle, ByVal radius As Integer) As GraphicsPath

    Dim roundRect As New GraphicsPath

    ' top line
    roundRect.AddLine(rect.Left + radius, rect.Top, _
        rect.Right - radius, rect.Top)

     ' Upper-right corner
    roundRect.AddArc(rect.Right - 2 * radius, _
        rect.Top, radius * 2, radius * 2, 270, 90)

    ' right edge
    roundRect.AddLine(rect.Right, rect.Top + radius, _
        rect.Right, rect.Bottom - 10)

    ' bottom-right corner
    roundRect.AddArc(rect.Right - radius * 2, _
        rect.Bottom - radius * 2, radius * 2, radius * 2, 0, 90)

    ' bottom
    roundRect.AddLine(rect.Right - 2 * radius, rect.Bottom, _
        rect.Left + radius, rect.Bottom)

    ' bottom-left edge
    roundRect.AddArc(rect.Left, rect.Bottom - 2 * radius, _
        2 * radius, 2 * radius, 90, 90)

    ' left side
    roundRect.AddLine(rect.Left, rect.Bottom - radius, _
        rect.Left, rect.Top + radius)

    ' upper-left corner
    roundRect.AddArc(rect.Left, rect.Top, 2 * radius, _
        2 * radius, 180, 90)

    Return roundRect
End Function
The background makes use of another new GDI+ feature, gradient brushes. I used a linear gradient brush to create the desired background effect. First, I filled the entire background rectangle with the lime green transparency color, and then I filled the interior rounded rectangle using the linear gradient brush fading from steel blue to light blue. I did all this work in an override for the OnPaintBackground method. Using the overrides can be more efficient than attaching event handlers to relevant events.
To finish the drawing code, you need to add a paint handler that draws the text. It draws a message passed to the toast window in its constructor. Next, you want to set the font to be consistent with the system-defined link color and active link. When the user enters the toast window, change the window font to underlined. When the user leaves the window, change the font back. This gives the user the impression that the text in your toast window is a link.
Fade In and Fade Out
The next step is to add the timer and handlers to update the opacity of the toast window. In the designer, add a timer and set the initial Opacity of the toast window to 0 percent. When the timer event fires, increase the opacity (I choose to increase it by 0.05). When the opacity gets to 1, reset the timer to fire in 3 seconds so the user will have time to see the toast window. Then reset the timer to a small interval, lowering the opacity each time it fires. Once the opacity reaches 0, close the window.
You need to add handlers to stop the fade in/fade out process when the user moves the mouse into the toast window. And, of course, you restart the fade out process when the user leaves the window. There's only one caveat here. The close box (see Figure 2) is a child window. Your main window gets the MouseLeave message when the user moves the mouse over the close box.
In addition to mouse enter and mouse leave methods for the toast window, you'll also need to add event handlers for any child windows in your toast window. While you do get the enter and leave events when the user moves between the close box and the parent toast window, you will never get the MouseLeave message from one window before you get the MouseEnter event for the other. That means you cannot get the state wrong as you move from one window to the other. Your toast window won't go away while the user is interacting with it.
Before you leave the toast window implementation, you need to define how it should behave when you receive multiple updates. In this sample, I took the easy way out: if a second notification should happen while a toast window is being displayed, it's simply ignored. Commercial applications take a different approach. Outlook 2003 creates a queue of toast windows, one for each e-mail message. MSN Messenger stacks toast windows up the screen until the top of the desktop is reached. This sample just doesn't generate enough interesting notifications to make that worthwhile.
Skinning Your Application
Now it's time to apply some style to that main window (see Figure 4). To get the effect, you need to create a background image. Any location that you want to be transparent should be drawn in the transparent color. In my sample, I again chose lime green for the background. Set the background image to the new bitmap, set the form border style to None, and you're nearly finished. There is a problem in some graphics cards that prevents the transparency from working when the bitmap color depth does not match the monitor color depth (see the Knowledge Base article 822495 at BUG: The TransparencyKey Property Is Not Effective for Microsoft Windows Forms If the Color Depth of the Monitor Is Set to a Value That Is Greater Than 24-Bit for more information). To fix this, you need to make the background bitmap transparent. The OnLoad override shown in the following code does just that.
Protected Overrides Sub OnLoad(ByVal e As EventArgs)
    Dim bitmapBG As Bitmap = _CType
(BackgroundImage,Bitmap)
    bitmapBG.MakeTransparent(bitmapBG.GetPixel(0, 0))
    TransparencyKey = bitmapBG.GetPixel(0, 0)
    MyBase.OnLoad(e)
End Sub
After updating the image, you also need to update the transparency key in order to match the changed values of the pixels.
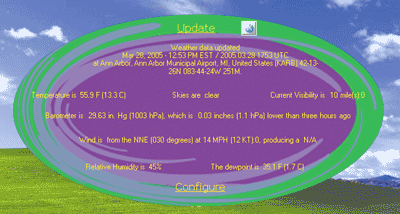
Figure 4** Adding Style to the Main Window **
Next, you need to modify the controls so they are transparent and show up on the background better. I chose a yellow font to contrast with the background image. You can modify the background color either in the designer or code, setting it to System.Drawing.Color.Transparent. The background image will then show through your controls (see Figure 5).
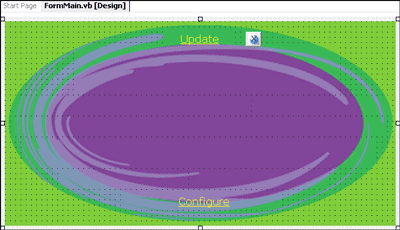
Figure 5** Background Image Showing Through **
Finally, it helps your users to add a mechanism to move the main window around the screen. Since there is no longer a title bar, you can let the user move the window by pressing the left mouse button anywhere in the visible form and dragging the window from place to place. The MouseMove method moves the window if the user is dragging it:
Protected Overrides Sub OnMouseMove(ByVal e As MouseEventArgs)
    If _isMoving Then
        Location = New Point(Location.X + e.X - XOffset,
            Location.Y + e.Y - YOffset)
    End If
    MyBase.OnMouseMove(e)
End Sub
That works quite well, unless the user happens to click the mouse in one of those child windows you've created to display the weather information. To make that work, you need to create a mouse down handler that initiates a move operation when the user clicks a mouse button when over one of your child windows. But it should not work on all your child windows—you still want the default behavior for the link buttons and the close box. The same method can handle all the MouseDown events for any of the other child controls, as shown in the following:
Private Sub Child_MouseDown(ByVal sender As Object, _
    ByVal e As System.Windows.Forms.MouseEventArgs) Handles _
        labelAirPressure.MouseDown, labelDewPoint.MouseDown, _
        labelHumidity.MouseDown, labelLocation.MouseDown, _
        labelSkyConditions.MouseDown, labelTemperature.MouseDown, _
        labelVisibility.MouseDown, labelWind.MouseDown
    If (e.Button = MouseButtons.Left) Then
       _isMoving = True
       XOffset = e.X
       YOffset = e.Y
    End If
End Sub
Add the close box and the link buttons to get the latest weather information and you're finished.
Conclusion
When you are creating applications that need to interact with the user in different ways, make them stand out, but don't overdo it. The standard look is familiar to users, so if you break that mold, do it with good reason. Too many applications take up space on the system tray, so don't do that unless it really is the best way for your application to interact with users. If it's not, use a different method to make your application's presence known.
Bill Wagner is a cofounder of SRT Solutions, Inc. and is Microsoft Regional Director for Michigan. Bill is the author of Effective C# (Addison-Wesley, 2004). Reach him at wwagner@srtsolutions.com, or his blog at www.srtsolutions.com/public/blog/20574.