你当前正在访问 Microsoft Azure Global Edition 技术文档网站。 如果需要访问由世纪互联运营的 Microsoft Azure 中国技术文档网站,请访问 https://docs.azure.cn。
教程:设置数据产品批处理
在本教程中,了解如何设置已部署的数据产品服务。 使用 Azure 数据工厂集成和编排数据,并使用 Microsoft Purview 发现、管理和治理数据资产。
了解如何:
- 创建和部署所需资源
- 分配角色和访问权限
- 连接资源以进行数据集成
本教程帮助你熟悉部署在 <DMLZ-prefix>-dev-dp001 示例数据产品资源组中的服务。 体验 Azure 服务如何相互连接以及采取了哪些安全措施。
在部署新组件时,你将有机会研究 Purview 如何连接服务治理以创建一个全面的、最新的数据环境图。 结果是自动化的数据发现、敏感数据分类和端到端数据世系。
先决条件
在开始设置批量数据产品之前,请确保你满足以下先决条件:
Azure 订阅。 如果没有 Azure 订阅,可立即创建 Azure 免费帐户。
Azure 订阅的权限。 若要为部署设置 Purview 和 Azure Synapse Analytics,你必须在 Azure 订阅中具有用户访问管理员角色或所有者角色。 你将在本教程中为服务和服务主体设置更多角色分配。
已部署的资源。 要完成本教程,你的 Azure 订阅中必须已经部署了下列资源:
Microsoft Purview 帐户。 该帐户是数据管理登陆区域部署的一部分创建的。
自承载集成运行时。 运行时是作为数据登陆区域部署的一部分创建的。
注意
在本教程中,占位符是指在开始本教程之前部署的先决条件资源:
<DMLZ-prefix>是指在创建数据管理登陆区域部署时输入的前缀。<DLZ-prefix>是指在创建数据登陆区域部署时输入的前缀。<DP-prefix>是指在创建批量数据产品部署时输入的前缀。
创建 Azure SQL 数据库实例
若要开始本教程,请创建两个示例 SQL 数据库实例。 后面的部分将使用数据库来模拟 CRM 和 ERP 数据源。
在 Azure 门户,在门户全局控件中,选择 Cloud Shell 图标以打开 Azure Cloud Shell 终端。 为终端类型选择 Bash。

在 Cloud Shell 中运行以下脚本。 该脚本查找
<DLZ-prefix>-dev-dp001资源组和资源组中的<DP-prefix>-dev-sqlserver001Azure SQL 服务器。 然后,该脚本在<DP-prefix>-dev-sqlserver001服务器上创建两个 SQL 数据库实例。 数据库已预先填充 AdventureWorks 示例数据。 数据包括本教程中使用的表。请确保将
subscription参数占位符值替换为你自己的 Azure 订阅 ID。# Azure SQL Database instances setup # Create the AdatumCRM and AdatumERP databases to simulate customer and sales data. # Use the ID for the Azure subscription you used to deployed the data product. az account set --subscription "<your-subscription-ID>" # Get the resource group for the data product. resourceGroupName=$(az group list -o tsv --query "[?contains(@.name, 'dp001')==\`true\`].name") # Get the existing Azure SQL Database server name. sqlServerName=$(az sql server list -g $resourceGroupName -o tsv --query "[?contains(@.name, 'sqlserver001')==\`true\`].name") # Create the first SQL Database instance, AdatumCRM, to create the customer's data source. az sql db create --resource-group $resourceGroupName --server $sqlServerName --name AdatumCRM --service-objective Basic --sample-name AdventureWorksLT # Create the second SQL Database instance, AdatumERP, to create the sales data source. az sql db create --resource-group $resourceGroupName --server $sqlServerName --name AdatumERP --service-objective Basic --sample-name AdventureWorksLT
脚本运行完毕后,在 <DP-prefix>-dev-sqlserver001 Azure SQL 服务器上,你有两个新的 SQL 数据库实例:AdatumCRM 和 AdatumERP。 这两个数据库都位于基本计算层级上。 数据库位于用于部署批量数据产品的同一 <DLZ-prefix>-dev-dp001 资源组中。
设置 Purview 以编录批量数据产品
接下来,完成设置 Purview 以编录批量数据产品的步骤。 首先创建一个服务主体。 然后,设置所需的资源并分配角色和访问权限。
创建服务主体
在 Azure 门户,在门户全局控件中,选择 Cloud Shell 图标以打开 Azure Cloud Shell 终端。 为终端类型选择 Bash。
请修改以下脚本:
- 将
subscriptionId参数占位符值替换为你自己的 Azure 订阅 ID。 - 将
spname参数占位符值替换为要用于服务主体的名称。 服务主体名称在订阅中必须是唯一的。
更新参数值后,请在 Cloud Shell 中运行脚本。
# Replace the parameter values with the name you want to use for your service principal name and your Azure subscription ID. spname="<your-service-principal-name>" subscriptionId="<your-subscription-id>" # Set the scope to the subscription. scope="/subscriptions/$subscriptionId" # Create the service principal. az ad sp create-for-rbac \ --name $spname \ --role "Contributor" \ --scope $scope- 将
检查 JSON 输出中是否存在类似于以下示例的结果。 记下或复制输出中的值以在后续步骤中使用。
{
  "appId": "<your-app-id>",
  "displayName": "<service-principal-display-name>",
  "name": "<your-service-principal-name>",
  "password": "<your-service-principal-password>",
  "tenant": "<your-tenant>"
}
设置服务主体访问和权限
从上一步生成的 JSON 输出中,获取以下返回值:
- 服务主体 ID (
appId) - 服务主体密钥 (
password)
服务主体必须具有以下权限:
- 存储帐户上的存储 Blob 数据读取者角色。
- 对 SQL 数据库实例的数据读取者权限。
若要设置具有所需角色和权限的服务主体,请完成以下步骤。
Azure 存储帐户权限
在 Azure 门户中,请转到
<DLZ-prefix>devrawAzure 存储帐户。 在资源菜单中,选择“访问控制 (IAM)”。
选择“添加”>“添加角色分配”。

在“添加角色分配”中的“角色”选项卡上,搜索并选择“存储 Blob 数据读取者”。 然后选择下一步。

在“成员”中,选择“选择成员”。

在“选择成员”中,搜索所创建的服务主体的名称。

在搜索结果中,选择服务主体,然后选择“选择”。

若要完成角色分配,请选择“查看 + 分配”两次。
对剩余的存储帐户重复本部分中的步骤:
<DLZ-prefix>devencur<DLZ-prefix>devwork
SQL 数据库权限
若要设置 SQL 数据库权限,请使用查询编辑器连接到 Azure SQL 虚拟机。 由于所有资源都位于专用终结点后面,因此必须先使用 Azure 堡垒主机虚拟机登录到Azure 门户。
在 Azure 门户中,连接到 <DMLZ-prefix>-dev-bastion 资源组中部署的虚拟机。 如果不确定如何使用堡垒主机服务连接到虚拟机,请参阅连接到 VM。
若要将服务主体添加为数据库中的用户,可能需要先将自己添加为 Microsoft Entra 管理员。在步骤 1 和步骤 2 中,将自己添加为 Microsoft Entra 管理员。在步骤 3 到 5 中,向数据库授予服务主体权限。 从堡垒主机虚拟机登录到门户时,请在 Azure 门户中搜索 Azure SQL 虚拟机。
转到
<DP-prefix>-dev-sqlserver001Azure SQL 虚拟机。 在设置下的资源菜单中,选择“Microsoft Entra ID”。
在命令栏中,选择“设置管理员”。搜索并选择自己的帐户。 选择“选择”。

在资源菜单中,选择“SQL 数据库”,然后选择
AdatumCRM数据库。
在 AdatumCRM 资源菜单中,选择“查询编辑器(预览版)”。 在“Active Directory 身份验证”下,选择“按以下身份继续”按钮进行登录。

在查询编辑器中,修改以下语句以将
<service principal name>替换为你创建的服务主体的名称(例如purview-service-principal)。 然后,运行语句。CREATE USER [<service principal name>] FROM EXTERNAL PROVIDER GO EXEC sp_addrolemember 'db_datareader', [<service principal name>] GO
对 AdatumERP 数据库重复步骤 3 到 5。
设置密钥保管库
Purview 从 Azure 密钥保管库实例读取服务主体密钥。 密钥保管库是在数据管理登陆区域部署中创建的。 设置密钥保管库需要完成以下步骤:
将服务主体密钥作为机密添加到密钥保管库。
在密钥保管库中授予 Purview MSI 机密读取者权限。
将密钥保管库作为密钥保管库连接添加到 Purview。
在 Purview 中创建指向密钥保管库机密的凭据。
将机密添加到密钥保管库的权限
在 Azure 门户中,转到“Azure 密钥保管库”服务。 搜索
<DMLZ-prefix>-dev-vault001密钥保管库。
在资源菜单中,选择“访问控制 (IAM)”。 在命令栏中,依次选择“添加”、“添加角色分配”。

在“角色”选项卡上,搜索并选择“密钥保管库管理员”。 选择下一步。
在“成员”中,选择“选择成员”以添加当前登录的帐户。

在“选择成员”中,搜索当前已登录的帐户。 选择帐户,然后选择“选择”。

若要完成角色分配过程,请选择“查看 + 分配”两次”。
向密钥保管库添加机密
完成以下步骤,从堡垒主机虚拟机登录到 Azure 门户。
在
<DMLZ-prefix>-dev-vault001密钥保管库资源菜单中,选择“机密”。 在命令栏中,选择“生成/导入”以创建新机密。
在“创建机密”窗格中,选择或输入以下值:
设置 操作 上传选项 选择“手动”。 Name 输入服务主体机密。 值 输入你之前创建的服务主体密码。 
注意
此步骤使用服务主体密码密钥在密钥保管库中创建一个名为
service-principal-secret的机密。 Purview 使用机密连接到数据源并扫描数据源。 如果输入了不正确的密码,则无法完成以下部分。选择创建。
在密钥保管库中设置 Purview 权限
若要使 Purview 实例读取存储在密钥保管库中的机密,必须在密钥保管库中分配 Purview 相关权限。 若要设置权限,请将 Purview 托管标识添加到“密钥保管库机密读取者”角色。
在
<DMLZ-prefix>-dev-vault001密钥保管库资源菜单中,选择“访问控制 (IAM)”。在命令栏中,依次选择“添加”、“添加角色分配”。

在“角色”中,搜索并选择“密钥保管库机密用户”。 选择下一步。

在“成员”中,选择“选择成员”。

搜索
<DMLZ-prefix>-dev-purview001Purview 实例。 选择要添加相关帐户的实例。 然后选择“选择”。
若要完成角色分配过程,请选择“查看 + 分配”两次”。

在 Purview 中设置密钥保管库连接
若要设置到 Purview 的密钥保管库连接,必须使用 Azure 堡垒主机虚拟机登录到 Azure 门户。
在 Azure 门户中,转到
<DMLZ-prefix>-dev-purview001Purview 帐户。 在“开始”下,在“打开 Microsoft Purview 治理门户”中,选择“打开”。
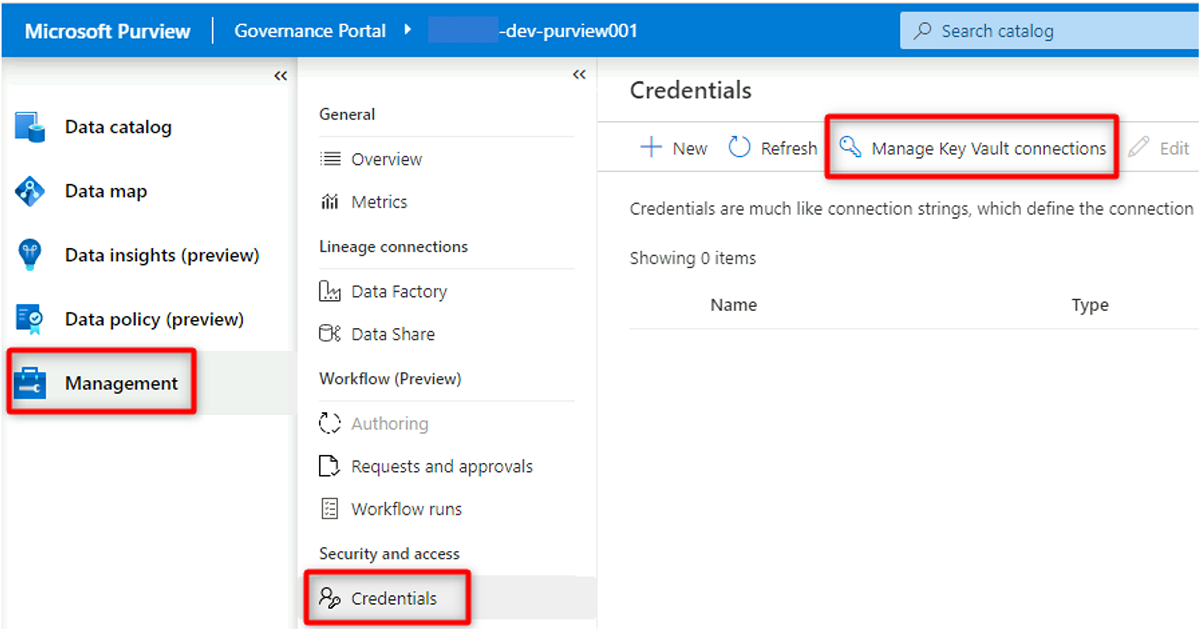
在 Purview Studio 中,选择“管理”>“凭据”。 在“凭据”命令栏中,选择“管理密钥保管库连接”,然后选择“新建”。
在“新建密钥保管库连接”中,选择或输入以下信息:
设置 操作 Name 输入 <DMLZ-prefix>-dev-vault001。 Azure 订阅 选择托管密钥保管库的订阅。 密钥库名称 选择 <DMLZ-prefix>-dev-vault001 密钥保管库。 
选择创建。
在“确认授予访问权限”中,选择“确认”。
在 Purview 中创建凭据
设置密钥保管库的最后一步是在 Purview 中创建一个凭据,该凭据指向在服务主体的密钥保管库中创建的机密。
在 Purview Studio 中,选择“管理”>“凭据”。 在“凭据”命令栏中,选择“新建”。

在“新建凭据”中,选择或输入以下信息:
设置 操作 Name 输入 purviewServicePrincipal。 身份验证方法 选择 “服务主体”。 租户 ID 将自动填充该值。 服务主体 ID 输入服务主体的应用程序 ID 或客户端 ID。 密钥保管库连接 选择你在上一部分中创建的密钥保管库连接。 机密名称 在密钥保管库中输入密钥的名称 ( service-principal-secret)。 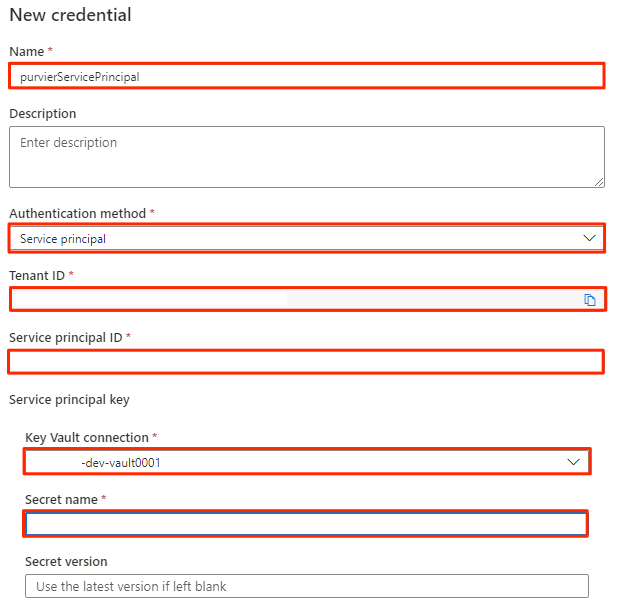
选择创建。
注册数据源
此时,Purview 可以连接到服务主体。 现在可以注册和设置数据源。
注册 Azure Data Lake Storage Gen2 帐户
以下步骤概述了注册 Azure Data Lake Storage Gen2 存储帐户的过程。
在 Purview Studio 中,选择数据映射图标,选择“源”,然后选择“注册”。

在“注册源”中,选择 Azure Data Lake Storage Gen2,然后选择“继续”。

在“注册源 (Azure Data Lake Storage Gen2)”中,选择或输入以下信息:
设置 操作 Name 输入 <DLZ-prefix>dldevraw。 Azure 订阅 选择托管存储帐户的订阅。 存储帐户名称 选择相关的存储帐户。 终结点 该值会根据选定的存储帐户自动填充。 选择一个集合 选择“根集合”。 
选择“注册”以创建数据源。
对以下存储帐户重复以下步骤:
<DMLZ-prefix>devencur<DMLZ-prefix>devwork
将 SQL 数据库实例注册为数据源
在 Purview Studio 中,选择数据映射图标,选择“源”,然后选择“注册”。
在“注册源”中,选择“Azure SQL 数据库”,然后选择“继续”。

在“注册源 (Azure SQL数据库)”中,选择或输入以下信息:
设置 操作 Name 输入 SQLDatabase(在创建 Azure SQL 数据库实例中创建的数据库的名称)。 订阅 选择托管数据库的订阅。 服务器名称 输入 <DP-prefix>-dev-sqlserver001。 
选择“注册” 。
设置扫描
接下来,设置数据源的扫描。
扫描 Data Lake Storage Gen2 数据源
在 Purview Studio 中,转到数据映射。 在数据源上,选择“新建扫描”图标。

在新的扫描窗格中,选择或输入以下信息:
设置 操作 Name 输入 Scan_<DLZ-prefix>devraw。 通过集成运行时进行连接 选择使用数据登陆区域部署的自承载集成运行时。 凭据 选择为 Purview 设置的服务主体。 
选择“测试连接”以验证连接和权限是否已到位。 选择“继续”。
在“限定扫描范围”中,选择整个存储帐户作为扫描的范围,然后选择“继续”。

在“选择扫描规则集”中,选择“AdlsGen2”,然后选择“继续”。

在“设置扫描触发器”中,选择“一次”,然后选择“继续”。

在“查看扫描”中,查看扫描设置。 选择“保存并运行”以开始扫描。

对以下存储帐户重复以下步骤:
<DMLZ-prefix>devencur<DMLZ-prefix>devwork
扫描 SQL 数据库数据源
在 Azure SQL 数据库数据源中,选择“新建扫描”。

在新的扫描窗格中,选择或输入以下信息:
设置 操作 Name 输入 Scan_Database001。 通过集成运行时进行连接 选择 Purview-SHIR。 数据库名称 选择数据库名称。 凭据 选择在 Purview 中创建的密钥保管库凭据。 世系提取(预览) 选择 “关闭”。 
选择“测试连接”以验证连接和权限是否已到位。 选择“继续”。
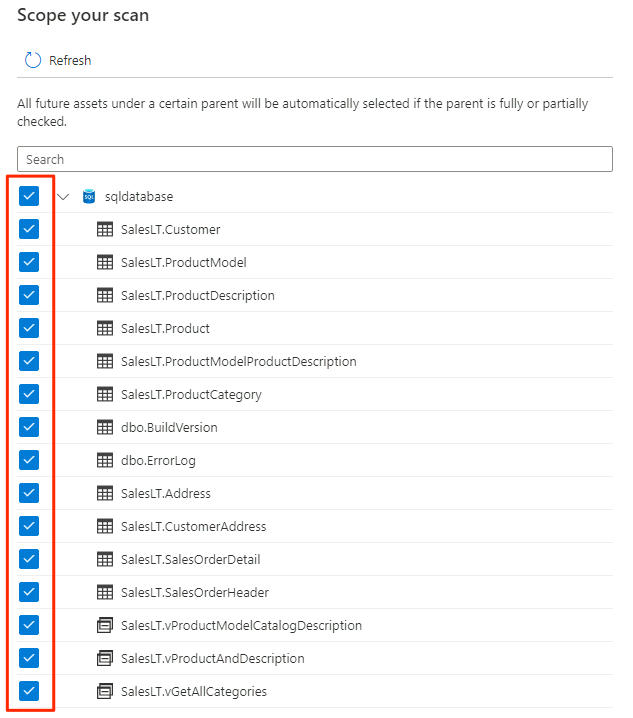
选择扫描的范围。 要扫描整个数据库,请使用默认值。
在“选择扫描规则集”中,选择 “AzureSqlDatabase”,然后选择“继续”。

在“设置扫描触发器”中,选择“一次”,然后选择“继续”。

在“查看扫描”中,查看扫描设置。 选择“保存并运行”以开始扫描。
针对 AdatumERP 数据库重复上述步骤。
现在为已注册数据源的数据治理设置了 Purview。
将 SQL 数据库数据复制到 Data Lake Storage Gen2
在以下步骤中,你将使用数据工厂中的复制数据工具创建一个管道,以将表从 SQL 数据库实例 AdatumCRM 和 AdatumERP 复制到 <DLZ-prefix>devraw Data Lake Storage Gen2 帐户中的 CSV 文件。
环境被锁定为公共访问,因此首先需要设置专用终结点。 若要使用专用终结点,你将在本地浏览器中登录 Azure 门户,然后连接到堡垒主机虚拟机以访问所需的 Azure 服务。
创建专用终结点
若要为所需的资源设置专用终结点,请执行以下操作:
在
<DMLZ-prefix>-dev-bastion资源组中选择<DMLZ-prefix>-dev-vm001。
在命令栏中,选择“连接”,然后选择“堡垒”。

输入虚拟机的用户名和密码,然后选择“连接”。

在虚拟机的 Web 浏览器中,转到 Azure 门户。 转到
<DLZ-prefix>-dev-shared-integration资源组并打开<DLZ-prefix>-dev-integration-datafactory001数据工厂。
在“入门指南”下的“打开 Azure 数据工厂工作室”中,选择“打开”。

在“数据工厂工作室”菜单中,选择“管理”图标(该图标看起来像一个方形工具箱,上面印有扳手)。 在资源菜单中,选择“托管专用终结点”以创建将数据工厂连接到其他受保护的 Azure 服务所需的专用终结点。
后面的部分中将讨论批准专用终结点的访问请求。 批准专用终结点访问请求后,其审批状态为“已批准”,如以下示例中的
<DLZ-prefix>devencur存储帐户所示。
在批准专用终结点连接之前,请选择“新建”。 输入 Azure SQL,查找用于为
<DP-prefix>-dev-sqlserver001Azure SQL 虚拟机创建新的托管专用终结点 Azure SQL 数据库连接器。 虚拟机包含你之前创建的AdatumCRM和AdatumERP数据库。在“新建托管专用终结点 (Azure SQL 数据库)”中,为“名称”输入 data-product-dev-sqlserver001。 输入用于创建资源的 Azure 订阅。 对于“服务器名称”,选择
<DP-prefix>-dev-sqlserver001以便你可以在接下来的几部分中从此数据工厂连接到此服务器。


批准专用终结点访问请求
若要为所需服务提供数据工厂对专用终结点的访问权限,有以下几个选项:
选项 1:在你请求访问的每个服务中,在 Azure 门户中,转到服务的网络或专用终结点连接选项并批准对专用终结点的访问请求。
选项 2:在 Bash 模式下在 Azure Cloud Shell 中运行以下脚本,以一次批准对所需专用终结点的所有访问请求。
# Storage managed private endpoint approval

# devencur
resourceGroupName=$(az group list -o tsv  --query "[?contains(@.name, '-dev-storage')==\`true\`].name")
storageAcctName=$(az storage account list -g $resourceGroupName -o tsv  --query "[?contains(@.name, 'devencur')==\`true\`].name")
endPointConnectionName=$(az network private-endpoint-connection list -g $resourceGroupName -n $storageAcctName --type Microsoft.Storage/storageAccounts -o tsv --query "[?contains(@.properties.privateLinkServiceConnectionState.status, 'Pending')==\`true\`].name")

az network private-endpoint-connection approve -g $resourceGroupName -n $endPointConnectionName --resource-name $storageAcctName --type Microsoft.Storage/storageAccounts --description "Approved"

# devraw
resourceGroupName=$(az group list -o tsv  --query "[?contains(@.name, '-dev-storage')==\`true\`].name")
storageAcctName=$(az storage account list -g $resourceGroupName -o tsv  --query "[?contains(@.name, 'devraw')==\`true\`].name")
endPointConnectionName=$(az network private-endpoint-connection list -g $resourceGroupName -n $storageAcctName --type Microsoft.Storage/storageAccounts -o tsv --query "[?contains(@.properties.privateLinkServiceConnectionState.status, 'Pending')==\`true\`].name")
az network private-endpoint-connection approve -g $resourceGroupName -n $endPointConnectionName --resource-name $storageAcctName --type Microsoft.Storage/storageAccounts --description "Approved"

# SQL Database managed private endpoint approval
resourceGroupName=$(az group list -o tsv  --query "[?contains(@.name, '-dev-dp001')==\`true\`].name")
sqlServerName=$(az sql server list -g $resourceGroupName -o tsv  --query "[?contains(@.name, 'sqlserver001')==\`true\`].name")
endPointConnectionName=$(az network private-endpoint-connection list -g $resourceGroupName -n $sqlServerName --type Microsoft.Sql/servers -o tsv --query "[?contains(@.properties.privateLinkServiceConnectionState.status, 'Pending')==\`true\`].name")
az network private-endpoint-connection approve -g $resourceGroupName -n $endPointConnectionName --resource-name $sqlServerName --type Microsoft.Sql/servers --description "Approved"

# Key Vault private endpoint approval
resourceGroupName=$(az group list -o tsv  --query "[?contains(@.name, '-dev-metadata')==\`true\`].name")
keyVaultName=$(az keyvault list -g $resourceGroupName -o tsv  --query "[?contains(@.name, 'dev-vault001')==\`true\`].name")
endPointConnectionID=$(az network private-endpoint-connection list -g $resourceGroupName -n $keyVaultName --type Microsoft.Keyvault/vaults -o tsv --query "[?contains(@.properties.privateLinkServiceConnectionState.status, 'Pending')==\`true\`].id")
az network private-endpoint-connection approve -g $resourceGroupName --id $endPointConnectionID --resource-name $keyVaultName --type Microsoft.Keyvault/vaults --description "Approved"

# Purview private endpoint approval
resourceGroupName=$(az group list -o tsv  --query "[?contains(@.name, 'dev-governance')==\`true\`].name")
purviewAcctName=$(az purview account list -g $resourceGroupName -o tsv  --query "[?contains(@.name, '-dev-purview001')==\`true\`].name")
for epn in $(az network private-endpoint-connection list -g $resourceGroupName -n $purviewAcctName --type Microsoft.Purview/accounts -o tsv --query "[?contains(@.properties.privateLinkServiceConnectionState.status, 'Pending')==\`true\`].name")
do
    az network private-endpoint-connection approve -g $resourceGroupName -n $epn --resource-name $purviewAcctName --type Microsoft.Purview/accounts --description "Approved"
done
以下示例显示了 <DLZ-prefix>devraw 存储帐户如何管理专用终结点访问请求。 在存储帐户的资源菜单中,选择“网络”。 在命令栏中,选择“专用终结点连接”。

对于某些 Azure 资源,请在资源菜单中选择“专用终结点连接”。 以下屏幕截图显示了 Azure SQL 服务器的示例。
若要批准专用终结点访问请求,请在“专用终结点连接”中选择挂起的访问请求,然后选择“批准:”

在每个必需的服务中批准访问请求后,该请求可能需要几分钟时间才能在数据工厂工作室的托管专用终结点中显示为“已批准”。 即使在命令栏中选择“刷新”,审批状态可能已过时几分钟。
完成对所需服务的所有访问请求的批准后,在托管专用终结点中,所有服务的“审批”状态值为“已批准:”

角色分配
完成对专用终结点访问请求的批准后,请为数据工厂添加适当的角色权限以访问这些资源:
<DP-prefix>-dev-sqlserver001Azure SQL 服务器中的 SQL Database 实例AdatumCRM和AdatumERP- 存储帐户
<DLZ-prefix>devraw、<DLZ-prefix>devencur和<DLZ-prefix>devwork - Purview 帐户
<DMLZ-prefix>-dev-purview001
Azure SQL 虚拟机
若要添加角色分配,请从 Azure SQL 虚拟机开始。 在
<DMLZ-prefix>-dev-dp001资源组中,转到<DP-prefix>-dev-sqlserver001。在资源菜单中,选择“访问控制 (IAM)”。 在命令栏中,选择“添加”>“添加角色分配”。
在“角色”选项卡上,选择“参与者”,然后选择“下一步”。

在“成员”中,对于“将访问权限分配到”,选择“托管标识”。 对于“成员”,请选择“选择成员”。

在“选择托管标识”中,选择 Azure 订阅。 对于“托管标识”,请选择“数据工厂 (V2)”以查看可用的数据工厂。 在数据工厂列表中,选择“Azure 数据工厂 <DLZ-prefix>-dev-integration-datafactory001”。 选择“选择”。

选择“查看 + 分配”两次以完成该过程。
存储帐户
接下来,将所需角色分配给 <DLZ-prefix>devraw、<DLZ-prefix>devencur 和 <DLZ-prefix>devwork 存储帐户。
若要分配角色,请完成用于创建 Azure SQL 服务器角色分配的相同步骤。 但是,对于角色,请选择“存储 Blob 数据参与者”,而不是“参与者”。
为所有三个存储帐户分配角色后,数据工厂可以连接并访问存储帐户。
Microsoft Purview
添加角色分配的最后一步是将 Microsoft Purview 中的 Purview Data Curator 角色添加到 <DLZ-prefix>-dev-integration-datafactory001 数据工厂的托管标识帐户。 完成以下步骤,以便数据工厂可以将来自多个数据源的数据目录资产信息发送到 Purview 帐户。
在资源组
<DMLZ-prefix>-dev-governance中,转到<DMLZ-prefix>-dev-purview001Purview 帐户。在 Purview Studio 中,选择“数据映射”图标,然后选择“集合”。
选择集合的“角色分配”选项卡。 在“数据策展人”下,为
<DLZ-prefix>-dev-integration-datafactory001添加托管标识:
将数据工厂连接到 Purview
权限已设置,Purview 现在可以查看数据工厂。 下一步是将 <DMLZ-prefix>-dev-purview001 连接到 <DLZ-prefix>-dev-integration-datafactory001。
在 Purview Studio 中,选择“管理”图标,然后选择“数据工厂”。 选择“新建”以创建数据工厂连接。
在“新建数据工厂连接”窗格中,输入 Azure 订阅并选择
<DLZ-prefix>-dev-integration-datafactory001数据工厂。 选择“确定”。
在
<DLZ-prefix>-dev-integration-datafactory001数据工厂工作室实例的“管理”>“Azure Purview”下,刷新 Azure Purview 帐户。Data Lineage - Pipeline集成现在显示绿色的“已连接”图标。

创建 ETL 管道
既然 <DLZ-prefix>-dev-integration-datafactory001 具有所需的访问权限,请在数据工厂中创建一个复制活动,以将数据从 SQL 数据库实例移动到 <DLZ-prefix>devraw 原始存储帐户。
将复制数据工具与 AdatumCRM 配合使用
此过程从 AdatumCRM SQL 数据库实例中提取客户数据并将其复制到 Data Lake Storage Gen2 存储。
在数据工厂工作室中,选择“创作”图标,然后选择“工厂资源”。 选择加号 (+) ,然后选择复制数据工具。

完成复制数据工具向导中的每个步骤:
若要创建触发器以每隔 24 小时运行管道,请选择“计划”。

要创建链接服务以将此数据工厂连接到
<DP-prefix>-dev-sqlserver001服务器(源)上的AdatumCRMSQL 数据库实例,请选择“新建连接”。
注意
如果在 SQL 数据库实例或存储帐户中连接或访问数据时遇到错误,请查看 Azure 订阅中的权限。 确保数据工厂具有对任何有问题的资源的所需凭据和访问权限。
选择以下三个表:
SalesLT.AddressSalesLT.CustomerSalesLT.CustomerAddress

创建新的链接服务以访问
<DLZ-prefix>devrawAzure Data Lake Storage Gen2 存储(目标)。
浏览
<DLZ-prefix>devraw存储中的文件夹并选择“数据”作为目标。
将文件名后缀更改为 .csv 并使用其他默认选项。

转到下一个窗格,然后选择“向文件添加标头”。

完成向导后,“部署完成”窗格类似于以下示例:


新管道列在 Pipelines 中。
运行管道
此过程在 Data\CRM 文件夹中创建三个 .csv 文件,每个文件对应于 AdatumCRM 数据库中的每个选定表。
重命名管道
CopyPipeline_CRM_to_Raw。重命名数据集
CRM_Raw_Storage和CRM_DB。在“工厂资源”命令栏中,选择“全部发布”。
选择
CopyPipeline_CRM_to_Raw管道,然后在管道命令栏中,选择“触发器”将三个表从 SQL 数据库复制到 Data Lake Storage Gen2。
将复制数据工具与 AdatumERP 配合使用
接下来,从 AdatumERP 数据库提取数据。 数据表示来自 ERP 系统的销售数据。
仍在数据工厂工作室中,使用“复制数据”工具创建新的管道。 这次,你将销售数据从
AdatumERP发送到<DLZ-prefix>devraw存储帐户数据文件夹,与你处理 CRM 数据的方式相同。 完成相同的步骤,但使用AdatumERP数据库作为源。创建每小时触发的计划。
创建到
AdatumERPSQL 数据库实例的链接服务。
选择以下七个表:
SalesLT.ProductSalesLT.ProductCategorySalesLT.ProductDescriptionSalesLT.ProductModelSalesLT.ProductModelProductDescriptionSalesLT.SalesOrderDetailSalesLT.SalesOrderHeader

使用到
<DLZ-prefix>devraw存储帐户的现有链接服务并将文件扩展名设置为 .csv。
选择“将页眉添加到文件”。
再次完成向导并重命名管道为
CopyPipeline_ERP_to_DevRaw。 然后在命令栏中,选择“全部发布”。 最后,在这个新创建的管道上运行触发器,将选定的七个表从 SQL 数据库复制到 Data Lake Storage Gen2。

完成这些步骤后,<DLZ-prefix>devraw Data Lake Storage Gen2 存储中有 10 个 CSV 文件。 在下一部分中,你将策展 <DLZ-prefix>devencur Data Lake Storage Gen2 存储中的文件。
策展 Data Lake Storage Gen2 中的数据
在原始 <DLZ-prefix>devraw Data Lake Storage Gen2 存储中创建完 10 个 CSV 文件后,在将这些文件复制到策展 <DLZ-prefix>devencur Data Lake Storage Gen2 存储时根据需要转换它们。
继续使用 Azure 数据工厂创建这些新管道来协调数据移动。
将 CRM 策展到客户数据
创建一个数据流,在 <DLZ-prefix>devraw 中获取 Data\CRM 文件夹中的 CSV 文件。 转换文件并将转换后的文件以 .parquet 文件格式复制到 <DLZ-prefix>devencur 中的 Data\Customer 文件夹。
在 Azure 数据工厂中,转到数据工厂并选择“编排”。

在“常规”中,将管道命名为
Pipeline_transform_CRM。在“活动”窗格中,展开“移动和转换”。 将数据流活动拖放到管道画布中。

在“添加数据流”中,选择“创建新数据流”并将数据流命名为
CRM_to_Customer。 选择“完成”。注意
在管道画布的命令栏中,打开“数据流调试”。 在调试模式下,可以针对实时 Apache Spark 群集以交互方式测试转换逻辑。 数据流集群需要 5 到 7 分钟来预热。 我们建议你在开始数据流开发之前打开调试。

在
CRM_to_Customer数据流中选择完选项后,Pipeline_transform_CRM管道类似于以下示例:
数据流类似于以下示例:

接下来,在
CRMAddress源的数据流中修改以下设置:从 Data Lake Storage Gen2 创建新数据集。 使用 DelimitedText 格式。 为数据集
DevRaw_CRM_Address命名。将链接服务连接到
<DLZ-prefix>devraw。选择
Data\CRM\SalesLTAddress.csv文件作为源。
在配对的
CustAddress接收器的数据流中修改以下设置:创建名为
DevEncur_Cust_Address的新数据集。在
<DLZ-prefix>devencur中选择 Data\Customer 文件夹作为接收器。在“设置\输出到单个文件”下,将文件转换为 Address.Parquet。
对于数据流配置的其余部分,请使用下表中针对每个组件的信息。 请注意,前两行是 CRMAddress 和 CustAddress。 将它们用作其他对象的示例。
不在以下任一表中的项目是 RemovePasswords 架构修饰符。 前面的屏幕截图显示该项目介于 CRMCustomer 和 CustCustomer 之间。 若要添加此架构修饰符,请转到“选择设置”并删除 PasswordHash 和 PasswordSalt。
CRMCustomer 从 .crv 文件返回一个 15 列的模式。 CustCustomer 在架构修饰符删除两个密码列后仅写入 13 列。
完整表
| 名称 | 对象类型 | 数据集名称 | 数据存储 | 格式类型 | 链接服务 | 文件或文件夹 |
|---|---|---|---|---|---|---|
CRMAddress |
target | DevRaw_CRM_Address |
Azure Data Lake Storage Gen2 | DelimitedText | devraw |
Data\CRM\SalesLTAddress.csv |
CustAddress |
接收器 | DevEncur_Cust_Address |
Azure Data Lake Storage Gen2 | Parquet | devencur |
Data\Customer\Address.parquet |
CRMCustomer |
target | DevRaw_CRM_Customer |
Azure Data Lake Storage Gen2 | DelimitedText | devraw |
Data\CRM\SalesLTCustomer.csv |
CustCustomer |
接收器 | DevEncur_Cust_Customer |
Azure Data Lake Storage Gen2 | Parquet | devencur |
Data\Customer\Customer.parquet |
CRMCustomerAddress |
target | DevRaw_CRM_CustomerAddress |
Azure Data Lake Storage Gen2 | DelimitedText | devraw |
Data\CRM\SalesLTCustomerAddress.csv |
CustCustomerAddress |
接收器 | DevEncur_Cust_CustomerAddress |
Azure Data Lake Storage Gen2 | Parquet | devencur |
Data\Customer\CustomerAddress.parquet |
ERP 到 Sales 表
现在,重复类似的步骤来创建 Pipeline_transform_ERP 管道,创建 ERP_to_Sales 数据流以转换 <DLZ-prefix>devraw 中 Data\ERP 文件夹中的 .csv 文件,并将转换后的文件复制到 <DLZ-prefix>devencur 中的 Data\Sales 文件夹中。
在下表中,你将找到要在 ERP_to_Sales 数据流中创建的对象以及需要为每个对象修改的设置。 每个 .csv 文件都映射到一个 .parquet 接收器。
| 名称 | 对象类型 | 数据集名称 | 数据存储 | 格式类型 | 链接服务 | 文件或文件夹 |
|---|---|---|---|---|---|---|
ERPProduct |
target | DevRaw_ERP_Product |
Azure Data Lake Storage Gen2 | DelimitedText | devraw |
Data\ERP\SalesLTProduct.csv |
SalesProduct |
接收器 | DevEncur_Sales_Product |
Azure Data Lake Storage Gen2 | Parquet | devencur |
Data\Sales\Product.parquet |
ERPProductCategory |
target | DevRaw_ERP_ProductCategory |
Azure Data Lake Storage Gen2 | DelimitedText | devraw |
Data\ERP\SalesLTProductCategory.csv |
SalesProductCategory |
接收器 | DevEncur_Sales_ProductCategory |
Azure Data Lake Storage Gen2 | Parquet | devencur |
Data\Sales\ProductCategory.parquet |
ERPProductDescription |
target | DevRaw_ERP_ProductDescription |
Azure Data Lake Storage Gen2 | DelimitedText | devraw |
Data\ERP\SalesLTProductDescription.csv |
SalesProductDescription |
接收器 | DevEncur_Sales_ProductDescription |
Azure Data Lake Storage Gen2 | Parquet | devencur |
Data\Sales\ProductDescription.parquet |
ERPProductModel |
target | DevRaw_ERP_ProductModel |
Azure Data Lake Storage Gen2 | DelimitedText | devraw |
Data\ERP\SalesLTProductModel.csv |
SalesProductModel |
接收器 | DevEncur_Sales_ProductModel |
Azure Data Lake Storage Gen2 | Parquet | devencur |
Data\Sales\ProductModel.parquet |
ERPProductModelProductDescription |
target | DevRaw_ERP_ProductModelProductDescription |
Azure Data Lake Storage Gen2 | DelimitedText | devraw |
Data\ERP\SalesLTProductModelProductDescription.csv |
SalesProductModelProductDescription |
接收器 | DevEncur_Sales_ProductModelProductDescription |
Azure Data Lake Storage Gen2 | Parquet | devencur |
Data\Sales\ProductModelProductDescription.parquet |
ERPProductSalesOrderDetail |
target | DevRaw_ERP_ProductSalesOrderDetail |
Azure Data Lake Storage Gen2 | DelimitedText | devraw |
Data\ERP\SalesLTProductSalesOrderDetail.csv |
SalesProductSalesOrderDetail |
接收器 | DevEncur_Sales_ProductSalesOrderDetail |
Azure Data Lake Storage Gen2 | Parquet | devencur |
Data\Sales\ProductSalesOrderDetail.parquet |
ERPProductSalesOrderHeader |
target | DevRaw_ERP_ProductSalesOrderHeader |
Azure Data Lake Storage Gen2 | DelimitedText | devraw |
Data\ERP\SalesLTProductSalesOrderHeader.csv |
SalesProductSalesOrderHeader |
接收器 | DevEncur_Sales_ProductSalesOrderHeader |
Azure Data Lake Storage Gen2 | Parquet | devencur |
Data\Sales\ProductSalesOrderHeader.parquet |