你当前正在访问 Microsoft Azure Global Edition 技术文档网站。 如果需要访问由世纪互联运营的 Microsoft Azure 中国技术文档网站,请访问 https://docs.azure.cn

配置 Microsoft Security DevOps Azure DevOps 扩展

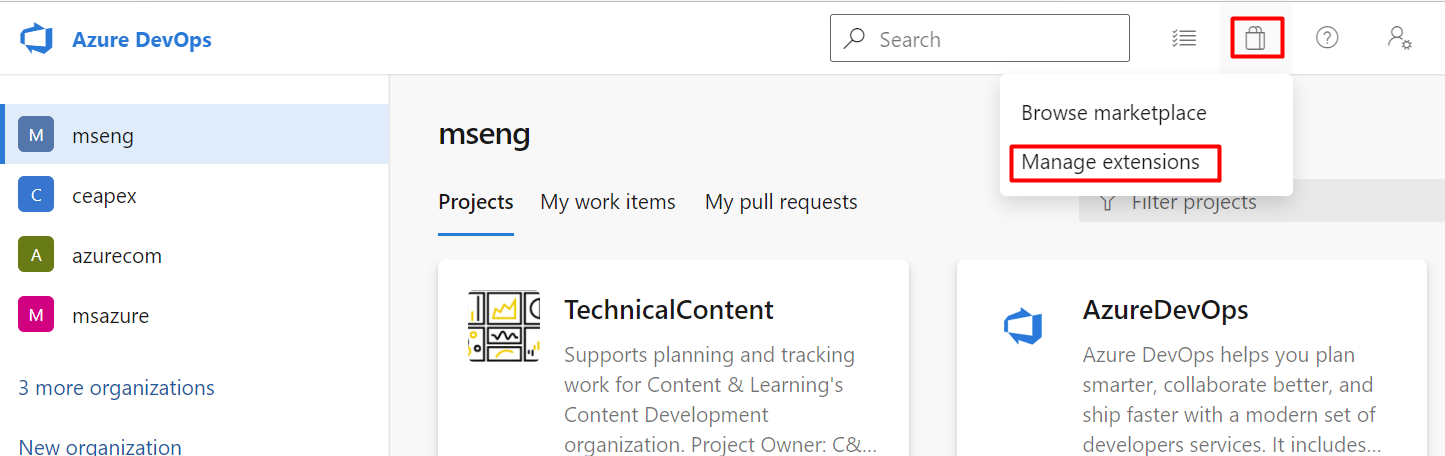
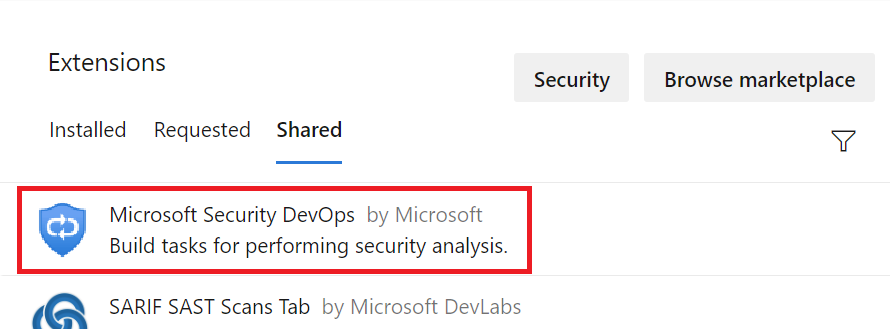
Microsoft Security DevOps 是一个命令行应用程序,它将静态分析工具集成到开发生命周期中。 Microsoft Security DevOps 安装、配置和运行最新版本的静态分析工具(包括但不限于 SDL/安全性和合规性工具)。 Microsoft Security DevOps 是数据驱动的,具有可移植配置,可实现跨多个环境的确定性执行。

Microsoft Security DevOps 使用以下开源工具:

名称 语言 许可证
反恶意软件 Windows 中来自 Microsoft Defender for Endpoint 的反恶意软件防护,它会扫描恶意软件并在发现恶意软件时中断构建。 默认情况下,此工具在 Windows 最新代理上扫描。 非开放源代码
Bandit Python Apache 许可证 2.0
BinSkim 二进制 - Windows、ELF MIT 许可证
ESlint JavaScript MIT 许可证
IaCFileScanner Terraform、CloudFormation、ARM 模板、Bicep 非开放源代码
模板分析器 ARM 模板、Bicep MIT 许可证
Terrascan Terraform (HCL2)、Kubernetes (JSON/YAML)、Helm v3、Kustomize、Dockerfiles、CloudFormation Apache 许可证 2.0
Trivy 容器映像、基础结构即代码 (IaC) Apache 许可证 2.0

注意

从 2023 年 9 月 20 日起,适用于 Azure DevOps 的 Microsoft Security DevOps (MSDO) 扩展中的机密扫描 (CredScan) 工具已停用。 MSDO 机密扫描将替换为适用于 Azure DevOps 的 GitHub Advanced Security

先决条件

  • 安装扩展需要 Azure DevOps 组织的项目集合管理员权限。

如果无权安装扩展,则必须在安装过程中向 Azure DevOps 组织的管理员请求访问权限。

配置 Microsoft Security DevOps Azure DevOps 扩展

配置 Microsoft Security DevOps Azure DevOps 扩展:

  1. 登录 Azure DevOps

  2. 导航到“购物袋”>“管理扩展”。

    显示如何导航到“管理扩展”屏幕的屏幕截图。

  3. 选择“共享”。

    注意

    如果已安装了 Microsoft Security DevOps 扩展,它将列在“已安装”选项卡中。

  4. 选择“Microsoft Security DevOps”。

    显示在何处选择 Microsoft Security DevOps 的屏幕截图。

  5. 选择“安装” 。

  6. 从下拉菜单中选择适当的组织。

  7. 选择“安装” 。

  8. 选择“转到组织”。

使用 YAML 配置管道

使用 YAML 配置管道:

  1. 登录到 Azure DevOps

  2. 选择你的项目。

  3. 导航到“管道”

  4. 选择“新建管道”。

    显示在 DevOps 中查找创建管道的位置的屏幕截图。

  5. 选择“Azure Repos Git”。

    显示要导航到的位置以选择 Azure 存储库 git 的屏幕截图。

  6. 选择相关的存储库。

    显示在何处选择存储库的屏幕截图。

  7. 选择“初学者管道”。

    显示在何处选择初学者管道的屏幕截图。

  8. 将以下 YAML 粘贴到管道中:

    # Starter pipeline
    # Start with a minimal pipeline that you can customize to build and deploy your code.
    # Add steps that build, run tests, deploy, and more:
    # https://aka.ms/yaml
    trigger: none
    pool:
      # ubuntu-latest also supported.
      vmImage: 'windows-latest'
    steps:
    - task: MicrosoftSecurityDevOps@1
      displayName: 'Microsoft Security DevOps'
      inputs:    
      # command: 'run' | 'pre-job' | 'post-job'. Optional. The command to run. Default: run
      # config: string. Optional. A file path to an MSDO configuration file ('*.gdnconfig').
      # policy: 'azuredevops' | 'microsoft' | 'none'. Optional. The name of a well-known Microsoft policy. If no configuration file or list of tools is provided, the policy may instruct MSDO which tools to run. Default: azuredevops.
      # categories: string. Optional. A comma-separated list of analyzer categories to run. Values: 'code', 'artifacts', 'IaC', 'containers'. Example: 'IaC, containers'. Defaults to all.
      # languages: string. Optional. A comma-separated list of languages to analyze. Example: 'javascript,typescript'. Defaults to all.
      # tools: string. Optional. A comma-separated list of analyzer tools to run. Values: 'bandit', 'binskim', 'eslint', 'templateanalyzer', 'terrascan', 'trivy'.
      # break: boolean. Optional. If true, will fail this build step if any error level results are found. Default: false.
      # publish: boolean. Optional. If true, will publish the output SARIF results file to the chosen pipeline artifact. Default: true.
      # artifactName: string. Optional. The name of the pipeline artifact to publish the SARIF result file to. Default: CodeAnalysisLogs*.


    注意

    与 Defender for Cloud 集成需要使用 artifactName“CodeAnalysisLogs”。 有关其他工具配置选项和环境变量,请参阅 Microsoft Security DevOps wiki

  9. 若要提交管道,请选择“保存并运行”。

    管道将运行几分钟并保存结果。

    注意

    在 Azure DevOps 组织中安装 SARIF SAST Scans Tab 扩展,以确保生成的分析结果会自动显示在“扫描”选项卡下。

将第三方安全工具的检测结果上传到 Defender for Cloud

虽然 Defender for Cloud 提供 MSDO CLI 来实现跨一组开源安全分析器的标准化功能和策略控制,但你可以灵活地将 CI/CD 管道中配置的其他第三方安全工具的结果上传到 Defender for Cloud,以实现全面的代码到云上下文化。 上传到 Defender for Cloud 的所有结果必须采用标准的 SARIF 格式。

首先,确保 Azure DevOps 存储库已加入 Defender for Cloud。 成功加入 Defender for Cloud 后,它会持续监视“CodeAnalysisLogs”工件以提供 SARIF 输出。

可以使用“PublishBuildArtifacts@1”任务来确保将 SARIF 输出发布到正确的项目。 例如,如果安全分析器输出“results.sarif”,则你可以在作业中配置以下任务,以确保将结果上传到 Defender for Cloud:

- task: PublishBuildArtifacts@1
  inputs:
    PathtoPublish: 'results.sarif'
    ArtifactName: 'CodeAnalysisLogs'

Findings from third-party security tools will appear as 'Azure DevOps repositories should have code scanning findings resolved' assessments associated with the repository the secuirty finding was identified in.