你当前正在访问 Microsoft Azure Global Edition 技术文档网站。 如果需要访问由世纪互联运营的 Microsoft Azure 中国技术文档网站,请访问 https://docs.azure.cn。
教程:保护 Azure 远程渲染和模型存储
在本教程中,你将了解如何执行以下操作:
- 保护包含 Azure 远程渲染模型的 Azure Blob 存储
- 使用 Microsoft Entra ID 进行身份验证以访问 Azure 远程渲染实例
- 使用 Azure 凭据进行 Azure 远程渲染身份验证
先决条件
- 本教程以教程:优化材料、照明和效果为基础构建。
为何需要额外的安全性
应用程序的当前状态及其对 Azure 资源的访问权限如下所示:
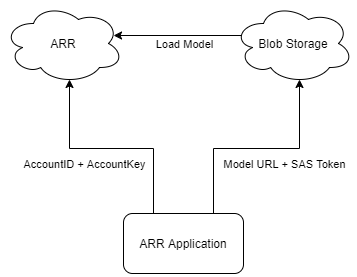
“AccountID + AccountKey”和“URL + SAS 令牌”都同时存储了用户名和密码。 例如,如果公开了“AccountID + AccountKey”,攻击者在未经你允许的情况下使用你的 ARR 资源是很容易的,且由你承担后果。
在 Azure Blob 存储中保护内容
通过正确的配置,Azure 远程渲染可以安全访问 Azure Blob 存储的内容。 请参阅操作说明:链接存储帐户,了解如何使用 blob 存储帐户配置 Azure 远程渲染实例。
在使用链接的 Blob 存储时,可以使用略有不同的方法来加载模型:
var loadModelParams = new LoadModelFromSasOptions(modelPath, modelEntity);
var task = ARRSessionService.CurrentActiveSession.Connection.LoadModelFromSasAsync(loadModelParams);
上述行使用 FromSas 版本的参数和会话操作。 必须将它们转换为非 SAS 版本:
var loadModelParams = LoadModelOptions.CreateForBlobStorage(storageAccountPath, blobName, modelPath, modelEntity);
var task = ARRSessionService.CurrentActiveSession.Connection.LoadModelAsync(loadModelParams);
让我们修改 RemoteRenderingCoordinator 以从链接的 blob 存储帐户加载自定义模型。
如果尚未执行此操作,请完成操作说明:链接存储帐户,向 ARR 实例授予访问 Blob 存储实例的权限。
将以下已修改的 LoadModel 方法添加到当前 LoadModel 方法正下方的 RemoteRenderingCoordinator 中 :
/// <summary>
/// Loads a model from blob storage that has been linked to the ARR instance
/// </summary>
/// <param name="storageAccountName">The storage account name, this contains the blob containers </param>
/// <param name="blobName">The blob container name, i.e. arroutput</param>
/// <param name="modelPath">The relative path inside the container to the model, i.e. test/MyCustomModel.arrAsset</param>
/// <param name="parent">The parent Transform for this remote entity</param>
/// <param name="progress">A call back method that accepts a float progress value [0->1]</param>
/// <returns></returns>
public async Task<Entity> LoadModel(string storageAccountName, string blobName, string modelPath, UnityEngine.Transform parent = null, Action<float> progress = null)
{
    //Create a root object to parent a loaded model to
    var modelEntity = ARRSessionService.CurrentActiveSession.Connection.CreateEntity();

    //Get the game object representation of this entity
    var modelGameObject = modelEntity.GetOrCreateGameObject(UnityCreationMode.DoNotCreateUnityComponents);

    //Ensure the entity will sync its transform with the server
    var sync = modelGameObject.GetComponent<RemoteEntitySyncObject>();
    sync.SyncEveryFrame = true;

    //Parent the new object under the defined parent
    if (parent != null)
    {
        modelGameObject.transform.SetParent(parent, false);
        modelGameObject.name = parent.name + "_Entity";
    }

    //Load a model that will be parented to the entity
    var loadModelParams = LoadModelOptions.CreateForBlobStorage($"{storageAccountName}.blob.core.windows.net", blobName, modelPath, modelEntity);
    var loadModelAsync = ARRSessionService.CurrentActiveSession.Connection.LoadModelAsync(loadModelParams, progress);
    var result = await loadModelAsync;
    return modelEntity;
}
此代码与原始
LoadModel方法相同,但我们已将该方法调用的 SAS 版本替换为非 SAS 版本。storageAccountName和blobName的额外输入也已添加到参数中。 我们将从另一个方法中调用此新的 LoadModel 方法,该方法类似于在第一个教程中创建的第一个 LoadTestModel 方法。将以下方法添加到 LoadTestModel 正后方的 RemoteRenderingCoordinator
private bool loadingLinkedCustomModel = false;

[SerializeField]
private string storageAccountName;
public string StorageAccountName {
    get => storageAccountName.Trim();
    set => storageAccountName = value;
}

[SerializeField]
private string blobContainerName;
public string BlobContainerName {
    get => blobContainerName.Trim();
    set => blobContainerName = value;
}

[SerializeField]
private string modelPath;
public string ModelPath {
    get => modelPath.Trim();
    set => modelPath = value;
}

[ContextMenu("Load Linked Custom Model")]
public async void LoadLinkedCustomModel()
{
    if (CurrentCoordinatorState != RemoteRenderingState.RuntimeConnected)
    {
        Debug.LogError("Please wait for the runtime to connect before loading the test model. Try again later.");
        return;
    }
    if (loadingLinkedCustomModel)
    {
        Debug.Log("Linked Test model already loading or loaded!");
        return;
    }
    loadingLinkedCustomModel = true;

    // Create a parent object to use for positioning
    GameObject testParent = new GameObject("LinkedCustomModel");
    testParent.transform.position = new Vector3(0f, 0f, 3f);

    await LoadModel(StorageAccountName, BlobContainerName, ModelPath, testParent.transform, (progressValue) => Debug.Log($"Loading Test Model progress: {Math.Round(progressValue * 100, 2)}%"));
}
此代码会将另外三个字符串变量添加到 RemoteRenderingCoordinator 组件。
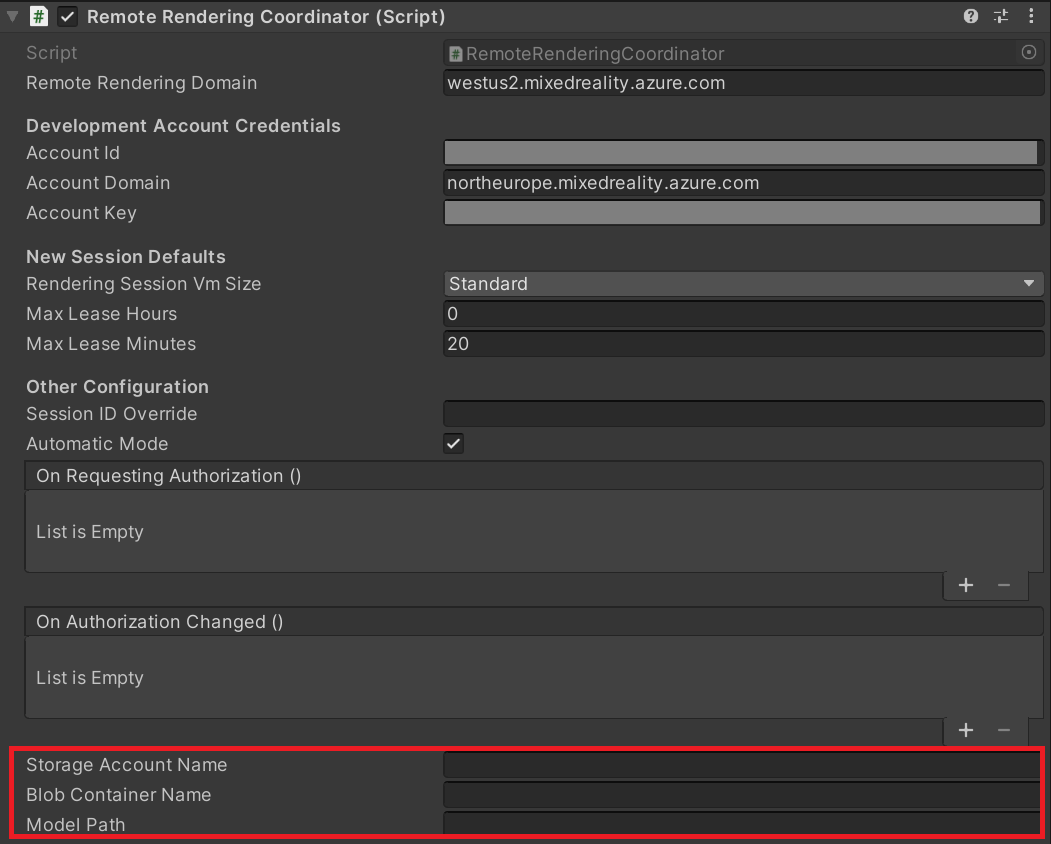
将值添加到 RemoteRenderingCoordinator 组件。 按照模型转换快速入门进行操作后,你的值应为:
- 存储帐户名称:你的存储帐户名称,即为存储帐户选择的全局唯一名称。 在快速入门中,这是 arrtutorialstorage,你的值将与此不同。
- Blob 容器名称:arroutput,Blob 存储容器
- 模型路径:Arrconfig.json 文件中定义的“outputFolderPath”和“outputAssetFileName”的组合。 在快速入门中,这是 "outputFolderPath":"converted/robot"、"outputAssetFileName": "robot.arrAsset"。 这会生成模型路径值“converted/robot/robot.arrAsset”,你的值会与此不同。
提示
如果运行 Conversion.ps1 脚本,而不包含“-UseContainerSas”参数,则该脚本将为你输出上述所有值,而不是 SAS 令牌。

现在,请删除或禁用 GameObject TestModel,以便为自定义模型加载提供空间。
播放场景并连接到远程会话。
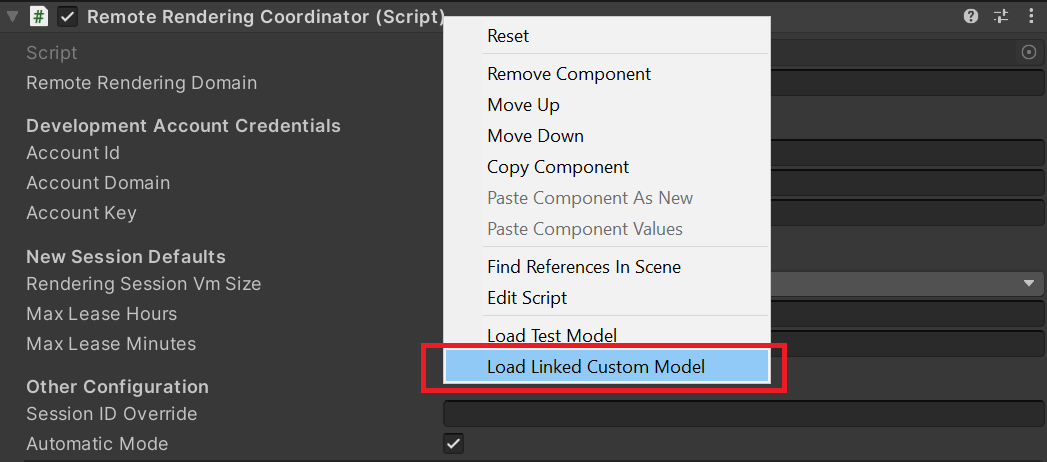
打开 RemoteRenderingCoordinator 上的上下文菜单,然后选择“加载链接的自定义模型”。
通过从本地应用程序中删除 SAS 令牌,这些步骤提高了应用程序的安全性。
现在,应用程序的当前状态及其对 Azure 资源的访问权限如下所示:
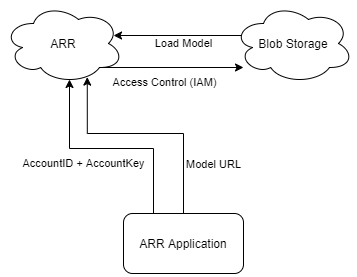
还需要从本地应用程序中删除另外一个“密码”,即 AccountKey。 可以使用 Microsoft Entra 身份验证完成此操作。
Microsoft Entra 身份验证
使用 Microsoft Entra 身份验证,可以通过更可控的方式确定使用 ARR 的个人或组。 ARR 内置了对接受访问令牌的支持,而不是对使用帐户密钥的支持。 可以将访问令牌看作是一个有时间限制的、特定于用户的密钥,它只解锁所请求的特定资源的某些部分。
RemoteRenderingCoordinator 脚本具有一个名为 ARRCredentialGetter 的委托,该委托包含一个返回 SessionConfiguration 对象的方法,此方法用于配置远程会话管理。 我们可以将一个不同的方法分配给 ARRCredentialGetter,这使我们可以使用 Azure 登录流,生成包含 Azure 访问令牌的 SessionConfiguration 对象。 此访问令牌特定于正在登录的用户。
请按照如何:配置身份验证 - 已部署的应用程序的身份验证,其中包括注册新的 Microsoft Entra 应用程序和配置对 ARR 实例的访问。
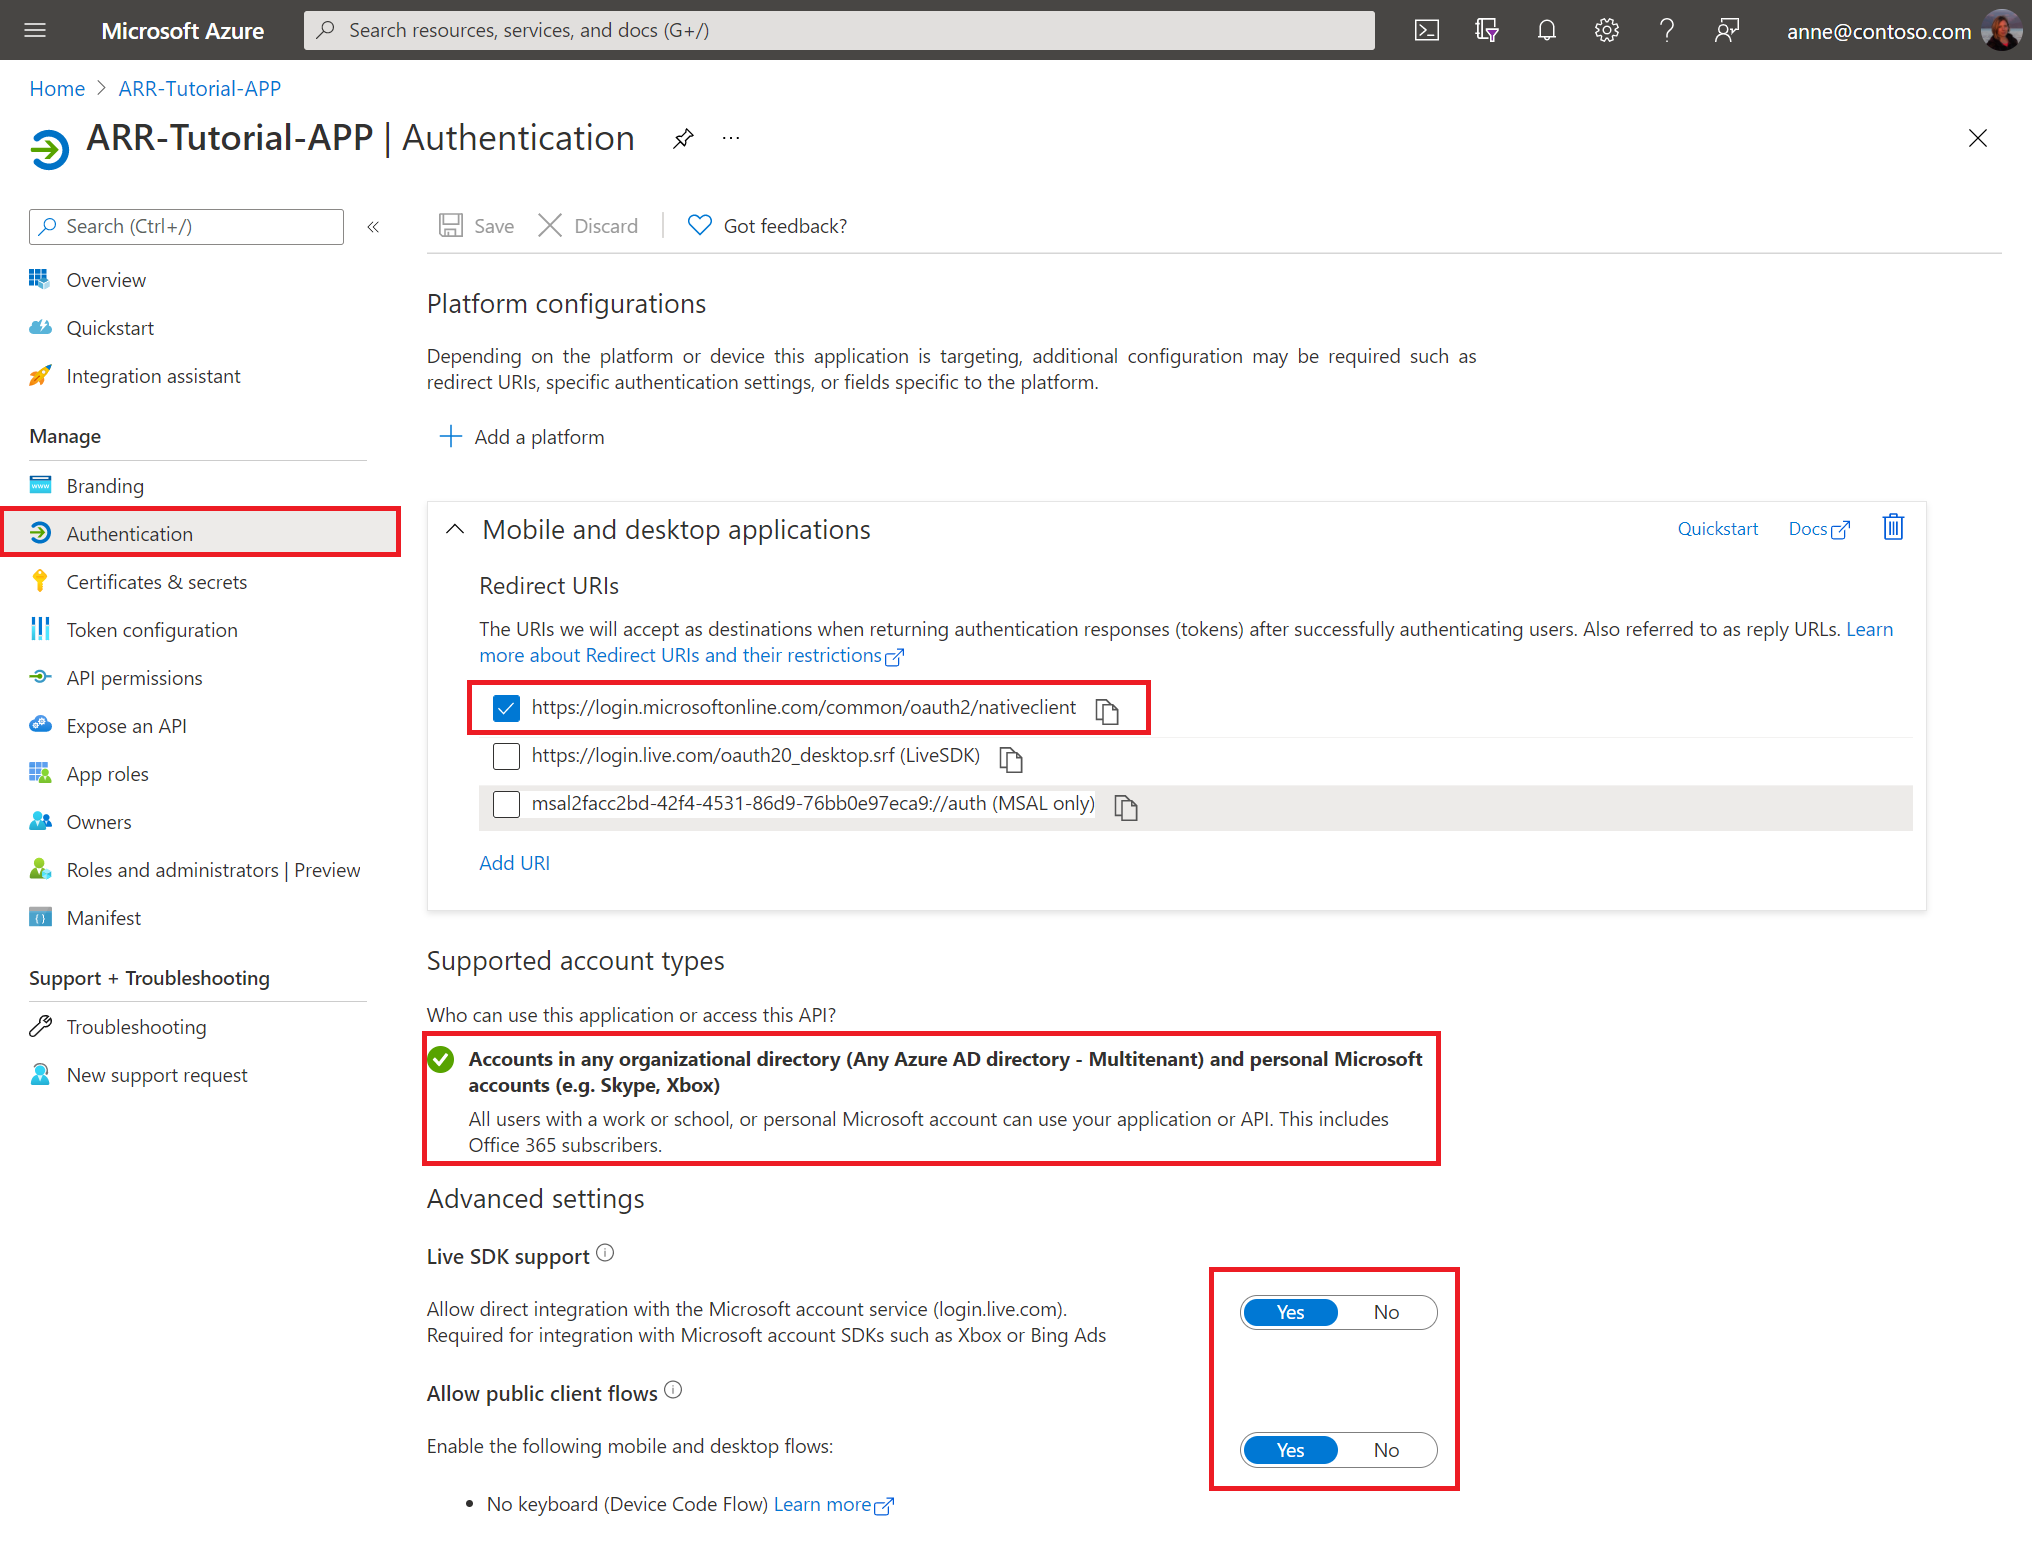
配置新的 Microsoft Entra 应用程序后,请检查 Microsoft Entra 应用程序,如下图所示:
Microsoft Entra 应用程序 -> 身份验证
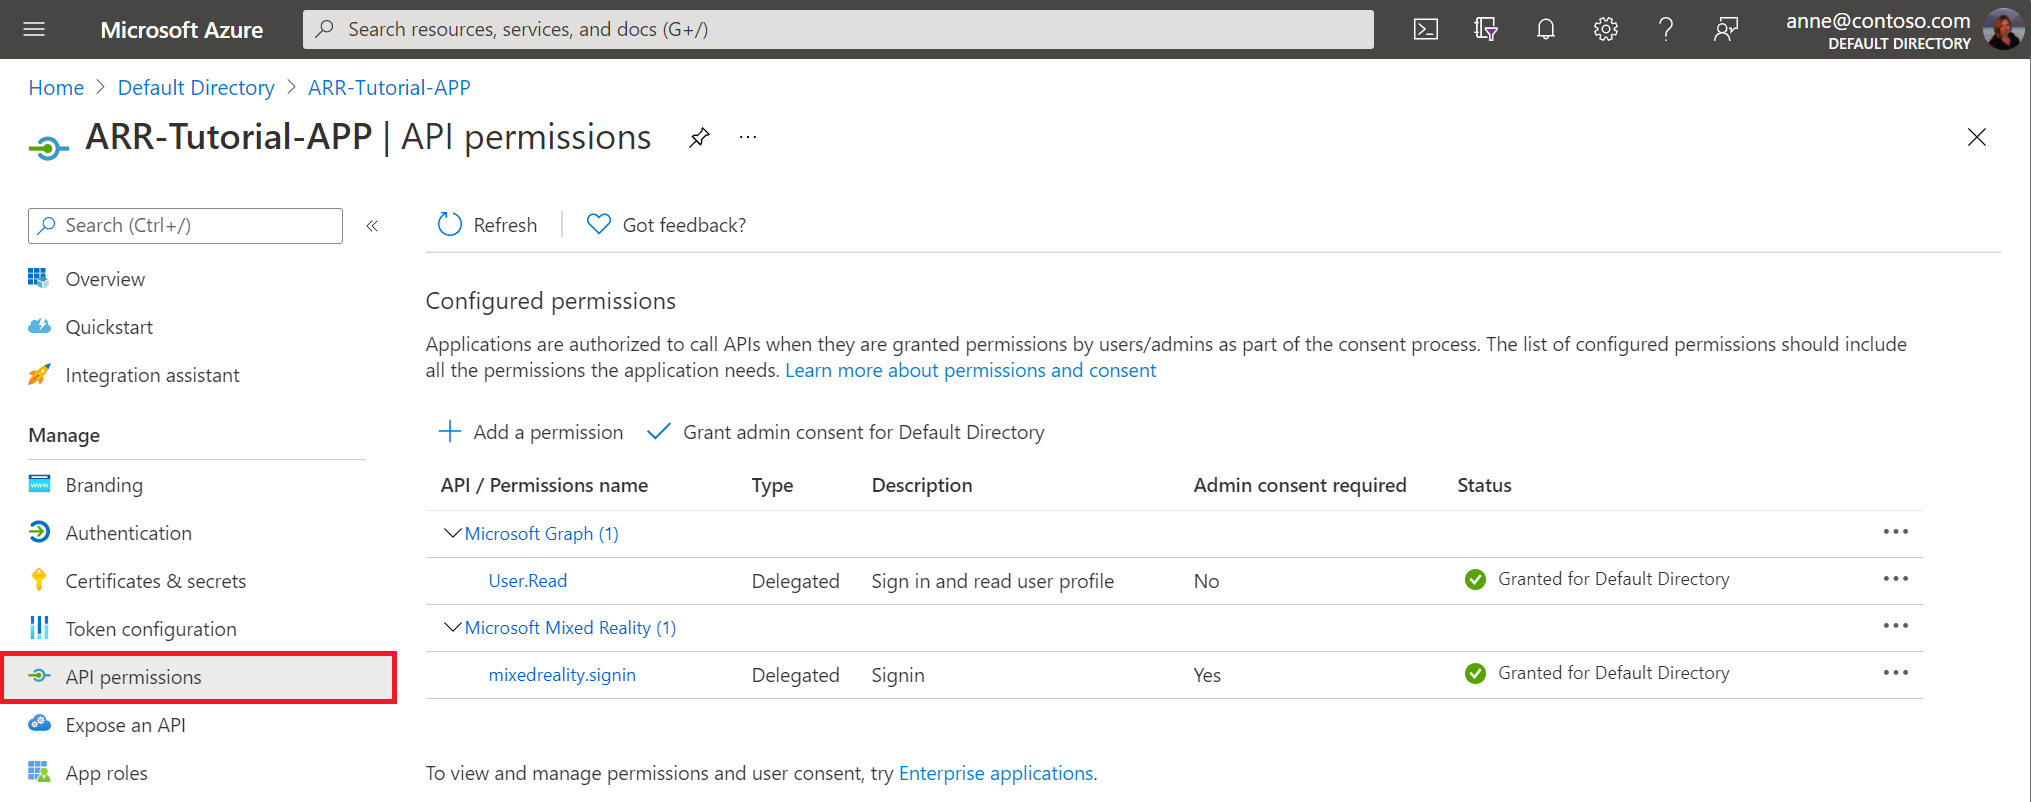
Microsoft Entra 应用程序 -> API 权限
配置远程渲染帐户后,请检查你的配置是否如下图所示:
ARR -> AccessControl (IAM)
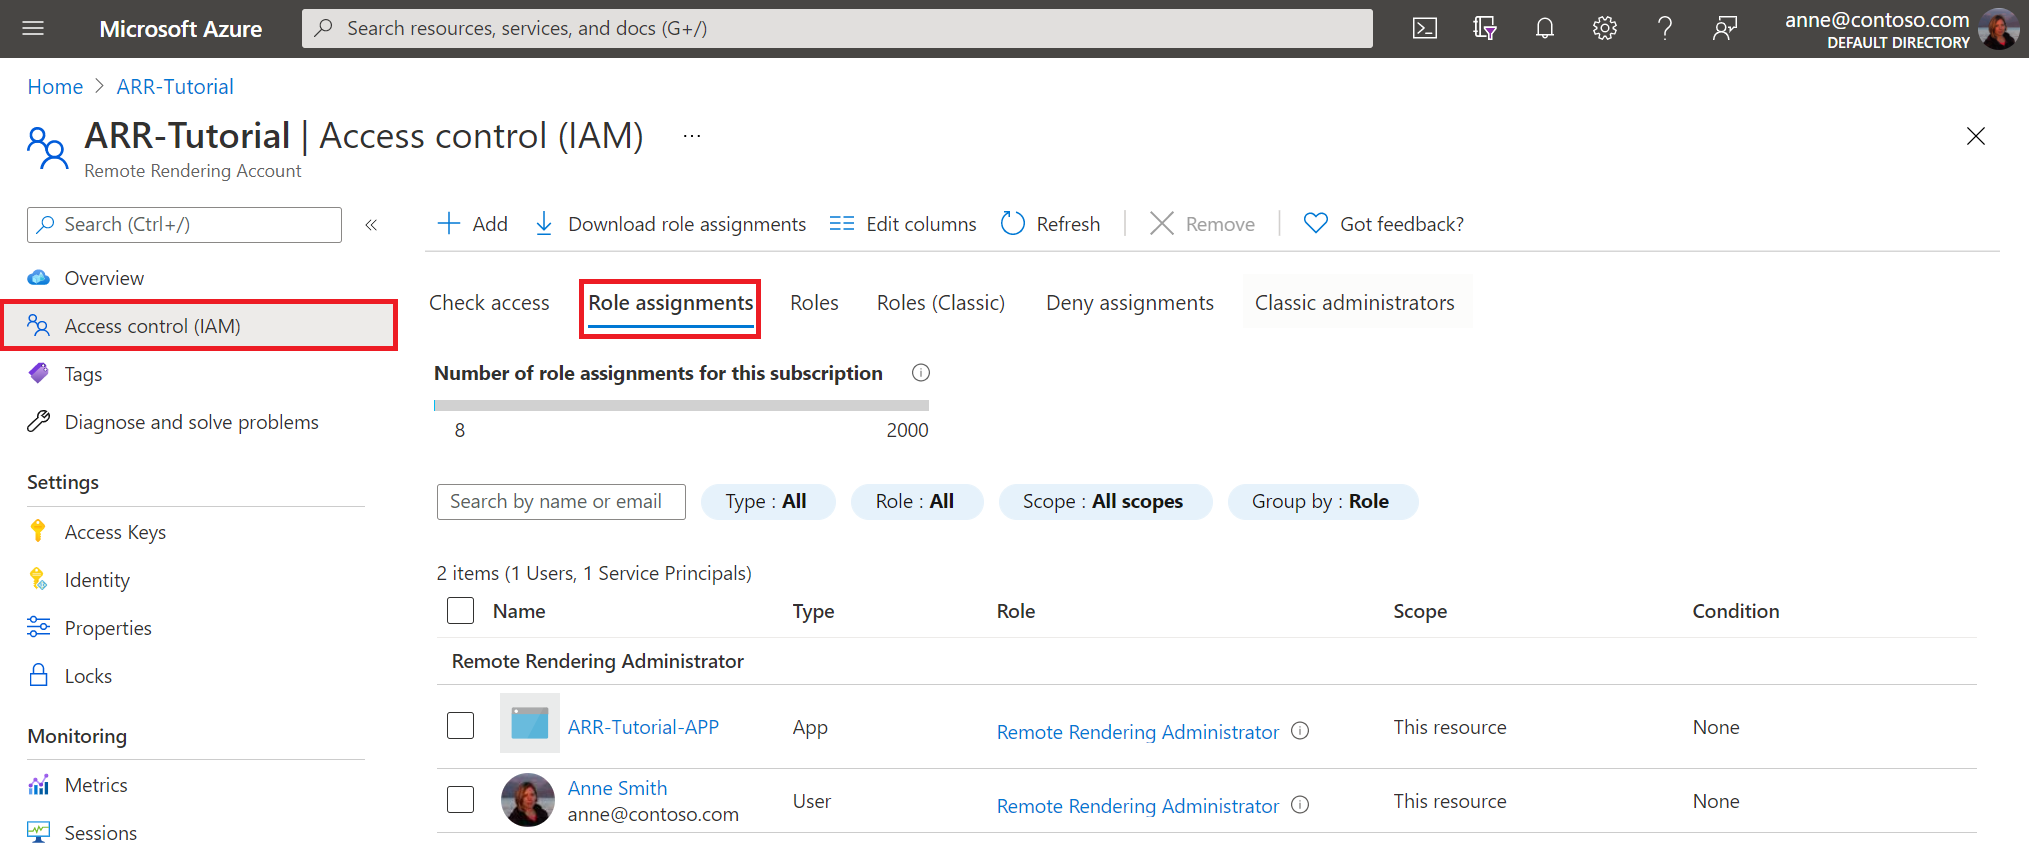
注意
所有者角色的权限不足以通过客户端应用程序管理会话。 对于要授予会话管理权限的每个用户,你需要向他们提供远程渲染客户端角色。 对于要管理会话和转换模型的每个用户,必须为其提供远程渲染管理员角色。
有了 Azure 方面,我们现在需要修改代码如何连接到 ARR 服务。 为此,我们实现了 BaseARRAuthentication 的实例,这会返回一个新的 SessionConfiguration 对象。 在这种情况下,将使用 Azure 访问令牌配置帐户信息。
创建一个名为 AADAuthentication 的新脚本,并将其代码替换为以下内容:
// Copyright (c) Microsoft Corporation. All rights reserved.
// Licensed under the MIT License. See LICENSE in the project root for license information.

using Microsoft.Azure.RemoteRendering;
using Microsoft.Identity.Client;
using System;
using System.Linq;
using System.Threading;
using System.Threading.Tasks;
using UnityEngine;

public class AADAuthentication : BaseARRAuthentication
{
    [SerializeField]
    private string activeDirectoryApplicationClientID;
    public string ActiveDirectoryApplicationClientID
    {
        get => activeDirectoryApplicationClientID.Trim();
        set => activeDirectoryApplicationClientID = value;
    }

    [SerializeField]
    private string azureTenantID;
    public string AzureTenantID
    {
        get => azureTenantID.Trim();
        set => azureTenantID = value;
    }

    [SerializeField]
    private string azureRemoteRenderingDomain;
    public string AzureRemoteRenderingDomain
    {
        get => azureRemoteRenderingDomain.Trim();
        set => azureRemoteRenderingDomain = value;
    }

    [SerializeField]
    private string azureRemoteRenderingAccountID;
    public string AzureRemoteRenderingAccountID
    {
        get => azureRemoteRenderingAccountID.Trim();
        set => azureRemoteRenderingAccountID = value;
    }

    [SerializeField]
    private string azureRemoteRenderingAccountDomain;
    public string AzureRemoteRenderingAccountDomain
    {
        get => azureRemoteRenderingAccountDomain.Trim();
        set => azureRemoteRenderingAccountDomain = value;
    }

    public override event Action<string> AuthenticationInstructions;

    string authority => "https://login.microsoftonline.com/" + AzureTenantID;

    string redirect_uri = "https://login.microsoftonline.com/common/oauth2/nativeclient";

    string[] scopes => new string[] { "https://sts.mixedreality.azure.com//.default" };

    public void OnEnable()
    {
        RemoteRenderingCoordinator.ARRCredentialGetter = GetARRCredentials;
        this.gameObject.AddComponent<ExecuteOnUnityThread>();
    }

    public async override Task<SessionConfiguration> GetARRCredentials()
    {
        var result = await TryLogin();
        if (result != null)
        {
            Debug.Log("Account signin successful " + result.Account.Username);

            var AD_Token = result.AccessToken;

            return await Task.FromResult(new SessionConfiguration(AzureRemoteRenderingAccountDomain, AzureRemoteRenderingDomain, AzureRemoteRenderingAccountID, "", AD_Token, ""));
        }
        else
        {
            Debug.LogError("Error logging in");
        }
        return default;
    }

    private Task DeviceCodeReturned(DeviceCodeResult deviceCodeDetails)
    {
        //Since everything in this task can happen on a different thread, invoke responses on the main Unity thread
        ExecuteOnUnityThread.Enqueue(() =>
        {
            // Display instructions to the user for how to authenticate in the browser
            Debug.Log(deviceCodeDetails.Message);
            AuthenticationInstructions?.Invoke(deviceCodeDetails.Message);
        });

        return Task.FromResult(0);
    }

    public override async Task<AuthenticationResult> TryLogin()
    {
        var clientApplication = PublicClientApplicationBuilder.Create(ActiveDirectoryApplicationClientID).WithAuthority(authority).WithRedirectUri(redirect_uri).Build();
        AuthenticationResult result = null;
        try
        {
            var accounts = await clientApplication.GetAccountsAsync();

            if (accounts.Any())
            {
                result = await clientApplication.AcquireTokenSilent(scopes, accounts.First()).ExecuteAsync();

                return result;
            }
            else
            {
                try
                {
                    result = await clientApplication.AcquireTokenWithDeviceCode(scopes, DeviceCodeReturned).ExecuteAsync(CancellationToken.None);
                    return result;
                }
                catch (MsalUiRequiredException ex)
                {
                    Debug.LogError("MsalUiRequiredException");
                    Debug.LogException(ex);
                }
                catch (MsalServiceException ex)
                {
                    Debug.LogError("MsalServiceException");
                    Debug.LogException(ex);
                }
                catch (MsalClientException ex)
                {
                    Debug.LogError("MsalClientException");
                    Debug.LogException(ex);
                    // Mitigation: Use interactive authentication
                }
                catch (Exception ex)
                {
                    Debug.LogError("Exception");
                    Debug.LogException(ex);
                }
            }
        }
        catch (Exception ex)
        {
            Debug.LogError("GetAccountsAsync");
            Debug.LogException(ex);
        }

        return null;
    }
}
注意
此代码并不完整,不能用于商业应用程序。 例如,你至少还可能需要添加注销功能。 可以使用客户端应用程序提供的 Task RemoveAsync(IAccount account) 方法实现此目的。 此代码仅用于教程,你的实现过程将特定于你的应用程序。
代码首先尝试使用 AquireTokenSilent 以无提示方式获取令牌。 如果用户之前已经对此应用程序进行了身份验证,则此操作会成功。 如果不成功,请转到用户涉及度更高的策略。
对于此代码,我们使用设备代码流来获取访问令牌。 通过此流,用户可在计算机或移动设备上登录其 Azure 帐户,并将生成的令牌发送回 HoloLens 应用程序。
从 ARR 的角度来看,此类最重要的部分是这一行:
return await Task.FromResult(new SessionConfiguration(AzureRemoteRenderingAccountDomain, AzureRemoteRenderingDomain, AzureRemoteRenderingAccountID, "", AD_Token, ""));
在这里,我们使用远程渲染域、帐户 ID、帐户域和访问令牌创建新的 SessionConfiguration 对象。 只要基于先前配置的基于角色的权限向用户授予了所需权限,ARR 服务便可以使用此令牌来查询、创建和加入远程渲染会话。
进行此更改后,应用程序的当前状态及其对 Azure 资源的访问权限如下所示:
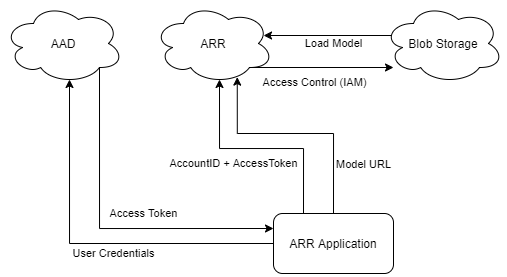
由于用户凭据不是存储在设备上(在本例中甚至未在设备上输入),因此其暴露风险很低。 现在,设备正在使用特定于用户的、有时间限制的访问令牌访问 ARR,而 ARR 使用访问控制 (IAM) 访问 Blob 存储。 这两个步骤移除了源代码中的“密码”,因此显著提高了安全性。 然而,这并不是最安全的方法,将模型和会话管理转移到 Web 服务可进一步提高安全性。 商业准备一章中探讨了需要考虑的有关额外安全性的事项。
测试 Microsoft Entra 身份验证
在 Unity 编辑器中,当 Microsoft Entra 身份验证处于活动状态时,需要在每次启动应用程序时进行身份验证。 在设备上,首次启动时需要执行身份验证步骤,然后将仅在令牌过期或无效时才需要再次执行。
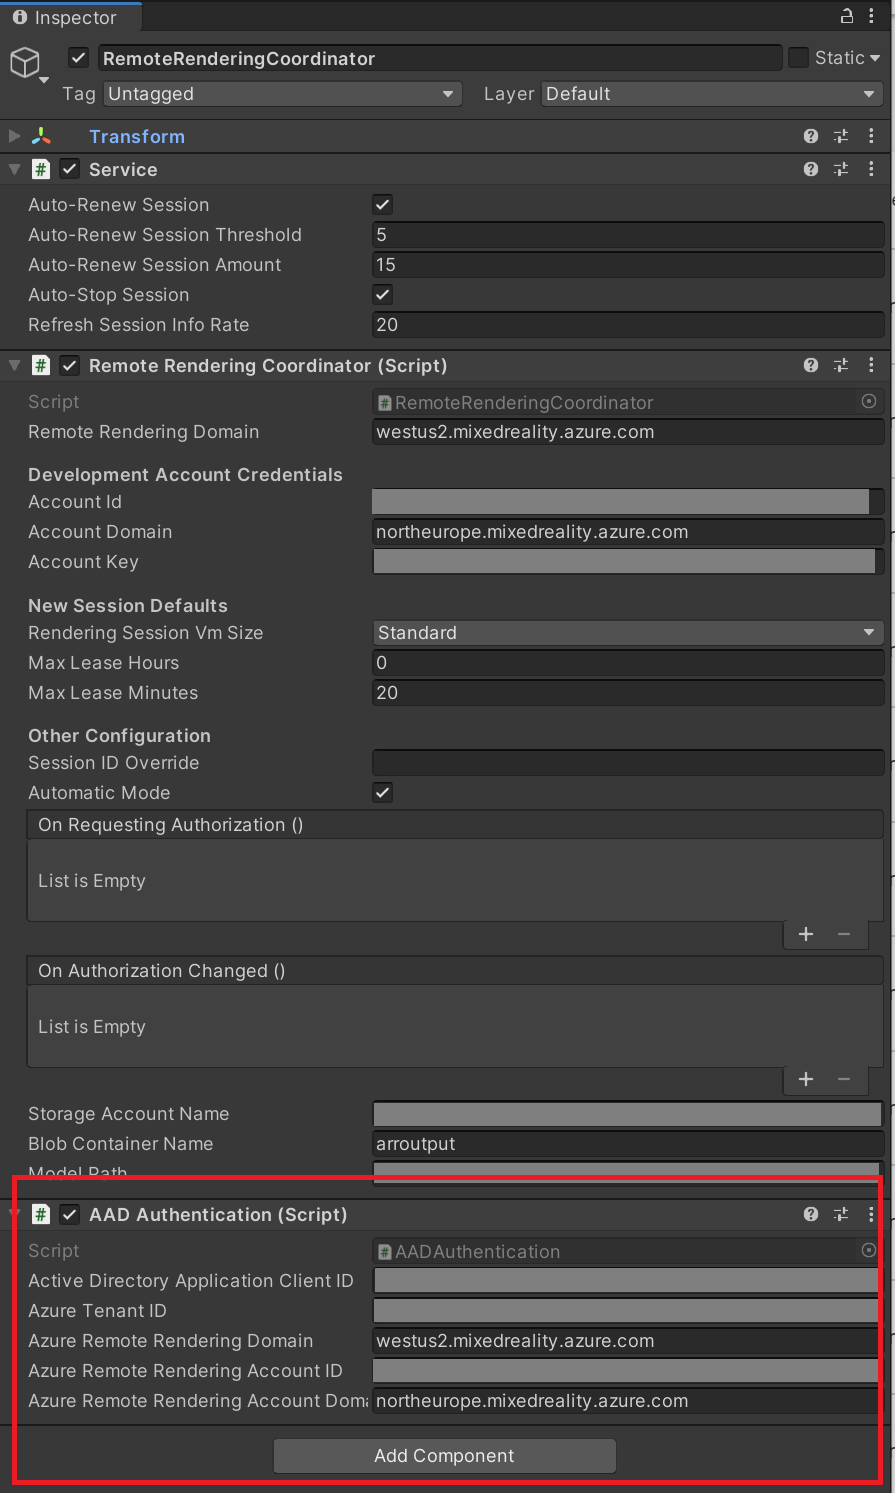
将“Microsoft Entra 身份验证”组件添加到“RemoteRenderingCoordinator”GameObject。
注意
如果使用 ARR 示例存储库中已完成的项目,请确保单击其标题旁边的复选框来启用“Microsoft Entra 身份验证”组件。
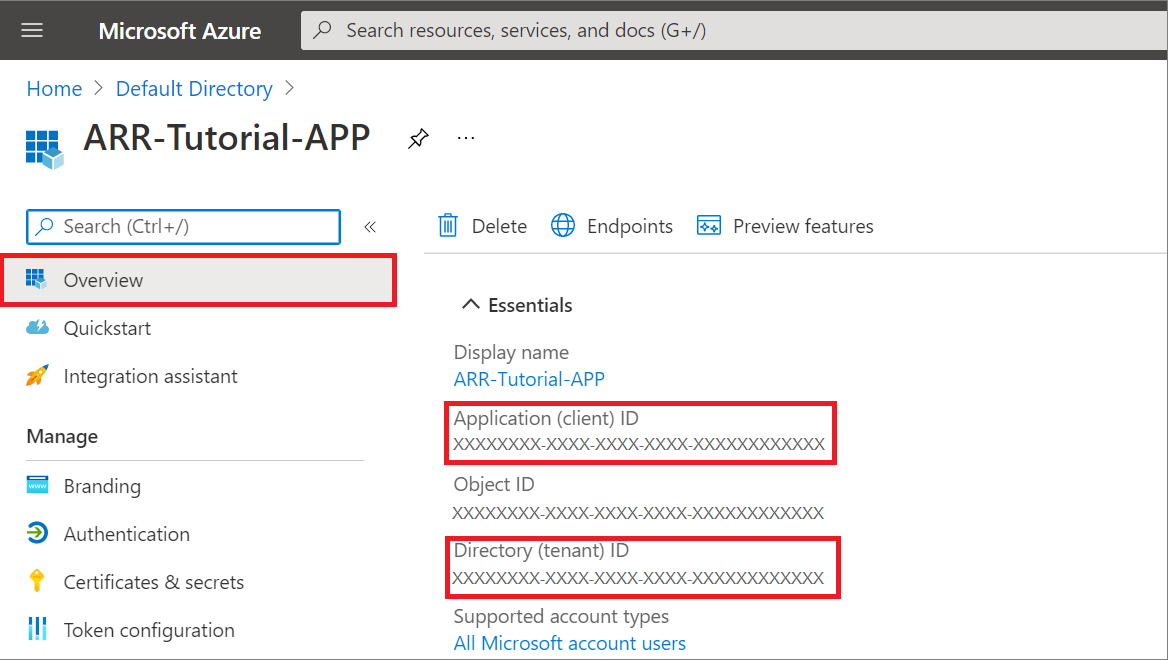
填写客户 ID 和租户 ID 的值。 这些值可以在应用程序注册的概述页面中找到:
- Active Directory 应用程序客户端 ID 是在 Microsoft Entra 应用注册中找到应用程序(客户端)ID(请参阅下图)。
- Azure 租户 ID 是在 Microsoft Entra 应用注册中找到的目录(租户)ID(请参阅下图)。
- Azure 远程渲染域与你在 RemoteRenderingCoordinator 的远程渲染域中使用的域相同 。
- Azure 远程渲染帐户 ID 与用于 RemoteRenderingCoordinator 的帐户 ID 相同 。
- Azure 远程渲染帐户域与你在 RemoteRenderingCoordinator 中使用的帐户域相同 。
在 Unity 编辑器中按“播放”并同意运行会话。 “Microsoft Entra 身份验证”组件具有视图控制器,因此会自动连接它,在会话授权模式面板后显示提示。
请按照 AppMenu 右边面板中的说明操作。 看到的内容应该如下所示:
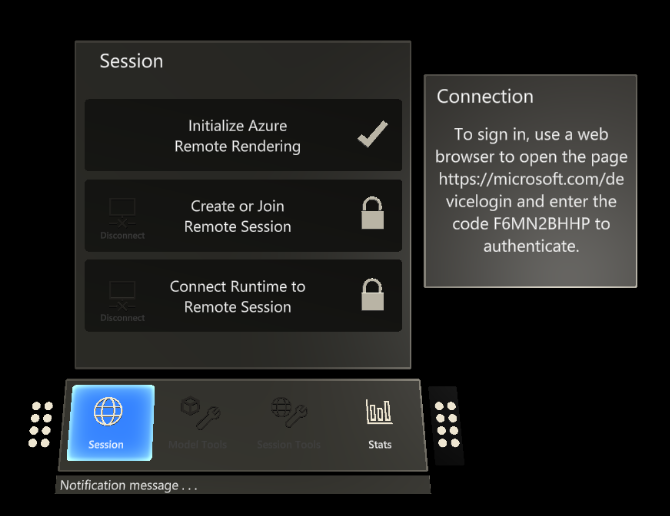
在辅助设备(或同一设备上的浏览器)上输入提供的代码并使用凭据登录后,一个访问令牌会返回到发出请求的应用程序中(在本例中为 Unity 编辑器)。
此后,应用程序中的所有内容应会正常运行。 如果没有按照预期的方式完成各个阶段,请检查 Unity 控制台是否有任何错误。
在设备上构建
如果正在使用 MSAL 到设备构建应用程序,则需要在项目的“Assets”文件夹中包含一个文件。 这有助于编译器使用 Tutorial Assets 中包含的 Microsoft.Identity.Client.dll 正确构建应用程序。
在 Assets 中添加名为 link.xml 的新文件
将以下内容添加到文件:
<linker>
    <assembly fullname="Microsoft.Identity.Client" preserve="all"/>
    <assembly fullname="System.Runtime.Serialization" preserve="all"/>
    <assembly fullname="System.Core">
        <type fullname="System.Linq.Expressions.Interpreter.LightLambda" preserve="all" />
    </assembly>
</linker>
保存更改
遵循快速入门:将 Unity 示例部署到 HoloLens - 生成示例项目中的步骤,生成到 HoloLens。
后续步骤
本教程集的其余部分包含概念性主题,可用于创建使用 Azure 远程渲染的生产就绪应用程序。