你当前正在访问 Microsoft Azure Global Edition 技术文档网站。 如果需要访问由世纪互联运营的 Microsoft Azure 中国技术文档网站,请访问 https://docs.azure.cn。
快速入门:使用 ARM 模板或 Bicep 创建特定安全警报自动响应
在本快速入门中,你将了解如何使用 Azure 资源管理器模板(ARM 模板)或 Bicep 文件来创建工作流自动化。 当 Microsoft Defender for Cloud 收到特定安全警报时,工作流自动化将触发逻辑应用。
先决条件
如果没有 Azure 订阅,请在开始之前创建一个免费帐户。
有关使用 Microsoft Defender for Cloud 的工作流自动化功能所需的角色和权限列表,请参阅工作流自动化。
本快速入门中的示例假定你已有一个逻辑应用。 若要部署示例,请传入包含逻辑应用名称和资源组的参数。 有关部署逻辑应用的信息,请参阅快速入门:使用 Bicep 在多租户 Azure 逻辑应用中创建和部署消耗逻辑应用工作流或者快速入门:使用 ARM 模板在多租户 Azure 逻辑应用中创建和部署消耗逻辑应用工作流。
ARM 模板教程
Azure 资源管理器模板是定义项目基础结构和配置的 JavaScript 对象表示法 (JSON) 文件。 模板使用声明性语法。 你可以在不编写用于创建部署的编程命令序列的情况下,描述预期部署。
如果你的环境满足先决条件,并且你熟悉如何使用 ARM 模板,请选择“部署到 Azure”按钮。 Azure 门户中会打开模板。

查看模板
本快速入门中使用的模板来自 Azure 快速启动模板。
{
  "$schema": "https://schema.management.azure.com/schemas/2019-04-01/deploymentTemplate.json#",
  "contentVersion": "1.0.0.0",
  "metadata": {
    "_generator": {
      "name": "bicep",
      "version": "0.5.6.12127",
      "templateHash": "5191074894407113732"
    }
  },
  "parameters": {
    "automationName": {
      "type": "string",
      "maxLength": 24,
      "minLength": 3
    },
    "location": {
      "type": "string",
      "defaultValue": "[resourceGroup().location]",
      "metadata": {
        "description": "Location for the automation"
      }
    },
    "logicAppName": {
      "type": "string",
      "minLength": 3
    },
    "logicAppResourceGroupName": {
      "type": "string",
      "minLength": 3
    },
    "subscriptionId": {
      "type": "string",
      "defaultValue": "[subscription().subscriptionId]",
      "metadata": {
        "description": "The Azure resource GUID id of the subscription"
      }
    },
    "alertSettings": {
      "type": "object",
      "metadata": {
        "description": "The alert settings object used for deploying the automation"
      }
    }
  },
  "variables": {
    "automationDescription": "automation description for subscription {0}",
    "scopeDescription": "automation scope for subscription {0}"
  },
  "resources": [
    {
      "type": "Microsoft.Security/automations",
      "apiVersion": "2019-01-01-preview",
      "name": "[parameters('automationName')]",
      "location": "[parameters('location')]",
      "properties": {
        "description": "[format(variables('automationDescription'), parameters('subscriptionId'))]",
        "isEnabled": true,
        "actions": [
          {
            "actionType": "LogicApp",
            "logicAppResourceId": "[resourceId('Microsoft.Logic/workflows', parameters('logicAppName'))]",
            "uri": "[listCallbackURL(resourceId(parameters('subscriptionId'), parameters('logicAppResourceGroupName'), 'Microsoft.Logic/workflows/triggers', parameters('logicAppName'), 'manual'), '2019-05-01').value]"
          }
        ],
        "scopes": [
          {
            "description": "[format(variables('scopeDescription'), parameters('subscriptionId'))]",
            "scopePath": "[subscription().id]"
          }
        ],
        "sources": [
          {
            "copy": [
              {
                "name": "ruleSets",
                "count": "[length(range(0, length(parameters('alertSettings').alertSeverityMapping)))]",
                "input": {
                  "rules": [
                    {
                      "propertyJPath": "[parameters('alertSettings').alertSeverityMapping[range(0, length(parameters('alertSettings').alertSeverityMapping))[copyIndex('ruleSets')]].jpath]",
                      "propertyType": "String",
                      "expectedValue": "[parameters('alertSettings').alertSeverityMapping[range(0, length(parameters('alertSettings').alertSeverityMapping))[copyIndex('ruleSets')]].expectedValue]",
                      "operator": "[parameters('alertSettings').alertSeverityMapping[range(0, length(parameters('alertSettings').alertSeverityMapping))[copyIndex('ruleSets')]].operator]"
                    },
                    {
                      "propertyJPath": "Severity",
                      "propertyType": "String",
                      "expectedValue": "[parameters('alertSettings').alertSeverityMapping[range(0, length(parameters('alertSettings').alertSeverityMapping))[copyIndex('ruleSets')]].severity]",
                      "operator": "Equals"
                    }
                  ]
                }
              }
            ],
            "eventSource": "Alerts"
          }
        ]
      }
    }
  ]
}
相关资源
- Microsoft.Security/automations:在收到包含特定字符串的 Microsoft Defender for Cloud 警报时将触发逻辑应用的自动化。
- Microsoft.Logic/workflows:可触发的空逻辑应用。
有关其他 Defender for Cloud 快速入门模板,请参阅这些社区提供的模板。
部署模板
PowerShell:
New-AzResourceGroup -Name <resource-group-name> -Location <resource-group-location> #use this command when you need to create a new resource group for your deployment New-AzResourceGroupDeployment -ResourceGroupName <resource-group-name> -TemplateUri https://raw.githubusercontent.com/Azure/azure-quickstart-templates/master/quickstarts/microsoft.security/securitycenter-create-automation-for-alertnamecontains/azuredeploy.jsonCLI:
az group create --name <resource-group-name> --location <resource-group-location> #use this command when you need to create a new resource group for your deployment az deployment group create --resource-group <my-resource-group> --template-uri https://raw.githubusercontent.com/Azure/azure-quickstart-templates/master/quickstarts/microsoft.security/securitycenter-create-automation-for-alertnamecontains/azuredeploy.json门户:
若要查找有关此部署选项的详细信息,请参阅使用部署按钮从 GitHub 存储库部署模板。
查看已部署的资源
使用 Azure 门户检查是否已部署工作流自动化。
登录 Azure 门户。
搜索并选择“Microsoft Defender for Cloud”。
选择“筛选器”。
选择在其上部署了新的工作流自动化的特定订阅。
从 Microsoft Defender for Cloud 菜单打开“工作流自动化”并查看新的自动化。
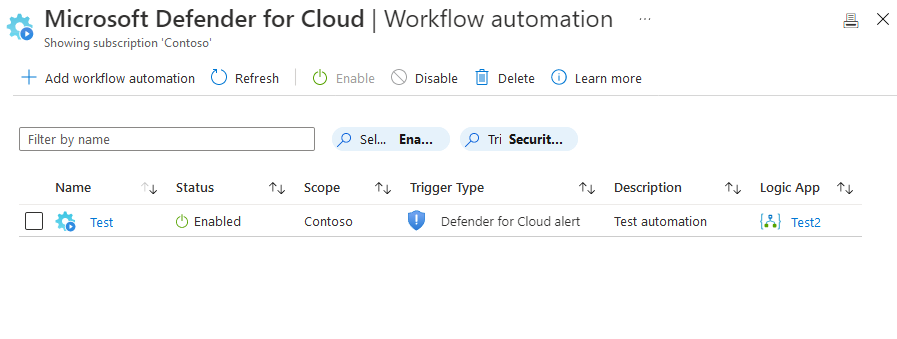
提示
如果订阅中有许多工作流自动化,则使用“按名称筛选”选项。

清理资源
不再需要时,请在 Azure 门户中删除该工作流自动化。
登录 Azure 门户。
搜索并选择“Microsoft Defender for Cloud”。
选择“筛选器”。
选择在其上部署了新的工作流自动化的特定订阅。
从 Microsoft Defender for Cloud 菜单打开“工作流自动化”并查找要删除的自动化。
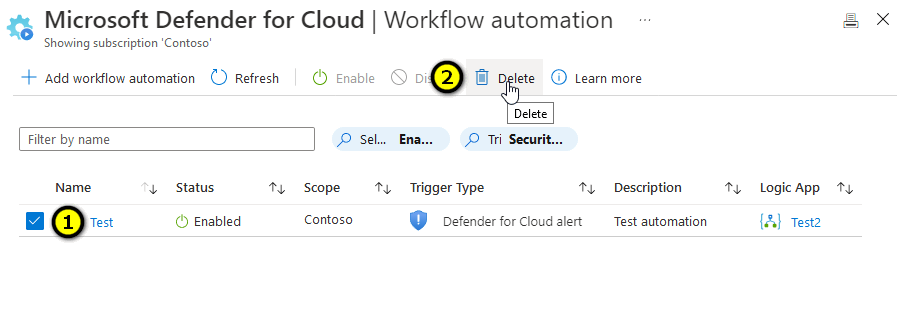
选中要删除的项的复选框。
从工具栏中选择“删除”。

Bicep 教程
Bicep 是一种特定于域的语言 (DSL),使用声明性语法来部署 Azure 资源。 它提供简明的语法、可靠的类型安全性以及对代码重用的支持。 Bicep 会针对你的 Azure 基础结构即代码解决方案提供最佳创作体验。
查阅 Bicep 文件
本快速入门中使用的 Bicep 文件来自 Azure 快速入门模板。
@minLength(3)
@maxLength(24)
param automationName string

@description('Location for the automation')
param location string = resourceGroup().location

@minLength(3)
param logicAppName string

@minLength(3)
param logicAppResourceGroupName string

@description('The Azure resource GUID id of the subscription')
param subscriptionId string = subscription().subscriptionId

@description('The alert settings object used for deploying the automation')
param alertSettings object

var automationDescription = 'automation description for subscription {0}'
var scopeDescription = 'automation scope for subscription {0}'

resource automation 'Microsoft.Security/automations@2019-01-01-preview' = {
  name: automationName
  location: location
  properties: {
    description: format(automationDescription, subscriptionId)
    isEnabled: true
    actions: [
      {
        actionType: 'LogicApp'
        logicAppResourceId: resourceId('Microsoft.Logic/workflows', logicAppName)
        uri: listCallbackURL(resourceId(subscriptionId, logicAppResourceGroupName, 'Microsoft.Logic/workflows/triggers', logicAppName, 'manual'), '2019-05-01').value
      }
    ]
    scopes: [
      {
        description: format(scopeDescription, subscriptionId)
        scopePath: subscription().id
      }
    ]
    sources: [
      {
        eventSource: 'Alerts'
        ruleSets: [for j in range(0, length(alertSettings.alertSeverityMapping)): {
          rules: [
            {
              propertyJPath: alertSettings.alertSeverityMapping[j].jpath
              propertyType: 'String'
              expectedValue: alertSettings.alertSeverityMapping[j].expectedValue
              operator: alertSettings.alertSeverityMapping[j].operator
            }
            {
              propertyJPath: 'Severity'
              propertyType: 'String'
              expectedValue: alertSettings.alertSeverityMapping[j].severity
              operator: 'Equals'
            }
          ]
        }]
      }
    ]
  }
}
相关资源
- Microsoft.Security/automations:在收到包含特定字符串的 Microsoft Defender for Cloud 警报时将触发逻辑应用的自动化。
- Microsoft.Logic/workflows:可触发的空逻辑应用。
有关其他 Defender for Cloud 快速入门模板,请参阅这些社区提供的模板。
部署 Bicep 文件
将该 Bicep 文件另存为本地计算机上的 main.bicep。
使用 Azure CLI 或 Azure PowerShell 来部署该 Bicep 文件。
az group create --name exampleRG --location eastus az deployment group create --resource-group exampleRG --template-file main.bicep --parameters automationName=<automation-name> logicAppName=<logic-name> logicAppResourceGroupName=<group-name> alertSettings={alert-settings}需要输入以下参数:
- automationName:将 <automation-name> 替换为自动化的名称。 该名称的最小长度为 3 个字符,最大长度为 24 个字符。
- logicAppName:将 <logic-name> 替换为逻辑应用的名称。 其长度最小为 3 个字符。
- logicAppResourceGroupName:将 <group-name> 替换为资源所在的资源组的名称。 其长度最小为 3 个字符。
- alertSettings:将 {alert-settings} 替换为用于部署自动化的警报设置对象。
注意
部署完成后,应会看到一条指出部署成功的消息。
查看已部署的资源
使用 Azure 门户、Azure CLI 或 Azure PowerShell 列出资源组中已部署的资源。
az resource list --resource-group exampleRG
清理资源
如果不再需要资源组及其所有资源,请使用 Azure 门户、Azure CLI 或 Azure PowerShell 将其删除。
az group delete --name exampleRG
后续步骤
有关指导你完成创建 ARM 模板或 Bicep 文件的过程的分步教程,请参阅: