适用于:✔️ Linux VM ✔️ 灵活规模集
本文介绍如何通过 Azure 门户将新磁盘和现有磁盘附加到 Linux 虚拟机。 也可以在 Azure 门户中将数据磁盘附加到 Windows VM。
你当前正在访问 Microsoft Azure Global Edition 技术文档网站。 如果需要访问由世纪互联运营的 Microsoft Azure 中国技术文档网站,请访问 https://docs.azure.cn。
适用于:✔️ Linux VM ✔️ 灵活规模集
本文介绍如何通过 Azure 门户将新磁盘和现有磁盘附加到 Linux 虚拟机。 也可以在 Azure 门户中将数据磁盘附加到 Windows VM。
将磁盘附加到 VM 前,请查看以下提示:
虚拟机的大小决定了可以附加多少个磁盘。 有关详细信息,请参阅虚拟机大小。
执行以下步骤:
转到 Azure 门户以找到 VM。 搜索并选择“虚拟机”。
从列表中选择要将磁盘附加到的 VM。
在“虚拟机”页的“设置”下,选择“磁盘”。
执行以下步骤:
在“磁盘”窗格的“数据磁盘”下,选择“创建并附加新磁盘” 。
输入托管磁盘的名称。 查看默认设置,并根据需要更新“存储类型”、“大小(GiB)”、“加密”和“主机缓存” 。

完成后,选择页面顶部的“保存”,以创建托管磁盘并更新 VM 配置。
执行以下步骤:
在“磁盘”窗格的“数据磁盘”下,选择“附加现有磁盘”。
选择“磁盘名称”的下拉菜单,然后从可用托管磁盘列表中选择一个磁盘。
选择“保存”以附加现有托管磁盘并更新 VM 配置:
若要对新磁盘进行分区、格式化和装载,以便 Linux VM 可以使用它,请通过 SSH 登录到 VM。 有关详细信息,请参阅如何在 Azure 中将 SSH 用于 Linux。 以下示例使用用户名“azureuser”连接到使用公共 IP 地址 10.123.123.25 的 VM :
ssh azureuser@10.123.123.25
连接到 VM 后,需要找到该磁盘。 在此示例中,我们使用 lsblk 来列出磁盘。
lsblk -o NAME,HCTL,SIZE,MOUNTPOINT | grep -i "sd"
The output is similar to the following example:
sda     0:0:0:0      30G
├─sda1             29.9G /
├─sda14               4M
└─sda15             106M /boot/efi
sdb     1:0:1:0      14G
└─sdb1               14G /mnt
sdc     3:0:0:0       4G
In this example, the disk that was added was sdc. It's a LUN 0 and is 4GB.
For a more complex example, here's what multiple data disks look like in the portal:
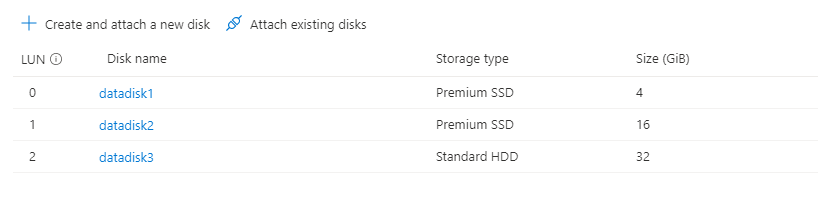
In the image, you can see that there are 3 data disks: 4 GB on LUN 0, 16GB at LUN 1, and 32G at LUN 2.
Here's what that might look like using lsblk:
sda     0:0:0:0      30G
├─sda1             29.9G /
├─sda14               4M
└─sda15             106M /boot/efi
sdb     1:0:1:0      14G
└─sdb1               14G /mnt
sdc     3:0:0:0       4G
sdd     3:0:0:1      16G
sde     3:0:0:2      32G
From the output of lsblk you can see that the 4GB disk at LUN 0 is sdc, the 16GB disk at LUN 1 is sdd, and the 32G disk at LUN 2 is sde.
Important
If you are using an existing disk that contains data, skip to mounting the disk. The following instructions will delete data on the disk.
If you're attaching a new disk, you need to partition the disk.
The parted utility can be used to partition and to format a data disk.
parted that is available for your distro.The following example uses parted on /dev/sdc, which is where the first data disk will typically be on most VMs. Replace sdc with the correct option for your disk. We're also formatting it using the XFS filesystem.
sudo parted /dev/sdc --script mklabel gpt mkpart xfspart xfs 0% 100%
sudo mkfs.xfs /dev/sdc1
sudo partprobe /dev/sdc1
Use the partprobe utility to make sure the kernel is aware of the new partition and filesystem. Failure to use partprobe can cause the blkid or lslbk commands to not return the UUID for the new filesystem immediately.
Create a directory to mount the file system using mkdir. The following example creates a directory at /datadrive:
sudo mkdir /datadrive
Use mount to then mount the filesystem. The following example mounts the /dev/sdc1 partition to the /datadrive mount point:
sudo mount /dev/sdc1 /datadrive
To ensure that the drive is remounted automatically after a reboot, it must be added to the /etc/fstab file. It's also highly recommended that the UUID (Universally Unique Identifier) is used in /etc/fstab to refer to the drive rather than just the device name (such as, /dev/sdc1). If the OS detects a disk error during boot, using the UUID avoids the incorrect disk being mounted to a given location. Remaining data disks would then be assigned those same device IDs. To find the UUID of the new drive, use the blkid utility:
sudo blkid
The output looks similar to the following example:
/dev/sda1: LABEL="cloudimg-rootfs" UUID="11111111-1b1b-1c1c-1d1d-1e1e1e1e1e1e" TYPE="ext4" PARTUUID="1a1b1c1d-11aa-1234-1a1a1a1a1a1a"
/dev/sda15: LABEL="UEFI" UUID="BCD7-96A6" TYPE="vfat" PARTUUID="1e1g1cg1h-11aa-1234-1u1u1a1a1u1u"
/dev/sdb1: UUID="22222222-2b2b-2c2c-2d2d-2e2e2e2e2e2e" TYPE="ext4" TYPE="ext4" PARTUUID="1a2b3c4d-01"
/dev/sda14: PARTUUID="2e2g2cg2h-11aa-1234-1u1u1a1a1u1u"
/dev/sdc1: UUID="33333333-3b3b-3c3c-3d3d-3e3e3e3e3e3e" TYPE="xfs" PARTLABEL="xfspart" PARTUUID="c1c2c3c4-1234-cdef-asdf3456ghjk"
Note
Improperly editing the /etc/fstab file could result in an unbootable system. If unsure, refer to the distribution's documentation for information on how to properly edit this file. You should create a backup of the /etc/fstab file is created before editing.
Next, open the /etc/fstab file in a text editor. Add a line to the end of the file, using the UUID value for the /dev/sdc1 device that was created in the previous steps, and the mountpoint of /datadrive. Using the example from this article, the new line would look like the following:
UUID=33333333-3b3b-3c3c-3d3d-3e3e3e3e3e3e /datadrive xfs defaults,nofail 1 2
When you're done editing the file, save and close the editor.
Note
Later removing a data disk without editing fstab could cause the VM to fail to boot. Most distributions provide either the nofail and/or nobootwait fstab options. These options allow a system to boot even if the disk fails to mount at boot time. Consult your distribution's documentation for more information on these parameters.
The nofail option ensures that the VM starts even if the filesystem is corrupt or the disk does not exist at boot time. Without this option, you may encounter behavior as described in Cannot SSH to Linux VM due to FSTAB errors
现在可以再次使用 lsblk 来查看磁盘和装入点。
lsblk -o NAME,HCTL,SIZE,MOUNTPOINT | grep -i "sd"
输出将如下所示:
sda     0:0:0:0      30G
├─sda1             29.9G /
├─sda14               4M
└─sda15             106M /boot/efi
sdb     1:0:1:0      14G
└─sdb1               14G /mnt
sdc     3:0:0:0       4G
└─sdc1                4G /datadrive
可以看到 sdc 现在已装载到 /datadrive。
某些 Linux 内核支持 TRIM/UNMAP 操作以放弃磁盘上未使用的块。 此功能主要用于通知 Azure 已删除的页不再有效,可以丢弃。 此功能可以节省根据消耗的存储量(例如非托管标准磁盘和磁盘快照)计费的磁盘的费用。
在 Linux VM 中有两种方法可以启用 TRIM 支持。 与往常一样,有关建议的方法,请参阅分发:
在 /etc/fstab 中使用 discard 装载选项,例如:
```config
UUID=33333333-3b3b-3c3c-3d3d-3e3e3e3e3e3e   /datadrive   xfs   defaults,discard   1   2
```
在某些情况下,discard 选项可能会影响性能。 此处,还可以从命令行手动运行 fstrim 命令,或将其添加到 crontab 以定期运行:
Ubuntu
sudo apt-get install util-linux
sudo fstrim /datadrive
RHEL
sudo yum install util-linux
sudo fstrim /datadrive
SUSE
sudo zypper install util-linux
sudo fstrim /datadrive
即将发布:在整个 2024 年,我们将逐步淘汰作为内容反馈机制的“GitHub 问题”,并将其取代为新的反馈系统。 有关详细信息,请参阅:https://aka.ms/ContentUserFeedback。
提交和查看相关反馈