三维转换概述
本主题描述如何向 Windows Presentation Foundation (WPF) 图形系统中的 3D 模型应用转换。 开发人员可以借助转换功能对模型进行重定位、大小调整和重定向,而无需更改用来定义模型的基值。
3D 坐标空间
Windows Presentation Foundation (WPF) 中的 3D 图形内容封装在 Viewport3D 元素中,该元素可以参与二维元素结构。 该图形系统将 Viewport3D 视为一个像 Windows Presentation Foundation (WPF) 中的许多其他元素一样的二维视觉元素。 Viewport3D 充当三维场景中的窗口(即视区)。 更准确地说,它是 3D 场景所投影到的图面。 尽管可以将 Viewport3D 与其他 2D 绘图对象用在同一个场景图中,但是不能在 Viewport3D 中渗透 2D 和 3D 对象。 以下讨论中所描述的坐标空间包含在 Viewport3D 元素中。
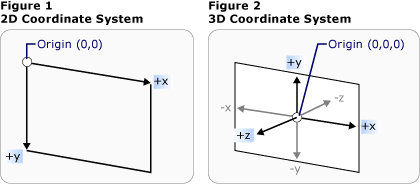
2D 图形的 Windows Presentation Foundation (WPF) 坐标系将原点定位在呈现图面(通常是屏幕)的左上角。 在 2D 系统中,x 轴上的正值朝右,y 轴上的正值朝下。 但是在 3D 坐标系中,原点位于屏幕中心,x 轴上的正值朝右,但是 y 轴上的正值朝上,z 轴上的正值从原点向外朝向观察者。

坐标系比较
由这些轴定义的空间是 3D 对象在 Windows Presentation Foundation (WPF) 中的固定参考框架。 当在该空间中生成模型并创建光源和照相机以查看这些模型时,一定要在向每个模型应用转换时,将固定参考框架或“全局空间”与为该模型创建的局部参考框架区分开。 另请记住,根据光源和照相机设置,全局空间中的对象可能会看上去完全不同或者根本不可见,但是照相机的位置不会改变对象在全局空间中的位置。
转换模型
创建模型时,它们在场景中有特定的位置。 为了在场景中移动、旋转这些模型或者更改这些模型的大小而更改用来定义模型本身的顶点不切实际。 而正如在 2D 中一样,可以向模型应用转换。
每个模型对象都有一个 Transform 属性,借助该属性,可以对模型进行移动、重定向或调整大小。 应用转换时,实际上是按照由转换功能指定的矢量或值(以适用者为准)来偏移模型的所有点。 换言之,用户已经转换了在其中定义模型的坐标空间(“模型空间”),但是尚未更改在整个场景的坐标系(“全局空间”)中构成模型几何形状的值。
平移转换
3D 转换继承自抽象基类 Transform3D;其中包括仿射变换类 TranslateTransform3D、ScaleTransform3D 和 RotateTransform3D。 Windows Presentation Foundation (WPF) 3D 系统还提供一个 MatrixTransform3D 类,使用该类可以用更简明的矩阵操作来指定同样的转换。
TranslateTransform3D 沿着使用 OffsetX、OffsetY 和 OffsetZ 属性指定的偏移矢量的方向移动 Model3D 中的所有点。 例如,假设立方体的一个顶点位于 (2,2,2),偏移矢量 (0,1.6,1) 会将该顶点 (2,2,2) 移到 (2,3.6,3)。 该立方体的顶点在模型空间中仍位于 (2,2,2),但是现在,该模型空间与全局空间的关系已经发生改变,因此,模型空间中的 (2,2,2) 是世界空间中的 (2,3.6,3)。

偏移后的平移
下面的代码示例演示如何应用平移。
<Page xmlns="http://schemas.microsoft.com/winfx/2006/xaml/presentation"
  xmlns:x="http://schemas.microsoft.com/winfx/2006/xaml" >
  <DockPanel>
    <Viewbox>
      <Canvas Width="600" Height="201">

        <!-- The Viewport3D provides a rendering surface for 3-D visual content. -->
        <Viewport3D Name="MyAnimatedObject"
          ClipToBounds="True" Width="600" Height="150"
          Canvas.Left="0" Canvas.Top="10">

          <!-- Defines the camera used to view the 3D object. -->
          <Viewport3D.Camera>
            <PerspectiveCamera x:Name="myPerspectiveCamera" Position="0,0,2" LookDirection="0,0,-1"
             FieldOfView="60" />
          </Viewport3D.Camera>

          <!-- The ModelVisual3D children contain the 3D models -->
          <Viewport3D.Children>

            <!-- This ModelVisual3D defines the light cast in the scene. Without light, the
                 3D object cannot be seen. -->
            <ModelVisual3D>
              <ModelVisual3D.Content>
                <DirectionalLight Color="#FFFFFF" Direction="-0.612372,-0.5,-0.612372" />
              </ModelVisual3D.Content>
            </ModelVisual3D>
            <ModelVisual3D>
              <ModelVisual3D.Content>
                <GeometryModel3D>

                  <!-- The geometry specifes the shape of the 3D plane. In this case, a flat sheet is created. -->
                  <GeometryModel3D.Geometry>
                    <MeshGeometry3D
                     TriangleIndices="0,1,2 3,4,5 "
                     Normals="0,0,1 0,0,1 0,0,1 0,0,1 0,0,1 0,0,1 "
                     TextureCoordinates="0,0 1,0 1,1 1,1 0,1 0,0 "
                     Positions="-0.5,-0.5,0.5 0.5,-0.5,0.5 0.5,0.5,0.5 0.5,0.5,0.5 -0.5,0.5,0.5 -0.5,-0.5,0.5 " />
                  </GeometryModel3D.Geometry>

                  <!-- The material specifies the material applied to the plane. In this case it is a linear gradient.-->
                  <GeometryModel3D.Material>
                    <MaterialGroup>
                      <DiffuseMaterial>
                        <DiffuseMaterial.Brush>
                          <SolidColorBrush Color="Cyan" Opacity="0.3"/>
                        </DiffuseMaterial.Brush>
                      </DiffuseMaterial>
                    </MaterialGroup>
                  </GeometryModel3D.Material>
                  <!-- The Transform specifies how to transform the 3D object. The OffsetX property is animated
                       in the Storyboard below. -->
                  <GeometryModel3D.Transform>
                    <TranslateTransform3D x:Name="myTranslateTransform3D" OffsetX="0" OffsetY="0" OffsetZ="0" />
                  </GeometryModel3D.Transform>
                </GeometryModel3D>
              </ModelVisual3D.Content>
            </ModelVisual3D>
          </Viewport3D.Children>
          <!-- Trigger the TranslateTransform3D animation when the 3D object loads. -->
          <Viewport3D.Triggers>
            <EventTrigger RoutedEvent="Viewport3D.Loaded">
              <BeginStoryboard>
                <Storyboard>

                  <!-- This animation animates the OffsetX property of the TranslateTransform3D. -->
                  <DoubleAnimation
                   Storyboard.TargetName="myTranslateTransform3D"
                   Storyboard.TargetProperty="OffsetX"
                   To="-0.8"
                   AutoReverse="True" RepeatBehavior="Forever" />

                  <!-- If you want to animate OffsetY and/or OffsetZ, create similar DoubleAnimations
                       respectively. -->

                </Storyboard>
              </BeginStoryboard>
            </EventTrigger>
          </Viewport3D.Triggers>
        </Viewport3D>
      </Canvas>
    </Viewbox>
  </DockPanel>
</Page>
缩放转换
ScaleTransform3D 以中心点为参照,通过指定缩放矢量更改模型比例。 可以指定等比缩放,即在 X、Y 和 Z 轴上将模型缩放同样的值来按比例更改模型的大小。 例如,将转换的 ScaleX、ScaleY 和 ScaleZ 属性设置为 0.5 会使模型的大小减半;将相同属性设置为 2 会使其在三个轴上的比例加倍。

ScaleVector 示例
通过指定非等比转换(X、Y 和 Z 值不相等的缩放转换),可以使模型在一个或两个维度上拉伸或收缩,而不会影响其他维度。 例如,将 ScaleX 设置为 1、ScaleY 设置为 2、ScaleZ 设置为 1 将导致转换后的模型高度加倍,但 X 轴和 Z 轴上的比例保持不变。
默认情况下,ScaleTransform3D 会使顶点围绕原点 (0,0,0) 拉伸或收缩。 但是,如果要转换的模型不是从原点绘制的,则从原点缩放模型不会“就地”缩放模型。相反,当模型的顶点乘以缩放矢量时,缩放操作将产生平移模型和缩放模型的效果。

缩放中心示例
若要“就地”缩放模型,请通过设置 ScaleTransform3D 的 CenterX、CenterY 和 CenterZ 属性来指定模型的中心。 这可确保图形系统缩放模型空间,然后平移该空间,使其在指定的 Point3D 上居中。 相反,如果模型围绕原点生成,而且指定了其他中心点,则将看到模型会背离原点平移。
旋转转换
可以通过几种不同的方法来旋转 3D 模型。 典型的旋转转换指定一个轴以及围绕该轴旋转的角度。 RotateTransform3D 类让你可以使用 Rotation 属性定义 Rotation3D。 然后在 Rotation3D 上指定 Axis 和 Angle 属性,在本例中为 AxisAngleRotation3D,以定义转换。 下面的几个示例围绕 Y 轴将模型旋转 60 度。
<Page xmlns="http://schemas.microsoft.com/winfx/2006/xaml/presentation"
  xmlns:x="http://schemas.microsoft.com/winfx/2006/xaml" >
  <DockPanel>
    <Viewbox>
      <Canvas Width="321" Height="201">

        <!-- The Viewport3D provides a rendering surface for 3-D visual content. -->
        <Viewport3D Name="MyAnimatedObject"
          ClipToBounds="True" Width="150" Height="150"
          Canvas.Left="0" Canvas.Top="10">

          <!-- Defines the camera used to view the 3D object. -->
          <Viewport3D.Camera>
            <PerspectiveCamera x:Name="myPerspectiveCamera" Position="0,0,2" LookDirection="0,0,-1"
             FieldOfView="60" />
          </Viewport3D.Camera>

          <!-- The ModelVisual3D children contain the 3D models -->
          <Viewport3D.Children>

            <!-- Two ModelVisual3D define the lights cast in the scene. Without light, the
                 3D object cannot be seen. Also, the direction of the lights affect shadowing. -->
            <ModelVisual3D>
              <ModelVisual3D.Content>
                <DirectionalLight Color="#FFFFFF" Direction="-0.612372,-0.5,-0.612372" />
              </ModelVisual3D.Content>
            </ModelVisual3D>
            <ModelVisual3D>
              <ModelVisual3D.Content>
                <DirectionalLight Color="#FFFFFF" Direction="0.612372,-0.5,-0.612372" />
              </ModelVisual3D.Content>
            </ModelVisual3D>
            <ModelVisual3D>
              <ModelVisual3D.Content>
                <GeometryModel3D>

                  <!-- The geometry specifes the shape of the 3D plane. In this case, a flat sheet is created. -->
                  <GeometryModel3D.Geometry>
                    <MeshGeometry3D
                     TriangleIndices="0,1,2 3,4,5 "
                     Normals="0,0,1 0,0,1 0,0,1 0,0,1 0,0,1 0,0,1 "
                     TextureCoordinates="0,0 1,0 1,1 1,1 0,1 0,0 "
                     Positions="-0.5,-0.5,0.5 0.5,-0.5,0.5 0.5,0.5,0.5 0.5,0.5,0.5 -0.5,0.5,0.5 -0.5,-0.5,0.5 " />
                  </GeometryModel3D.Geometry>

                  <!-- The material specifies the material applied to the plane. In this case it is a linear gradient.-->
                  <GeometryModel3D.Material>
                    <MaterialGroup>
                      <DiffuseMaterial>
                        <DiffuseMaterial.Brush>
                          <LinearGradientBrush StartPoint="0,0.5" EndPoint="1,0.5">
                            <LinearGradientBrush.GradientStops>
                              <GradientStop Color="Yellow" Offset="0" />
                              <GradientStop Color="Red" Offset="0.25" />
                              <GradientStop Color="Blue" Offset="0.75" />
                              <GradientStop Color="LimeGreen" Offset="1" />
                            </LinearGradientBrush.GradientStops>
                          </LinearGradientBrush>
                        </DiffuseMaterial.Brush>
                      </DiffuseMaterial>
                    </MaterialGroup>
                  </GeometryModel3D.Material>

                  <!-- The Transform specifies how to transform the 3D object. The properties of the
                        Rotation object are animated causing the 3D object to rotate and "wobble" (see Storyboard below).-->
                  <GeometryModel3D.Transform>
                    <RotateTransform3D>
                      <RotateTransform3D.Rotation>
                        <AxisAngleRotation3D x:Name="myAngleRotation" Axis="0,3,0" Angle="40" />
                      </RotateTransform3D.Rotation>
                    </RotateTransform3D>
                  </GeometryModel3D.Transform>
                </GeometryModel3D>
              </ModelVisual3D.Content>
            </ModelVisual3D>
          </Viewport3D.Children>

          <!-- Trigger the rotation animation when the 3D object loads. -->
          <Viewport3D.Triggers>
            <EventTrigger RoutedEvent="Viewport3D.Loaded">
              <BeginStoryboard>
                <Storyboard>

                  <!-- This animation animates the Angle property of the AxisAngleRotation3D
                       making the 3D object rotate from -60 degrees to 60 degrees. -->
                  <DoubleAnimation
                   Storyboard.TargetName="myAngleRotation"
                   Storyboard.TargetProperty="Angle"
                   From="-60" To="60" Duration="0:0:4" AutoReverse="True"  RepeatBehavior="Forever"/>

                  <!-- This animation animates the Axis property of the AxisAngleRotation3D
                       making the 3D wobble as it rotates. -->
                  <Vector3DAnimation
                   Storyboard.TargetName="myAngleRotation"
                   Storyboard.TargetProperty="Axis"
                   From="0,3,0" To="1,0,1" Duration="0:0:4" AutoReverse="True"  RepeatBehavior="Forever"/>

                </Storyboard>
              </BeginStoryboard>
            </EventTrigger>
          </Viewport3D.Triggers>
        </Viewport3D>
      </Canvas>

    </Viewbox>
  </DockPanel>
</Page>
注意:Windows Presentation Foundation (WPF) 3D 是一个右手系统,这意味着,如果旋转角度为正数,则将围绕轴逆时针旋转。
如果未为 RotateTransform3D 上的 CenterX、CenterY 和 CenterZ 属性指定值,则轴和角度的旋转假定围绕原点旋转。 与缩放一样,牢记旋转时会转换模型的整个坐标空间,这会很有帮助。 如果模型不是围绕原点创建,或者它以前平移过,则旋转可能会围绕原点“转动”,而不是就地旋转。

围绕指定的新中心旋转
若要“就地”旋转模型,请将模型的实际中心指定为旋转中心。 由于几何形状通常围绕原点建模,因此,在依次执行下列操作时通常将获取一组预期的转换结果:调整模型大小(缩放该模型),然后设置模型方向(旋转该模型),最后将模型移到所需的位置(平移该模型)。

旋转示例
指定了轴和角度的旋转非常适于静态转换和某些动画。 但是,请考虑围绕 X 轴将立方体模型旋转 60 度,然后围绕 Z 轴将其旋转 45 度。 可以将这种转换描述为两个离散的仿射转换,也可以将其描述为一个矩阵。 但是,对于按照这种方式定义的旋转,可能很难顺利地进行动画处理。 尽管按照这两种方法计算的模型起始位置和结束位置相同,但是,从计算的角度来看,无法确定该模型经过的中间位置。 四元数提供了一种用来在旋转的起始位置和结束位置之间计算内插值的替代方法。
四元数表示 3D 空间中的轴和绕该轴的旋转。 例如,四元数可以表示 (1,1,2) 轴以及 50 度的旋转角度。 四元数在定义旋转方面的价值在于可以针对它们执行的两个运算:合成和内插。 应用于几何的两个四元数的组成意味着“将几何围绕 axis2 旋转 rotation2,然后将其围绕 axis1 旋转 rotation1”。通过使用合成,可以将几何上的两个旋转组合在一起,得到一个表示结果的四元数。 由于四元数内插可以计算出从一个轴和方向到另一个轴和方向的顺利而又合理的路径,因此可以从原始位置到合成的四元数之间进行内插,以便实现从一个位置到另一个位置的顺利过渡,从而可以对该转换进行动画处理。 对于要进行动画处理的模型,可以使用 Rotation 属性的 QuaternionRotation3D 指定旋转的目标 Quaternion。
使用转换集合
生成场景时,通常会向模型应用多个转换。 将转换添加到 Transform3DGroup 类的 Children 集合中,方便地对转换进行分组,以便应用于场景中的各种模型。 通常,可以很方便地在几个不同的组中重复使用某个转换,这与通过向每个实例应用一组不同的转换来重复使用模型大体相同。 请注意,将转换添加到集合中的顺序至关重要:集合中的转换按照从第一个到最后一个的顺序应用。
对转换进行动画处理
Windows Presentation Foundation (WPF) 3D 实现与 2D 图形参与同一个计时和动画系统。 换言之,若要对 3D 场景进行动画处理,需要对其模型的属性进行动画处理。 可以直接对基元的属性进行动画处理,但是通常很容易对用来更改模型位置或外观的转换进行动画处理。 由于可以向 Model3DGroup 对象及个别模型应用转换,因此可以向 Model3Dgroup 的子级应用一组动画,向一组对象应用另一组动画。 有关 Windows Presentation Foundation (WPF) 计时和动画系统的背景信息,请参阅动画概述和演示图板概述。
若要对 Windows Presentation Foundation (WPF) 中的对象进行动画处理,可以创建时间线、定义动画(实际上是随着时间的推移而更改某个属性值)并指定要向其应用动画的属性。 此属性必须是 FrameworkElement 的属性。 由于 3D 场景中的所有对象都是 Viewport3D 的子级,因此要应用于场景的任何动画所面向的属性都是 Viewport3D 属性的属性。 请务必仔细设计动画的属性路径,因为语法可能会极为冗长。
假设用户希望就地旋转某个对象,而且还希望应用摆动动作以公开要查看的对象的更多内容。 可以选择向模型应用 RotateTransform3D,并对模型从一个矢量旋转到另一个矢量时所围绕的轴进行动画处理。 下面的代码示例演示如何将 Vector3DAnimation 应用于该转换的 Rotation3D 的 Axis 属性,并假设 RotateTransform3D 是应用于具有 TransformGroup 的模型的几个转换之一。
//Define a rotation
RotateTransform3D myRotateTransform = new RotateTransform3D(new AxisAngleRotation3D(new Vector3D(0, 1, 0), 1));
'Define a rotation
Dim myRotateTransform As New RotateTransform3D(New AxisAngleRotation3D(New Vector3D(0, 1, 0), 1))
Vector3DAnimation myVectorAnimation = new Vector3DAnimation(new Vector3D(-1, -1, -1), new Duration(TimeSpan.FromMilliseconds(5000)));
myVectorAnimation.RepeatBehavior = RepeatBehavior.Forever;
Dim myVectorAnimation As New Vector3DAnimation(New Vector3D(-1, -1, -1), New Duration(TimeSpan.FromMilliseconds(5000)))
myVectorAnimation.RepeatBehavior = RepeatBehavior.Forever
使用类似的语法面向其他转换属性来移动或缩放该对象。 例如,可以在进行缩放转换时将 Point3DAnimation 应用于 ScaleCenter 属性,以便顺利扭曲模型的形状。
尽管上面的几个示例对 GeometryModel3D 的属性进行转换,但是还可以对场景中其他模型的属性进行转换。 例如,通过对应用于 Light 对象的平移进行动画处理来创建移动灯光和阴影效果,这些效果可以显著改变模型的外观。
由于照相机也是模型,因此也可以对照相机属性进行转换。 尽管确实可以通过改变照相机的位置或平面距离来改变场景的外观(实际上是变换整个场景的投影),但应注意,对于观察者来说,以这种方法实现的许多效果不如将转换应用于场景中模型的地点或位置更有“视觉意义”。
另请参阅
反馈
即将发布:在整个 2024 年,我们将逐步淘汰作为内容反馈机制的“GitHub 问题”,并将其取代为新的反馈系统。 有关详细信息,请参阅:https://aka.ms/ContentUserFeedback。
提交和查看相关反馈
