为负载均衡的客户端访问服务配置 Kerberos 身份验证
若要将 Kerberos 身份验证与运行客户端访问服务的负载均衡邮箱服务器配合使用,必须完成本文中所述的配置步骤。
在 Active Directory 域服务中创建备用服务帐户凭据
运行共享相同命名空间和 URL 的客户端访问服务的所有 Exchange 服务器都必须使用相同的 备用服务帐户凭据 或 (ASA 凭据) 。 一般情况下,Exchange 每个版本的林中有一个帐户就足够了。
重要
Exchange 2010 和 Exchange 2016 不能共享相同的 ASA 凭据。 如果为 Exchange 2010 创建了 ASA 凭据,则必须为 Exchange 2016 创建一个新凭据。
由于共享命名空间支持 CNAME 记录,Microsoft 建议使用 A 记录。 这样可确保客户端根据共享名称(而不是服务器 FQDN)正确发出 Kerberos 票证请求。
注意
本地Exchange Server环境中不支持组托管服务帐户 (gMSA) ,因此无法在此方案中使用。
设置 ASA 凭据时,请牢记这些准则:
帐户类型:建议创建计算机帐户而不是用户帐户。 计算机帐户不允许交互式登录,且安全策略可能比用户帐户简单。 如果您创建了计算机帐户,实际上密码并不会过期,但是我们仍然建议您定期更新密码。 您可以使用本地组策略指定计算机帐户和脚本的最长期限,达到此期限后,将定期删除不符合当前策略的计算机帐户。 本地安全策略还确定何时必须更改密码。 我们建议您使用计算机帐户,但您也可以创建用户帐户。
帐户名称:帐户名称没有要求。 您可以根据自己的命名方案使用任何名称。
帐户组:用于 ASA 凭据的帐户不需要特殊安全特权。 如果使用计算机帐户,则该帐户只需是“域计算机”安全组的成员。 如果使用用户帐户,则该帐户只需是“域用户”安全组的成员。
帐户密码:将使用创建帐户时提供的密码。 因此当您创建帐户时,您应该使用一个复杂密码,确保密码符合您的组织的密码要求。
将 ASA 凭据创建为计算机帐户
在域连接的计算机上,运行 Windows PowerShell 或 Exchange 命令行管理程序。
使用 Import-Module cmdlet 导入 Active Directory 模块。
Import-Module ActiveDirectory使用 New-ADComputer cmdlet 新建一个使用此 cmdlet 语法的 Active Directory 计算机帐户:
New-ADComputer [-Name] <string> [-AccountPassword <SecureString>] [-AllowReversiblePasswordEncryption <System.Nullable[boolean]>] [-Description <string>] [-Enabled <System.Nullable[bool]>]示例:
New-ADComputer -Name EXCH2016ASA -AccountPassword (Read-Host 'Enter password' -AsSecureString) -Description 'Alternate Service Account credentials for Exchange' -Enabled:$True -SamAccountName EXCH2016ASA其中 EXCH2016ASA 是帐户的名称, Exchange 的备用服务帐户凭据 说明是你想要的, 而 SamAccountName 参数的值(在本例中为 EXCH2016ASA)在目录中必须是唯一的。
使用以下 cmdlet 语法,通过 Set-ADComputer cmdlet 启用由 Kerberos 使用的 AES 256 加密密码支持:
Set-ADComputer [-Name] <string> [-add @{<attributename>="<value>"]示例:
Set-ADComputer EXCH2016ASA -add @{"msDS-SupportedEncryptionTypes"="28"}其中 ,EXCH2016ASA 是帐户的名称,要修改的属性是 msDS-SupportedEncryptionTypes ,小数值为 28,这将启用以下密码:RC4-HMAC、AES128-CTS-HMAC-SHA1-96、AES256-CTS-HMAC-SHA1-96。
有关这些 cmdlet 的详细信息,请参阅 Import-Module 和 New-ADComputer。
跨林方案
如果你有跨林或资源林部署,并且用户位于包含 Exchange 的 Active Directory 林之外,则必须在林之间配置林信任关系。 此外,对于部署中的每个林,必须设置一个路由规则,以便在林中的所有名称后缀和跨林之间启用信任。 有关管理跨林信任的详细信息,请参阅 配置合作伙伴组织。
标识与 ASA 凭据关联的服务主体名称
创建 ASA 凭据后,必须) 将 Exchange 服务主体名称 (SPN 与 ASA 凭据相关联。 Exchange SPN 列表可能因配置而异,但至少应包括以下内容:
- http/:将此 SPN 用于 Outlook Anywhere、MAPI over HTTP、Exchange Web Services、自动发现和脱机通讯簿。
SPN 值必须与网络负载均衡器上的服务名称匹配,而不是单个服务器上的服务名称。 为帮助规划应使用的 SPN 值,请考虑以下方案:
在这些方案中,假设已为运行客户端访问服务的成员使用的内部 URL、外部 URL 和自动发现内部 URI 部署负载均衡的完全限定域名 (FQDN) 。
单个 Active Directory 站点
如果您具有单个 Active Directory 站点,您的环境可能如下图中所示:
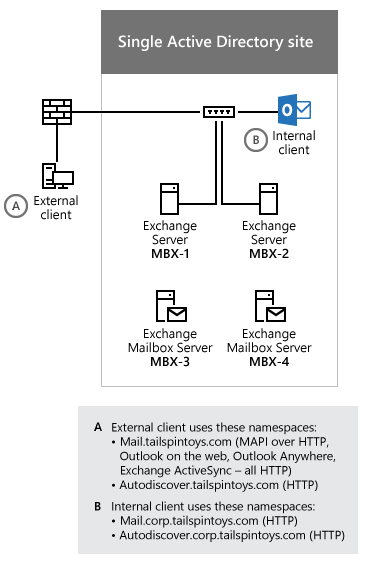
根据上图中内部 Outlook 客户端使用的 FQDN,您必须将以下 SPN 与 ASA 凭据相关联:
- http/mail.corp.tailspintoys.com
- http/autodiscover.corp.tailspintoys.com
多个 Active Directory 站点
如果您具有多个 Active Directory 站点,您的环境可能如下图中所示:
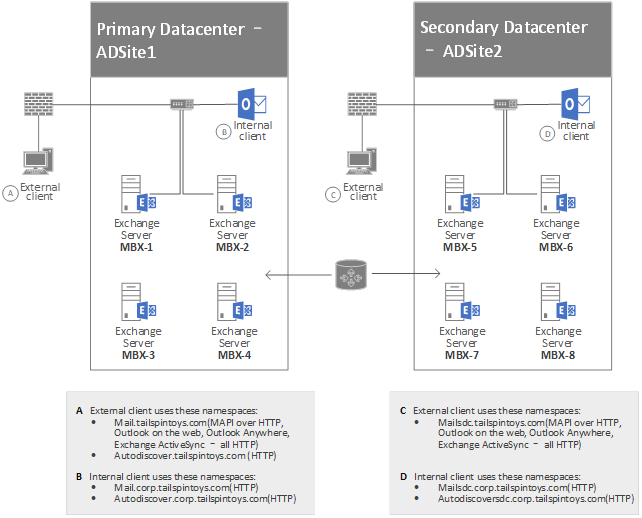
根据上图中 Outlook 客户端使用的 FQDN,您必须将以下 SPN 与 ADSite 1 中运行客户端访问服务的邮箱服务器使用的 ASA 凭据相关联:
- http/mail.corp.tailspintoys.com
- http/autodiscover.corp.tailspintoys.com
还必须将以下 SPN 与 ADSite 2 中运行客户端访问服务的邮箱服务器使用的 ASA 凭据相关联:
- http/mailsdc.corp.tailspintoys.com
- http/autodiscoversdc.corp.tailspintoys.com
在运行客户端访问服务的每台服务器上配置并验证 ASA 凭据的配置
创建帐户后,必须验证该帐户是否已复制到所有 AD DS 域控制器。 具体而言,该帐户必须存在于运行将使用 ASA 凭据的客户端访问服务的每台服务器上。 接下来,在部署中运行客户端访问服务的每台服务器上将帐户配置为 ASA 凭据。
使用 Exchange 命令行管理程序配置 ASA 凭据,如下列过程之一所述:
- 将 ASA 凭据部署到运行客户端访问服务的第一个 Exchange 服务器
- 将 ASA 凭据部署到运行客户端访问服务的后续 Exchange 服务器
部署 ASA 凭据的唯一受支持方法是使用 RollAlternateServiceAcountPassword.ps1 脚本。 有关详细信息和运行脚本所需的权限,请参阅 在 Shell 中使用RollAlternateserviceAccountCredential.ps1脚本。 脚本运行后,建议您验证是否已正确更新了所有目标服务器。
将 ASA 凭据部署到运行客户端访问服务的第一个 Exchange 服务器
在 Exchange 2016 或 Exchange 2019 服务器上打开 Exchange 命令行管理程序。
将目录更改为 <Exchange 2016 安装目录>\V15\Scripts。
运行以下命令,将 ASA 凭据部署到运行客户端访问服务的第一个 Exchange 2016 或 Exchange 2019 服务器:
.\RollAlternateServiceAccountPassword.ps1 -ToSpecificServer cas-1.corp.tailspintoys.com -GenerateNewPasswordFor tailspin\EXCH2016ASA$When you're asked if you want to change the password for the alternate service account, answer Yes.
下面是当您运行 RollAlternateServiceAccountPassword.ps1 脚本时显示的输出示例。
========== Starting at 01/12/2016 10:17:47 ==========
Creating a new session for implicit remoting of "Get-ExchangeServer" command...
Destination servers that will be updated:
Name                                                        PSComputerName
----                                                        --------------
cas-1                                                   cas-1.corp.tailspintoys.com
Credentials that will be pushed to every server in the specified scope (recent first):
UserName
Password
--------
--------
tailspin\EXCH2016ASA$
System.Security.SecureString
Prior to pushing new credentials, all existing credentials that are invalid or no longer work will be removed from  the destination servers.
Pushing credentials to server mbx-1
Setting a new password on Alternate Service Account in Active Directory
Password change
Do you want to change password for tailspin\EXCH2016ASA$ in Active Directory at this time?
[Y] Yes  [N] No  [S] Suspend  [?] Help (default is "Y"): y
Preparing to update Active Directory with a new password for tailspin\EXCH2016ASA$ ...
Resetting a password in the Active Directory for tailspin\EXCH2016ASA$ ...
New password was successfully set to Active Directory.
Retrieving the current Alternate Service Account configuration from servers in scope
Alternate Service Account properties:
StructuralObjectClass QualifiedUserName Last Pwd Update       SPNs
--------------------- ----------------- ---------------       ----
computer              tailspin\EXCH2016ASA$   1/12/2016 10:19:53 AM
Per-server Alternate Service Account configuration as of the time of script completion:
   Array: {mail.corp.tailspintoys.com}
Identity  AlternateServiceAccountConfiguration
--------  ------------------------------------
cas-1 Latest: 1/12/2016 10:19:22 AM, tailspin\EXCH2016ASA$
          ...
========== Finished at 01/12/2016 10:20:00 ==========
        THE SCRIPT HAS SUCCEEDED
将 ASA 凭据部署到另一台运行客户端访问服务的 Exchange 服务器
在 Exchange 2016 或 Exchange 2019 服务器上打开 Exchange 命令行管理程序。
将目录更改为 <Exchange 2016 安装目录>\V15\Scripts。
运行以下命令,将 ASA 凭据部署到运行客户端访问服务的另一个 Exchange 2016 或 Exchange 2019 服务器:
.\RollAlternateServiceAccountPassword.ps1 -ToSpecificServer cas-2.corp.tailspintoys.com -CopyFrom cas-1.corp.tailspintoys.com对运行要向其部署 ASA 凭据的客户端访问服务的每台服务器重复步骤 3。
下面是当您运行 RollAlternateServiceAccountPassword.ps1 脚本时显示的输出示例。
========== Starting at 01/12/2016 10:34:35 ==========
Destination servers that will be updated:
Name                                                        PSComputerName
----                                                        --------------
cas-2                                                   cas-2.corp.tailspintoys.com
Credentials that will be pushed to every server in the specified scope (recent first):
UserName
Password
--------
--------
tailspin\EXCH2016ASA$
System.Security.SecureString
Prior to pushing new credentials, all existing credentials will be removed from the destination servers.
Pushing credentials to server mbx-2
Retrieving the current Alternate Service Account configuration from servers in scope
Alternate Service Account properties:
StructuralObjectClass QualifiedUserName Last Pwd Update       SPNs
--------------------- ----------------- ---------------       ----
computer              tailspin\EXCH2016ASA$   1/12/2016 10:19:53 AM
Per-server Alternate Service Account configuration as of the time of script completion:
   Array: cas-2.corp.tailspintoys.com
Identity  AlternateServiceAccountConfiguration
--------  ------------------------------------
cas-2 Latest: 1/12/2016 10:37:59 AM, tailspin\EXCH2016ASA$
          ...
========== Finished at 01/12/2016 10:38:13 ==========
        THE SCRIPT HAS SUCCEEDED
验证 ASA 凭据的部署
在 Exchange 2016 或 Exchange 2019 服务器上打开 Exchange 命令行管理程序。
运行以下命令,检查运行客户端访问服务的服务器上的设置:
Get-ClientAccessServer CAS-3 -IncludeAlternateServiceAccountCredentialStatus | Format-List Name, AlternateServiceAccountConfiguration在运行客户端访问服务的每台服务器上重复步骤 2,你希望验证其 ASA 凭据的部署。
下面是当未设置之前的 ASA 凭据,运行上述 Get-ClientAccessServer 命令时显示的输出示例。
Name                                 : CAS-1
AlternateServiceAccountConfiguration : Latest: 1/12/2016 10:19:22 AM, tailspin\EXCH2016ASA$
                                       Previous: <Not set>
                                          ...
下面是当之前设置了 ASA 凭据,运行上述 Get-ClientAccessServer 命令时显示的输出示例。 返回之前的 ASA 凭据以及设置凭据的日期和时间。
Name                                 : CAS-3
AlternateServiceAccountConfiguration : Latest: 1/12/2016 10:19:22 AM, tailspin\EXCH2016ASA$
                                       Previous: 7/15/2015 12:58:35 PM, tailspin\oldSharedServiceAccountName$
                                          ...
将服务主体名称 (SPN) 与 ASA 凭据相关联
重要
在将 ASA 凭据部署到至少一个Exchange Server之前,请勿将 SPN 与 ASA 凭据关联,如前面将 ASA 凭据部署到运行客户端访问服务的第一个 Exchange 服务器中所述。 否则,您将遇到 Kerberos 身份验证错误。
在将 SPN 与 ASA 凭据相关联之前,必须验证目标 SPN 是否尚未与林中的其他帐户相关联。 ASA 凭据必须是林中与这些 SPN 关联的唯一帐户。 可以通过从命令行运行 setspn 命令来验证在林中没有与 SPN 关联的其他帐户。
运行 setspn 命令,验证 SPN 尚未与林中的帐户相关联
按“启动”。 In the Search box, type Command Prompt, then in the list of results, select Command Prompt.
在命令提示符处,键入以下命令:
setspn -F -Q <SPN>其中 <SPN> 是您希望与 ASA 凭据相关联的 SPN。 例如:
setspn -F -Q http/mail.corp.tailspintoys.com该命令不应返回任何内容。 如果该命令返回内容,则表明另一个帐户已与 SPN 关联。 对要与 ASA 凭据关联的每个 SPN 重复此步骤一次。
使用 setspn 命令将 SPN 与 ASA 凭据相关联
按“启动”。 在 “搜索 ”框中,键入 “命令提示符”,然后在结果列表中选择“ 命令提示符 ”。
在命令提示符处,键入以下命令:
setspn -S <SPN> <Account>$其中 <SPN> 是您希望与 ASA 凭据相关联的 SPN,<Account> 是与 ASA 凭据相关联的帐户。 例如:
setspn -S http/mail.corp.tailspintoys.com tailspin\EXCH2016ASA$针对要与 ASA 凭据关联的每个 SPN 运行一次此命令。
使用 setspn 命令确认已将 SPN 与 ASA 凭据相关联
按“启动”。 在 “搜索 ”框中,键入 “命令提示符”,然后在结果列表中选择“ 命令提示符 ”。
在命令提示符处,键入以下命令:
setspn -L <Account>$其中 <Account> 是与 ASA 凭据关联的帐户。 例如:
setspn -L tailspin\EXCH2016ASA$只需运行此命令一次。
为 Outlook 客户端启用 Kerberos 身份验证
在 Exchange 2016 或 Exchange 2019 服务器上打开 Exchange 命令行管理程序。
若要为 Outlook Anywhere 客户端启用 Kerberos 身份验证,请在运行客户端访问服务的 Exchange 2016 或 Exchange 2019 服务器上运行以下命令:
Get-OutlookAnywhere -Server CAS-1 | Set-OutlookAnywhere -InternalClientAuthenticationMethod Negotiate若要通过 HTTP 客户端为 MAPI 启用 Kerberos 身份验证,请在运行客户端访问服务的 Exchange 2016 或 Exchange 2019 服务器上运行以下命令:
Get-MapiVirtualDirectory -Server CAS-1 | Set-MapiVirtualDirectory -IISAuthenticationMethods Ntlm,Negotiate在具有Exchange Online的混合环境中,或者如果在内部使用 OAuth,请在运行客户端访问服务的 Exchange 2016 或 Exchange 2019 服务器上运行以下命令:
$mapidir = Get-MapiVirtualDirectory -Server CAS-1
$mapidir | Set-MapiVirtualDirectory -IISAuthenticationMethods ($mapidir.IISAuthenticationMethods +='Negotiate')
对运行要为其启用 Kerberos 身份验证的客户端访问服务的每台 Exchange 2016 或 Exchange 2019 服务器重复步骤 2 和 3。
验证 Exchange 客户端 Kerberos 身份验证
成功配置 Kerberos 和 ASA 凭据后,验证客户端是否可以成功进行身份验证,如这些任务中所述。
验证 Microsoft Exchange 服务主机服务是否正在运行
运行客户端访问服务的服务器上的 Microsoft Exchange 服务主机服务 (MSExchangeServiceHost) 负责管理 ASA 凭据。 如果 MSExchangeServiceHost 未运行,则无法进行 Kerberos 身份验证。 默认情况下,该服务配置为当计算机启动时自动启动。
验证 Microsoft Exchange 服务主机服务是否已启动
单击“开始”,键入“services.msc”,然后从列表中选择“services.msc”。
In the Services window, locate the Microsoft Exchange Service Host service in the list of services.
The status of the service should be Running. If the status is not Running, right-click the service, and then click Start.
验证运行客户端访问服务的服务器的 Kerberos
在运行客户端访问服务的每台服务器上配置 ASA 凭据时,运行 了 Set-ClientAccessServer cmdlet。 运行此 cmdlet 后,可以使用日志来验证成功的 Kerberos 连接。
使用 HttpProxy 日志文件验证 Kerberos 是否正常工作
在文本编辑器中,浏览到 HttpProxy 日志存储的文件夹。 默认情况下,此日志存储在以下文件夹中:
%ExchangeInstallPath%\Logging\HttpProxy\RpcHttp
打开最新的日志文件,然后查找“ 协商”一词。 日志文件中的行类似于以下示例:
2014-02-19T13:30:49.219Z,e19d08f4-e04c-42da-a6be-b7484b396db0,15,0,775,22,,RpcHttp,mail.corp.tailspintoys.com,/rpc/rpcproxy.dll,,Negotiate,True,tailspin\Wendy,tailspintoys.com,MailboxGuid~ad44b1e0-e44f-4a16-9396-3a437f594f88,MSRPC,192.168.1.77,EXCH1,200,200,,RPC_OUT_DATA,Proxy,exch2.tailspintoys.com,15.00.0775.000,IntraForest,MailboxGuidWithDomain,,,,76,462,1,,1,1,,0,,0,,0,0,16272.3359,0,0,3,0,23,0,25,0,16280,1,16274,16230,16233,16234,16282,?ad44b1e0-e44f-4a16-9396-3a437f594f88@tailspintoys.com:6001,,BeginRequest=2014-02-19T13:30:32.946Z;BeginGetRequestStream=2014-02-19T13:30:32.946Z;OnRequestStreamReady=2014-02-19T13:30:32.946Z;BeginGetResponse=2014-02-19T13:30:32.946Z;OnResponseReady=2014-02-19T13:30:32.977Z;EndGetResponse=2014-02-19T13:30:32.977Z;,PossibleException=IOException;如果看到 AuthenticationType 值为 Negotiate,则表示服务器已成功创建 Kerberos 身份验证连接。
维护 ASA 凭据
如果必须定期刷新 ASA 凭据的密码,请使用本文中的配置 ASA 凭据的步骤。 考虑设置一个计划任务来执行定期密码维护。 请务必监视计划任务,以确保密码及时滚动并防止发生可能的身份验证中断。
关闭 Kerberos 身份验证
若要将运行客户端访问服务的服务器配置为停止使用 Kerberos,请取消关联或删除 ASA 凭据中的 SPN。 如果删除 SPN,客户端将不会尝试 Kerberos 身份验证,并且配置为使用协商身份验证的客户端将改用 NTLM。 配置为仅使用 Kerberos 的客户端将无法连接。 删除 SPN 后,还应删除帐户。
删除 ASA 凭据
在 Exchange 2016 或 Exchange 2019 服务器上打开 Exchange 命令行管理程序,并运行以下命令:
Set-ClientAccessServer CAS-1 -RemoveAlternateServiceAccountCredentials虽然您不必立即执行此操作,但您最后应重新启动所有客户端计算机,从计算机中清除 Kerberos 票证缓存。