快速入门:客户端应用程序初始化 (C++)
本快速入门介绍如何实现 MIP C++ SDK 在运行时使用的客户端初始化模式。
注意
本快速入门中概述的步骤对于使用 MIP 文件、策略或保护 SDK 的任何客户端应用程序都是必需的。 尽管本快速入门介绍的是文件 SDK 的用法,但使用策略和保护 SDK 的客户端也适用同样的模式。 依次完成剩下的快速入门,因为其中的每个快速入门都以前一个为基础,下面开始第一个快速入门。
先决条件
如果尚未完成,请确保:
- 完成 Microsoft 信息保护 (MIP) SDK 安装和配置中的步骤。 此“客户端应用程序初始化”快速入门需要先正确安装和配置 SDK。
- 可选:
创建 Visual Studio 解决方案和项目
首先,创建并配置初始 Visual Studio 解决方案和项目,其他快速入门以此为基础。
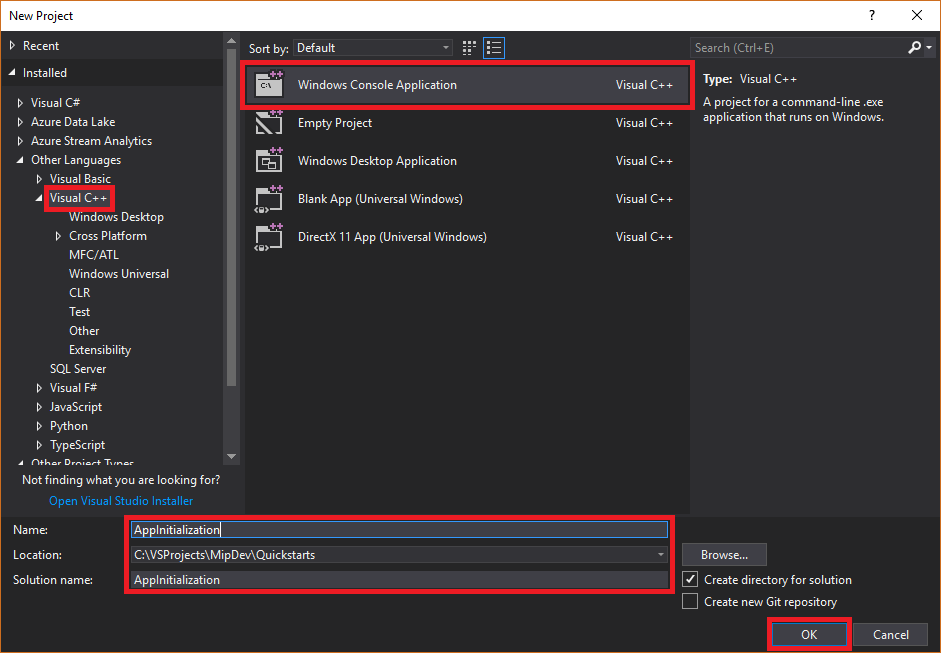
打开 Visual Studio 2017,依次选择“文件”菜单、“新建”、“项目”。 在“新建项目”对话框中:
在左窗格的“已安装”下的“其他语言”中,选择“Visual C++”。
在中心窗格中,选择“Windows 控制台应用程序”
在底部窗格中,对项目“名称”、“位置”和包含的“解决方案名称”进行相应更新。
完成后,单击右下角的“确定”按钮。
将 MIP 文件 SDK 的 Nuget 包添加到项目:
在“解决方案资源管理器”中,右键单击项目节点(直接在顶部/解决方案节点下方单击),然后选择“管理 NuGet 包...”:
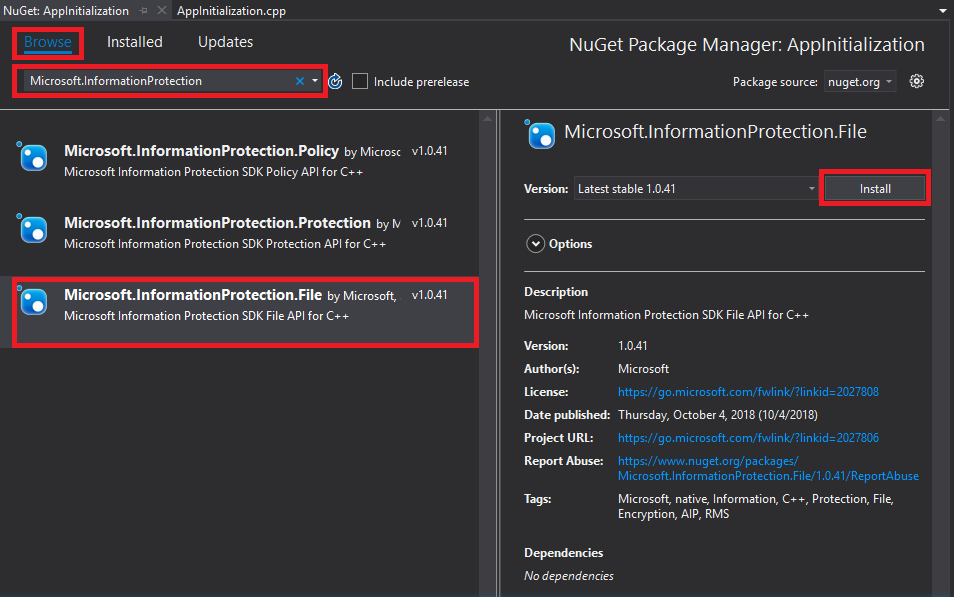
当“NuGet 包管理器”选项卡在编辑器组选项卡区域中打开时:
- 选择浏览。
- 在搜索框中输入“Microsoft.InformationProtection”。
- 选择“Microsoft.InformationProtection.File”包。
- 单击“安装”,然后在显示“预览更改”确认对话框时,单击“确定”。


实现观察程序类来监视文件配置文件和引擎对象
现在,通过扩展 SDK 的 mip::FileProfile::Observer 类,为文件配置文件观察程序类创建一个基本实现。 观察程序将实例化,稍后再用于监视文件配置文件对象的加载,以及将引擎对象添加到配置文件。
将新类添加到项目,这将会生成 header/.h 和 implementation/.cpp 文件:
在“解决方案资源管理器”中,再次右键单击项目节点,选择“添加”,然后选择“类”。
在“添加类”对话框中:
- 在“类名”字段中,输入“profile_observer”。 请注意,系统会根据输入的名称自动填充“.h 文件”和“.cpp 文件”字段。
- 完成后,单击“确定”按钮。

为类生成 .h 文件和 .cpp 文件后,这两个文件都会在编辑器组选项卡中打开。 现在更新每个文件,实现新的观察程序类:
通过选择/删除生成的
profile_observer类来更新“profile_observer.h”。 不要删除上一步生成的预处理器指令(#pragma、#include)。 然后,将以下源复制/粘贴到文件中的任何现有预处理器指令之后:#include <memory> #include "mip/file/file_profile.h" class ProfileObserver final : public mip::FileProfile::Observer { public: ProfileObserver() { } void OnLoadSuccess(const std::shared_ptr<mip::FileProfile>& profile, const std::shared_ptr<void>& context) override; void OnLoadFailure(const std::exception_ptr& error, const std::shared_ptr<void>& context) override; void OnAddEngineSuccess(const std::shared_ptr<mip::FileEngine>& engine, const std::shared_ptr<void>& context) override; void OnAddEngineFailure(const std::exception_ptr& error, const std::shared_ptr<void>& context) override; };通过选择/删除生成的
profile_observer类实现来更新“profile_observer.cpp”。 不要删除上一步生成的预处理器指令(#pragma、#include)。 然后,将以下源复制/粘贴到文件中的任何现有预处理器指令之后:#include <future> using std::promise; using std::shared_ptr; using std::static_pointer_cast; using mip::FileEngine; using mip::FileProfile; void ProfileObserver::OnLoadSuccess(const shared_ptr<FileProfile>& profile, const shared_ptr<void>& context) { auto promise = static_pointer_cast<std::promise<shared_ptr<FileProfile>>>(context); promise->set_value(profile); } void ProfileObserver::OnLoadFailure(const std::exception_ptr& error, const shared_ptr<void>& context) { auto promise = static_pointer_cast<std::promise<shared_ptr<FileProfile>>>(context); promise->set_exception(error); } void ProfileObserver::OnAddEngineSuccess(const shared_ptr<FileEngine>& engine, const shared_ptr<void>& context) { auto promise = static_pointer_cast<std::promise<shared_ptr<FileEngine>>>(context); promise->set_value(engine); } void ProfileObserver::OnAddEngineFailure(const std::exception_ptr& error, const shared_ptr<void>& context) { auto promise = static_pointer_cast<std::promise<shared_ptr<FileEngine>>>(context); promise->set_exception(error); }
(可选)使用 F6(生成解决方案)运行解决方案的测试编译/链接,以确保在继续之前成功完成生成。

实现身份验证委托
MIP SDK 使用类扩展性实现身份验证,它提供了一种与客户端应用程序共享身份验证工作的机制。 客户端必须获取合适的 OAuth2 访问令牌,并在运行时提供给 MIP SDK。
现在,通过扩展 SDK 的 mip::AuthDelegate 类,并替代/实现 mip::AuthDelegate::AcquireOAuth2Token() 纯虚函数,为身份验证委托创建一个实现。 身份验证委托稍后由文件配置文件和文件引擎对象实例化并使用。
通过在上一部分步骤 1 中使用的相同的 Visual Studio“添加类”功能,将另一个类添加到项目中。 这次在“类名”字段中输入“auth_delegate”。
现在更新每个文件,实现新的身份验证委托类:
通过将所有生成的
auth_delegate类代码替换为以下源来更新“auth_delegate.h”。 不要删除上一步生成的预处理器指令(#pragma、#include):#include <string> #include "mip/common_types.h" class AuthDelegateImpl final : public mip::AuthDelegate { public: AuthDelegateImpl() = delete; // Prevents default constructor AuthDelegateImpl( const std::string& appId) // AppID for registered AAD app : mAppId(appId) {}; bool AcquireOAuth2Token( // Called by MIP SDK to get a token const mip::Identity& identity, // Identity of the account to be authenticated, if known const OAuth2Challenge& challenge, // Authority (AAD tenant issuing token), and resource (API being accessed; "aud" claim). OAuth2Token& token) override; // Token handed back to MIP SDK private: std::string mAppId; std::string mToken; std::string mAuthority; std::string mResource; };通过将所有生成的
auth_delegate类实现替换为以下源来更新“auth_delegate.cpp”。 不要删除上一步生成的预处理器指令(#pragma、#include)。重要
以下令牌获取代码不适合用于生产。 在生产环境中,必须替换为动态获取令牌的代码,使用:
- Microsoft Entra 应用注册中指定的 appId 和回复/重定向 URI(回复/重定向 URI 必须与应用注册相匹配)
- SDK 在
challenge参数中传递的权限和资源 URL(资源 URL 必须与应用注册的 API/权限匹配) - 有效的应用/用户凭据,其中帐户与 SDK 传递的
identity参数匹配。 OAuth2“原生”客户端应提示输入用户凭据并使用“授权代码”流。 OAuth2“机密客户端”可以将自己的安全凭据与“客户端凭据”流(例如服务)一起使用,或者使用“授权代码”流(例如 Web 应用)来提示输入用户凭据。
OAuth2 令牌获取是一个复杂的协议,通常通过使用库来完成。 根据需要,TokenAcquireOAuth2Token() 仅由 MIP SDK 调用。
#include <iostream>
using std::cout;
using std::cin;
using std::string;

bool AuthDelegateImpl::AcquireOAuth2Token(const mip::Identity& identity, const OAuth2Challenge& challenge, OAuth2Token& token)
{
     // Acquire a token manually, reuse previous token if same authority/resource. In production, replace with token acquisition code.
     string authority = challenge.GetAuthority();
     string resource = challenge.GetResource();
     if (mToken == "" || (authority != mAuthority || resource != mResource))
     {
         cout << "\nRun the PowerShell script to generate an access token using the following values, then copy/paste it below:\n";
         cout << "Set $authority to: " + authority + "\n";
         cout << "Set $resourceUrl to: " + resource + "\n";
         cout << "Sign in with user account: " + identity.GetEmail() + "\n";
         cout << "Enter access token: ";
         cin >> mToken;
         mAuthority = authority;
         mResource = resource;
         system("pause");
     }

     // Pass access token back to MIP SDK
     token.SetAccessToken(mToken);

     // True = successful token acquisition; False = failure
     return true;
}
(可选)使用 F6(生成解决方案)运行解决方案的测试编译/链接,以确保在继续之前成功完成生成。
实现许可委托
现在,通过扩展 SDK 的 mip::ConsentDelegate 类,并替代/实现 mip::AuthDelegate::GetUserConsent() 纯虚函数,为许可委托创建一个实现。 许可委托稍后由文件配置文件和文件引擎对象实例化并使用。
通过在之前使用的相同的 Visual Studio“添加类”功能,将另一个类添加到项目中。 这次在“类名”字段中输入“consent_delegate”。
现在更新每个文件,实现新的许可委托类:
通过将所有生成的
consent_delegate类代码替换为以下源来更新“consent_delegate.h”。 不要删除上一步生成的预处理器指令(#pragma、#include):#include "mip/common_types.h" #include <string> class ConsentDelegateImpl final : public mip::ConsentDelegate { public: ConsentDelegateImpl() = default; virtual mip::Consent GetUserConsent(const std::string& url) override; };通过将所有生成的
consent_delegate类实现替换为以下源来更新“consent_delegate.cpp”。 不要删除上一步生成的预处理器指令(#pragma、#include)。#include <iostream> using mip::Consent; using std::string; Consent ConsentDelegateImpl::GetUserConsent(const string& url) { // Accept the consent to connect to the url std::cout << "SDK will connect to: " << url << std::endl; return Consent::AcceptAlways; }
(可选)使用 F6(生成解决方案)运行解决方案的测试编译/链接,以确保在继续之前成功完成生成。
构造文件配置文件和引擎
如前所述,使用 MIP API 的 SDK 客户端需要配置文件和引擎对象。 通过添加代码来实例化配置文件和引擎对象,完成本快速入门的编码部分:
在“解决方案资源管理器”中,打开项目中包含
main()方法实现的 .cpp 文件。 该文件默认与包含它的项目同名,该名称在项目创建期间指定。删除生成的
main()实现。 不要删除在项目创建期间由 Visual Studio 生成的预处理器指令(#pragma、#include)。 在任何预处理器指令后面追加以下代码:
#include "mip/mip_context.h"
#include "auth_delegate.h"
#include "consent_delegate.h"
#include "profile_observer.h"

using std::promise;
using std::future;
using std::make_shared;
using std::shared_ptr;
using std::string;
using std::cout;
using mip::ApplicationInfo;
using mip::FileProfile;
using mip::FileEngine;

int main()
{
  // Construct/initialize objects required by the application's profile object
  // ApplicationInfo object (App ID, name, version)
  ApplicationInfo appInfo{"<application-id>",
                          "<application-name>",
                          "<application-version>"};

  // Create MipConfiguration object.
  std::shared_ptr<mip::MipConfiguration> mipConfiguration = std::make_shared<mip::MipConfiguration>(appInfo,
				                                                                                               "mip_data",
                                                                                      			         mip::LogLevel::Trace,
                                                                                                     false);


  std::shared_ptr<mip::MipContext> mMipContext = mip::MipContext::Create(mipConfiguration);

  auto profileObserver = make_shared<ProfileObserver>();                     // Observer object
  auto authDelegateImpl = make_shared<AuthDelegateImpl>("<application-id>"); // Authentication delegate object (App ID)
  auto consentDelegateImpl = make_shared<ConsentDelegateImpl>();             // Consent delegate object

  // Construct/initialize profile object
  FileProfile::Settings profileSettings(
                                mMipContext,
                                mip::CacheStorageType::OnDisk,
                                consentDelegateImpl,
                                profileObserver);

  // Set up promise/future connection for async profile operations; load profile asynchronously
  auto profilePromise = make_shared<promise<shared_ptr<FileProfile>>>();
  auto profileFuture = profilePromise->get_future();

  try
	  {
		  mip::FileProfile::LoadAsync(profileSettings, profilePromise);
  }
	  catch (const std::exception& e)
	  {
		  cout << "An exception occurred... are the Settings and ApplicationInfo objects populated correctly?\n\n" << e.what() << "'\n";

		  system("pause");
		  return 1;
	  }
	  auto profile = profileFuture.get();

  // Construct/initialize engine object
  FileEngine::Settings engineSettings(
                                  mip::Identity("<engine-account>"), // Engine identity (account used for authentication)
                                  authDelegateImpl,		       // Token acquisition implementation
				    "<engine-state>",                  // User-defined engine state
                                  "en-US");                          // Locale (default = en-US)

  // Set the engineId for caching.
  engineSettings.SetEngineId("<engine-account>");
  // Set up promise/future connection for async engine operations; add engine to profile asynchronously
  auto enginePromise = make_shared<promise<shared_ptr<FileEngine>>>();
  auto engineFuture = enginePromise->get_future();
  profile->AddEngineAsync(engineSettings, enginePromise);
  std::shared_ptr<FileEngine> engine;
  try
  {
    engine = engineFuture.get();
  }
  catch (const std::exception& e)
  {
    cout << "An exception occurred... is the access token incorrect/expired?\n\n" << e.what() << "'\n";

    system("pause");
    return 1;
  }

  // Application shutdown. Null out profile and engine, call ReleaseAllResources();
  // Application may crash at shutdown if resources aren't properly released.
  // handler = nullptr; // This will be used in later quick starts.
  engine = nullptr;
  profile = nullptr;
  mMipContext->ShutDown();
  mMipContext = nullptr;

  return 0;
  }
使用字符串常量替换刚刚粘贴的源代码中的所有占位符值:
占位符 值 示例 <application-id> 分配给在 MIP SDK 安装和配置一文的步骤 #2 中注册的应用程序的 Microsoft Entra 应用程序 ID (GUID)。 替换 2 个实例。 "0edbblll-8773-44de-b87c-b8c6276d41eb"<application-name> 应用程序的用户定义的易记名称。 必须包含有效的 ASCII 字符(不包括“;”),并且最好与在 Microsoft Entra 注册中使用的应用程序名称匹配。 "AppInitialization"<application-version> 应用程序的用户定义的版本信息。 必须包含有效的 ASCII 字符(不包括“;”)。 "1.1.0.0"<engine-account> 用于引擎标识的帐户。 在获取令牌期间使用用户帐户进行身份验证时,帐户必须与此值匹配。 "user1@tenant.onmicrosoft.com"<engine-state> 与引擎关联的用户定义的状态。 "My App State"现在,对应用程序进行最终生成并解决所有错误。 代码应会成功生成,但在完成下一个快速入门之前还不能正确运行。 如果运行应用程序,将显示类似于以下内容的输出。 在完成下一个快速入门之前,你将无法提供访问令牌。
后续步骤
完成初始化代码后,接下来可以开始学习下一个快速入门,你将开始了解 MIP 文件 SDK。
反馈
即将发布:在整个 2024 年,我们将逐步淘汰作为内容反馈机制的“GitHub 问题”,并将其取代为新的反馈系统。 有关详细信息,请参阅:https://aka.ms/ContentUserFeedback。
提交和查看相关反馈