编写大型数据集
API 将数据 Range.setValues() 置于一个范围内。 此 API 存在限制,具体取决于各种因素,例如数据大小和网络设置。 这意味着,如果尝试将大量信息作为单个操作写入工作簿,则需要以较小的批处理写入数据,以便可靠地更新 大范围。
示例的第一部分演示如何在 Excel 中编写大型数据集。 第二部分将示例扩展为 Power Automate 流的一部分。 如果脚本的运行时间长于 Power Automate 操作超时,则这是必需的。
有关 Office 脚本的性能基础知识,请阅读 提高 Office 脚本的性能。
示例 1:批量写入大型数据集
此脚本以较小的部分写入某个范围的行。 它一次选择要写入的 1000 个单元格。 在空白工作表上运行脚本,以查看更新批处理的运行情况。 控制台输出可进一步了解所发生的情况。
注意
可以通过更改 的值来更改要写入的总行数 SAMPLE_ROWS。 可以通过更改 的值来更改要作为单个操作写入的 CELLS_IN_BATCH单元格数。
function main(workbook: ExcelScript.Workbook) {
  const SAMPLE_ROWS = 100000;
  const CELLS_IN_BATCH = 10000;

  // Get the current worksheet.
  const sheet = workbook.getActiveWorksheet();

  console.log(`Generating data...`)
  let data: (string | number | boolean)[][] = [];
  // Generate six columns of random data per row.
  for (let i = 0; i < SAMPLE_ROWS; i++) {
    data.push([i, ...[getRandomString(5), getRandomString(20), getRandomString(10), Math.random()], "Sample data"]);
  }

  console.log(`Calling update range function...`);
  const updated = updateRangeInBatches(sheet.getRange("B2"), data, CELLS_IN_BATCH);
  if (!updated) {
    console.log(`Update did not take place or complete. Check and run again.`);
  }
}

function updateRangeInBatches(
  startCell: ExcelScript.Range,
  values: (string | boolean | number)[][],
  cellsInBatch: number
): boolean {

  const startTime = new Date().getTime();
  console.log(`Cells per batch setting: ${cellsInBatch}`);

  // Determine the total number of cells to write.
  const totalCells = values.length * values[0].length;
  console.log(`Total cells to update in the target range: ${totalCells}`);
  if (totalCells <= cellsInBatch) {
    console.log(`No need to batch -- updating directly`);
    updateTargetRange(startCell, values);
    return true;
  }

  // Determine how many rows to write at once.
  const rowsPerBatch = Math.floor(cellsInBatch / values[0].length);
  console.log("Rows per batch: " + rowsPerBatch);
  let rowCount = 0;
  let totalRowsUpdated = 0;
  let batchCount = 0;

  // Write each batch of rows.
  for (let i = 0; i < values.length; i++) {
    rowCount++;
    if (rowCount === rowsPerBatch) {
      batchCount++;
      console.log(`Calling update next batch function. Batch#: ${batchCount}`);
      updateNextBatch(startCell, values, rowsPerBatch, totalRowsUpdated);

      // Write a completion percentage to help the user understand the progress.
      rowCount = 0;
      totalRowsUpdated += rowsPerBatch;
      console.log(`${((totalRowsUpdated / values.length) * 100).toFixed(1)}% Done`);
    }
  }

  console.log(`Updating remaining rows -- last batch: ${rowCount}`)
  if (rowCount > 0) {
    updateNextBatch(startCell, values, rowCount, totalRowsUpdated);
  }

  let endTime = new Date().getTime();
  console.log(`Completed ${totalCells} cells update. It took: ${((endTime - startTime) / 1000).toFixed(6)} seconds to complete. ${((((endTime  - startTime) / 1000)) / cellsInBatch).toFixed(8)} seconds per ${cellsInBatch} cells-batch.`);

  return true;
}

/**
 * A helper function that computes the target range and updates.
 */
function updateNextBatch(
  startingCell: ExcelScript.Range,
  data: (string | boolean | number)[][],
  rowsPerBatch: number,
  totalRowsUpdated: number
) {
  const newStartCell = startingCell.getOffsetRange(totalRowsUpdated, 0);
  const targetRange = newStartCell.getResizedRange(rowsPerBatch - 1, data[0].length - 1);
  console.log(`Updating batch at range ${targetRange.getAddress()}`);
  const dataToUpdate = data.slice(totalRowsUpdated, totalRowsUpdated + rowsPerBatch);
  try {
    targetRange.setValues(dataToUpdate);
  } catch (e) {
    throw `Error while updating the batch range: ${JSON.stringify(e)}`;
  }
  return;
}

/**
 * A helper function that computes the target range given the target range's starting cell
 * and selected range and updates the values.
 */
function updateTargetRange(
  targetCell: ExcelScript.Range,
  values: (string | boolean | number)[][]
) {
  const targetRange = targetCell.getResizedRange(values.length - 1, values[0].length - 1);
  console.log(`Updating the range: ${targetRange.getAddress()}`);
  try {
    targetRange.setValues(values);
  } catch (e) {
    throw `Error while updating the whole range: ${JSON.stringify(e)}`;
  }
  return;
}

// Credit: https://www.codegrepper.com/code-examples/javascript/random+text+generator+javascript
function getRandomString(length: number): string {
  var randomChars = 'ABCDEFGHIJKLMNOPQRSTUVWXYZabcdefghijklmnopqrstuvwxyz0123456789';
  var result = '';
  for (var i = 0; i < length; i++) {
    result += randomChars.charAt(Math.floor(Math.random() * randomChars.length));
  }
  return result;
}
培训视频:编写大型数据集
观看 Sudhi Ramamurthy 在 YouTube 上演练此示例。
示例 2:从 Power Automate 流批量写入数据
对于此示例,需要完成以下步骤。
- 在 OneDrive 中创建名为 SampleData.xlsx的工作簿。
- 在 OneDrive 中创建名为 TargetWorkbook.xlsx的第二个工作簿。
- 使用 Excel 打开 SampleData.xlsx 。
- 添加示例数据。 可以使用 “批量写入大型数据集 ”部分中的脚本来生成此数据。
- 创建并保存以下两个脚本。 使用 “自动>新建脚本” 粘贴代码,并使用建议的名称保存脚本。
- 按照 Power Automate 流:在循环中读取和写入数据 下的步骤创建流。
示例代码:读取所选行
function main(
  workbook: ExcelScript.Workbook,
  startRow: number,
  batchSize: number
): string[][] {
  // This script only reads the first worksheet in the workbook.
  const sheet = workbook.getWorksheets()[0];

  // Get the boundaries of the range.
  // Note that we're assuming usedRange is too big to read or write as a single range.
  const usedRange = sheet.getUsedRange();
  const lastColumnIndex = usedRange.getLastColumn().getColumnIndex();
  const lastRowindex = usedRange.getLastRow().getRowIndex();

  // If we're starting past the last row, exit the script.
  if (startRow > lastRowindex) {
      return [[]];
  }

  // Get the next batch or the rest of the rows, whichever is smaller.
  const rowCountToRead = Math.min(batchSize, (lastRowindex - startRow + 1));
  const rangeToRead = sheet.getRangeByIndexes(startRow, 0, rowCountToRead, lastColumnIndex + 1);
  return rangeToRead.getValues() as string[][];
}
示例代码:在行位置写入数据
function main(
  workbook: ExcelScript.Workbook,
  data: string[][],
  currentRow: number,
  batchSize: number
): boolean {
  // Get the first worksheet.
  const sheet = workbook.getWorksheets()[0];

  // Set the given data.
  if (data && data.length > 0) {
    sheet.getRangeByIndexes(currentRow, 0, data.length, data[0].length).setValues(data);
  }

  // If the script wrote less data than the batch size, signal the end of the flow.
  return batchSize > data.length;
}
Power Automate 流:在循环中读取和写入数据
登录到 Power Automate 并创建新的 即时云流。
选择 “手动触发流 ”,然后选择“ 创建”。
创建变量以跟踪正在读取和写入的当前行。 在流生成器中 + ,选择按钮和 “添加操作”。 选择 “初始化变量” 操作,并为其指定以下值。
- 名称:currentRow
- 类型:整数
- 值:0

添加操作以设置要在单个批处理中读取的行数。 根据列数,这可能需要更小以避免数据传输限制。 使用以下值创建新的 Initialize 变量 操作。
- 名称:batchSize
- 类型:整数
- 值:10000

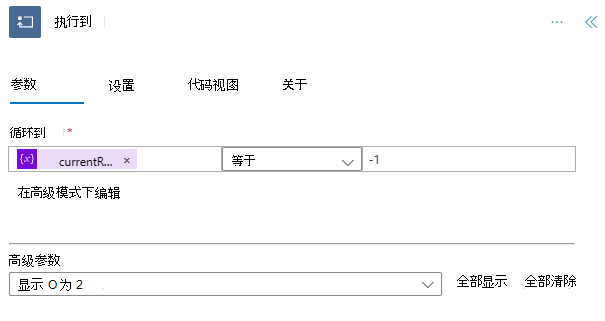
添加 “直到”控件 。 流将读取数据区块,直到数据全部复制。 你将使用 值 -1 来指示数据已到达末尾。 为控件提供以下值。
- 选择值: currentRow (动态内容)
- 等于 下拉列表中的 ()
- 选择值:-1
其余步骤将添加到 “执行” 控件中。 接下来,调用脚本来读取数据。 添加 Excel Online (Business) 连接器的 “运行”脚本 操作。 将其重命名为 “读取数据”。 对操作使用以下值。
- 位置:OneDrive for Business
- 文档库:OneDrive
- 文件:文件选取器) 选择的“SampleData.xlsx” (
- 脚本:读取所选行
- startRow: currentRow (动态内容)
- batchSize: batchSize (动态内容)

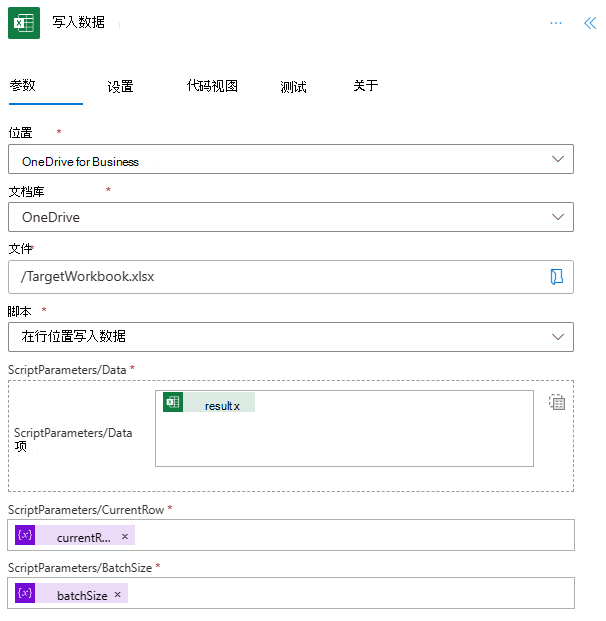
调用脚本以写入数据。 添加第二个 运行脚本 操作。 将其重命名为 写入数据。 对操作使用以下值。
- 位置:OneDrive for Business
- 文档库:OneDrive
- 文件:文件选取器) 选择的“TargetWorkbook.xlsx” (
- 脚本:在行位置写入数据
- data:从读取数据) (动态内容的结果
- 首先按 “切换到整个数组的输入 ”。
- startRow: currentRow (动态内容)
- batchSize: batchSize (动态内容)
更新当前行以反映已读取和写入一批数据。 添加具有以下值的 Increment 变量 操作。
- 名称:currentRow
- 值: batchSize (动态内容)

如果脚本已读取所有内容,则添加 Condition 控件以检查。 当写入的行数少于批大小允许的行数时,“在行位置写入数据”脚本将返回 true。 这意味着它位于数据集的末尾。 使用以下值创建 Condition 控件操作。
- 从写入数据) 中选择一个值:结果 (动态内容
- 等于 下拉列表中的 ()
- 选择一个值: true (表达式)

在 Condition 控件的 True 部分下,将 currentRow 变量设置为 -1。 使用以下值添加 Set 变量 操作。
- 名称:currentRow
- 值:-1

保存流。 流设计器应如下图所示。

使用流编辑器页上的“ 测试 ”按钮,或通过“我的流”选项卡运行 流 。请务必在出现提示时允许访问。
“TargetWorkbook.xlsx”文件现在应具有“SampleData.xlsx”中的数据。
反馈
即将发布:在整个 2024 年,我们将逐步淘汰作为内容反馈机制的“GitHub 问题”,并将其取代为新的反馈系统。 有关详细信息,请参阅:https://aka.ms/ContentUserFeedback。
提交和查看相关反馈