你当前正在访问 Microsoft Azure Global Edition 技术文档网站。 如果需要访问由世纪互联运营的 Microsoft Azure 中国技术文档网站,请访问 https://docs.azure.cn。
Azure PowerShell 入门
警告
AzureRM PowerShell 模块已自 2024 年 2 月 29 日起正式弃用。 为了确保持续获得支持和更新,建议用户从 AzureRM 迁移到 Az PowerShell 模块。
尽管 AzureRM 模块仍可运行,但不再受到维护或支持,任何继续使用的行为都由用户自行决定并自行承担风险。 有关过渡到 Az 模块的指导,请参阅我们的迁移资源。
Azure PowerShell 用于从命令行管理 Azure 资源,以及生成可以针对 Azure 资源管理器运行的自动化脚本。 可以通过 Azure Cloud Shell 在浏览器中使用它,也可以将它安装在本地计算机上。 本文将帮助你开始使用 Azure PowerShell,并讲解与其相关的核心概念。
安装 Azure PowerShell
首先,请确保已安装最新版本的 Azure PowerShell。 有关最新版本的信息,请参阅发行说明。
若要验证安装是否成功,请从 PowerShell 运行
Get-InstalledModule -Name AzureRM -AllVersions。
Azure Cloud Shell
最简单的入门方法是启动 Cloud Shell。
从 Azure 门户的顶部导航栏启动 Cloud Shell。

选择要使用的订阅并创建存储帐户。
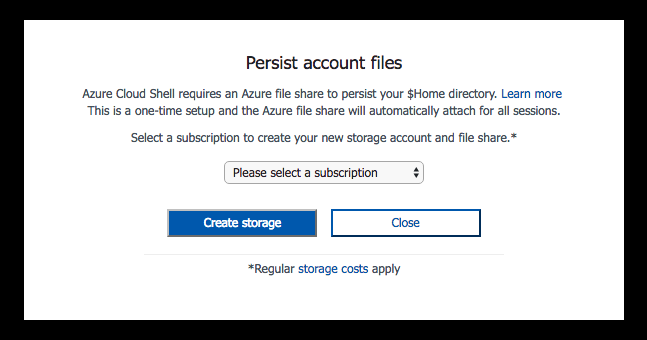
创建存储后,Cloud Shell 会在浏览器中打开 PowerShell 会话。

也可以安装 Azure PowerShell 并在 PowerShell 会话本地使用它。
登录 Azure
以交互方式登录:
键入
Connect-AzureRmAccount。 此时会出现一个对话框,要求输入 Azure 凭据。 通过“-Environment”选项可针对 Azure China 或 Azure Germany 进行身份验证。例如 Connect-AzureRmAccount -Environment AzureChinaCloud
键入与帐户关联的电子邮件地址和密码。 Azure 将对凭据信息进行身份验证和保存,然后关闭该窗口。
登录到 Azure 帐户后,可以使用 Azure PowerShell cmdlet 访问和管理订阅中的资源。
使用简单的默认值创建 Windows 虚拟机
New-AzureRmVM cmdlet 提供了一种简化的语法,使得创建新虚拟机更加轻松。 必须提供的只有两个参数值:VM 的名称和该 VM 上本地管理员帐户的一组凭据。
首先,创建凭据对象。
$cred = Get-Credential -Message 'Enter a username and password for the virtual machine.'
Windows PowerShell credential request.
Enter a username and password for the virtual machine.
User: localAdmin
Password for user localAdmin: *********
然后,创建 VM。
New-AzureRmVM -Name SampleVM -Credential $cred
ResourceGroupName        : SampleVM
Id                       : /subscriptions/XXXXXXXX-XXXX-XXXX-XXXX-XXXXXXXXXXXX/resourceGroups/SampleVM/providers/Microsoft.Compute/virtualMachines/SampleVM
VmId                     : 43f6275d-ce50-49c8-a831-5d5974006e63
Name                     : SampleVM
Type                     : Microsoft.Compute/virtualMachines
Location                 : eastus
Tags                     : {}
HardwareProfile          : {VmSize}
NetworkProfile           : {NetworkInterfaces}
OSProfile                : {ComputerName, AdminUsername, WindowsConfiguration, Secrets}
ProvisioningState        : Succeeded
StorageProfile           : {ImageReference, OsDisk, DataDisks}
FullyQualifiedDomainName : samplevm-2c0867.eastus.cloudapp.azure.com
你可能想知道另外创建了哪些对象以及 VM 是如何配置的。 让我们先看一下资源组。
Get-AzureRmResourceGroup |
  Select-Object -Property ResourceGroupName, Location
ResourceGroupName          Location
-----------------          --------
cloud-shell-storage-westus westus
SampleVM                   eastus
cloud-shell-storage-westus 资源组是在你首次使用 Cloud Shell 时创建的。 SampleVM 资源组由 New-AzureRmVM cmdlet 创建。
现在,这一新资源组中还创建了其他哪些资源?
Get-AzureRmResource |
  Where ResourceGroupName -eq SampleVM |
    Select-Object -Property ResourceGroupName, Location, ResourceType, Name
ResourceGroupName          Location ResourceType                            Name
-----------------          -------- ------------                            ----
SAMPLEVM                   eastus   Microsoft.Compute/disks                 SampleVM_OsDisk_1_9b286c54b168457fa1f8c47...
SampleVM                   eastus   Microsoft.Compute/virtualMachines       SampleVM
SampleVM                   eastus   Microsoft.Network/networkInterfaces     SampleVM
SampleVM                   eastus   Microsoft.Network/networkSecurityGroups SampleVM
SampleVM                   eastus   Microsoft.Network/publicIPAddresses     SampleVM
SampleVM                   eastus   Microsoft.Network/virtualNetworks       SampleVM
让我们再了解一些有关该 VM 的详细信息。 此示例演示如何检索有关用于创建 VM 的 OS 映像的信息。
Get-AzureRmVM -Name SampleVM -ResourceGroupName SampleVM |
  Select-Object -ExpandProperty StorageProfile |
    Select-Object -ExpandProperty ImageReference
Publisher : MicrosoftWindowsServer
Offer     : WindowsServer
Sku       : 2016-Datacenter
Version   : latest
Id        :
创建完全配置的 Linux 虚拟机
前面的示例使用了简化的语法和默认参数值来创建 Windows 虚拟机。 在此示例中,我们为虚拟机的所有选项提供值。
创建资源组
在本例中,我们需要创建资源组。 使用 Azure 中的资源组可以同时管理希望以逻辑方式分组的多个资源。 例如,可为应用程序或项目创建资源组,并在其中添加虚拟机、数据库和 CDN 服务。
让我们在 Azure 的西欧区域创建一个名为“MyResourceGroup”的资源组。 为此,请键入以下命令:
New-AzureRmResourceGroup -Name 'myResourceGroup' -Location 'westeurope'
ResourceGroupName : myResourceGroup
Location          : westeurope
ProvisioningState : Succeeded
Tags              :
ResourceId        : /subscriptions/XXXXXXXX-XXXX-XXXX-XXXX-XXXXXXXXXXXX/resourceGroups/myResourceGroup
这一新资源组将用于容纳我们创建的新 VM 所需的所有资源。 若要创建新的 Linux VM,必须先创建其他所需的资源并将其分配到配置中。 然后,可以使用该配置来创建 VM。 此外,用户配置文件的 .ssh 目录中需具备名为 id_rsa.pub 的 SSH 公钥。
创建所需的网络资源
首先,需要创建一个子网配置,以便在创建虚拟网络过程中使用。 此外,还要创建一个公共 IP 地址,以便能够连接到此 VM。 我们将创建一个网络安全组来保护对公共地址的访问。 最后,使用上述所有资源创建虚拟 NIC。
# Variables for common values
$resourceGroup = 'myResourceGroup'
$location = 'westeurope'
$vmName = 'myLinuxVM'

# Definer user name and blank password
$securePassword = ConvertTo-SecureString 'azurepassword' -AsPlainText -Force
$cred = New-Object -TypeName System.Management.Automation.PSCredential ('azureuser', $securePassword)

# Create a subnet configuration
$subnetConfig = New-AzureRmVirtualNetworkSubnetConfig -Name mySubnet2 -AddressPrefix 192.168.2.0/24

# Create a virtual network
$vnet = New-AzureRmVirtualNetwork -ResourceGroupName $resourceGroup -Location $location `
  -Name MYvNET2 -AddressPrefix 192.168.0.0/16 -Subnet $subnetConfig

# Create a public IP address and specify a DNS name
$publicIp = New-AzureRmPublicIpAddress -ResourceGroupName $resourceGroup -Location $location `
  -Name "mypublicdns$(Get-Random)" -AllocationMethod Static -IdleTimeoutInMinutes 4
$publicIp | Select-Object Name,IpAddress

# Create an inbound network security group rule for port 22
$nsgRuleSSH = New-AzureRmNetworkSecurityRuleConfig -Name myNetworkSecurityGroupRuleSSH  -Protocol Tcp `
  -Direction Inbound -Priority 1000 -SourceAddressPrefix * -SourcePortRange * -DestinationAddressPrefix * `
  -DestinationPortRange 22 -Access Allow

# Create a network security group
$nsg = New-AzureRmNetworkSecurityGroup -ResourceGroupName $resourceGroup -Location $location `
  -Name myNetworkSecurityGroup2 -SecurityRules $nsgRuleSSH

# Create a virtual network card and associate with public IP address and NSG
$nic = New-AzureRmNetworkInterface -Name myNic2 -ResourceGroupName $resourceGroup -Location $location `
  -SubnetId $vnet.Subnets[0].Id -PublicIpAddressId $publicIp.Id -NetworkSecurityGroupId $nsg.Id
创建 VM 配置
有了所需资源以后,就可以创建 VM 配置对象了。
# Create a virtual machine configuration
$vmConfig = New-AzureRmVMConfig -VMName $vmName -VMSize Standard_D1 |
  Set-AzureRmVMOperatingSystem -Linux -ComputerName $vmName -Credential $cred -DisablePasswordAuthentication |
  Set-AzureRmVMSourceImage -PublisherName Canonical -Offer UbuntuServer -Skus 14.04.2-LTS -Version latest |
  Add-AzureRmVMNetworkInterface -Id $nic.Id

# Configure SSH Keys
$sshPublicKey = Get-Content -Raw "$env:USERPROFILE\.ssh\id_rsa.pub"
Add-AzureRmVMSshPublicKey -VM $vmConfig -KeyData $sshPublicKey -Path '/home/azureuser/.ssh/authorized_keys'
创建虚拟机
现在可以使用 VM 配置对象创建 VM。
New-AzureRmVM -ResourceGroupName $resourceGroup -Location $location -VM $vmConfig
创建 VM 后,可以使用创建的 VM 的公共 IP 地址通过 SSH 登录到新的 Linux VM:
ssh xx.xxx.xxx.xxx
Welcome to Ubuntu 14.04.4 LTS (GNU/Linux 3.19.0-65-generic x86_64)

 * Documentation:  https://help.ubuntu.com/

  System information as of Sun Feb 19 00:32:28 UTC 2017

  System load: 0.31              Memory usage: 3%   Processes:       89
  Usage of /:  39.6% of 1.94GB   Swap usage:   0%   Users logged in: 0

  Graph this data and manage this system at:
    https://landscape.canonical.com/

  Get cloud support with Ubuntu Advantage Cloud Guest:
    http://www.ubuntu.com/business/services/cloud

0 packages can be updated.
0 updates are security updates.


The programs included with the Ubuntu system are free software;
the exact distribution terms for each program are described in the
individual files in /usr/share/doc/*/copyright.

Ubuntu comes with ABSOLUTELY NO WARRANTY, to the extent permitted by
applicable law.

my-login@MyLinuxVM:../../..$
在 Azure 中创建其他资源
前面已经逐步讲解了如何创建资源组、Linux VM 和 Windows Server VM。 还可以创建许多其他类型的 Azure 资源。
例如,若要创建稍后可与新建的 VM 相关联的 Azure 网络负载均衡器,可以使用以下 create 命令:
New-AzureRmLoadBalancer -Name MyLoadBalancer -ResourceGroupName myResourceGroup -Location westeurope
还可以使用以下命令为基础结构创建新的专用虚拟网络(在 Azure 中通常称为“VNet”):
$subnetConfig = New-AzureRmVirtualNetworkSubnetConfig -Name mySubnet2 -AddressPrefix 10.0.0.0/16
$vnet = New-AzureRmVirtualNetwork -ResourceGroupName myResourceGroup -Location westeurope `
  -Name MYvNET3 -AddressPrefix 10.0.0.0/16 -Subnet $subnetConfig
Azure 和 Azure PowerShell 的强大之处在于,我们不仅可以使用它们来获取基于云的基础结构,而且还可以创建托管的平台服务。 此外,可将托管的平台服务与基础结构结合使用,构建更强大的解决方案。
例如,可以使用 Azure PowerShell 创建 Azure 应用服务。 Azure 应用服务是一个托管的平台服务,使用它能够十分方便地托管 Web 应用,而无需考虑基础结构。 创建 Azure 应用服务后,可以使用以下命令中应用服务中创建两个新的 Azure Web 应用:
# Create an Azure AppService that we can host any number of web apps within
New-AzureRmAppServicePlan -Name MyAppServicePlan -Tier Basic -NumberofWorkers 2 -WorkerSize Small -ResourceGroupName myResourceGroup -Location westeurope

# Create Two Web Apps within the AppService (note: name param must be a unique DNS entry)
New-AzureRmWebApp -Name MyWebApp43432 -AppServicePlan MyAppServicePlan -ResourceGroupName myResourceGroup -Location westeurope
New-AzureRmWebApp -Name MyWebApp43433 -AppServicePlan MyAppServicePlan -ResourceGroupName myResourceGroup -Location westeurope
列出已部署的资源
可以使用 Get-AzureRmResource cmdlet 列出 Azure 中运行的资源。 以下示例显示我们在新资源组中创建的资源。
Get-AzureRmResource |
  Where-Object ResourceGroupName -eq myResourceGroup |
    Select-Object Name,Location,ResourceType
Name                                                  Location   ResourceType
----                                                  --------   ------------
myLinuxVM_OsDisk_1_36ca038791f642ba91270879088c249a   westeurope Microsoft.Compute/disks
myWindowsVM_OsDisk_1_f627e6e2bb454c72897d72e9632adf9a westeurope Microsoft.Compute/disks
myLinuxVM                                             westeurope Microsoft.Compute/virtualMachines
myWindowsVM                                           westeurope Microsoft.Compute/virtualMachines
myWindowsVM/BGInfo                                    westeurope Microsoft.Compute/virtualMachines/extensions
myNic1                                                westeurope Microsoft.Network/networkInterfaces
myNic2                                                westeurope Microsoft.Network/networkInterfaces
myNetworkSecurityGroup1                               westeurope Microsoft.Network/networkSecurityGroups
myNetworkSecurityGroup2                               westeurope Microsoft.Network/networkSecurityGroups
mypublicdns245369171                                  westeurope Microsoft.Network/publicIPAddresses
mypublicdns779537141                                  westeurope Microsoft.Network/publicIPAddresses
MYvNET1                                               westeurope Microsoft.Network/virtualNetworks
MYvNET2                                               westeurope Microsoft.Network/virtualNetworks
micromyresomywi032907510                              westeurope Microsoft.Storage/storageAccounts
删除资源
若要清理 Azure 帐户,可以删除我们在本示例中创建的资源。 可以使用 Remove-AzureRm* cmdlet 删除不再需要的资源。 若要删除我们创建的 Windows VM,请使用以下命令:
Remove-AzureRmVM -Name myWindowsVM -ResourceGroupName myResourceGroup
系统将提示你确认删除该资源。
Confirm
Are you sure you want to remove resource group 'myResourceGroup'
[Y] Yes  [N] No  [S] Suspend  [?] Help (default is "Y"): Y
还可以一次性删除多个资源。 例如,以下命令将删除我们到目前为止对所有示例使用的资源组“MyResourceGroup”。 同时会删除该组中的所有资源。
Remove-AzureRmResourceGroup -Name myResourceGroup
Confirm
Are you sure you want to remove resource group 'myResourceGroup'
[Y] Yes  [N] No  [S] Suspend  [?] Help (default is "Y"): Y
该任务可能需要几分钟时间才能完成,具体时间取决于资源的数量和类型。
获取示例
若要详细了解 Azure PowerShell 的用法,请查看适用于 Linux VM、Windows VM、Web 应用和 SQL 数据库的最常用脚本。