如何自定义打印设置(UWP 设备应用)
在 Windows 8.1 中,UWP 设备应用允许打印机制造商自定义显示高级打印设置的浮出控件。 本主题介绍高级打印设置浮出控件,并说明 C# 版本的打印设置和打印通知示例如何将默认浮出控件替换为自定义浮出控件。 要了解有关 UWP 设备应用的一般详细信息,请参阅初识 UWP 设备应用。
C# 版本的打印设置和打印通知示例使用 Preferences.xaml 页面来演示高级打印设置的自定义浮出控件的 UI。 打印帮助程序类用于创建设备上下文 (IPrinterExtensionContext) 并执行设备查询。 PrinterHelperClass.cs 文件位于 DeviceAppForPrintersLibrary 项目中,并使用 PrinterExtensionLibrary 项目中定义的 API。 打印机扩展库提供了一种访问 v4 打印驱动程序的打印机扩展接口的便捷方法。 有关详细信息,请参阅打印机扩展库概述。
注意
本主题中显示的代码示例基于 C# 版本的打印设置和打印通知示例。 此示例还有 JavaScript 和 C++ 版本。 请注意,由于 C++ 可以直接访问 COM,因此该示例的 C++ 版本不包括代码库项目。 下载示例以查看最新版本的代码。
高级打印设置
高级打印设置体验是指用户想要选择“打印”窗口中未提供的打印设置时打印机提供的功能。 可通过“打印”窗口中的更多设置链接访问它。 它不是全屏体验,而是显示在浮出控件中,该浮出控件用于显示当用户单击或点击外部时关闭的轻型上下文用户界面。
此体验可用于突出显示打印机的差异化功能,例如能够将水印应用于文档页、提供安全打印选项或图像增强选项。
如果没有为打印机安装 UWP 设备应用,Windows 将提供默认打印设置体验。 如果 Windows 检测到已为打印机安装了 UWP 设备应用,并且该应用已选择加入 windows.printTaskSettings 扩展,则你的应用将替换 Windows 提供的默认体验。
要调用高级打印设置的浮出控件,请执行以下操作:
打开支持打印的 UWP 应用
通过在屏幕右侧轻扫来访问(或使用 Windows 徽标键 + C)超级按钮
点击“设备”超级按钮
点击“打印”
点击打印机
此时会打开“打印”窗口
单击“打印”窗口中的更多设置链接
此时会打开高级打印设置浮出控件
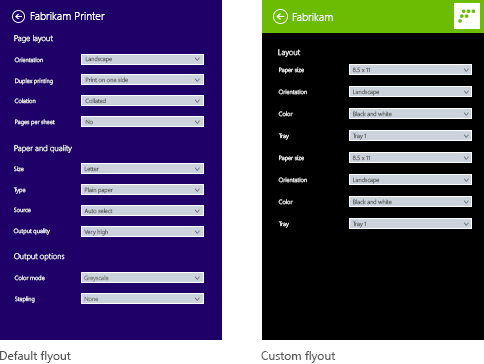
在没有为打印机安装 UWP 设备应用时,将显示默认浮出控件
如果已为打印机安装了 UWP 设备应用,将显示自定义浮出控件
先决条件
准备工作:
请确保使用 v4 打印驱动程序安装打印机。 有关详细信息,请参阅开发 v4 打印驱动程序。
设置你的开发电脑。 有关下载工具和创建开发人员帐户的信息,请参阅入门。
将应用与商店相关联。 请参阅创建 UWP 设备应用以获取相关信息。
为你的打印机创建设备元数据,将其与你的应用关联起来。 请参阅创建设备元数据以了解详细信息。
为你的应用的主页构建 UI。 所有 UWP 设备应用都可以从“开始”启动,并以全屏方式显示。 使用“开始”体验,以符合设备特定品牌和功能的方式突出你的产品或服务。 它可以使用的 UI 控件类型没有特殊限制。 要开始设计全屏体验,请参阅 Microsoft Store 设计原则。
如果要使用 C# 或 JavaScript 编写应用,请将 PrinterExtensionLibrary 和 DeviceAppForPrintersLibrary 项目添加到你的 UWP 设备应用解决方案。 可以在打印设置和打印通知示例中找到每个项目。
注意
由于 C++ 可以直接访问 COM,因此 C++ 应用不需要单独的库来处理基于 COM 的打印机设备上下文。
步骤 1:注册扩展
要让 Windows 识别应用可以提供有关高级打印设置的自定义浮出控件,它必须注册打印任务设置扩展。 此扩展在 Extension 元素中声明,其属性 Category 设置为值 windows.printTaskSettings。 在 C# 和 C++ 示例中,Executable 属性设置为 $targetnametoken$.exe,属性 EntryPoint 设置为 DeviceAppForPrinters.App。
可以在 Microsoft Visual Studio 中清单设计器的“声明”选项卡上添加打印任务设置扩展。 还可以使用 XML(文本)编辑器手动编辑应用包清单 XML。 在“解决方案资源管理器”中,右键单击 Package.appxmanifest 文件。
此示例显示 Extension 元素中的打印任务设置扩展,因为它显示在应用包清单文件 Package.appxmanifest 中。
<?xml version="1.0" encoding="utf-8"?>
<Package xmlns="http://schemas.microsoft.com/appx/2010/manifest">
  <Identity Name="Microsoft.SDKSamples.DeviceAppForPrinters.CS" Publisher="CN=Microsoft Corporation, O=Microsoft Corporation, L=Redmond, S=Washington, C=US" Version="1.0.0.0" />
  <Properties>
    <DisplayName>Device App For Printers C# sample</DisplayName>
    <PublisherDisplayName>Microsoft Corporation</PublisherDisplayName>
    <Logo>Assets\storeLogo-sdk.png</Logo>
  </Properties>
  <Prerequisites>
    <OSMinVersion>6.3.0</OSMinVersion>
    <OSMaxVersionTested>6.3.0</OSMaxVersionTested>
  </Prerequisites>
  <Resources>
    <Resource Language="x-generate" />
  </Resources>
  <Applications>
    <Application Id="DeviceAppForPrinters" Executable="$targetnametoken$.exe" EntryPoint="DeviceAppForPrinters.App">
      <VisualElements DisplayName="Device App For Printers C# sample" Logo="Assets\squareTile-sdk.png" SmallLogo="Assets\smallTile-sdk.png" Description="DeviceAppForPrinters C# sample" ForegroundText="light" BackgroundColor="#00b2f0" ToastCapable="true">
<DefaultTile ShowName="allLogos" ShortName="App4PrinterCS" WideLogo="Assets\tile-sdk.png" />
<SplashScreen Image="Assets\splash-sdk.png" BackgroundColor="#00b2f0" />
      </VisualElements>
      <Extensions>
<Extension Category="windows.backgroundTasks" EntryPoint="BackgroundTask.PrintBackgroundTask">
  <BackgroundTasks>
    <Task Type="systemEvent" />
  </BackgroundTasks>
</Extension>
<Extension Category="windows.printTaskSettings" Executable="$targetnametoken$.exe" EntryPoint="DeviceAppForPrinters.App" />
      </Extensions>
    </Application>
  </Applications>
</Package>
步骤 2:构建 UI
在构建应用之前,应与设计人员和营销团队合作来设计用户体验。 用户体验应体现公司的品牌形象,帮助你与用户建立联系。
设计指南
在设计自定义浮出控件之前,请务必查看 UWP 应用浮出控件指南。 这些指南有助于确保浮出控件提供与其他 UWP 应用一致的直观体验。
对于应用的主页,请记住,Windows 8.1 可以在一个监视器上显示不同大小的多个应用。 请参阅以下指南,详细了解应用如何在不同屏幕大小、窗口大小和方向之间正常重排。
浮出控件尺寸
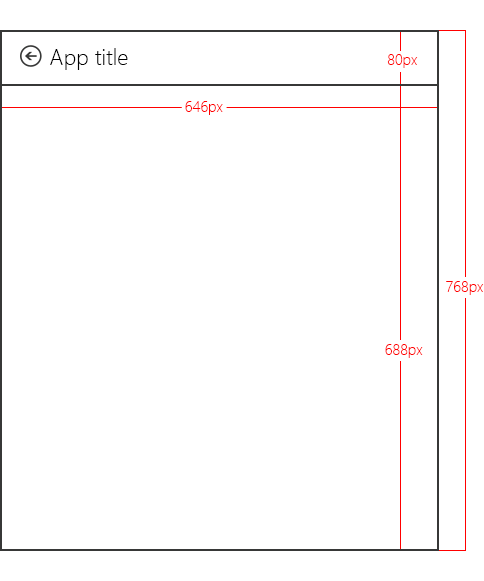
显示高级打印设置的浮出控件宽为 646 像素,高度至少为 768 像素(实际高度取决于用户的屏幕分辨率)。 浮出控件标题区域中的“后退”按钮由 Windows 提供。 “应用标题”文本是应用清单中的应用标题。 标题区域高 80 像素,因此为自定义浮出控件保留的可视区域为 688 像素。
注意
如果自定义浮出控件高度超过 688 像素,则用户可以滑动或滚动以查看位于可视区域上方或下方的浮出控件部分。
定义应用标题颜色和图标
标题、背景色、文本颜色和自定义浮出控件上的小徽标取自应用包清单文件中的 VisualElements 元素。
此示例显示应用包清单文件 (Package.appxmanifest) 中 VisualElements 元素定义的标题和图标。
      <VisualElements DisplayName="Device App For Printers C# sample" Logo="Assets\squareTile-sdk.png" SmallLogo="Assets\smallTile-sdk.png" Description="DeviceAppForPrinters C# sample" ForegroundText="light" BackgroundColor="#00b2f0" ToastCapable="true">
        <DefaultTile ShowName="allLogos" ShortName="App4PrinterCS" WideLogo="Assets\tile-sdk.png" />
        <SplashScreen Image="Assets\splash-sdk.png" BackgroundColor="#00b2f0" />
      </VisualElements>
最佳实践
保持相同的外观。 将自定义浮出控件与“开始”体验(应用的主页)的设计对齐,包括字体、颜色和控件等元素。 无论用户从何处调用应用,都应该感觉熟悉。
使交互保持简单。 避免耗时或复杂的交互。 在大多数情况下,最好在“开始”体验中完成设置打印机、查看状态、订购墨水和故障排除等操作。
尽量减少导航。 避免让用户在自定义浮出控件中的多个页面之间来回导航。 请改用垂直滚动或内联控件,例如渐进式披露控件、下拉列表和内联错误消息。
不要使用轻型消除浮出控件。 打印体验已使用轻型消除浮出控件。 在自定义浮出控件中包含另一个轻型消除元素可能会使用户感到困惑。
禁用引导用户离开打印体验的链接。 当用户正在打印内容时,应采取措施确保它们保留在打印上下文中。 例如,如果你的应用具有指向应用其他区域的链接(例如主页或用于购买墨水的页面),则应禁用它们,以便用户不会意外地离开高级打印设置体验。
步骤 3:处理激活
如果你的应用已声明打印任务设置扩展,它必须实现一种 OnActivated 方法来处理应用 Activation 事件。 应用激活是在应用启动时,应用可以选择启动哪个页面。 对于已声明打印任务设置扩展的应用,Windows 会在 Activated 事件参数中传递打印任务扩展上下文:Windows.ApplicationModel.Activation.IActivatedEventArgs。
当事件参数 kind 的属性等于 Windows.ApplicationModel.Activation.ActivationKind.printTask 时,UWP 设备应用可以确定激活适用于高级打印设置(有人刚刚点击了打印设置对话框中的“更多选项”设置)。
注意
在某些情况下,如果用户在启动应用后立即关闭应用,可能会在激活处理程序内引发异常。 要避免这种情况,请确保激活处理程序高效完成,并且不会执行资源密集型处理。
本示例显示 OnActivated 方法中的激活事件处理程序,如 Constants.cs 文件中所示。 然后,事件参数将强制转换为 Windows.ApplicationModel.Activation.PrintTaskSettingsActivatedEventArgs。 尽管该示例在 Constants.cs 文件中包括此代码,但它实际上是 App.xaml.cs 文件中定义的 App 类的一部分。
partial class App : Application
{
    protected override void OnActivated(IActivatedEventArgs args)
    {
        if (args.Kind == ActivationKind.PrintTaskSettings)
        {
            Frame rootFrame = new Frame();
            if (null == Window.Current.Content)
            {
                rootFrame.Navigate(typeof(MainPage));
                Window.Current.Content = rootFrame;
            }
            Window.Current.Activate();

            MainPage mainPage = (MainPage)rootFrame.Content;

            // Load advanced printer preferences scenario
            mainPage.LoadAdvancedPrintSettingsContext((PrintTaskSettingsActivatedEventArgs)args);
        }
    }
}
步骤 4:显示设置
调用 LoadAdvancedPrintSettingsContext 方法时,将打印任务配置上下文分配给 MainPage 类的变量。 这将允许自定义浮出控件在启动时访问打印设置。
传递给 LoadAdvancedPrintSettingsContext 方法的事件参数公开用于访问和控制打印机的属性:
- args.configuration 属性提供类型为 Windows.Devices.Printers.Extensions.PrintTaskConfiguration 的对象。 此对象提供对打印任务扩展上下文的访问权限,还可以添加事件处理程序来更新打印票证。
- args.configuration.printerExtensionContext 属性提供类型为 Windows.Devices.Printers.Extensions.PrinterExtensionContext 的对象。 此对象是指向 Print Schema、PrintTicket 和打印队列信息的 PrinterExtensionLibrary 接口的指针。 如果未公开任何接口,则为 null。 有关详细信息,请参阅打印机扩展库概述。
本示例显示 LoadAdvancedPrintSettingsContext 方法,如 Constants.cs 文件中所示。
public PrintTaskConfiguration Config;
public Object Context;

public void LoadAdvancedPrintSettingsContext(PrintTaskSettingsActivatedEventArgs args)
{
    Config = args.Configuration;
    Context = Config.PrinterExtensionContext;
    LoadScenario(typeof(DeviceAppForPrinters.Preferences));
}
在自定义浮出控件页 Preferences.xaml.cs 中,一个名为 rootPage 的类充当指向 MainPage 类的指针,以便可以从浮出控件访问打印任务扩展上下文和打印机设备上下文。
此示例显示部分 Preferences 类的指针,来自 Preferences.xaml.cs 文件。 下载打印设置和打印通知示例以查看完整代码。
public sealed partial class Preferences : SDKTemplate.Common.LayoutAwarePage
{
    // A pointer back to the main page.
    MainPage rootPage = MainPage.Current;

    // To listen for save requests.
    PrintTaskConfiguration configuration;

    // To create the printer device context.
    Object printerExtensionContext;
    PrintHelperClass printHelper;

    // The features in this sample were chosen because they're available on a wide range of printer drivers.
    private string[] features = { "PageOrientation", "PageOutputColor", "PageMediaSize", "PageMediaType" };
    private string[] selections = { null, null, null, null };

    // . . .
    // . . .
    // . . .
调用 Preferences.xaml.cs 的页面构造函数时,将为打印任务扩展上下文(名为 configuration 的 PrintTaskConfiguration 对象)和打印机设备上下文(名为 printHelper 的PrintHelperClass 对象)创建对象。
创建这些对象后,打印机设备上下文将在 DisplaySettings 方法中用于加载 TextBlocks 和 ComboBoxes。 请注意,与 JavaScript 不同,选择的更改不会在与应用其他部分相同的线程上触发。 你必须保留用户选择的本地缓存,以供以后使用。
此示例显示 Preferences.xaml.cs 文件中的自定义浮出控件页面构造函数 DisplaySettings 和其他帮助程序方法。
public Preferences()
{
    this.InitializeComponent();

    configuration = rootPage.Config;
    printerExtensionContext = rootPage.Context;
    printHelper = new PrintHelperClass(printerExtensionContext);

    // Disable scenario navigation by hiding the scenario list UI elements
    ((UIElement)rootPage.FindName("Scenarios")).Visibility = Windows.UI.Xaml.Visibility.Collapsed;
    ((UIElement)rootPage.FindName("ScenarioListLabel")).Visibility = Windows.UI.Xaml.Visibility.Collapsed;
    ((UIElement)rootPage.FindName("DescriptionText")).Visibility = Windows.UI.Xaml.Visibility.Collapsed;

    DisplaySettings();
}


private void DisplaySettings(bool constraints=false)
{
    PrintOptions.Visibility = Windows.UI.Xaml.Visibility.Visible;
    WaitPanel.Visibility = Windows.UI.Xaml.Visibility.Collapsed;

    // Fill in the drop-down select controls for some common printing features.
    TextBlock[] featureLabels = { PageOrientationLabel, PageOutputColorLabel, PageMediaSizeLabel, PageMediaTypeLabel };
    ComboBox[] featureBoxes = { PageOrientationBox, PageOutputColorBox, PageMediaSizeBox, PageMediaTypeBox };

    for (int i = 0; i < features.Length; i++)
    {
        // Only display a feature if it exists
        featureLabels[i].Visibility = Windows.UI.Xaml.Visibility.Collapsed;
        featureBoxes[i].Visibility = Windows.UI.Xaml.Visibility.Collapsed;

        string feature = features[i];

        // Check whether the currently selected printer's capabilities include this feature.
        if (!printHelper.FeatureExists(feature))
        {
            continue;
        }

        // Fill in the labels so that they display the display name of each feature.
        featureLabels[i].Text = printHelper.GetFeatureDisplayName(feature);
        string[] index = printHelper.GetOptionInfo(feature, "Index");
        string[] displayName = printHelper.GetOptionInfo(feature, "DisplayName");
        string selectedOption = printHelper.GetSelectedOptionIndex(feature);

        // Unless specified, do not get constraints
        bool[] constrainedList = constraints ? printHelper.GetOptionConstraints(feature) : new bool[index.Length];

        // Populate the combo box with the options for the current feature.
        PopulateBox(featureBoxes[i], index, displayName, selectedOption, constrainedList);
        selections[i] = selectedOption;

        // Every time the selection for a feature changes, we update our local cached set of selections.
        featureBoxes[i].SelectionChanged += OnFeatureOptionsChanged;

        // Show existing features
        featureLabels[i].Visibility = Windows.UI.Xaml.Visibility.Visible;
        featureBoxes[i].Visibility = Windows.UI.Xaml.Visibility.Visible;
    }
}

void PopulateBox(ComboBox box, string[] index, string[] displayName, string selectedOption, bool[] constrainedList)
{
    // Clear the combobox of any options from previous UI refresh before repopulating it.
    box.SelectionChanged -= OnFeatureOptionsChanged;
    box.Items.Clear();
    // There should be only one displayName for each possible option.
    if (index.Length == displayName.Length)
    {
        for (int i = 0; i < index.Length; i++)
        {
            // Create a new DisplayItem so the user will see the friendly displayName instead of the index.
            ComboBoxItem newItem = new ComboBoxItem();
            newItem.Content = displayName[i];
            newItem.DataContext = index[i];
            newItem.Foreground = constrainedList[i] ? new SolidColorBrush(Colors.Red) : new SolidColorBrush(Colors.Black);
            box.Items.Add(newItem);

            // Display current selected option as selected in the combo box.
            if (selectedOption == index[i])
            {
                box.SelectedIndex = i;
                box.Foreground = newItem.Foreground;
            }
        }
    }
}

private void OnFeatureOptionsChanged(object sender, SelectionChangedEventArgs args)
{
    ComboBox comboBox = sender as ComboBox;

    for (int i = 0; i < features.Length; i++)
    {
        if (features[i] + "Box" == comboBox.Name)
        {
            selections[i] = (comboBox.SelectedItem as ComboBoxItem).DataContext as string;
        }
    }
}
步骤 5:保存设置
当用户完成设置高级打印设置后,Microsoft Store 设备应用需要在用户返回到“打印”窗口之前保存更改。 为此,应用需要侦听用户点击“后退“按钮(从自定义浮出控件页面)的时间。 发生这种情况时,将触发打印任务扩展上下文(对象 configuration)的 SaveRequested 事件。
本示例显示 Preferences.xaml.cs 文件中自定义浮出控件的 OnNavigatedTo 事件处理程序中添加的 SaveRequested 事件侦听器。 触发 SaveRequested 事件时,将调用 OnSaveRequested 方法(该方法也在 Preferences.xaml.cs 文件中)。
protected override void OnNavigatedTo(NavigationEventArgs e)
{
    if (null == configuration)
    {
        rootPage.NotifyUser("Configuration arguments cannot be null", NotifyType.ErrorMessage);
        return;
    }

    // Add an event listener for saverequested (the back button of the flyout is pressed).
    configuration.SaveRequested += OnSaveRequested;
}
在 OnSaveRequested 方法中,应用首先使用 printHelper 对象为打印机扩展上下文上的每项功能设置当前选定的选项。 然后,它在作为 OnSaveRequested 方法参数传递进来的 request 对象上调用 Save 方法。 Windows.Devices.Printers.Extensions.PrintTaskConfigurationSaveRequest 类中的 Save 方法使用打印机扩展上下文验证打印票证并保存打印任务配置。
重要
如果打印票证以任何方式无效,Save 方法将引发应用必须处理的异常。 如果应用未处理异常,则会停止打印流,迫使用户轻型消除浮出控件并重启打印流。
此示例显示 Preferences.xaml.cs 文件中的 OnSaveRequested 方法。 由于 SaveRequested 事件未在 UI 线程上引发,因此需要使用 Windows.UI.Core.CoreDispatcher 将消息发布到 UI 线程,以在验证和保存票证时显示相应的消息。
async private void OnSaveRequested(object sender, PrintTaskConfigurationSaveRequestedEventArgs args)
{
    if (null == printHelper || null == printerExtensionContext || null == args)
    {
        await Dispatcher.RunAsync(Windows.UI.Core.CoreDispatcherPriority.Normal, () =>
        {
            rootPage.NotifyUser("onSaveRequested: args, printHelper, and context cannot be null", NotifyType.ErrorMessage);
        });
        return;
    }

    // Get the request object, which has the save method that allows saving updated print settings.
    PrintTaskConfigurationSaveRequest request = args.Request;

    if (null == request)
    {
        await Dispatcher.RunAsync(Windows.UI.Core.CoreDispatcherPriority.Normal, () =>
        {
            rootPage.NotifyUser("onSaveRequested: request cannot be null", NotifyType.ErrorMessage);
        });
        return;
    }

    PrintTaskConfigurationSaveRequestedDeferral deferral = request.GetDeferral();

    // Two separate messages are dispatched to:
    // 1) put up a popup panel,
    // 2) set the each options to the print ticket and attempt to save it,
    // 3) tear down the popup panel if the print ticket could not be saved.
    await Dispatcher.RunAsync(Windows.UI.Core.CoreDispatcherPriority.Normal, () =>
    {
        PrintOptions.Visibility = Windows.UI.Xaml.Visibility.Collapsed;
        WaitPanel.Visibility = Windows.UI.Xaml.Visibility.Visible;
    });

    // Go through all the feature select elements, look up the selected
    // option name, and update the context
    // for each feature
    for (var i = 0; i < features.Length; i++)
    {
        // Set the feature's selected option in the context's print ticket.
        // The printerExtensionContext object is updated with each iteration of this loop
        printHelper.SetFeatureOption(features[i], selections[i]);
    }

    bool ticketSaved;
    try
    {
        // This save request will throw an exception if ticket validation fails.
        // When the exception is thrown, the app flyout will remain.
        // If you want the flyout to remain regardless of outcome, you can call
        // request.Cancel(). This should be used sparingly, however, as it could
        // disrupt the entire the print flow and will force the user to
        // light dismiss to restart the entire experience.
        request.Save(printerExtensionContext);

        if (configuration != null)
        {
            configuration.SaveRequested -= OnSaveRequested;
        }
        ticketSaved = true;
    }
    catch (Exception exp)
    {
        // Check if the HResult from the exception is from an invalid ticket, otherwise rethrow the exception
        if (exp.HResult.Equals(unchecked((int)0x8007000D))) // E_INVALID_DATA
        {
            ticketSaved = false;
        }
        else
        {
            throw;
        }
    }

    // If ticket isn't saved, refresh UI and notify user
    if (!ticketSaved)
    {
        await Dispatcher.RunAsync(Windows.UI.Core.CoreDispatcherPriority.Normal, () =>
        {
            rootPage.NotifyUser("Failed to save the print ticket", NotifyType.ErrorMessage);
            DisplaySettings(true);
        });
    }
    deferral.Complete();
}
保存需要用户输入的选项
打印设置和打印通知示例演示了如何设置定义的功能,其中涵盖大多数打印选项。 但是,某些选项需要自定义 UI 来获取用户指定的值。 例如,如果应用使用高级打印设置来指定自定义页面大小,则会执行以下步骤来保存用户指定的值:
在应用激活期间检索打印票证。 之前的步骤 3:处理激活介绍了打印设置的应用激活。
检查是否指定了页面大小选项。 在 C# 或 JS 应用中,打印帮助程序类可以检查此选项。 在 C++ 应用中,调用 IPrintSchemaOption 上的 QueryInterface 以检索 IPrintSchemaPageMediaSizeOption。
本示例演示打印帮助程序类中的一种方法,用于检查是否指定了页面大小选项。
public bool ShouldShowCustomUI(string index)
{
    if (null != index)
    {
        string feature = "PageMediaSize";
        int i = int.Parse(index);
        IPrintSchemaOption selectedOption = GetCachedFeatureOptions(feature)[i];
        if (selectedOption.Name.Equals("CustomMediaSize", StringComparison.CurrentCulture)
            || selectedOption.Name.Equals("PSCustomMediaSize", StringComparison.CurrentCulture))
        {
            return true;
        }
    }
    return false;
}
在自定义浮出控件中,会显示一个自定义 UI,要求用户输入页面高度和宽度,并从 IPrintSchemaPageMediaSizeOption 检索用户指定的高度和宽度。
此示例显示了一个自定义浮出控件的方法,用于要求用户输入页面高度和宽度。
private void ShowCustomPageMediaSizeUI(string index, bool keepValue)
{
    //Hide custom media size UI unless needed
    if (IsCustomSizeSelected(index))
    {
       if (keepValue && (!customWidth.Equals("")) && (!customHeight.Equals("")))
       {
                    CustomWidthBox.Text = customWidth;
                    CustomHeightBox.Text = customHeight;
       }
       else
       {
          // Use a helper function from the WinRT helper component
          CustomWidthBox.Text = printHelper.GetCustomWidth(index);
          CustomHeightBox.Text = printHelper.GetCustomHeight(index);
       }
       CustomUIPanel.Visibility = Windows.UI.Xaml.Visibility.Visible;
       CustomWidthBox.KeyDown += OnCustomValueEntered;
       CustomHeightBox.KeyDown += OnCustomValueEntered;
    }
    else
    {
       CustomUIPanel.Visibility = Windows.UI.Xaml.Visibility.Collapsed;
       CustomWidthBox.KeyDown -= OnCustomValueEntered;
       CustomHeightBox.KeyDown -= OnCustomValueEntered;
    }
}
使用用户指定的值更新
IPrintSchemaPageMediaSizeOption对象,并验证高度和宽度是否与用户指定的值匹配。此示例是用于更新打印机帮助程序类中的
IPrintSchemaPageMediaSizeOption对象的帮助程序方法。 如果自定义浮出控件中的OnSaveRequested处理程序确定请求了自定义页面大小选项,则会调用此函数。public void SetCustomMediaSizeDimensions(string width, string height) { if ((null == width) && (null == height) && (null == Capabilities)) { return; } try { CheckSizeValidity(width, height); } catch (FormatException e) { throw new ArgumentException(e.Message); } catch (OverflowException e) { throw new ArgumentException(e.Message); } // The context is retrieved during app activation. IPrintSchemaTicket ticket = context.Ticket; // // Input XML as Stream // XElement ticketRootXElement = null; using (Stream ticketReadStream = ticket.GetReadStream()) { ticketRootXElement = XElement.Load(ticketReadStream); } XNamespace psfNs = PrintSchemaConstants.FrameworkNamespaceUri; XNamespace pskNs = PrintSchemaConstants.KeywordsNamespaceUri; string pskPrefix = ticketRootXElement.GetPrefixOfNamespace(pskNs); // Modify the MediaSizeHeight and MediaSizeWidth IEnumerable<XElement> parameterInitCollection = from c in ticketRootXElement.Elements(psfNs + "ParameterInit") select c; foreach (XElement parameterInit in parameterInitCollection) { if (0 == String.Compare((string)parameterInit.Attribute("name"), pskPrefix + ":PageMediaSizePSWidth")) { IEnumerable<XElement> valueCollection = from c in parameterInit.Elements(psfNs + "Value") select c; valueCollection.ElementAt(0).Value = width; } else if (0 == String.Compare((string)parameterInit.Attribute("name"), pskPrefix + ":PageMediaSizePSHeight")) { IEnumerable<XElement> valueCollection = from c in parameterInit.Elements(psfNs + "Value") select c; valueCollection.ElementAt(0).Value = height; } } // // Write XLinq changes back to DOM // using (Stream ticketWriteStream = ticket.GetWriteStream()) { ticketRootXElement.Save(ticketWriteStream); } }
测试
在测试 UWP 设备应用之前,必须使用设备元数据将其链接到你的打印机。
你需要一份打印机的设备元数据包副本,以便在其中添加设备应用信息。 如果没有设备元数据,可以使用设备元数据创作向导构建,如主题为 UWP 设备应用创建设备元数据所述。
注意
要使用设备元数据创作向导,必须先安装 Microsoft Visual Studio Professional、Microsoft Visual Studio Ultimate 或适用于 Windows 8.1 的独立 SDK,然后才能完成本主题中的步骤。 安装 Microsoft Visual Studio Express for Windows 会安装不包含向导的 SDK 版本。
以下步骤构建你的应用并安装设备元数据。
启用测试签名。
通过双击 DeviceMetadataWizard.exe,从 %ProgramFiles(x86)%\Windows Kits\8.1\bin\x86 启动设备元数据创作向导
在“工具”菜单中,选择“启用测试签名”。
重新启动计算机
通过打开解决方案 (.sln) 文件生成解决方案。 按 F7 或在示例加载后从顶部菜单中转到“生成-生成解决方案”。>
断开连接并卸载打印机。 此步骤是必需的,以便 Windows 下次检测设备时读取更新的设备元数据。
编辑和保存设备元数据。 要将设备应用链接到你的设备,必须将设备应用与你的设备相关联
注意
注意:如果尚未创建设备元数据,请参阅为 UWP 设备应用创建设备元数据。
如果设备元数据创作向导尚未打开,请双击 DeviceMetadataWizard.exe 从 %ProgramFiles(x86)%\Windows Kits\8.1\bin\x86 将其打开。
单击“编辑设备元数据”。 这样,就可以编辑现有的设备元数据包。
在“打开”对话框中,找到与 UWP 设备应用关联的设备元数据包。 (它具有 devicemetadata-ms 文件扩展名。)
在“指定 UWP 设备应用信息”页上,在“UWP 设备应用”框中输入 Microsoft Store 应用信息。 单击“导入 UWP 应用清单文件”,自入“包名称”、“发布者名称”和“UWP 应用 ID”。
如果你的应用正在注册打印机通知,请填写“通知处理程序”框。 在”事件 ID“中,输入打印事件处理程序的名称。 在”事件资产“中,输入代码所在的文件的名称。
完成后,单击“下一步”,直到进入“完成”页。
在“查看设备元数据包”页上,确保所有设置都正确,并选择“将设备元数据包复制到本地计算机上的元数据存储”复选框中。 然后单击保存。
重新连接打印机,以便 Windows 在设备连接时读取更新的设备元数据。
疑难解答
问题:高级打印设置显示默认浮出控件而不是自定义浮出控件
如果高级打印设置浮出控件显示默认浮出控件,而不是你的应用实现的自定义浮出控件...
可能的原因:测试签名未打开。 有关打开调试的信息,请参阅本主题中的“调试”部分。
可能的原因:应用未查询正确的包系列名称。 在代码中检查包系列名称。 在 Visual Studio 中打开 package.appxmanifest,并确保要查询的包系列名称与“打包”选项卡中“包系列名称”字段中的名称匹配。
可能的原因:设备元数据没有与包系列名称关联。 使用设备元数据创作向导打开设备元数据,并检查包系列名称。 双击 DeviceMetadataWizard.exe,从 %ProgramFiles(x86)%\Windows Kits\8.1\bin\x86 启动向导。
问题:应用在浮出控件中启动,然后立即关闭
如果高级打印设置的自定义浮出控件在启动后立即消失...
- 可能的原因:在 Windows 8 中,浮出控件中有一个已知问题,即 UWP 应用将在调试器下关闭。 确认激活成功后,关闭调试。 如果需要调试保存打印票证,请在激活后附加调试器。
相关主题
反馈
即将发布:在整个 2024 年,我们将逐步淘汰作为内容反馈机制的“GitHub 问题”,并将其取代为新的反馈系统。 有关详细信息,请参阅:https://aka.ms/ContentUserFeedback。
提交和查看相关反馈