教程:在 Windows 应用中支持 Surface Dial(和其他滚轮设备)

Surface Dial 与 Surface Studio 和 Surface 触控笔(可在 Microsoft Store 购买)。
本教程逐步讲解如何自定义滚轮设备(如 Surface Dial)支持的用户交互体验。 我们使用示例应用中的代码片段(可从 GitHub 下载)(请参阅示例代码),以演示每个步骤中讨论的各种功能和关联的 RadialController API。
重点关注以下内容:
- 指定在 RadialController 菜单上显示哪些内置工具
- 向菜单添加自定义工具
- 控制触觉反馈
- 自定义单击交互
- 自定义旋转交互
有关实现这些及其他功能的详细信息,请参阅 Windows 应用中的 Surface Dial 交互。
介绍
Surface Dial 是辅助输入设备,与主要输入设备(如笔、触摸或鼠标)一起使用时可帮助用户提高工作效率。 作为辅助输入设备,Dial 通常由非主导手使用,以提供对系统命令和其他项(更具体一点,包括工具和功能)的访问权限。
Dial 支持三种基本手势:
- 按住以显示命令的内置菜单。
- 旋转以突出显示菜单项(如果菜单处于活动状态),或者修改应用中的当前操作(如果菜单未处于活动状态)。
- 单击以选择突出显示的菜单项(如果菜单处于活动状态),或调用应用中的命令(如果菜单未处于活动状态)。
先决条件
- 运行 Windows 10 创意者更新或更高版本的计算机(或虚拟机)
- Visual Studio 2019
- Windows 10 SDK (10.0.15063.0)
- 滚轮设备(目前仅有 Surface Dial)
- 如果你还不熟悉使用 Visual Studio 进行 Windows 应用开发,请在开始本教程前浏览以下主题:
设置设备
- 确保 Windows 设备已打开。
- 转到“开始”,选择“设置”>“设备”>“蓝牙和其他设备”,然后打开“蓝牙”。
- 取下 Surface Dial 底部以打开电池舱,并确保里面有两节 AAA 电池。
- 如果 Dial 底面存在电池标签,请撕掉该标签。
- 按住电池旁边的小内插按钮,直到蓝牙灯闪烁。
- 返回到 Windows 设备,然后选择“添加蓝牙或其他设备”。
- 在“添加设备”对话框中,选择“蓝牙”>“Surface Dial”。 Surface Dial 现在应已连接,并被添加到“蓝牙和其他设备”设置页中“鼠标、键盘和笔”下的设备列表中。
- 测试 Dial,方法是按住 Dial 几秒钟以显示内置菜单。
- 如果菜单未在屏幕上显示(Dial 还应出现振动),返回蓝牙设置,删除设备,然后尝试重新连接设备。
注意
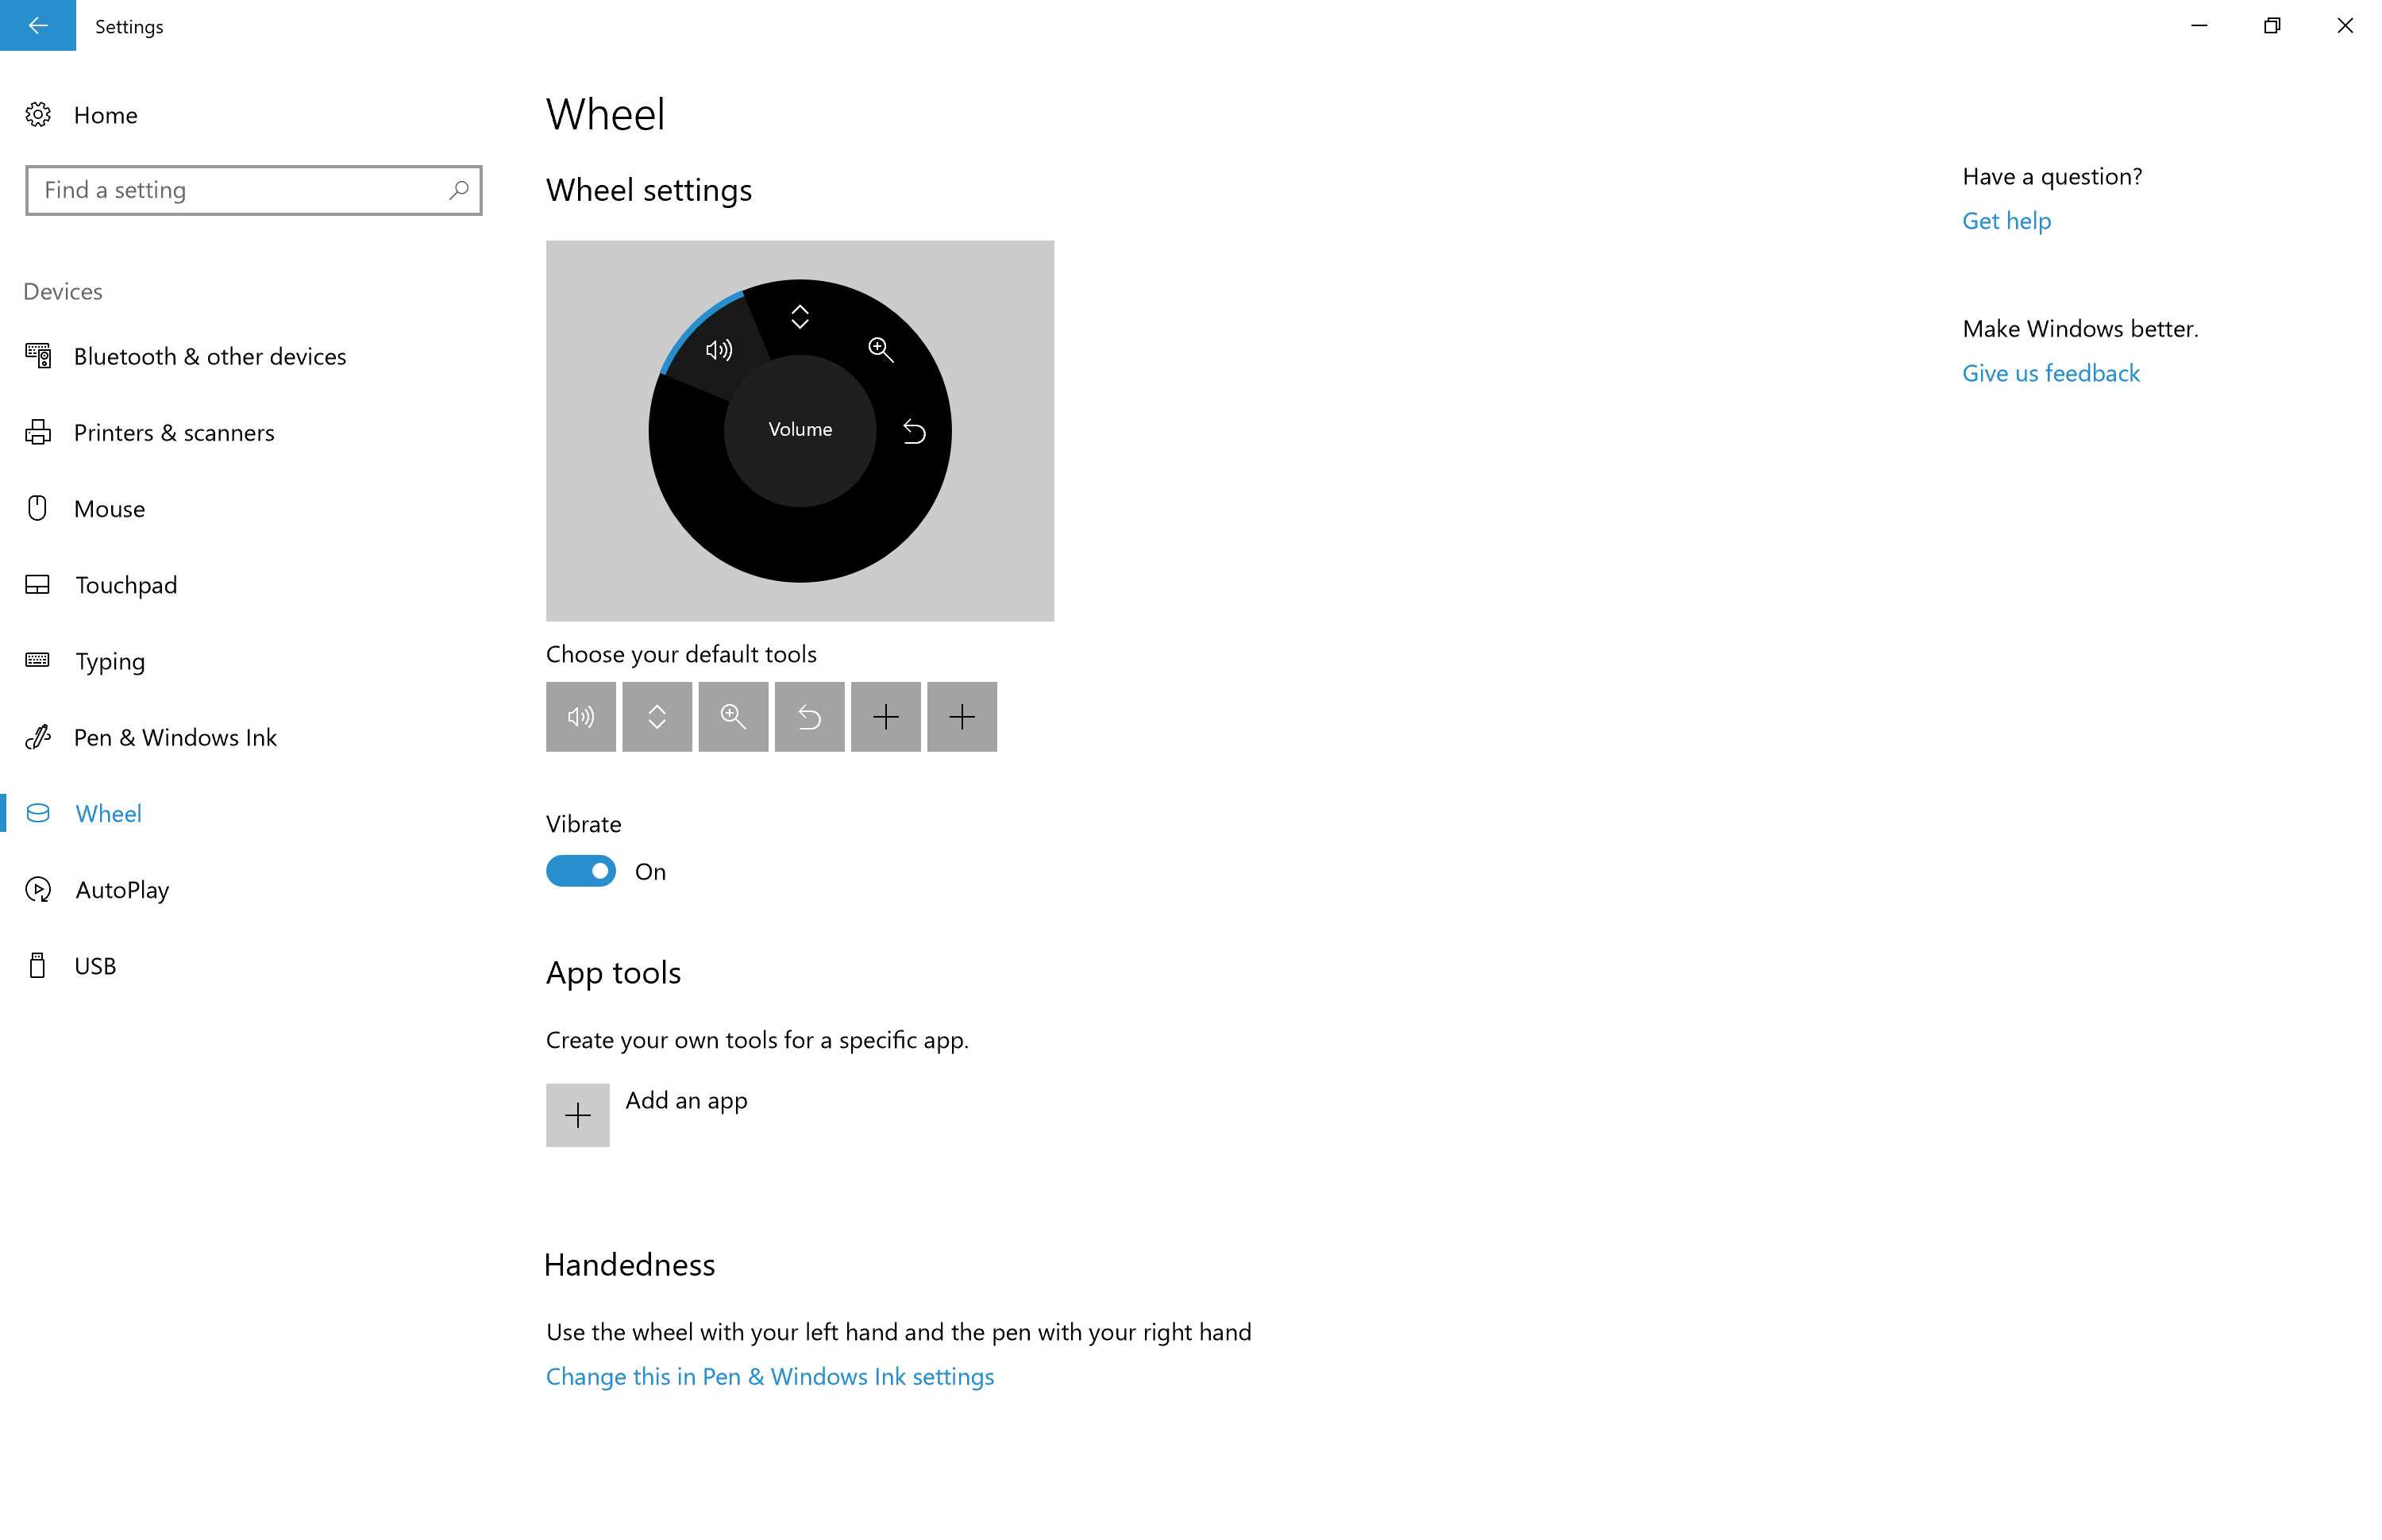
滚轮设备可以通过“滚轮”设置进行配置:
- 在“开始”菜单上,选择“设置”。
- 选择“设备”>“滚轮”。
现在,你可以开始使用本教程了。
示例代码
在本教程中,我们使用示例应用来演示所讨论的概念和功能。
从 GitHub 的 windows-appsample-get-started-radialcontroller 示例下载此 Visual Studio 示例和源代码:
- 选择绿色的“克隆或下载”按钮。

- 如果你有 GitHub 帐户,则可以选择“在 Visual Studio 中打开”,将存储库克隆到本地计算机。
- 如果你没有 GitHub 帐户,或者只是想要项目的本地副本,则选择“下载 ZIP”(你需要以后定期查看以下载最新的更新)。
重要
示例中的大部分代码都会注释掉。当我们完成本主题中的每个步骤时,系统会要求你取消注释代码的各个部分。 在 Visual Studio 中,只需突出显示代码行,然后按 Ctrl-K,然后按 Ctrl-U。
支持滚轮功能的组件
这些对象为 Windows 应用提供大部分滚轮设备体验。
| 组件 | 说明 |
|---|---|
| RadialController 类和相关 | 表示滚轮输入设备或配件,例如 Surface Dial。 |
| IRadialControllerConfigurationInterop / IRadialControllerInterop 此处未介绍该功能,有关详细信息,请参阅 Windows 桌面示例。 |
实现与 Windows 应用的互操作性。 |
步骤 1:运行示例
下载 RadialController 示例应用后,请验证它是否运行:
- 在 Visual Studio 中打开示例项目。
- 将“解决方案平台”下拉列表设置为非 Arm 选择。
- 按 F5 编译、部署并运行。
注意
或者,可以选择“调试”>“开始调试”菜单项,或选择此处显示的“本地计算机”运行按钮:
应用窗口随即打开,初始屏幕显示几秒钟后,你将看到这个最先出现的屏幕。

好了,现在我们有了基本的 Windows 应用,在本教程接下来的所有部分我们都会用到它。 在以下步骤中,我们添加了 RadialController 功能。
步骤 2:基本 RadialController 功能
当应用在前台运行时,长按 Surface Dial 显示 “RadialController”菜单。
我们还没有为应用进行任何自定义,因此菜单包含一组默认的上下文工具。
这些图像显示了默认菜单的两种变体。 (还有许多其他变体,包括 Windows 桌面处于活动状态且前台没有应用时的基本系统工具,当 InkToolbar 存在时的其他墨迹书写工具,以及使用地图应用时的映射工具。
| RadialController 菜单(默认值) | RadialController 菜单(默认为媒体播放) |
|---|---|
 |
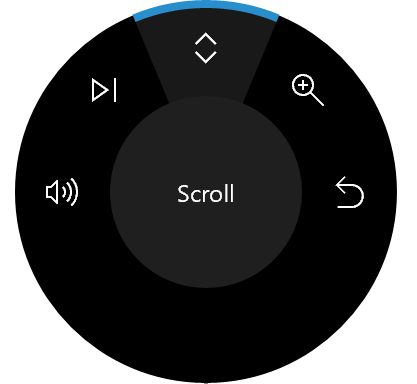 |
现在,我们将从一些基本自定义开始。
步骤 3:为滚轮输入添加控件
首先,让我们为应用添加 UI:
接下来,打开 MainPage_Basic.xaml 文件。
找到标有此步骤标题的代码 (("<!-- Step 3: Add controls for wheel input -->")。
取消注释以下行。
<Button x:Name="InitializeSampleButton"
        HorizontalAlignment="Center"
        Margin="10"
        Content="Initialize sample" />
<ToggleButton x:Name="AddRemoveToggleButton"
                HorizontalAlignment="Center"
                Margin="10"
                Content="Remove Item"
                IsChecked="True"
                IsEnabled="False"/>
<Button x:Name="ResetControllerButton"
        HorizontalAlignment="Center"
        Margin="10"
        Content="Reset RadialController menu"
        IsEnabled="False"/>
<Slider x:Name="RotationSlider" Minimum="0" Maximum="10"
        Width="300"
        HorizontalAlignment="Center"/>
<TextBlock Text="{Binding ElementName=RotationSlider, Mode=OneWay, Path=Value}"
            Margin="0,0,0,20"
            HorizontalAlignment="Center"/>
<ToggleSwitch x:Name="ClickToggle"
                MinWidth="0"
                Margin="0,0,0,20"
                HorizontalAlignment="center"/>
此时,仅启用“初始化示例”按钮、滑块和切换开关。 其他按钮用于在后续步骤中添加和删除 RadialController 菜单项,这些菜单项提供滑块和切换开关的访问权限。

步骤 4:自定义基本 RadialController 菜单
现在,让我们添加启用控件的 RadialController 访问权所需的代码。
- 打开 MainPage_Basic.xaml.cs 文件。
- 找到标有此步骤标题的代码 ("// Step 4: Basic RadialController menu customization")。
- 取消注释以下行:
Windows.UI.Input 和 Windows.Storage.Streams 类型引用用于后续步骤中的功能:
// Using directives for RadialController functionality. using Windows.UI.Input;这些全局对象(RadialController、RadialControllerConfiguration、RadialControllerMenuItem)将在整个应用中使用。
private RadialController radialController;
private RadialControllerConfiguration radialControllerConfig;
private RadialControllerMenuItem radialControllerMenuItem;
在这里,我们指定用于启用控件并初始化自定义 RadialController 菜单项的按钮的 Click 处理程序。
InitializeSampleButton.Click += (sender, args) =>
{ InitializeSample(sender, args); };
接下来,初始化 RadialController 对象,并为 RotationChanged 和 ButtonClicked 事件设置处理程序。
// Set up the app UI and RadialController.
private void InitializeSample(object sender, RoutedEventArgs e)
{
    ResetControllerButton.IsEnabled = true;
    AddRemoveToggleButton.IsEnabled = true;

    ResetControllerButton.Click += (resetsender, args) =>
    { ResetController(resetsender, args); };
    AddRemoveToggleButton.Click += (togglesender, args) =>
    { AddRemoveItem(togglesender, args); };

    InitializeController(sender, e);
}
在这里,我们初始化自定义 RadialController 菜单项。 我们使用 CreateForCurrentView 获取对 RadialController 对象的引用,我们使用 RotationResolutionInDegrees 属性将旋转敏感度设置为“1”,然后使用 CreateFromFontGlyph 创建RadialControllerMenuItem,接下里我们将菜单项添加到 RadialController 菜单项集合,最后我们使用 SetDefaultMenuItems 清除默认菜单项,只保留自定义工具。
// Configure RadialController menu and custom tool.
private void InitializeController(object sender, RoutedEventArgs args)
{
    // Create a reference to the RadialController.
    radialController = RadialController.CreateForCurrentView();
    // Set rotation resolution to 1 degree of sensitivity.
    radialController.RotationResolutionInDegrees = 1;

    // Create the custom menu items.
    // Here, we use a font glyph for our custom tool.
    radialControllerMenuItem =
        RadialControllerMenuItem.CreateFromFontGlyph("SampleTool", "\xE1E3", "Segoe MDL2 Assets");

    // Add the item to the RadialController menu.
    radialController.Menu.Items.Add(radialControllerMenuItem);

    // Remove built-in tools to declutter the menu.
    // NOTE: The Surface Dial menu must have at least one menu item.
    // If all built-in tools are removed before you add a custom
    // tool, the default tools are restored and your tool is appended
    // to the default collection.
    radialControllerConfig =
        RadialControllerConfiguration.GetForCurrentView();
    radialControllerConfig.SetDefaultMenuItems(
        new RadialControllerSystemMenuItemKind[] { });

    // Declare input handlers for the RadialController.
    // NOTE: These events are only fired when a custom tool is active.
    radialController.ButtonClicked += (clicksender, clickargs) =>
    { RadialController_ButtonClicked(clicksender, clickargs); };
    radialController.RotationChanged += (rotationsender, rotationargs) =>
    { RadialController_RotationChanged(rotationsender, rotationargs); };
}

// Connect wheel device rotation to slider control.
private void RadialController_RotationChanged(
    object sender, RadialControllerRotationChangedEventArgs args)
{
    if (RotationSlider.Value + args.RotationDeltaInDegrees >= RotationSlider.Maximum)
    {
        RotationSlider.Value = RotationSlider.Maximum;
    }
    else if (RotationSlider.Value + args.RotationDeltaInDegrees < RotationSlider.Minimum)
    {
        RotationSlider.Value = RotationSlider.Minimum;
    }
    else
    {
        RotationSlider.Value += args.RotationDeltaInDegrees;
    }
}

// Connect wheel device click to toggle switch control.
private void RadialController_ButtonClicked(
    object sender, RadialControllerButtonClickedEventArgs args)
{
    ClickToggle.IsOn = !ClickToggle.IsOn;
}
- 然后,再次运行应用。
- 选择“初始化径向控制器”按钮。
- 当应用位于前台中时,长按 Surface Dial 显示菜单。 请注意,所有默认工具都已删除(使用 RadialControllerConfiguration.SetDefaultMenuItems 方法),只保留自定义工具。 下面是带有自定义工具的菜单。
| RadialController 菜单(自定义) |
|---|
 |
- 选择自定义工具,并试用现在通过 Surface Dial 支持的交互:
- 旋转操作可移动滑块。
- 单击将开关设置为打开或关闭。
好的,让我们挂接这些按钮。
步骤 5:在运行时配置菜单
在此步骤中,我们将挂接“添加/删除项”和“重置 RadialController 菜单”按钮,以显示如何动态自定义菜单。
打开 MainPage_Basic.xaml.cs 文件。
找到标有此步骤标题的代码 ("// Step 5: Configure menu at runtime")。
取消注释以下方法中的代码并再次运行应用,但不选择任何按钮(在下一步骤中进行选择)。
// Add or remove the custom tool. private void AddRemoveItem(object sender, RoutedEventArgs args) { if (AddRemoveToggleButton?.IsChecked == true) { AddRemoveToggleButton.Content = "Remove item"; if (!radialController.Menu.Items.Contains(radialControllerMenuItem)) { radialController.Menu.Items.Add(radialControllerMenuItem); } } else if (AddRemoveToggleButton?.IsChecked == false) { AddRemoveToggleButton.Content = "Add item"; if (radialController.Menu.Items.Contains(radialControllerMenuItem)) { radialController.Menu.Items.Remove(radialControllerMenuItem); // Attempts to select and activate the previously selected tool. // NOTE: Does not differentiate between built-in and custom tools. radialController.Menu.TrySelectPreviouslySelectedMenuItem(); } } } // Reset the RadialController to initial state. private void ResetController(object sender, RoutedEventArgs arg) { if (!radialController.Menu.Items.Contains(radialControllerMenuItem)) { radialController.Menu.Items.Add(radialControllerMenuItem); } AddRemoveToggleButton.Content = "Remove item"; AddRemoveToggleButton.IsChecked = true; radialControllerConfig.SetDefaultMenuItems( new RadialControllerSystemMenuItemKind[] { }); }选择“删除项”按钮,然后按住 Dial 再次显示菜单。
请注意,菜单现在包含工具的默认集合。 回想一下,在步骤 3 中设置自定义菜单时,我们删除了所有默认工具,并仅添加了自定义工具。 我们还注意到,当菜单设置为空集合时,将恢复当前上下文的默认项。 (我们在删除默认工具之前添加了自定义工具。)
选择“添加项目”按钮,然后按住 Dial。
注意,菜单现在包含工具和自定义工具的默认集合。
选择“重置 RadialController 菜单”按钮,然后按住 Dial。
请注意,菜单将返回到其原始状态。
步骤 6:自定义设备触觉
Surface Dial 和其他滚轮设备可以为用户提供与当前交互对应的触觉反馈(基于单击或旋转)。
在此步骤中,我们将介绍如何通过关联滑块和切换开关控件以及使用这些控件来动态指定触觉反馈行为,从而自定义触觉反馈。 对于本示例,切换开关必须设置为打开,以便启用反馈,而滑块值指定单击反馈的重复频率。
注意
用户可以在“设置”>“设备”>“滚轮”页面中禁用触觉反馈。
打开 App.xaml.cs 文件。
找到标有此步骤标题的代码 ("Step 6: Customize the device haptics")。
注释第一行和第三行(“MainPage_Basic”和“MainPage”),并取消注释第二行(“MainPage_Haptics”)。
rootFrame.Navigate(typeof(MainPage_Basic), e.Arguments);
rootFrame.Navigate(typeof(MainPage_Haptics), e.Arguments);
rootFrame.Navigate(typeof(MainPage), e.Arguments);
打开 MainPage_Haptics.xaml 文件。
找到标有此步骤标题的代码 ("<!-- Step 6: Customize the device haptics -->")。
取消注释以下行。 (此 UI 代码只是指示当前设备支持哪些触觉功能。)
<StackPanel x:Name="HapticsStack"
            Orientation="Vertical"
            HorizontalAlignment="Center"
            BorderBrush="Gray"
            BorderThickness="1">
    <TextBlock Padding="10"
                Text="Supported haptics properties:" />
    <CheckBox x:Name="CBDefault"
                Content="Default"
                Padding="10"
                IsEnabled="False"
                IsChecked="True" />
    <CheckBox x:Name="CBIntensity"
                Content="Intensity"
                Padding="10"
                IsEnabled="False"
                IsThreeState="True"
                IsChecked="{x:Null}" />
    <CheckBox x:Name="CBPlayCount"
                Content="Play count"
                Padding="10"
                IsEnabled="False"
                IsThreeState="True"
                IsChecked="{x:Null}" />
    <CheckBox x:Name="CBPlayDuration"
                Content="Play duration"
                Padding="10"
                IsEnabled="False"
                IsThreeState="True"
                IsChecked="{x:Null}" />
    <CheckBox x:Name="CBReplayPauseInterval"
                Content="Replay/pause interval"
                Padding="10"
                IsEnabled="False"
                IsThreeState="True"
                IsChecked="{x:Null}" />
    <CheckBox x:Name="CBBuzzContinuous"
                Content="Buzz continuous"
                Padding="10"
                IsEnabled="False"
                IsThreeState="True"
                IsChecked="{x:Null}" />
    <CheckBox x:Name="CBClick"
                Content="Click"
                Padding="10"
                IsEnabled="False"
                IsThreeState="True"
                IsChecked="{x:Null}" />
    <CheckBox x:Name="CBPress"
                Content="Press"
                Padding="10"
                IsEnabled="False"
                IsThreeState="True"
                IsChecked="{x:Null}" />
    <CheckBox x:Name="CBRelease"
                Content="Release"
                Padding="10"
                IsEnabled="False"
                IsThreeState="True"
                IsChecked="{x:Null}" />
    <CheckBox x:Name="CBRumbleContinuous"
                Content="Rumble continuous"
                Padding="10"
                IsEnabled="False"
                IsThreeState="True"
                IsChecked="{x:Null}" />
</StackPanel>
打开 MainPage_Haptics.xaml.cs 文件
找到标有此步骤标题的代码 ("Step 6: Haptics customization")
取消注释以下行:
Windows.Devices.Haptics 类型引用用于后续步骤中的功能。
using Windows.Devices.Haptics;在这里,我们指定在选择自定义 RadialController 菜单项时触发的 ControlAcquired 事件的处理程序。
radialController.ControlAcquired += (rc_sender, args) =>
{ RadialController_ControlAcquired(rc_sender, args); };
接下来,定义 ControlAcquired 处理程序,在该处理程序中可禁用默认触觉反馈并初始化触觉 UI。
private void RadialController_ControlAcquired(
    RadialController rc_sender,
    RadialControllerControlAcquiredEventArgs args)
{
    // Turn off default haptic feedback.
    radialController.UseAutomaticHapticFeedback = false;

    SimpleHapticsController hapticsController =
        args.SimpleHapticsController;

    // Enumerate haptic support.
    IReadOnlyCollection<SimpleHapticsControllerFeedback> supportedFeedback =
        hapticsController.SupportedFeedback;

    foreach (SimpleHapticsControllerFeedback feedback in supportedFeedback)
    {
        if (feedback.Waveform == KnownSimpleHapticsControllerWaveforms.BuzzContinuous)
        {
            CBBuzzContinuous.IsEnabled = true;
            CBBuzzContinuous.IsChecked = true;
        }
        else if (feedback.Waveform == KnownSimpleHapticsControllerWaveforms.Click)
        {
            CBClick.IsEnabled = true;
            CBClick.IsChecked = true;
        }
        else if (feedback.Waveform == KnownSimpleHapticsControllerWaveforms.Press)
        {
            CBPress.IsEnabled = true;
            CBPress.IsChecked = true;
        }
        else if (feedback.Waveform == KnownSimpleHapticsControllerWaveforms.Release)
        {
            CBRelease.IsEnabled = true;
            CBRelease.IsChecked = true;
        }
        else if (feedback.Waveform == KnownSimpleHapticsControllerWaveforms.RumbleContinuous)
        {
            CBRumbleContinuous.IsEnabled = true;
            CBRumbleContinuous.IsChecked = true;
        }
    }

    if (hapticsController?.IsIntensitySupported == true)
    {
        CBIntensity.IsEnabled = true;
        CBIntensity.IsChecked = true;
    }
    if (hapticsController?.IsPlayCountSupported == true)
    {
        CBPlayCount.IsEnabled = true;
        CBPlayCount.IsChecked = true;
    }
    if (hapticsController?.IsPlayDurationSupported == true)
    {
        CBPlayDuration.IsEnabled = true;
        CBPlayDuration.IsChecked = true;
    }
    if (hapticsController?.IsReplayPauseIntervalSupported == true)
    {
        CBReplayPauseInterval.IsEnabled = true;
        CBReplayPauseInterval.IsChecked = true;
    }
}
在 RotationChanged 和 ButtonClicked 事件处理程序中,我们将对应的滑块和切换按钮控件连接到自定义触觉。
// Connect wheel device rotation to slider control. private void RadialController_RotationChanged( object sender, RadialControllerRotationChangedEventArgs args) { ... if (ClickToggle.IsOn && (RotationSlider.Value > RotationSlider.Minimum) && (RotationSlider.Value < RotationSlider.Maximum)) { SimpleHapticsControllerFeedback waveform = FindWaveform(args.SimpleHapticsController, KnownSimpleHapticsControllerWaveforms.BuzzContinuous); if (waveform != null) { args.SimpleHapticsController.SendHapticFeedback(waveform); } } } private void RadialController_ButtonClicked( object sender, RadialControllerButtonClickedEventArgs args) { ... if (RotationSlider?.Value > 0) { SimpleHapticsControllerFeedback waveform = FindWaveform(args.SimpleHapticsController, KnownSimpleHapticsControllerWaveforms.Click); if (waveform != null) { args.SimpleHapticsController.SendHapticFeedbackForPlayCount( waveform, 1.0, (int)RotationSlider.Value, TimeSpan.Parse("1")); } } }最后,我们获取触觉反馈请求的波形(如果受支持)。
// Get the requested waveform.
private SimpleHapticsControllerFeedback FindWaveform(
    SimpleHapticsController hapticsController,
    ushort waveform)
{
    foreach (var hapticInfo in hapticsController.SupportedFeedback)
    {
        if (hapticInfo.Waveform == waveform)
        {
            return hapticInfo;
        }
    }
    return null;
}
现在再次运行应用,通过更改滑块值和切换开关状态来试用自定义触觉。
步骤 7:为 Surface Studio 和类似设备定义屏幕交互
与 Surface Studio 配对后,Surface Dial 可以提供更独特的用户体验。
除了前面已介绍的默认长按菜单体验之外,Surface Dial 还可以直接放置在 Surface Studio 的屏幕上。 这将启用特殊的“屏幕”菜单。
通过检测 Surface Dial 的接触位置和边界,系统处理设备的遮挡并显示更大版本的菜单,该菜单环绕在 Dial 外沿。 你的应用也可以使用这些信息来调整 UI,以便应用适配该设备及其预期用法,例如用户放置手部和手臂的位置。
本教程附带的示例包含一个稍微复杂一些的示例,该示例演示了其中的一些功能。
若查看该示例的具体执行情况(需要 Surface Studio):
在 Surface Studio 设备上下载示例(已安装 Visual Studio)
在 Visual Studio 中打开该示例
打开 App.xaml.cs 文件
找到标有此步骤标题的代码 ("Step 7: Define on-screen interactions for Surface Studio and similar devices")
注释第一行和第二行(“MainPage_Basic”和“MainPage_Haptics”)并取消注释第三行(“MainPage”)
rootFrame.Navigate(typeof(MainPage_Basic), e.Arguments);
rootFrame.Navigate(typeof(MainPage_Haptics), e.Arguments);
rootFrame.Navigate(typeof(MainPage), e.Arguments);
运行应用并将 Surface Dial 置于两个控制区域中的每个区域,并在它们之间交替。

总结
恭喜,你已完成了《入门教程:在 Windows 应用中支持 Surface Dial(和其他滚轮设备)》! 我们向你展示了在 Windows 应用中支持滚轮设备所需的基本代码,以及如何提供 RadialController API 支持的一些更加丰富的用户体验。
相关文章
API 参考
- RadialController 类
- RadialControllerButtonClickedEventArgs 类
- RadialControllerConfiguration 类
- RadialControllerControlAcquiredEventArgs 类
- RadialControllerMenu 类
- RadialControllerMenuItem 类
- RadialControllerRotationChangedEventArgs 类
- RadialControllerScreenContact 类
- RadialControllerScreenContactContinuedEventArgs 类
- RadialControllerScreenContactStartedEventArgs 类
- RadialControllerMenuKnownIcon 枚举
- RadialControllerSystemMenuItemKind 枚举
示例
主题示例
其他示例

反馈
即将发布:在整个 2024 年,我们将逐步淘汰作为内容反馈机制的“GitHub 问题”,并将其取代为新的反馈系统。 有关详细信息,请参阅:https://aka.ms/ContentUserFeedback。
提交和查看相关反馈