HoloLens(第一代)和 Azure 302b:自定义视觉
注意
混合现实学院教程在制作时考虑到了 HoloLens(第一代)和混合现实沉浸式头戴显示设备。 因此,对于仍在寻求这些设备的开发指导的开发人员而言,我们觉得很有必要保留这些教程。 我们不会在这些教程中更新 HoloLens 2 所用的最新工具集或集成相关的内容。 我们将维护这些教程,使之持续适用于支持的设备。 将来会发布一系列演示如何针对 HoloLens 2 进行开发的新教程。 此通知将在教程发布时通过指向这些教程的链接进行更新。
本课程介绍如何在混合现实应用程序中使用 Azure 自定义视觉功能来识别提供的图像中的自定义视觉内容。
此服务允许你使用对象图像训练机器学习模型。 然后,你将使用经过训练的模型来识别类似的对象,这由 Microsoft HoloLens 的相机捕获或连接到你的 PC 的用于沉浸式 (VR) 头戴显示设备的相机提供。

Azure 自定义视觉是一项 Microsoft 认知服务,可让开发人员生成自定义图像分类器。 然后,这些分类器可以与新图像一起用于识别或分类该新图像中的对象。 该服务提供了一个简单易用的在线门户来简化流程。 有关详细信息,请访问 Azure 自定义视觉服务页面。
完成本课程后,你会有一个混合现实应用程序,该应用程序将能够以两种模式工作:
分析模式:通过上传图像、创建标签和训练服务识别不同对象(在本例中为鼠标和键盘)来手动设置自定义视觉服务。 然后,你将创建一个 HoloLens 应用,该应用将使用相机捕获图像,并尝试识别现实世界中的这些对象。
训练模式:你将实现在你的应用程序中启用“训练模式”的代码。 训练模式将允许你使用 HoloLens 的相机捕获图像,将捕获的图像上传到服务,并训练自定义视觉模型。
本课程将介绍如何将自定义视觉服务的结果引入基于 Unity 的示例应用程序。 你可以自行决定将这些概念应用到你可能会生成的自定义应用程序。
设备支持
| 课程 | HoloLens | 沉浸式头戴显示设备 |
|---|---|---|
| MR 和 Azure 302b:自定义视觉 | ✔ | ✔ |
注意
尽管本课程重点介绍 HoloLens,但你也可以将本课程中学到的知识运用到 Windows Mixed Reality 沉浸式 (VR) 头戴显示设备。 由于沉浸式 (VR) 头戴显示设备没有可用的摄像头,因此你需要将外部摄像头连接到电脑。 随着课程的进行,你将看到有关支持沉浸式 (VR) 头戴显示设备可能需要进行的任何更改的说明。
先决条件
注意
本教程专为具有 Unity 和 C# 基本经验的开发人员设计。 另请注意,本文档中的先决条件和书面说明在编写时(2018 年 7 月)已经过测试和验证。 可以随意使用最新的软件(如安装工具一文所列),但不应假设本课程中的信息将与你在较新的软件中找到的信息(而不是下面列出的内容)完全匹配。
建议在本课程中使用以下硬件和软件:
- 一台与 Windows Mixed Reality 兼容的开发电脑,用于沉浸式 (VR) 头戴显示设备方面的开发
- 已启用开发人员模式的 Windows 10 Fall Creators Update(或更高版本)
- 最新的 Windows 10 SDK
- Unity 2017.4
- Visual Studio 2017
- Windows Mixed Reality 沉浸式 (VR) 头戴显示设备或已启用开发人员模式的 Microsoft HoloLens
- 已连接到电脑的摄像头(用于沉浸式头戴显示设备开发)
- 可访问 Internet 以便能够进行 Azure 设置和自定义视觉 API 检索
- 你希望自定义视觉服务识别的每个对象的一系列图像,至少五 (5) 幅(推荐十 (10) 幅)。 如果愿意,可以使用本课程已提供的图像(计算机鼠标和键盘)。
开始之前
- 为了避免在生成此项目时遇到问题,强烈建议在根文件夹或接近根的文件夹中创建本教程中提到的项目(长文件夹路径会在生成时导致问题)。
- 设置并测试 HoloLens。 如需有关设置 HoloLens 的支持,请确保参阅“HoloLens 设置”一文。
- 在开始开发新的 HoloLens 应用时,最好执行校准和传感器优化(有时 HoloLens 应用可以帮助为每个用户执行这些任务)。
有关校准的帮助信息,请单击此链接访问“HoloLens 校准”一文。
有关传感器优化的帮助信息,请单击此链接访问“HoloLens 传感器优化”一文。
第 1 章 - 自定义视觉服务门户
若要在 Azure 中使用自定义视觉服务,需要配置该服务的实例以供应用程序使用。
单击“入门”按钮。

登录到“自定义视觉服务”门户。

注意
如果你没有 Azure 帐户,需要创建一个。 如果你在课堂或实验室场景中跟着本教程学习,请让讲师或监督人员帮助设置你的新帐户。
首次登录后,系统会显示“服务条款”面板。 单击复选框以同意条款。 然后单击“我同意”。

同意条款后,你将被导航到门户的“项目”部分。 单击“新建项目”。
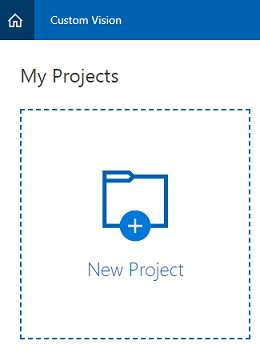
右侧会出现一个选项卡,提示你为项目指定一些字段。
插入项目的名称。
插入描述的描述(可选)。
选择一个资源组或创建一个新资源组。 通过资源组,可监视和预配 Azure 资产集合、控制其访问权限并管理其计费。 建议保留与常用资源组下的单个项目(例如这些课程)关联的所有 Azure 服务。
将“项目类型”设置为“分类”
将“领域”设置为“常规”。

若要详细了解 Azure 资源组,请访问资源组一文。
完成后,单击“创建项目”,你将被重定向到自定义视觉服务,也就是项目页面。
第 2 章 - 训练自定义视觉项目
进入自定义视觉门户后,主要目标是训练项目识别图像中的特定对象。 对于你希望应用程序识别的每个对象,至少需要五 (5) 幅图像,但最好是十 (10) 幅图像。 可以使用本课程已提供的图像(计算机鼠标和键盘)。
训练自定义视觉服务项目:
单击”标签”旁边的 + 按钮。
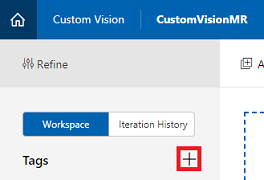
添加要识别的对象的名称。 单击“保存” 。

你会注意到你的“标记”已添加(可能需要重新加载页面才能显示)。 如果尚未选中,请单击新标签旁边的复选框。

单击页面中央的“添加图像”。
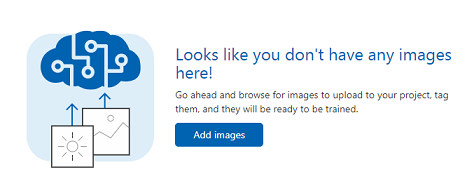
单击“浏览本地文件”,然后搜索并选择要上传的图像,最少为五 (5) 幅。 请记住,所有这些图像都应包含正在训练的对象。
注意
可以一次选择多幅图像进行上传。
在选项卡中看到图像后,请在“我的标签”框中选择适当的标签。

单击“上载文件”。 文件将开始上传。 确认上传后,单击完成。

重复相同的过程以创建一个名为“键盘”的新标签并为其上传适当的照片。 创建新标签后,请确保取消选中“鼠标”,这样才会显示“添加图像”窗口。
设置好两个标签后,单击“训练”,第一个训练迭代将开始生成。

生成完成后,你将能够看到两个名为“设为默认”和“预测 URL”的按钮。 首先点击“设为默认”,然后单击“预测 URL”。

注意
据此提供的端点 URL 设置为已标记为默认值的任何迭代。 因此,如果稍后进行新的迭代并将其更新为默认值,则无需更改代码。
单击“预测 URL”后,打开记事本,然后复制并粘贴 URL 和 Prediction-Key,稍后在代码中需要时检索。

单击屏幕右上角的齿轮图标。

复制训练密钥并将其粘贴到记事本中,以备后用。

同时复制项目 ID,并将其粘贴到你的记事本文件中,以备后用。
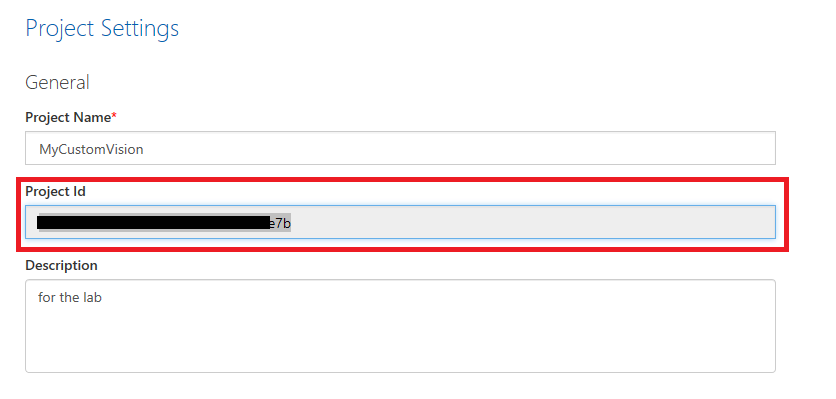
第 3 章 - 设置 Unity 项目
下面是用于使用混合现实进行开发的典型设置,因此,这对其他项目来说是一个不错的模板。
打开 Unity,单击“新建”。

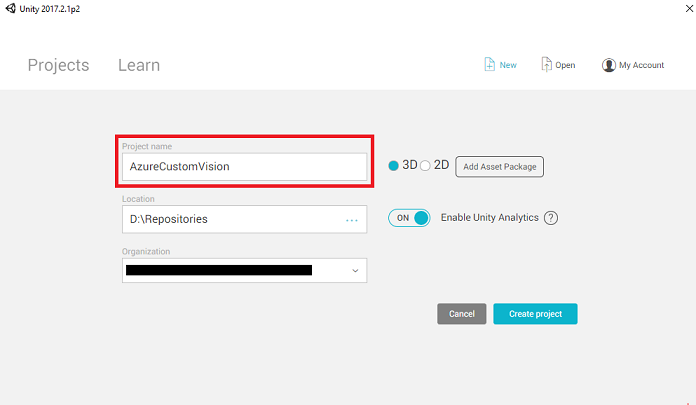
现在需要提供 Unity 项目名称。 插入 AzureCustomVision。确保项目模板设置为 3D。 将“位置”设置为适合你的位置(请记住,越接近根目录越好)。 然后,单击“创建项目”。
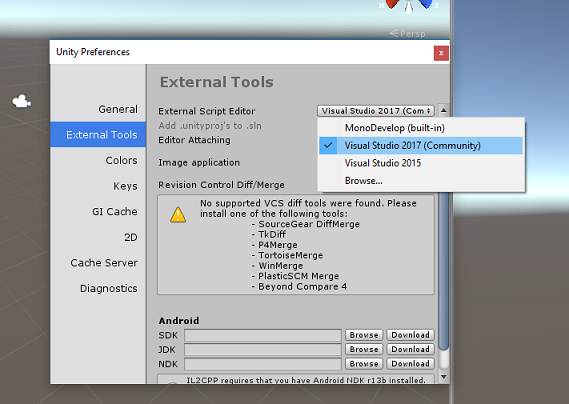
当 Unity 处于打开状态时,有必要检查默认“脚本编辑器”是否设置为“Visual Studio”。 转到“编辑”>“首选项”,然后在新窗口中导航到“外部工具”。 将外部脚本编辑器更改为 Visual Studio 2017。 关闭“首选项”窗口。
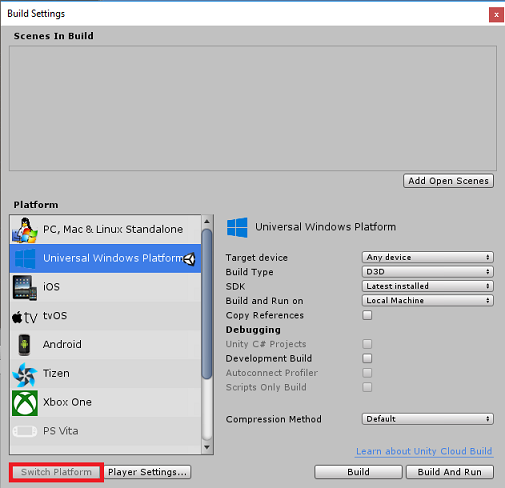
接下来,转到“文件”>“生成设置”,选择“通用 Windows 平台”,然后单击“切换平台”按钮以应用你的选择。
仍在“文件”>“生成设置”中,确保:
将“目标设备”设置为“HoloLens”
对于沉浸式头戴显示设备,将“目标设备”设置为“任何设备”。
将“生成类型”设置为“D3D”
将“SDK”设置为“最新安装的版本”
将“Visual Studio 版本”设置为“最新安装的版本”
将“生成并运行”设置为“本地计算机”
保存场景并将其添加到生成。
通过选择“添加开放场景”来执行此操作。 将出现一个保存窗口。
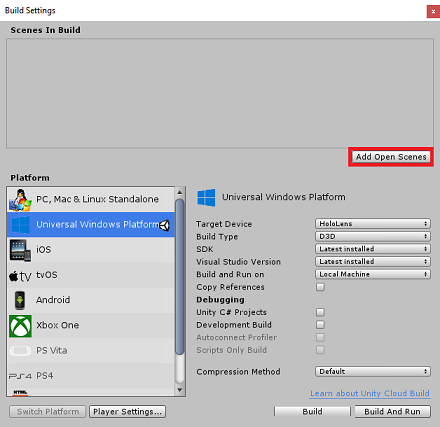
为此创建新文件夹,并为将来的任何场景创建一个新文件夹,然后选择“新建文件夹”按钮以创建新文件夹,将其命名为“场景”。

打开新创建的“场景”文件夹,然后在“文件名:”文本字段中,键入 CustomVisionScene,然后单击“保存”。
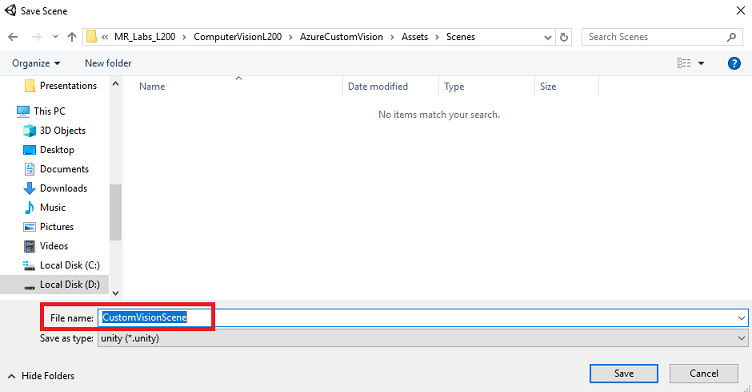
请注意,必须将 Unity 场景保存在资产文件夹中,因为它们必须与 Unity 项目关联。 创建场景文件夹(和其他类似文件夹)是构建 Unity 项目的典型方式。
在“生成设置”中,其余设置目前应保留为默认值。

在“生成设置”窗口中,单击“播放器设置”按钮,这会在检查器所在的空间中打开相关面板。
在此面板中,需要验证一些设置:
在“其他设置”选项卡中:
脚本运行时版本应为试验版(等效于 .Net 4.6),这将导致需要重启编辑器。
“脚本后端”应为 “.NET”
“API 兼容性级别”应为“.NET 4.6”
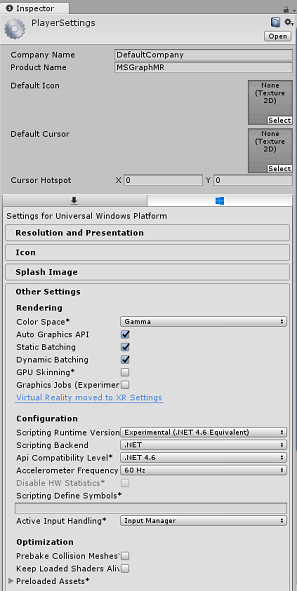
在“发布设置”选项卡的“功能”下,检查以下内容:
InternetClient
网络摄像头
Microphone

在面板再靠下部分,在“发布设置”下的“XR 设置”中,勾选“支持虚拟现实”,确保已添加“Windows Mixed Reality SDK”。
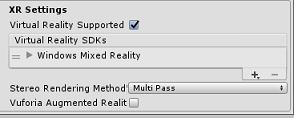
返回“生成设置”,此时 Unity C# 项目不再灰显;勾选此框旁边的复选框。
关闭“生成设置”窗口 。
保存场景和项目(“文件”>“保存场景/文件”>“保存项目”)。
第 4 章 - 在 Unity 中导入 Newtonsoft DLL
重要
如果要跳过本课程的“Unity 设置”组件,直接继续学习代码,请根据需要下载此 Azure-MR-302b.unitypackage,并将其作为自定义包导入项目中,然后从第 6 章继续。
本课程需要使用 Newtonsoft 库,你可以将其添加为资产的 DLL。 可以从此链接下载包含此库的包。 若要将 Newtonsoft 库导入项目,请使用本课程提供的 Unity 包。
通过使用“资产”>“导入包”>“自定义包”菜单选项,将“.unitypackage”添加到 Unity。
在弹出的“导入 Unity 包”框中,确保“插件”下面的所有内容(包括插件)都被选中。

单击“导入”按钮,将项添加到项目。
转到项目视图中“插件”下的“Newtonsoft”文件夹,然后选择 Newtonsoft.Json 插件。

选中 Newtonsoft.Json 插件后,请确保未选中“任何平台”,然后确保“WSAPlayer”也未选中,然后单击“应用”。 这样做只是为了确认文件配置正确。

注意
标记这些插件,会将它们配置为仅在 Unity 编辑器中使用。 WSA 文件夹中还有一组不同的插件,从 Unity 导出项目后,将使用它们。
接下来,需要打开 Newtonsoft 文件夹中的 WSA 文件夹。 你将看到刚刚配置的同一文件的副本。 选择该文件,然后在检查器中确保
- “任何平台”处于未选中状态
- 仅选中“WSAPlayer”
- “不处理”处于选中状态
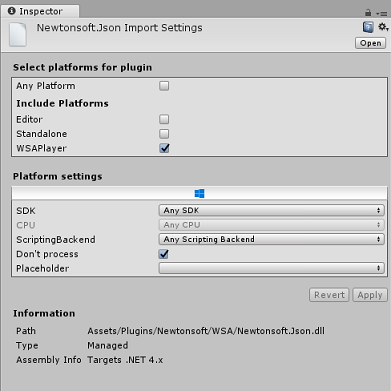
第 5 章 - 相机设置
在“层次结构”面板中选择“主相机”。
选择后,你将能够在“检查器面板”中查看“主摄像头”的所有组件。
相机对象必须命名为“Main Camera”(注意拼写)
“主摄像头”标记必须设置为“MainCamera”(注意拼写!)
请确保将“转换位置”设置为“0, 0, 0”
将“清除标志”设置为“纯色”(对于沉浸式头戴显示设备请忽略此项)。
将相机组件的“背景色”设置为“黑色,Alpha 0 (十六进制代码:#00000000)”(对于沉浸式头戴显示设备请忽略此项)。

第 6 章 - 创建 CustomVisionAnalyser 类。
此时,你已准备好编写一些代码。
需要从 CustomVisionAnalyser 类开始。
注意
下面显示的代码中对自定义视觉服务的调用是使用自定义视觉 REST API 进行的。 通过使用此 API,你将了解如何实现和使用这个 API(对于理解如何自己实现类似的东西很有用)。 请注意,Microsoft 提供了一个自定义视觉服务 SDK,也可用于调用该服务。 有关更多信息,请访问自定义视觉服务 SDK 文章。
此类负责执行以下操作:
加载作为字节数组捕获的最新图像。
将字节数组发送到 Azure 自定义视觉服务实例进行分析。
以 JSON 字符串的形式接收响应。
反序列化响应并将生成的预测传递给 SceneOrganiser 类,该类将负责响应的显示方式。
若要创建此类,请执行以下操作:
右键单击“项目”面板中的资产文件夹,然后单击“创建”>“文件夹”。 将该文件夹命名为“脚本”。
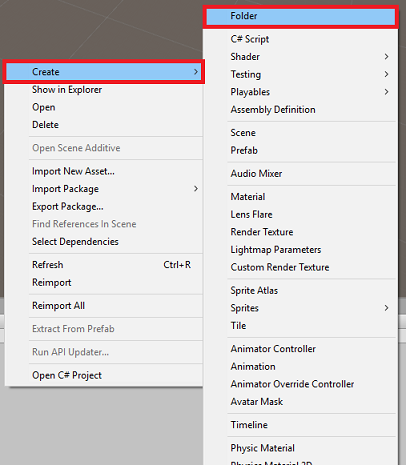
双击刚刚创建的文件夹,打开它。
在文件夹中单击右键,然后单击“创建”>“C# 脚本”。 将脚本命名为“CustomVisionAnalyser”。
双击新的 CustomVisionAnalyser 脚本以使用 Visual Studio 将其打开。
更新文件顶部的命名空间,以匹配以下内容:
using System.Collections;
using System.IO;
using UnityEngine;
using UnityEngine.Networking;
using Newtonsoft.Json;
在 CustomVisionAnalyser 类中,添加以下变量:
    /// <summary>
    /// Unique instance of this class
    /// </summary>
    public static CustomVisionAnalyser Instance;

    /// <summary>
    /// Insert your Prediction Key here
    /// </summary>
    private string predictionKey = "- Insert your key here -";

    /// <summary>
    /// Insert your prediction endpoint here
    /// </summary>
    private string predictionEndpoint = "Insert your prediction endpoint here";

    /// <summary>
    /// Byte array of the image to submit for analysis
    /// </summary>
    [HideInInspector] public byte[] imageBytes;
注意
请务必将预测密钥插入到 predictionKey 变量中,并将预测终结点插入到 predictionEndpoint 变量中。 你在本课程签名的部分中已将这些内容复制到了记事本。
现在需要添加 Awake() 的代码以初始化 Instance 变量:
    /// <summary>
    /// Initialises this class
    /// </summary>
    private void Awake()
    {
        // Allows this instance to behave like a singleton
        Instance = this;
    }
删除 Start() 和 Update() 方法。
接下来添加协同例程(其下面是静态 GetImageAsByteArray() 方法),用于获取 ImageCapture 类捕获的图像的分析结果。
注意
在 AnalyseImageCapture 协同例程中,存在对 SceneOrganiser 类的调用,但你还尚未创建这个类。 因此,请暂时保留这些行的注释。
    /// <summary>
    /// Call the Computer Vision Service to submit the image.
    /// </summary>
    public IEnumerator AnalyseLastImageCaptured(string imagePath)
    {
        WWWForm webForm = new WWWForm();
        using (UnityWebRequest unityWebRequest = UnityWebRequest.Post(predictionEndpoint, webForm))
        {
            // Gets a byte array out of the saved image
            imageBytes = GetImageAsByteArray(imagePath);

            unityWebRequest.SetRequestHeader("Content-Type", "application/octet-stream");
            unityWebRequest.SetRequestHeader("Prediction-Key", predictionKey);

            // The upload handler will help uploading the byte array with the request
            unityWebRequest.uploadHandler = new UploadHandlerRaw(imageBytes);
            unityWebRequest.uploadHandler.contentType = "application/octet-stream";

            // The download handler will help receiving the analysis from Azure
            unityWebRequest.downloadHandler = new DownloadHandlerBuffer();

            // Send the request
            yield return unityWebRequest.SendWebRequest();

            string jsonResponse = unityWebRequest.downloadHandler.text;

            // The response will be in JSON format, therefore it needs to be deserialized

            // The following lines refers to a class that you will build in later Chapters
            // Wait until then to uncomment these lines

            //AnalysisObject analysisObject = new AnalysisObject();
            //analysisObject = JsonConvert.DeserializeObject<AnalysisObject>(jsonResponse);
            //SceneOrganiser.Instance.SetTagsToLastLabel(analysisObject);
        }
    }

    /// <summary>
    /// Returns the contents of the specified image file as a byte array.
    /// </summary>
    static byte[] GetImageAsByteArray(string imageFilePath)
    {
        FileStream fileStream = new FileStream(imageFilePath, FileMode.Open, FileAccess.Read);

        BinaryReader binaryReader = new BinaryReader(fileStream);

        return binaryReader.ReadBytes((int)fileStream.Length);
    }
返回到 Unity 之前,请务必在 Visual Studio 中保存所做的更改。
第 7 章 - 创建 CustomVisionObjects 类
现在将创建的类是 CustomVisionObjects 类。
此脚本包含许多对象,由其他类用于序列化和反序列化对自定义视觉服务调用。
警告
请务必记下自定义视觉服务为你提供的终结点,因为以下 JSON 结构已设置为适用于自定义视觉预测 v2.0。 如果具有不同的版本,可能需要更新以下结构。
若要创建此类,请执行以下操作:
在“脚本”文件夹内右键单击,然后单击“创建”>“C# 脚本”。 调用脚本 CustomVisionObjects。
双击新的 CustomVisionObjects 脚本以使用 Visual Studio 将其打开。
将以下命名空间添加到 文件顶部:
using System;
using System.Collections.Generic;
using UnityEngine;
using UnityEngine.Networking;
删除 CustomVisionObjects 类中的 Start() 和 Update() 方法;此类现在应为空。
在 CustomVisionObjects 类外部添加以下类。 Newtonsoft 库使用这些对象来序列化并反序列化响应数据:
// The objects contained in this script represent the deserialized version
// of the objects used by this application

/// <summary>
/// Web request object for image data
/// </summary>
class MultipartObject : IMultipartFormSection
{
    public string sectionName { get; set; }

    public byte[] sectionData { get; set; }

    public string fileName { get; set; }

    public string contentType { get; set; }
}

/// <summary>
/// JSON of all Tags existing within the project
/// contains the list of Tags
/// </summary>
public class Tags_RootObject
{
    public List<TagOfProject> Tags { get; set; }
    public int TotalTaggedImages { get; set; }
    public int TotalUntaggedImages { get; set; }
}

public class TagOfProject
{
    public string Id { get; set; }
    public string Name { get; set; }
    public string Description { get; set; }
    public int ImageCount { get; set; }
}

/// <summary>
/// JSON of Tag to associate to an image
/// Contains a list of hosting the tags,
/// since multiple tags can be associated with one image
/// </summary>
public class Tag_RootObject
{
    public List<Tag> Tags { get; set; }
}

public class Tag
{
    public string ImageId { get; set; }
    public string TagId { get; set; }
}

/// <summary>
/// JSON of Images submitted
/// Contains objects that host detailed information about one or more images
/// </summary>
public class ImageRootObject
{
    public bool IsBatchSuccessful { get; set; }
    public List<SubmittedImage> Images { get; set; }
}

public class SubmittedImage
{
    public string SourceUrl { get; set; }
    public string Status { get; set; }
    public ImageObject Image { get; set; }
}

public class ImageObject
{
    public string Id { get; set; }
    public DateTime Created { get; set; }
    public int Width { get; set; }
    public int Height { get; set; }
    public string ImageUri { get; set; }
    public string ThumbnailUri { get; set; }
}

/// <summary>
/// JSON of Service Iteration
/// </summary>
public class Iteration
{
    public string Id { get; set; }
    public string Name { get; set; }
    public bool IsDefault { get; set; }
    public string Status { get; set; }
    public string Created { get; set; }
    public string LastModified { get; set; }
    public string TrainedAt { get; set; }
    public string ProjectId { get; set; }
    public bool Exportable { get; set; }
    public string DomainId { get; set; }
}

/// <summary>
/// Predictions received by the Service after submitting an image for analysis
/// </summary>
[Serializable]
public class AnalysisObject
{
    public List<Prediction> Predictions { get; set; }
}

[Serializable]
public class Prediction
{
    public string TagName { get; set; }
    public double Probability { get; set; }
}
第 8 章 - 创建 VoiceRecognizer 类
此类将识别用户的语音输入。
若要创建此类,请执行以下操作:
在“脚本”文件夹内右键单击,然后单击“创建”>“C# 脚本”。 调用脚本 VoiceRecognizer。
双击新的 VoiceRecognizer 脚本以在 Visual Studio 中将其打开。
在 VoiceRecognizer 类上方添加以下命名空间:
using System;
using System.Collections.Generic;
using System.Linq;
using UnityEngine;
using UnityEngine.Windows.Speech;
然后在 VoiceRecognizer 类中的 Start() 方法上方添加以下变量:
    /// <summary>
    /// Allows this class to behave like a singleton
    /// </summary>
    public static VoiceRecognizer Instance;

    /// <summary>
    /// Recognizer class for voice recognition
    /// </summary>
    internal KeywordRecognizer keywordRecognizer;

    /// <summary>
    /// List of Keywords registered
    /// </summary>
    private Dictionary<string, Action> _keywords = new Dictionary<string, Action>();
添加 Awake() 和 Start() 方法,后者将设置在将标签关联到图像时要识别的用户关键字:
    /// <summary>
    /// Called on initialization
    /// </summary>
    private void Awake()
    {
        Instance = this;
    }

    /// <summary>
    /// Runs at initialization right after Awake method
    /// </summary>
    void Start ()
    {

        Array tagsArray = Enum.GetValues(typeof(CustomVisionTrainer.Tags));

        foreach (object tagWord in tagsArray)
        {
            _keywords.Add(tagWord.ToString(), () =>
            {
                // When a word is recognized, the following line will be called
                CustomVisionTrainer.Instance.VerifyTag(tagWord.ToString());
            });
        }

        _keywords.Add("Discard", () =>
        {
            // When a word is recognized, the following line will be called
            // The user does not want to submit the image
            // therefore ignore and discard the process
            ImageCapture.Instance.ResetImageCapture();
            keywordRecognizer.Stop();
        });

        //Create the keyword recognizer
        keywordRecognizer = new KeywordRecognizer(_keywords.Keys.ToArray());

        // Register for the OnPhraseRecognized event
        keywordRecognizer.OnPhraseRecognized += KeywordRecognizer_OnPhraseRecognized;
    }
删除 Update() 方法。
添加以下处理程序,只要识别语音输入,就会调用该处理程序:
    /// <summary>
    /// Handler called when a word is recognized
    /// </summary>
    private void KeywordRecognizer_OnPhraseRecognized(PhraseRecognizedEventArgs args)
    {
        Action keywordAction;
        // if the keyword recognized is in our dictionary, call that Action.
        if (_keywords.TryGetValue(args.text, out keywordAction))
        {
            keywordAction.Invoke();
        }
    }
返回到 Unity 之前,请务必在 Visual Studio 中保存所做的更改。
注意
不必担心代码可能看起来有错误,因为即将提供进一步的类,便会修复这些错误。
第 9 章 - 创建 CustomVisionTrainer 类。
此类将链接一系列 Web 调用,以训练自定义视觉服务。 在代码上方会详细说明每个调用。
若要创建此类,请执行以下操作:
在“脚本”文件夹内右键单击,然后单击“创建”>“C# 脚本”。 调用脚本 CustomVisionTrainer。
双击新的 CustomVisionTrainer 脚本以使用 Visual Studio 将打开。
在 CustomVisionTrainer 类上方添加以下命名空间:
using Newtonsoft.Json;
using System.Collections;
using System.Collections.Generic;
using System.IO;
using System.Text;
using UnityEngine;
using UnityEngine.Networking;
然后在 CustomVisionTrainer 类中的 Start() 方法上方添加以下变量。
注意
此处使用的训练 URL 在“自定义视觉 1.2”文档中提供,其结构为:https://southcentralus.api.cognitive.microsoft.com/customvision/v1.2/Training/projects/{projectId}/
有关详细信息,请访问自定义视觉训练 v1.2 参考 API。警告
必须记下自定义视觉服务提供的用于训练模式的终结点,因为使用的结构(在 CustomVisionObjects 类中)已经设置为适用于自定义视觉训练 v1.2。 如果采用其他版本,可能需要更新 Objects 结构。
/// <summary> /// Allows this class to behave like a singleton /// </summary> public static CustomVisionTrainer Instance; /// <summary> /// Custom Vision Service URL root /// </summary> private string url = "https://southcentralus.api.cognitive.microsoft.com/customvision/v1.2/Training/projects/"; /// <summary> /// Insert your prediction key here /// </summary> private string trainingKey = "- Insert your key here -"; /// <summary> /// Insert your Project Id here /// </summary> private string projectId = "- Insert your Project Id here -"; /// <summary> /// Byte array of the image to submit for analysis /// </summary> internal byte[] imageBytes; /// <summary> /// The Tags accepted /// </summary> internal enum Tags {Mouse, Keyboard} /// <summary> /// The UI displaying the training Chapters /// </summary> private TextMesh trainingUI_TextMesh;添加下了 Start() 和 Awake() 方法。 这些方法在初始化时调用,并包含用于设置 UI 的调用:
    /// <summary>
    /// Called on initialization
    /// </summary>
    private void Awake()
    {
        Instance = this;
    }

    /// <summary>
    /// Runs at initialization right after Awake method
    /// </summary>
    private void Start()
    {
        trainingUI_TextMesh = SceneOrganiser.Instance.CreateTrainingUI("TrainingUI", 0.04f, 0, 4, false);
    }
删除 Update() 方法。 此类不需要该方法。
添加 RequestTagSelection() 方法。 当图像被捕获并存储在设备中并且现在准备提交给自定义视觉服务进行训练时,将首先调用此方法。 此方法在定型 UI 中显示一组关键字,用户可以使用这些关键字标记已捕获的映像。 该方法还会提醒 VoiceRecognizer 类开始倾听用户的语音输入。
    internal void RequestTagSelection()
    {
        trainingUI_TextMesh.gameObject.SetActive(true);
        trainingUI_TextMesh.text = $" \nUse voice command \nto choose between the following tags: \nMouse\nKeyboard \nor say Discard";

        VoiceRecognizer.Instance.keywordRecognizer.Start();
    }
添加 VerifyTag() 方法。 该方法将接收到 VoiceRecognizer 类识别的语音输入并验证其有效性,然后开始训练过程。
    /// <summary>
    /// Verify voice input against stored tags.
    /// If positive, it will begin the Service training process.
    /// </summary>
    internal void VerifyTag(string spokenTag)
    {
        if (spokenTag == Tags.Mouse.ToString() || spokenTag == Tags.Keyboard.ToString())
        {
            trainingUI_TextMesh.text = $"Tag chosen: {spokenTag}";
            VoiceRecognizer.Instance.keywordRecognizer.Stop();
            StartCoroutine(SubmitImageForTraining(ImageCapture.Instance.filePath, spokenTag));
        }
    }
添加 SubmitImageForTraining() 方法。 此方法将开始自定义视觉服务训练过程。 第一步是从服务中检索标签 ID,该服务与验证的用户语音输入相关联。 然后标签 ID 将与图像一起上传。
    /// <summary>
    /// Call the Custom Vision Service to submit the image.
    /// </summary>
    public IEnumerator SubmitImageForTraining(string imagePath, string tag)
    {
        yield return new WaitForSeconds(2);
        trainingUI_TextMesh.text = $"Submitting Image \nwith tag: {tag} \nto Custom Vision Service";
        string imageId = string.Empty;
        string tagId = string.Empty;

        // Retrieving the Tag Id relative to the voice input
        string getTagIdEndpoint = string.Format("{0}{1}/tags", url, projectId);
        using (UnityWebRequest www = UnityWebRequest.Get(getTagIdEndpoint))
        {
            www.SetRequestHeader("Training-Key", trainingKey);
            www.downloadHandler = new DownloadHandlerBuffer();
            yield return www.SendWebRequest();
            string jsonResponse = www.downloadHandler.text;

            Tags_RootObject tagRootObject = JsonConvert.DeserializeObject<Tags_RootObject>(jsonResponse);

            foreach (TagOfProject tOP in tagRootObject.Tags)
            {
                if (tOP.Name == tag)
                {
                    tagId = tOP.Id;
                }
            }
        }

        // Creating the image object to send for training
        List<IMultipartFormSection> multipartList = new List<IMultipartFormSection>();
        MultipartObject multipartObject = new MultipartObject();
        multipartObject.contentType = "application/octet-stream";
        multipartObject.fileName = "";
        multipartObject.sectionData = GetImageAsByteArray(imagePath);
        multipartList.Add(multipartObject);

        string createImageFromDataEndpoint = string.Format("{0}{1}/images?tagIds={2}", url, projectId, tagId);

        using (UnityWebRequest www = UnityWebRequest.Post(createImageFromDataEndpoint, multipartList))
        {
            // Gets a byte array out of the saved image
            imageBytes = GetImageAsByteArray(imagePath);

            //unityWebRequest.SetRequestHeader("Content-Type", "application/octet-stream");
            www.SetRequestHeader("Training-Key", trainingKey);

            // The upload handler will help uploading the byte array with the request
            www.uploadHandler = new UploadHandlerRaw(imageBytes);

            // The download handler will help receiving the analysis from Azure
            www.downloadHandler = new DownloadHandlerBuffer();

            // Send the request
            yield return www.SendWebRequest();

            string jsonResponse = www.downloadHandler.text;

            ImageRootObject m = JsonConvert.DeserializeObject<ImageRootObject>(jsonResponse);
            imageId = m.Images[0].Image.Id;
        }
        trainingUI_TextMesh.text = "Image uploaded";
        StartCoroutine(TrainCustomVisionProject());
    }
添加 TrainCustomVisionProject() 方法。 提交并标记图像后,便将调用此方法。 此方法将创建一个新的迭代,该迭代将使用提交到服务的所有先前图像以及刚刚上传的图像进行训练。 训练完成后,此方法将调用一个方法将新创建的 Iteration 设置为 Default,因此你要用于分析的端点是最新的训练迭代。
    /// <summary>
    /// Call the Custom Vision Service to train the Service.
    /// It will generate a new Iteration in the Service
    /// </summary>
    public IEnumerator TrainCustomVisionProject()
    {
        yield return new WaitForSeconds(2);

        trainingUI_TextMesh.text = "Training Custom Vision Service";

        WWWForm webForm = new WWWForm();

        string trainProjectEndpoint = string.Format("{0}{1}/train", url, projectId);

        using (UnityWebRequest www = UnityWebRequest.Post(trainProjectEndpoint, webForm))
        {
            www.SetRequestHeader("Training-Key", trainingKey);
            www.downloadHandler = new DownloadHandlerBuffer();
            yield return www.SendWebRequest();
            string jsonResponse = www.downloadHandler.text;
            Debug.Log($"Training - JSON Response: {jsonResponse}");

            // A new iteration that has just been created and trained
            Iteration iteration = new Iteration();
            iteration = JsonConvert.DeserializeObject<Iteration>(jsonResponse);

            if (www.isDone)
            {
                trainingUI_TextMesh.text = "Custom Vision Trained";

                // Since the Service has a limited number of iterations available,
                // we need to set the last trained iteration as default
                // and delete all the iterations you dont need anymore
                StartCoroutine(SetDefaultIteration(iteration));
            }
        }
    }
添加 SetDefaultIteration() 方法。 此方法将先前创建和训练的迭代设置为 Default。 完成后,此方法将必须删除服务中存在的先前迭代。 截止撰写本课程,服务中最多允许同时存在十 (10) 次迭代。
    /// <summary>
    /// Set the newly created iteration as Default
    /// </summary>
    private IEnumerator SetDefaultIteration(Iteration iteration)
    {
        yield return new WaitForSeconds(5);
        trainingUI_TextMesh.text = "Setting default iteration";

        // Set the last trained iteration to default
        iteration.IsDefault = true;

        // Convert the iteration object as JSON
        string iterationAsJson = JsonConvert.SerializeObject(iteration);
        byte[] bytes = Encoding.UTF8.GetBytes(iterationAsJson);

        string setDefaultIterationEndpoint = string.Format("{0}{1}/iterations/{2}",
                                                        url, projectId, iteration.Id);

        using (UnityWebRequest www = UnityWebRequest.Put(setDefaultIterationEndpoint, bytes))
        {
            www.method = "PATCH";
            www.SetRequestHeader("Training-Key", trainingKey);
            www.SetRequestHeader("Content-Type", "application/json");
            www.downloadHandler = new DownloadHandlerBuffer();

            yield return www.SendWebRequest();

            string jsonResponse = www.downloadHandler.text;

            if (www.isDone)
            {
                trainingUI_TextMesh.text = "Default iteration is set \nDeleting Unused Iteration";
                StartCoroutine(DeletePreviousIteration(iteration));
            }
        }
    }
添加 DeletePreviousIteration() 方法。 此方法将查找并删除之前的非默认迭代:
    /// <summary>
    /// Delete the previous non-default iteration.
    /// </summary>
    public IEnumerator DeletePreviousIteration(Iteration iteration)
    {
        yield return new WaitForSeconds(5);

        trainingUI_TextMesh.text = "Deleting Unused \nIteration";

        string iterationToDeleteId = string.Empty;

        string findAllIterationsEndpoint = string.Format("{0}{1}/iterations", url, projectId);

        using (UnityWebRequest www = UnityWebRequest.Get(findAllIterationsEndpoint))
        {
            www.SetRequestHeader("Training-Key", trainingKey);
            www.downloadHandler = new DownloadHandlerBuffer();
            yield return www.SendWebRequest();

            string jsonResponse = www.downloadHandler.text;

            // The iteration that has just been trained
            List<Iteration> iterationsList = new List<Iteration>();
            iterationsList = JsonConvert.DeserializeObject<List<Iteration>>(jsonResponse);

            foreach (Iteration i in iterationsList)
            {
                if (i.IsDefault != true)
                {
                    Debug.Log($"Cleaning - Deleting iteration: {i.Name}, {i.Id}");
                    iterationToDeleteId = i.Id;
                    break;
                }
            }
        }

        string deleteEndpoint = string.Format("{0}{1}/iterations/{2}", url, projectId, iterationToDeleteId);

        using (UnityWebRequest www2 = UnityWebRequest.Delete(deleteEndpoint))
        {
            www2.SetRequestHeader("Training-Key", trainingKey);
            www2.downloadHandler = new DownloadHandlerBuffer();
            yield return www2.SendWebRequest();
            string jsonResponse = www2.downloadHandler.text;

            trainingUI_TextMesh.text = "Iteration Deleted";
            yield return new WaitForSeconds(2);
            trainingUI_TextMesh.text = "Ready for next \ncapture";

            yield return new WaitForSeconds(2);
            trainingUI_TextMesh.text = "";
            ImageCapture.Instance.ResetImageCapture();
        }
    }
此类中添加的最后一个方法是 GetImageAsByteArray() 方法,在 Web 调用中使用该方法以将捕获的图像转换为字节数组。
    /// <summary>
    /// Returns the contents of the specified image file as a byte array.
    /// </summary>
    static byte[] GetImageAsByteArray(string imageFilePath)
    {
        FileStream fileStream = new FileStream(imageFilePath, FileMode.Open, FileAccess.Read);
        BinaryReader binaryReader = new BinaryReader(fileStream);
        return binaryReader.ReadBytes((int)fileStream.Length);
    }
返回到 Unity 之前,请务必在 Visual Studio 中保存所做的更改。
第 10 章 - 创建 SceneOrganiser 类
此类将:
创建要附加到主相机的 Cursor 对象。
创建一个 Label 对象,该对象将在服务识别出真实世界的对象时出现。
通过将适当的组件附加到“主摄像头”来设置主摄像头。
在分析模式下,在运行时在相对于主相机位置的适当世界空间中生成标签,并显示从自定义视觉服务接收的数据。
在训练模式中,生成将显示训练过程不同阶段的 UI。
若要创建此类,请执行以下操作:
在“脚本”文件夹内右键单击,然后单击“创建”>“C# 脚本”。 将脚本命名为“SceneOrganiser”。
双击新的 SceneOrganiser 脚本以使用 Visual Studio 将其打开。
你只需要一个命名空间,从 SceneOrganiser 类上方删除其他命名空间:
using UnityEngine;然后在 SceneOrganiser 类中的 Start() 方法上方添加以下变量:
    /// <summary>
    /// Allows this class to behave like a singleton
    /// </summary>
    public static SceneOrganiser Instance;

    /// <summary>
    /// The cursor object attached to the camera
    /// </summary>
    internal GameObject cursor;

    /// <summary>
    /// The label used to display the analysis on the objects in the real world
    /// </summary>
    internal GameObject label;

    /// <summary>
    /// Object providing the current status of the camera.
    /// </summary>
    internal TextMesh cameraStatusIndicator;

    /// <summary>
    /// Reference to the last label positioned
    /// </summary>
    internal Transform lastLabelPlaced;

    /// <summary>
    /// Reference to the last label positioned
    /// </summary>
    internal TextMesh lastLabelPlacedText;

    /// <summary>
    /// Current threshold accepted for displaying the label
    /// Reduce this value to display the recognition more often
    /// </summary>
    internal float probabilityThreshold = 0.5f;
删除 Start() 和 Update() 方法。
在变量正下方,添加 Awake() 方法,该方法将初始化类并设置场景。
    /// <summary>
    /// Called on initialization
    /// </summary>
    private void Awake()
    {
        // Use this class instance as singleton
        Instance = this;

        // Add the ImageCapture class to this GameObject
        gameObject.AddComponent<ImageCapture>();

        // Add the CustomVisionAnalyser class to this GameObject
        gameObject.AddComponent<CustomVisionAnalyser>();

        // Add the CustomVisionTrainer class to this GameObject
        gameObject.AddComponent<CustomVisionTrainer>();

        // Add the VoiceRecogniser class to this GameObject
        gameObject.AddComponent<VoiceRecognizer>();

        // Add the CustomVisionObjects class to this GameObject
        gameObject.AddComponent<CustomVisionObjects>();

        // Create the camera Cursor
        cursor = CreateCameraCursor();

        // Load the label prefab as reference
        label = CreateLabel();

        // Create the camera status indicator label, and place it above where predictions
        // and training UI will appear.
        cameraStatusIndicator = CreateTrainingUI("Status Indicator", 0.02f, 0.2f, 3, true);

        // Set camera status indicator to loading.
        SetCameraStatus("Loading");
    }
现在添加创建和定位主相机光标的 CreateCameraCursor() 方法,以及创建分析标签对象的 CreateLabel() 方法。
    /// <summary>
    /// Spawns cursor for the Main Camera
    /// </summary>
    private GameObject CreateCameraCursor()
    {
        // Create a sphere as new cursor
        GameObject newCursor = GameObject.CreatePrimitive(PrimitiveType.Sphere);

        // Attach it to the camera
        newCursor.transform.parent = gameObject.transform;

        // Resize the new cursor
        newCursor.transform.localScale = new Vector3(0.02f, 0.02f, 0.02f);

        // Move it to the correct position
        newCursor.transform.localPosition = new Vector3(0, 0, 4);

        // Set the cursor color to red
        newCursor.GetComponent<Renderer>().material = new Material(Shader.Find("Diffuse"));
        newCursor.GetComponent<Renderer>().material.color = Color.green;

        return newCursor;
    }

    /// <summary>
    /// Create the analysis label object
    /// </summary>
    private GameObject CreateLabel()
    {
        // Create a sphere as new cursor
        GameObject newLabel = new GameObject();

        // Resize the new cursor
        newLabel.transform.localScale = new Vector3(0.01f, 0.01f, 0.01f);

        // Creating the text of the label
        TextMesh t = newLabel.AddComponent<TextMesh>();
        t.anchor = TextAnchor.MiddleCenter;
        t.alignment = TextAlignment.Center;
        t.fontSize = 50;
        t.text = "";

        return newLabel;
    }
添加 SetCameraStatus() 方法,该方法将处理用于提供相机状态的文本网格的消息。
    /// <summary>
    /// Set the camera status to a provided string. Will be coloured if it matches a keyword.
    /// </summary>
    /// <param name="statusText">Input string</param>
    public void SetCameraStatus(string statusText)
    {
        if (string.IsNullOrEmpty(statusText) == false)
        {
            string message = "white";

            switch (statusText.ToLower())
            {
                case "loading":
                    message = "yellow";
                    break;

                case "ready":
                    message = "green";
                    break;

                case "uploading image":
                    message = "red";
                    break;

                case "looping capture":
                    message = "yellow";
                    break;

                case "analysis":
                    message = "red";
                    break;
            }

            cameraStatusIndicator.GetComponent<TextMesh>().text = $"Camera Status:\n<color={message}>{statusText}..</color>";
        }
    }
添加 PlaceAnalysisLabel() 和 SetTagsToLastLabel() 方法,这两个方法将生成来自自定义视觉服务的数据并显示在场景中。
    /// <summary>
    /// Instantiate a label in the appropriate location relative to the Main Camera.
    /// </summary>
    public void PlaceAnalysisLabel()
    {
        lastLabelPlaced = Instantiate(label.transform, cursor.transform.position, transform.rotation);
        lastLabelPlacedText = lastLabelPlaced.GetComponent<TextMesh>();
    }

    /// <summary>
    /// Set the Tags as Text of the last label created.
    /// </summary>
    public void SetTagsToLastLabel(AnalysisObject analysisObject)
    {
        lastLabelPlacedText = lastLabelPlaced.GetComponent<TextMesh>();

        if (analysisObject.Predictions != null)
        {
            foreach (Prediction p in analysisObject.Predictions)
            {
                if (p.Probability > 0.02)
                {
                    lastLabelPlacedText.text += $"Detected: {p.TagName} {p.Probability.ToString("0.00 \n")}";
                    Debug.Log($"Detected: {p.TagName} {p.Probability.ToString("0.00 \n")}");
                }
            }
        }
    }
最后,添加 CreateTrainingUI() 方法,当应用程序处于训练模式时,该方法将生成显示训练过程的多个阶段的 UI。 此方法也将用于创建相机状态对象。
    /// <summary>
    /// Create a 3D Text Mesh in scene, with various parameters.
    /// </summary>
    /// <param name="name">name of object</param>
    /// <param name="scale">scale of object (i.e. 0.04f)</param>
    /// <param name="yPos">height above the cursor (i.e. 0.3f</param>
    /// <param name="zPos">distance from the camera</param>
    /// <param name="setActive">whether the text mesh should be visible when it has been created</param>
    /// <returns>Returns a 3D text mesh within the scene</returns>
    internal TextMesh CreateTrainingUI(string name, float scale, float yPos, float zPos, bool setActive)
    {
        GameObject display = new GameObject(name, typeof(TextMesh));
        display.transform.parent = Camera.main.transform;
        display.transform.localPosition = new Vector3(0, yPos, zPos);
        display.SetActive(setActive);
        display.transform.localScale = new Vector3(scale, scale, scale);
        display.transform.rotation = new Quaternion();
        TextMesh textMesh = display.GetComponent<TextMesh>();
        textMesh.anchor = TextAnchor.MiddleCenter;
        textMesh.alignment = TextAlignment.Center;
        return textMesh;
    }
返回到 Unity 之前,请务必在 Visual Studio 中保存所做的更改。
重要
在继续之前,打开 CustomVisionAnalyser 类,并在 AnalyseLastImageCaptured() 方法中,取消注释以下行:
  AnalysisObject analysisObject = new AnalysisObject();
  analysisObject = JsonConvert.DeserializeObject<AnalysisObject>(jsonResponse);
  SceneOrganiser.Instance.SetTagsToLastLabel(analysisObject);
第 11 章 – 创建 ImageCapture 类
要创建的下一个类是 ImageCapture 类。
此类负责执行以下操作:
使用 HoloLens 相机捕获图像并将其存储在 App 文件夹中。
处理用户的点击手势。
维护 Enum 值,该值确定应用程序时在分析模式下运行还是在训练模式下运行。
若要创建此类,请执行以下操作:
转到之前创建的“脚本”文件夹。
右键单击该文件夹,然后单击“创建”>“C# 脚本”。 将该脚本命名为“ImageCapture”。
双击新的“ImageCapture”脚本以使用 Visual Studio 将其打开。
在文件的顶部用以下代码替换命名空间:
using System;
using System.IO;
using System.Linq;
using UnityEngine;
using UnityEngine.XR.WSA.Input;
using UnityEngine.XR.WSA.WebCam;
然后在 ImageCapture 类中的 Start() 方法上方添加以下变量:
    /// <summary>
    /// Allows this class to behave like a singleton
    /// </summary>
    public static ImageCapture Instance;

    /// <summary>
    /// Keep counts of the taps for image renaming
    /// </summary>
    private int captureCount = 0;

    /// <summary>
    /// Photo Capture object
    /// </summary>
    private PhotoCapture photoCaptureObject = null;

    /// <summary>
    /// Allows gestures recognition in HoloLens
    /// </summary>
    private GestureRecognizer recognizer;

    /// <summary>
    /// Loop timer
    /// </summary>
    private float secondsBetweenCaptures = 10f;

    /// <summary>
    /// Application main functionalities switch
    /// </summary>
    internal enum AppModes {Analysis, Training }

    /// <summary>
    /// Local variable for current AppMode
    /// </summary>
    internal AppModes AppMode { get; private set; }

    /// <summary>
    /// Flagging if the capture loop is running
    /// </summary>
    internal bool captureIsActive;

    /// <summary>
    /// File path of current analysed photo
    /// </summary>
    internal string filePath = string.Empty;
现在需要添加 Awake() 和 Start() 方法的代码:
    /// <summary>
    /// Called on initialization
    /// </summary>
    private void Awake()
    {
        Instance = this;

        // Change this flag to switch between Analysis Mode and Training Mode
        AppMode = AppModes.Training;
    }

    /// <summary>
    /// Runs at initialization right after Awake method
    /// </summary>
    void Start()
    {
        // Clean up the LocalState folder of this application from all photos stored
        DirectoryInfo info = new DirectoryInfo(Application.persistentDataPath);
        var fileInfo = info.GetFiles();
        foreach (var file in fileInfo)
        {
            try
            {
                file.Delete();
            }
            catch (Exception)
            {
                Debug.LogFormat("Cannot delete file: ", file.Name);
            }
        }

        // Subscribing to the HoloLens API gesture recognizer to track user gestures
        recognizer = new GestureRecognizer();
        recognizer.SetRecognizableGestures(GestureSettings.Tap);
        recognizer.Tapped += TapHandler;
        recognizer.StartCapturingGestures();

        SceneOrganiser.Instance.SetCameraStatus("Ready");
    }
实现一个在发生点击手势时要调用的处理程序。
    /// <summary>
    /// Respond to Tap Input.
    /// </summary>
    private void TapHandler(TappedEventArgs obj)
    {
        switch (AppMode)
        {
            case AppModes.Analysis:
                if (!captureIsActive)
                {
                    captureIsActive = true;

                    // Set the cursor color to red
                    SceneOrganiser.Instance.cursor.GetComponent<Renderer>().material.color = Color.red;

                    // Update camera status to looping capture.
                    SceneOrganiser.Instance.SetCameraStatus("Looping Capture");

                    // Begin the capture loop
                    InvokeRepeating("ExecuteImageCaptureAndAnalysis", 0, secondsBetweenCaptures);
                }
                else
                {
                    // The user tapped while the app was analyzing
                    // therefore stop the analysis process
                    ResetImageCapture();
                }
                break;

            case AppModes.Training:
                if (!captureIsActive)
                {
                    captureIsActive = true;

                    // Call the image capture
                    ExecuteImageCaptureAndAnalysis();

                    // Set the cursor color to red
                    SceneOrganiser.Instance.cursor.GetComponent<Renderer>().material.color = Color.red;

                    // Update camera status to uploading image.
                    SceneOrganiser.Instance.SetCameraStatus("Uploading Image");
                }
                break;
        }
    }
注意
在分析模式下,TapHandler 方法充当启动或停止照片捕获循环的开关。
在训练模式下,该方法将从相机捕获图像。
光标为“绿色”表示摄像头可以拍摄图像。
光标为“红色”表示摄像头处于繁忙状态。
添加由应用程序用来启动图像捕获过程并存储图像的方法。
    /// <summary>
    /// Begin process of Image Capturing and send To Azure Custom Vision Service.
    /// </summary>
    private void ExecuteImageCaptureAndAnalysis()
    {
        // Update camera status to analysis.
        SceneOrganiser.Instance.SetCameraStatus("Analysis");

        // Create a label in world space using the SceneOrganiser class
        // Invisible at this point but correctly positioned where the image was taken
        SceneOrganiser.Instance.PlaceAnalysisLabel();

        // Set the camera resolution to be the highest possible
        Resolution cameraResolution = PhotoCapture.SupportedResolutions.OrderByDescending((res) => res.width * res.height).First();

        Texture2D targetTexture = new Texture2D(cameraResolution.width, cameraResolution.height);

        // Begin capture process, set the image format
        PhotoCapture.CreateAsync(false, delegate (PhotoCapture captureObject)
        {
            photoCaptureObject = captureObject;

            CameraParameters camParameters = new CameraParameters
            {
                hologramOpacity = 0.0f,
                cameraResolutionWidth = targetTexture.width,
                cameraResolutionHeight = targetTexture.height,
                pixelFormat = CapturePixelFormat.BGRA32
            };

            // Capture the image from the camera and save it in the App internal folder
            captureObject.StartPhotoModeAsync(camParameters, delegate (PhotoCapture.PhotoCaptureResult result)
            {
                string filename = string.Format(@"CapturedImage{0}.jpg", captureCount);
                filePath = Path.Combine(Application.persistentDataPath, filename);
                captureCount++;
                photoCaptureObject.TakePhotoAsync(filePath, PhotoCaptureFileOutputFormat.JPG, OnCapturedPhotoToDisk);
            });
        });
    }
添加将在捕获照片和准备分析照片时调用的处理程序。 然后根据代码设置的模式将结果传递给 CustomVisionAnalyser 或 CustomVisionTrainer。
    /// <summary>
    /// Register the full execution of the Photo Capture.
    /// </summary>
    void OnCapturedPhotoToDisk(PhotoCapture.PhotoCaptureResult result)
    {
            // Call StopPhotoMode once the image has successfully captured
            photoCaptureObject.StopPhotoModeAsync(OnStoppedPhotoMode);
    }


    /// <summary>
    /// The camera photo mode has stopped after the capture.
    /// Begin the Image Analysis process.
    /// </summary>
    void OnStoppedPhotoMode(PhotoCapture.PhotoCaptureResult result)
    {
        Debug.LogFormat("Stopped Photo Mode");

        // Dispose from the object in memory and request the image analysis
        photoCaptureObject.Dispose();
        photoCaptureObject = null;

        switch (AppMode)
        {
            case AppModes.Analysis:
                // Call the image analysis
                StartCoroutine(CustomVisionAnalyser.Instance.AnalyseLastImageCaptured(filePath));
                break;

            case AppModes.Training:
                // Call training using captured image
                CustomVisionTrainer.Instance.RequestTagSelection();
                break;
        }
    }

    /// <summary>
    /// Stops all capture pending actions
    /// </summary>
    internal void ResetImageCapture()
    {
        captureIsActive = false;

        // Set the cursor color to green
        SceneOrganiser.Instance.cursor.GetComponent<Renderer>().material.color = Color.green;

        // Update camera status to ready.
        SceneOrganiser.Instance.SetCameraStatus("Ready");

        // Stop the capture loop if active
        CancelInvoke();
    }
返回到 Unity 之前,请务必在 Visual Studio 中保存所做的更改。
现在所有脚本都已完成,返回 Unity 编辑器,然后单击 SceneOrganiser 类并将其从 Scripts 文件夹拖动到 Hierarchy Panel 中的 Main Camera 对象。
第 12 章 - 生成前
若要对应用程序执行全面测试,需要将应用程序旁加载到 HoloLens。
执行此操作之前,请确保:
第 2 章中提到的所有设置均正确设置。
已正确分配主相机检视窗口面板中的所有字段。
将脚本“SceneOrganiser”附加到主摄像头对象。
确保将预测密钥插入到 predictionKey变量中。
你已将你的预测端点插入到 predictionEndpoint 变量中。
你已将训练密钥 插入 CustomVisionTrainer 类的 trainingKey 变量中。
你已将项目 ID 插入到 CustomVisionTrainer 类的 projectId 变量中。
第 13 章 - 构建并旁加载应用程序
若要开始生成过程,请执行以下操作:
转到“文件”>“生成设置”。
勾选“Unity C# 项目”。
单击“生成”。 Unity 将启动“文件资源管理器”窗口,你需要在其中创建并选择一个文件夹来生成应用。 现在创建该文件夹,并将其命名为“应用”。 选择“应用”文件夹,然后,单击“选择文件夹”。
Unity 将开始将项目生成到“应用”文件夹。
Unity 完成生成(可能需要一些时间)后,会在生成位置打开“文件资源管理器”窗口(检查任务栏,因为它可能不会始终显示在窗口上方,但会通知你增加了一个新窗口)。
在 HoloLens 上部署:
将需要 HoloLens 的 IP 地址(用于远程部署),并确保 HoloLens 处于“开发人员模式”。 要执行此操作:
佩戴 HoloLens 时,打开“设置”。
转到“网络和 Internet”>“Wi-Fi”>“高级选项”
记下 “IPv4” 地址。
接下来,导航回“设置”,然后转到“更新和安全”>“对于开发人员”
设置“开发人员模式”。
导航到新的 Unity 生成(“应用”文件夹)并使用 Visual Studio 打开解决方案文件。
在“解决方案配置”中,选择“调试”。
在“解决方案平台”中,选择“x86,远程计算机”。 系统将提示你插入远程设备的 IP 地址(在本例中为 HoloLens,你之前记下了该地址)。

转到“生成”菜单,并单击“部署解决方案”,将应用程序旁加载到 HoloLens。
你的应用现在应显示在 HoloLens 上的已安装应用列表中,随时可以启动!
注意
若要部署到沉浸式头戴显示设备,请将“解决方案平台”设置为“本地计算机”,并将“配置”设置为“调试”,将“平台”设置为“x86”。 然后,使用“生成”菜单项,选择“部署解决方案”,将其部署到本地计算机。
要使用应用程序,请执行以下操作:
要在训练模式和预测模式之间切换应用程序功能,需要更新 AppMode 变量,该变量位于 ImageCapture 类中的 Awake() 方法中。
        // Change this flag to switch between Analysis mode and Training mode
        AppMode = AppModes.Training;
或
        // Change this flag to switch between Analysis mode and Training mode
        AppMode = AppModes.Analysis;
在训练模式下:
目视鼠标或键盘并使用点击手势。
接下来,将出现要求你提供标签的文本。
说出“鼠标”或“键盘”。
在预测模式下:
目视对象,然后使用点击手势。
将出现文本,说明检测到的对象,概率最高(这是归一化的)。
第 14 章 - 评估并改善自定义视觉模型
为提高你的服务的准确形,需要继续训练用于预测的模型。 这是通过使用具有训练和预测模式的新应用程序来完成的,预测模式要求你访问门户,本章已经介绍了这方面的内容。 准备好多次重新访问你的门户,以不断改进你的模型。
再次前往 Azure 自定义视觉门户,进入项目后,选择“预测”选项卡(从页面的顶部中心):

你将看到在应用程序运行时发送到服务的所有图像。 如果将鼠标悬停在图像上,则图像将提供对该图像所做的预测:

选择其中一幅图像,将其打开。 打开后,你将在右侧看到对该图像所做的预测。 如果预测是正确的,并且你希望将此图像添加到你的服务的训练模型中,请单击“我的标签”输入框,然后选择希望关联的标签。 完成后,单击右下角的“保存并关闭”按钮,然后继续查看下一张图像。
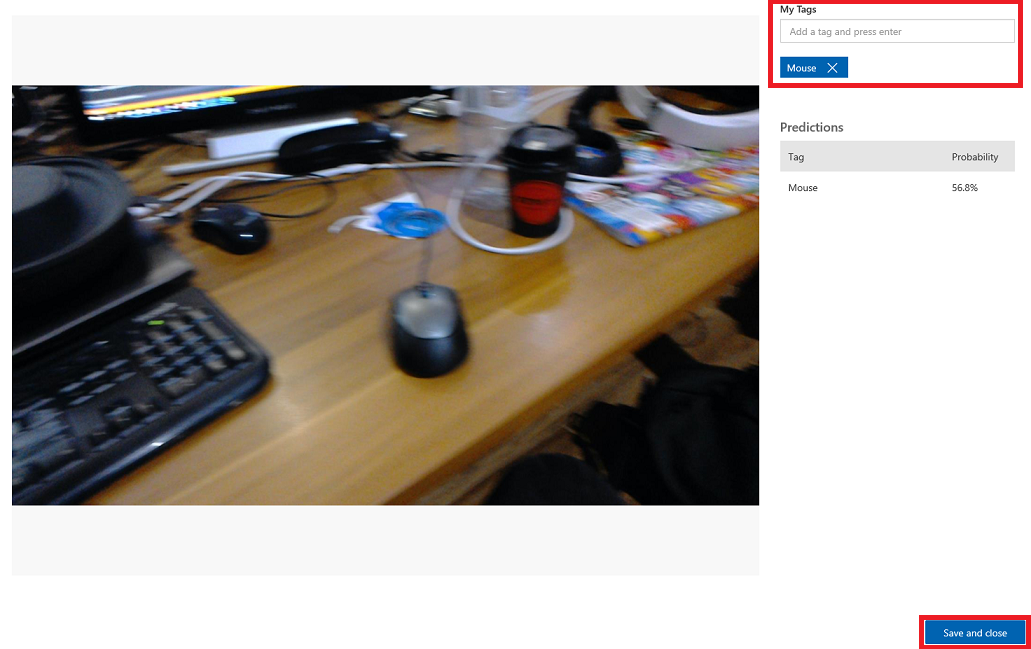
返回图像网格后,你会注意到已添加标签(并保存)的图像将被移除。 如果你发现任何图像中没有你所标记的项目,则可以删除这些图像,方法是单击该图像上的对勾(可以对多个图像执行此操作)然后单击网格页面右上角的“删除”。 在随后出现的弹出窗口中,你可以分别单击“是”、“删除”或“否”来确认删除或取消删除。

准备好继续时,请单击右上角的绿色“训练”按钮。 你的服务模型将使用你现在提供的所有图像进行训练(这将提高其准确性)。 训练完成后,请务必再次单击“设为默认”按钮,以便你的预测 URL 继续使用服务的最新迭代。


已完成的自定义视觉 API 应用程序
祝贺你,现已生成了一个混合现实应用,它可以利用 Azure 自定义视觉 API 来识别现实世界对象,训练服务模型,并显示识别内容的置信度。

额外练习
练习 1
训练自定义视觉服务来识别更多对象。
练习 2
请完成以下练习以扩展所学知识:
在识别出对象时播放声音。
练习 3
使用 API 通过应用正在分析的相同图像来重新训练服务,从而使服务更准确(预测和训练同时进行)。