使用参数启动 Windows 应用
调查
“开始”菜单中的某些 Windows 应用启动器需要在启动 Windows 应用时使用传递给可执行文件的参数。 为此,首先需要识别需要参数的启动器,然后再将 Windows 应用与包支持框架集成。
识别 Windows 应用启动器参数要求
在测试计算机上安装 Windows 应用。
打开 Windows“开始”菜单。
在“开始”菜单中找到并选择 Windows 应用启动器。
如果应用启动,则没有任何问题(在“开始”菜单中测试所有关联的 Windows 应用启动器)。
从测试计算机卸载 Windows 应用。
使用 Win32 安装介质将应用程序安装到测试计算机。
打开 Windows“开始”菜单。
在“开始”菜单中找到并右键单击 Windows 应用。
从下拉菜单中选择“更多”>>“打开文件位置”。
右键单击第一个关联的应用程序快捷方式(对所有关联的应用程序快捷方式重复后续三个步骤)。
从下拉菜单中选择“属性”。
在“目标”右侧的文本框中查看值。 在应用程序文件路径之后,如果列出了参数,则此应用
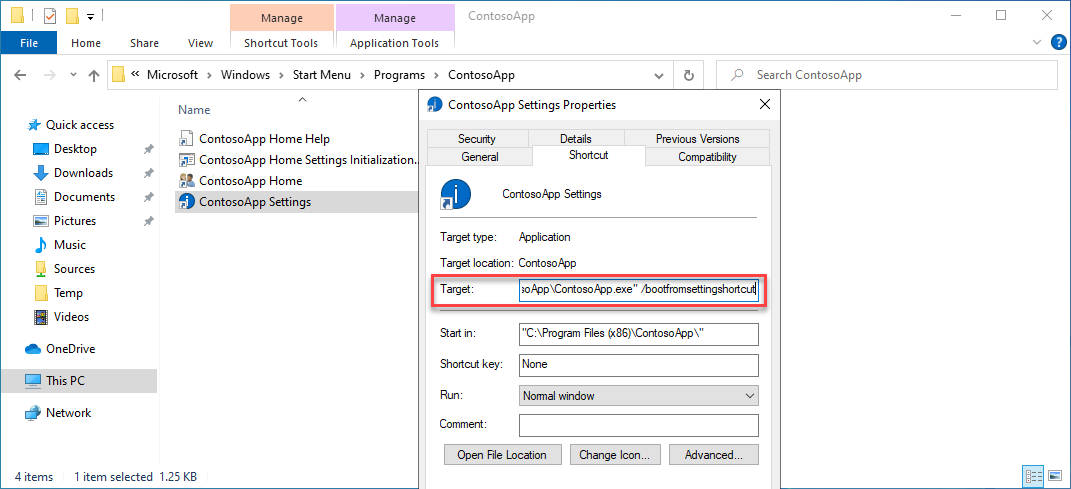
记录参数值以供将来使用。
解决方法
Windows 应用会将与应用程序相关的特定目录重定向到 C:\Program Files\WindowsApps 文件夹。 如果应用程序尝试写入 Windows 应用容器,将触发错误,写入将失败。
要解决与 Windows 应用无法写入 Windows 应用容器相关的问题,必须执行以下四个步骤:
上述步骤提供了以下指导:将 Windows 应用内容提取到本地暂存目录、将 PSF 修复文件注入到暂存 Windows 应用目录、将应用程序启动器配置为指向 PSF 启动器,然后将 PSF config.json 文件配置为将 PSF 启动器重定向到指定工作目录的应用。
下载并安装所需的工具
此流程将指导你检索和使用以下工具:
- NuGet 客户端工具
- 包支持框架
- Windows 10 SDK(最新版本)
- SysInternals Process Monitor
下面将提供有关下载和安装所需工具的分步指导。
下载 NuGet 客户端工具的最新(非预览)版本,并将 nuget.exe 保存在
C:\PSF\nuget文件夹中。通过“管理 PowerShell”窗口运行以下命令,使用 Nuget 下载包支持框架:
Set-Location "C:\PSF"
.\nuget\nuget.exe install Microsoft.PackageSupportFramework
下载并安装 Windows 10 软件开发工具包 (Win 10 SDK)。
- 下载 Win 10 SDK。
- 运行在上一步中下载的 winsdksetup.exe。
- 选择“下一步”按钮。
- 仅选择以下三项安装功能:
- 适用于桌面应用的 Windows SDK 签名工具
- 适用于 UWP C++ 应用的 Windows SDK
- 用于 UWP 应用本地化的 Windwos SDK
- 选择“安装”按钮。
- 选择“确定”按钮。
暂存 Windows 应用
通过暂存 Windows 应用,我们将提取/解压缩 Windows 应用的内容到本地目录。 将 Windows 应用解压缩到暂存位置后,可以注入 PSF 修复文件以更正任何不需要的体验。
打开“管理 PowerShell”窗口。
设置以下变量以定位特定应用文件和 Windows 10 SDK 版本:
$AppPath          = "C:\PSF\SourceApp\PSFSampleApp.msix"         ## Path to the MSIX App Installer
$StagingFolder    = "C:\PSF\Staging\PSFSampleApp"                ## Path to where the MSIX App will be staged
$OSArchitecture   = "x$((gcim Win32_Processor).AddressWidth)"    ## Operating System Architecture
$Win10SDKVersion  = "10.0.19041.0"                               ## Latest version of the Win10 SDK
通过运行以下 PowerShell cmdlet 将 Windows 应用解压缩到暂存文件夹:
## Sets the directory to the Windows 10 SDK
Set-Location "${env:ProgramFiles(x86)}\Windows Kits\10\Bin\$Win10SDKVersion\$OSArchitecture"

## Unpackages the Windows app to the staging folder
.\makeappx.exe unpack /p "$AppPath" /d "$StagingFolder"
创建和注入所需的 PSF 文件
要对 Windows 应用程序应用纠正措施,必须创建 config.json 文件,并提供有关失败的 Windows 应用启动器的信息。 如果有多个 Windows 应用启动器遇到问题,可以使用多个条目更新 config.json 文件。
更新 config.json 文件后,必须将 config.json 文件和支持的 PSF 修复文件移动到 Windows 应用包的根目录中。
打开 Visual Studio Code (VS Code) 或任何其他文本编辑器。
通过选择 VS Code 顶部的“文件”菜单,从下拉菜单中选择“新建文件”来创建新文件。
将文件另存为 config.json,方法是在 VS Code 窗口顶部选择“文件”菜单,然后从下拉菜单中选择“保存”。 在“另存为”窗口中,导航到 Windows 应用暂存目录 (C:\PSF\Staging\PSFSampleApp),并将“文件名”设置为
config.json。 选择保存按钮。将以下代码复制到新建的 config.json 文件中。
{
    "applications": [
        {
            "id": "",
            "executable": "",
            "arguments": ""
        }
    ]
}
使用 VS Code 或其他文本编辑器打开 Windows 应用暂存文件夹中的暂存 Windows 应用 AppxManifest 文件 (C:\PSF\Staging\PSFSampleApp\AppxManifest.xml)。
<Applications>
    <Application Id="PSFSAMPLE" Executable="VFS\ProgramFilesX64\PS Sample App\PSFSample.exe" EntryPoint="Windows.FullTrustApplication">
    <uap:VisualElements BackgroundColor="transparent" DisplayName="PSFSample" Square150x150Logo="Assets\StoreLogo.png" Square44x44Logo="Assets\StoreLogo.png" Description="PSFSample">
        <uap:DefaultTile Wide310x150Logo="Assets\StoreLogo.png" Square310x310Logo="Assets\StoreLogo.png" Square71x71Logo="Assets\StoreLogo.png" />
    </uap:VisualElements>
    </Application>
</Applications>
将 config.json 中的
applications.id值设置为与 AppxManifest.xml 文件的 Applications.Application.ID 字段中找到的值相同的值。
设置 config.json 中的
applications.executable值以定位位于 AppxManifest.xml 文件的 Applications.Application.Executable 字段中的相对文件夹路径。
将 config.json 中的
applications.arguments值设置为与用于启动应用程序的参数匹配。 请参阅调查 - 识别 Windows 应用启动器参数要求指导的最后一步记录的值。设置 config.json 中的
applications.workingdirectory值设置以定位位于 AppxManifest.xml 文件的 Applications.Application.Executable 字段中的相对文件夹路径。
保存已更新的 config.json 文件。
{
    "applications": [
        {
        "id": "PSFSample",
        "executable": "VFS/ProgramFilesX64/PS Sample App/PSFSample.exe",
        "arguments": "/bootfromsettingshortcut"
        }
    ]
}
将以下四个文件从基于应用程序可执行体系结构的包支持框架复制到暂存 Windows 应用的根目录。 以下文件位于 .\Microsoft.PackageSupportFramework.<Version>\bin。
应用程序 (x64) 应用程序 (x86) PSFLauncher64.exe PSFLauncher32.exe PSFRuntime64.dll PSFRuntime32.dll PSFRunDll64.exe PSFRunDll32.exe
更新 AppxManifest
创建和更新 config.json 文件后,必须为 config.json 中包含的每个 Windows 应用启动器更新 Windows 应用的 AppxManifest.xml。 AppxManifest 的应用程序现在必须定位与应用程序体系结构关联的 PSFLauncher.exe。
打开文件资源管理器,并导航到暂存的 MSIX 应用文件夹 (C:\PSF\Staging\PSFSampleApp)。
右键单击 AppxManifest.xml,然后从下拉菜单中选择“使用代码打开”(可选,可以使用另一个文本编辑器打开)。
使用以下信息更新 AppxManifest.xml 文件:
<Package ...>
...
<Applications>
    <Application Id="PSFSample"
                Executable="PSFLauncher32.exe"
                EntryPoint="Windows.FullTrustApplication">
    ...
    </Application>
</Applications>
</Package>
重新打包应用程序
所有更正都已应用,现在 Windows 应用可以重新打包到 MSIX 中,并使用代码签名证书进行签名。
打开“管理 PowerShell”窗口。
设置以下变量:
$AppPath          = "C:\PSF\SourceApp\PSFSampleApp_Updated.msix" ## Path to the MSIX App Installer
$CodeSigningCert  = "C:\PSF\Cert\CodeSigningCertificate.pfx"     ## Path to your code signing certificate
$CodeSigningPass  = "<Password>"                                 ## Password used by the code signing certificate
$StagingFolder    = "C:\PSF\Staging\PSFSampleApp"                ## Path to where the MSIX App will be staged
$OSArchitecture   = "x$((gcim Win32_Processor).AddressWidth)"    ## Operating System Architecture
$Win10SDKVersion  = "10.0.19041.0"                               ## Latest version of the Win10 SDK
通过运行以下 PowerShell cmdlet 重新打包暂存文件夹中的 Windows 应用:
Set-Location "${env:ProgramFiles(x86)}\Windows Kits\10\Bin\$Win10SDKVersion\$OSArchitecture"
.\makeappx.exe pack /p "$AppPath" /d "$StagingFolder"
通过运行以下 PowerShell cmdlet 对 Windows 应用进行签名:
Set-Location "${env:ProgramFiles(x86)}\Windows Kits\10\Bin\$Win10SDKVersion\$OSArchitecture"
.\signtool.exe sign /v /fd sha256 /f $CodeSigningCert /p $CodeSigningPass $AppPath
反馈
即将发布:在整个 2024 年,我们将逐步淘汰作为内容反馈机制的“GitHub 问题”,并将其取代为新的反馈系统。 有关详细信息,请参阅:https://aka.ms/ContentUserFeedback。
提交和查看相关反馈