操作指南:与 Graph 通知集成 (Android)
Graph 通知可让应用跨多个设备发送和管理面向用户的通知。
使用 Android 上的 Project Rome 客户端 SDK,Android 应用可以在注册后接收应用服务器发布的,面向已登录用户的通知。 该 SDK 可让应用客户端接收新的传入通知有效负载,管理现有通知的状态,以及检索通知历史记录。 有关通知及其如何实现以人为本的通知传送的详细信息,请参阅 Microsoft Graph 通知概述
Project Rome SDK 中的所有功能(包括 Graph 通知等)都是建立在一个称作“互联设备平台”的底层平台基础之上。 本指南旨在引导你完成所需的步骤来开始使用互联设备平台,并介绍如何使用该 SDK 中的 API 实现 Graph 通知特定的功能。
如需与通知方案相关的参考文档链接,请参阅 API 参考页。
以下步骤将会参考 Project Rome Android 示例应用中的代码。
对于所有的互联设备功能,都需要提供一个 Android 应用开发 IDE 和一个采用受支持体系结构之一(armeabi-v7a、arm64-v8a、x86 或 x86_64)或仿真器的 Android 设备。 该系统必须运行 Android 4.4.2 或更高版本。
互联设备平台和通知的初步设置
在实施远程连接之前,需要执行几个步骤,使 Android 应用能够连接到远程设备以及发送和接收通知。
注册应用
Project Rome SDK 的几乎所有功能(就近共享 API 除外)都需要 Microsoft 帐户 (MSA) 或 Azure Active Directory (AAD) 身份验证。 如果你没有 MSA 但想要使用 MSA,请在 account.microsoft.com 上注册。
注意
设备中继 API 不支持 Azure Active Directory (AAD) 帐户。
使用所选的身份验证方法时,必须遵照有关应用程序注册门户的说明,将应用注册到 Microsoft。 如果没有 Microsoft 开发人员帐户,需要创建一个。
使用 MSA 注册应用时,应会收到一个客户端 ID 字符串。 请保存此字符串,供稍后使用。 这样,应用便可以访问 Microsoft 的互联设备平台资源。 如果使用 AAD,请参阅 Azure Active Directory 身份验证库了解有关获取客户端 ID 字符串的说明。
添加 SDK
将以下存储库引用插入到项目根目录中的 build.gradle 文件。
allprojects {
    repositories {
        jcenter()
    }
}
然后,将以下依赖项插入到项目文件夹中的 build.gradle 文件。
dependencies {
    ...
    implementation 'com.microsoft.connecteddevices:connecteddevices-sdk:+'
}
在项目的 AndroidManifest.xml 文件中的 <manifest> 元素内添加以下权限(如果不存在这些权限)。 这样,就会授予应用连接到 Internet 的权限,并在设备上启用蓝牙发现。
请注意,只有在使用蓝牙发现时,才需要蓝牙相关的权限;对于互联设备平台中的其他功能,不需要这些权限。 此外,只需在 Android SDK 21 和更高版本上使用 ACCESS_COARSE_LOCATION。 在 Android SDK 23 和更高版本上,开发人员还必须在运行时提示用户授予定位访问权限。
<uses-permission android:name="android.permission.INTERNET" />
<uses-permission android:name="android.permission.BLUETOOTH" />
<uses-permission android:name="android.permission.BLUETOOTH_ADMIN" />
<uses-permission android:name="android.permission.ACCESS_COARSE_LOCATION" />
<uses-permission android:name="android.permission.ACCESS_NETWORK_STATE" />
接下来,转到互联连接设备功能要驻留到的活动类。 导入以下包。
import com.microsoft.connecteddevices;
import com.microsoft.connecteddevices.remotesystems;
import com.microsoft.connecteddevices.remotesystems.commanding;
设置身份验证和帐户管理
互联设备平台需要一个可在注册过程中使用的有效 OAuth 令牌。 你可以使用偏好的方法来生成和管理 OAuth 令牌。 但是,为了帮助开发人员开始使用该平台,我们在 Android 示例应用中包含了一个身份验证提供程序,以方便生成和管理刷新令牌。
若要自行实现 ConnectedDevicesAccountManager 接口,请记下以下信息:
如果使用 MSA,则需要在登录请求中包含以下范围:"wl.offline_access"、"ccs.ReadWrite"、"dds.read"、"dds.register"、"wns.connect"、"asimovrome.telemetry" 和 "https://activity.windows.com/UserActivity.ReadWrite.CreatedByApp"。
如果使用 AAD 帐户,需要请求以下受众:"https://cdpcs.access.microsoft.com"、"https://cs.dds.microsoft.com"、"https://wns.windows.com/" 和 "https://activity.microsoft.com"。
注意
设备中继 API 不支持 Azure Active Directory (AAD) 帐户。
不管是否使用提供的 ConnectedDevicesAccountManager 实现,只要使用 AAD,都需要在 Azure 门户上的应用注册(portal.azure.com >“Azure Active Directory”>“应用注册”)中指定以下权限:
- Microsoft 活动源服务
- 传送和修改此应用的用户通知
- 读取应用活动以及将其写入用户的活动源
- Windows 通知服务
- 将设备连接到 Windows 通知服务
- Microsoft 设备目录服务
- 查看设备列表
- 添加到设备和应用列表
- Microsoft 命令服务
- 与用户设备通信
- 读取用户设备
为推送通知注册应用程序
将应用程序注册到 Google 以获得 Firebase Cloud Messaging 支持。 请务必记下收到的发送方 ID 和服务器密钥,因为稍后需要用到。
注册后,必须在应用中将推送通知功能关联到互联设备平台。
mNotificationRegistration = new ConnectedDevicesNotificationRegistration();
mNotificationRegistration.setType(ConnectedDevicesNotificationType.FCM);
mNotificationRegistration.setToken(token);
mNotificationRegistration.setAppId(Secrets.FCM_SENDER_ID);
mNotificationRegistration.setAppDisplayName("SampleApp");
在 Microsoft Windows 开发人员中心注册应用以获得跨设备体验
重要
仅当你要使用 Project Rome 功能访问非 Windows 设备中的数据或对这些设备发出请求时,才需要执行此步骤。 如果只是针对 Windows 设备,则不需要完成此步骤。
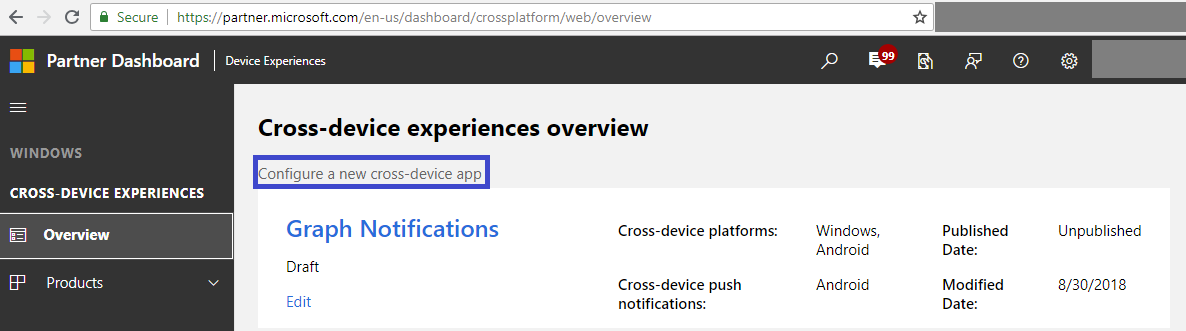
转到开发人员中心仪表板,在左侧导航窗格中导航到“跨设备体验”,并选择配置新的跨设备应用,如下所示。
开发人员中心加入过程需要执行以下步骤:
选择支持的平台 – 选择运行你的应用的、要为跨设备体验启用的平台。 对于 Graph 通知集成,可以选择“Windows”、“Android”和/或“iOS”。

提供应用 ID – 为运行你的应用的每个平台提供应用 ID。 对于 Android 应用,这是创建项目时分配给应用的包名称。 可在 Firebase 控制台中的“项目概述”->“常规”下找到包名称。 如果相同的应用有多个版本,或者存在不同的应用,而这些应用希望能够收到应用服务器发送的面向同一用户的相同通知,则你可以为每个平台添加不同的 ID(最多 10 个)。

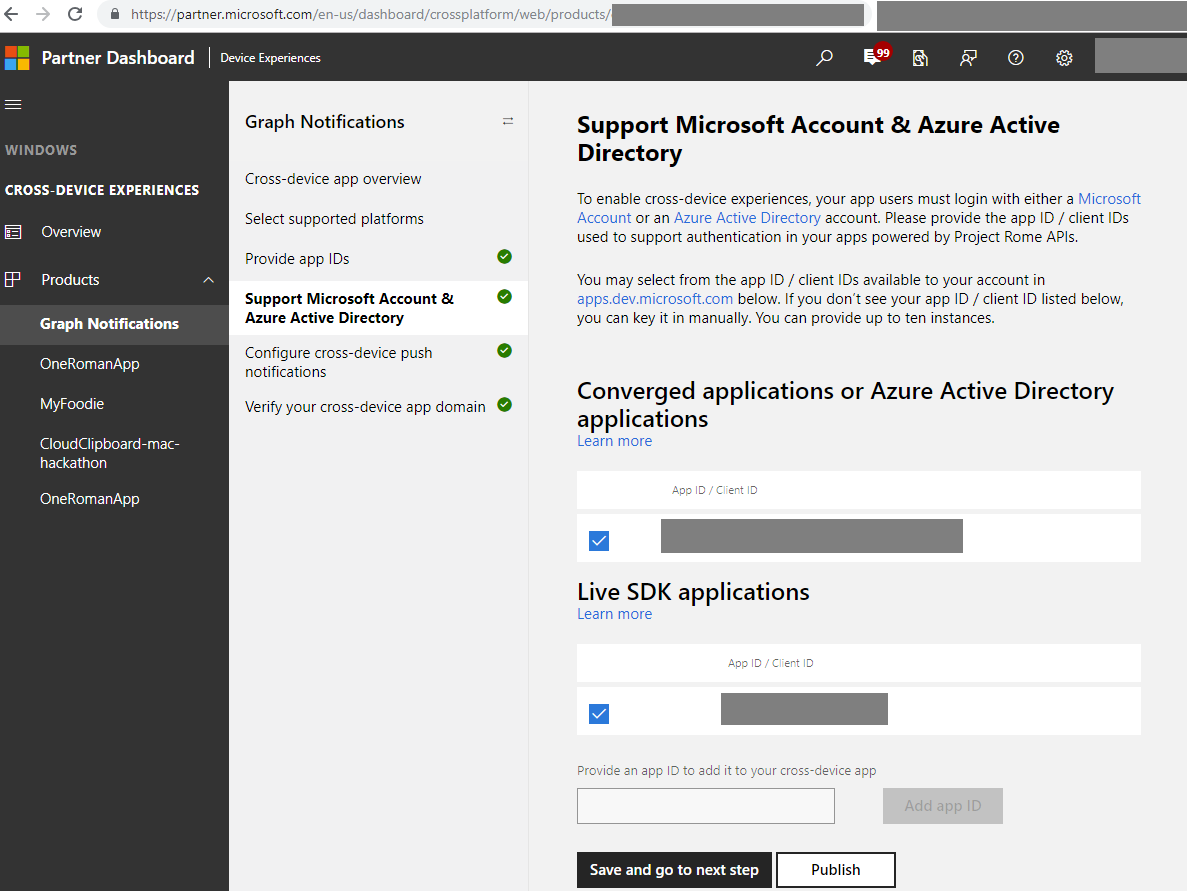
提供或选择 MSA 和/或 AAD 应用注册中的应用 ID。 对应于 MSA 或 AAD 应用注册的这些客户端 ID 是前面在执行 MSA/AAD 应用注册步骤时获取的。
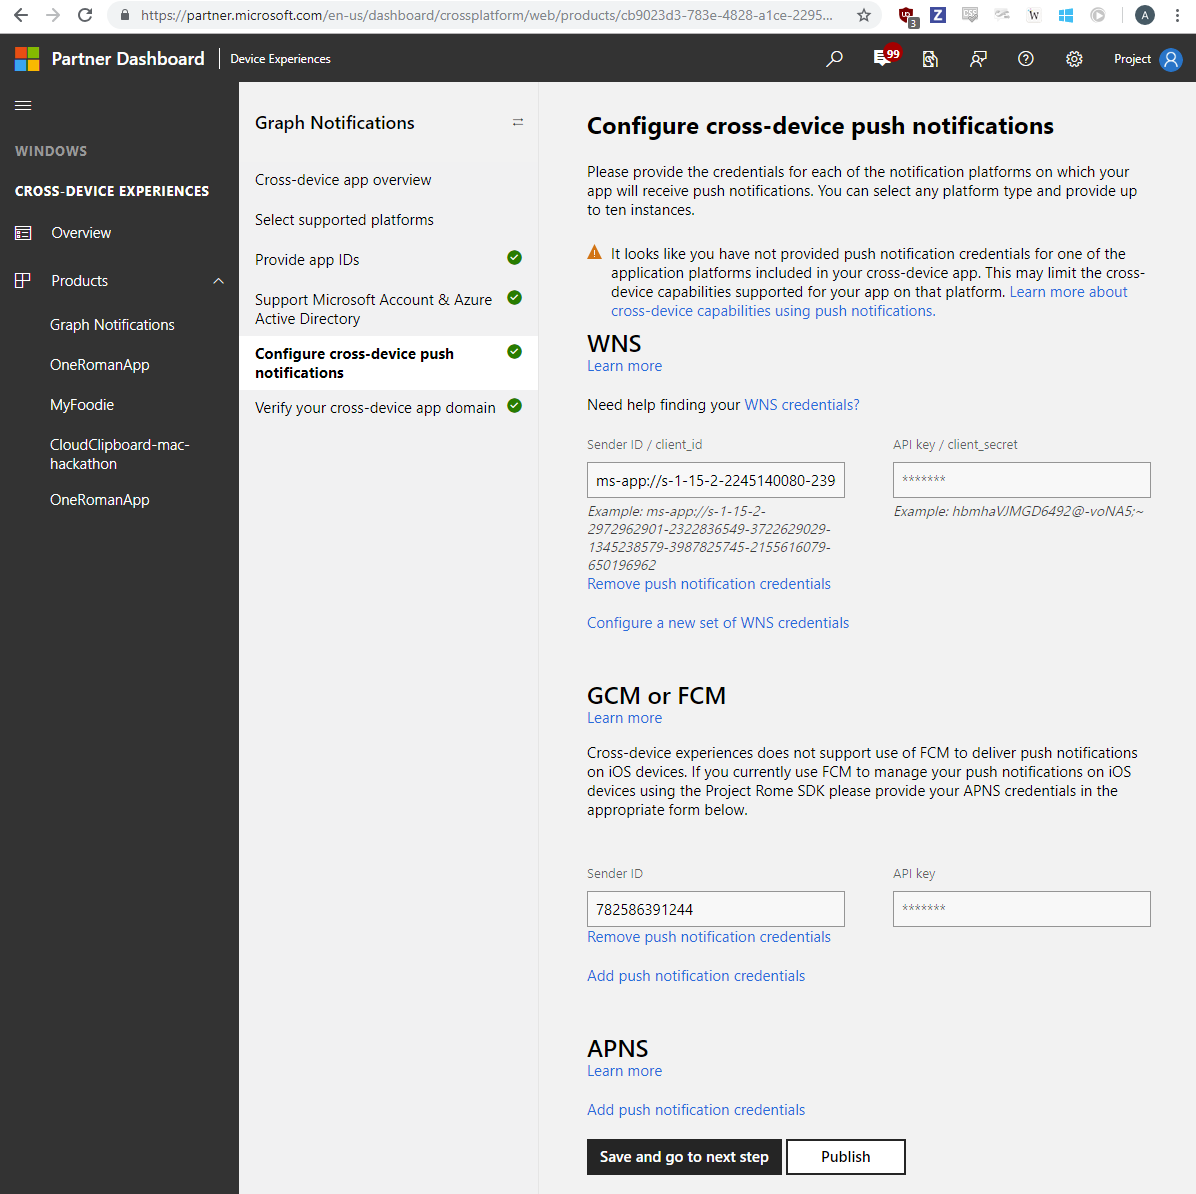
Graph 通知和其他互联设备平台功能利用主流平台上的每个本机通知平台将通知发送到应用客户端终结点,即 WNS(适用于 Windows UWP)、FCM(适用于 Android)和 APNS(适用于 iOS)。 请提供这些通知平台的凭据,以便在你发布面向用户的通知时,Graph 通知可以传送应用服务器的通知。 对于 Android,必须先启用 Cloud Messaging 服务才能使用 Microsoft Graph 通知。 另请注意,所需的发送方 ID 对应于 Firebase Cloud Messaging 发送方 ID,API 密钥对应于传统的服务器密钥。 可在“Firebase 控制台”->“项目”->“设置”中的“Cloud Messaging”选项卡下找到这两个 ID,如屏幕截图中所示。
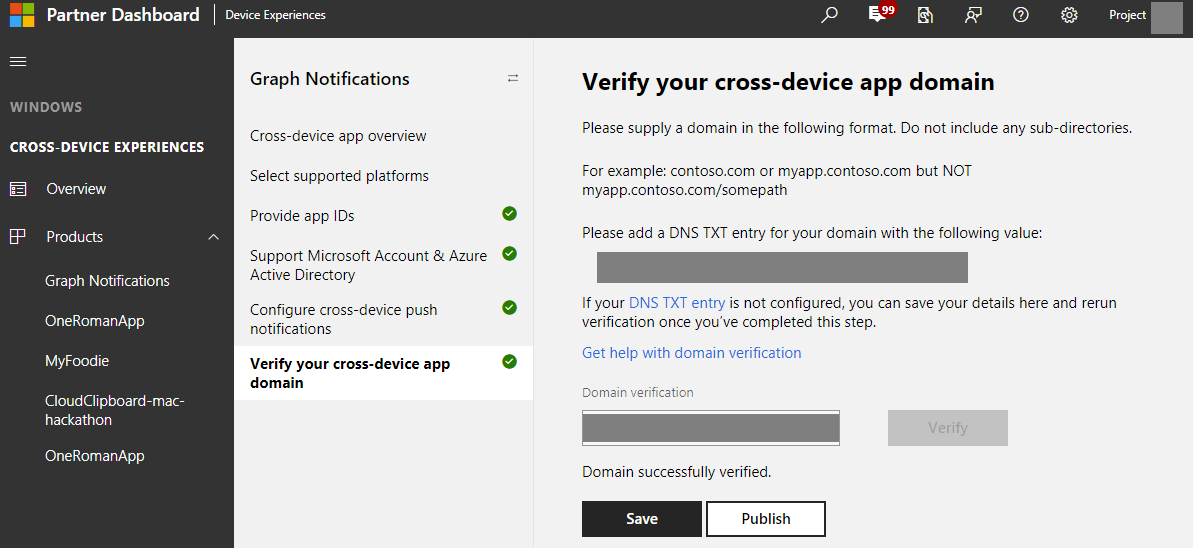
最后一步是验证跨设备应用域,这相当于验证你的应用是否拥有此域(类似于已注册应用的跨设备应用标识)的过程。
初始化 Graph 通知通道
Project Rome SDK 允许应用订阅不同的通道以接收和管理各种类型的用户数据 - 包括 Graph 通知、用户活动,等等。 所有这些数据在 UserDataFeed 中存储并同步。 UserNotification 是对应于通过 Graph 通知发送的面向用户的通知的类和数据类型。 若要与 Graph 通知集成并开始接收应用服务器发布的 UserNotification,首先需要通过创建 UserNotificationChannel 来初始化用户数据源。 应该像上述平台初始化步骤一样处理此过程:每当应用转到前台(但不是在平台初始化之前),都应该检查此过程,并可能需要重新执行。
以下方法初始化 UserNotificationChannel。
private UserNotificationChannel mNotificationChannel;
private UserDataFeed mUserDataFeed;

// ...

/**
 * Initializes the UserNotificationFeed.
 */
public void initializeUserNotificationFeed() {

    // define what scope of data this app needs
    SyncScope[] scopes = { UserNotificationChannel.getSyncScope() };

    // Get a reference to the UserDataFeed. This method is defined below
    mUserDataFeed = getUserDataFeed(scopes, new EventListener<UserDataFeed, Void>() {
        @Override
        public void onEvent(UserDataFeed userDataFeed, Void aVoid) {
            if (userDataFeed.getSyncStatus() == UserDataSyncStatus.SYNCHRONIZED) {
                // log synchronized.
            } else {
                // log synchronization not completed.
            }
        }
    });

    // this method is defined below
    mNotificationChannel = getUserNotificationChannel();
}

// instantiate the UserDataFeed
private UserDataFeed getUserDataFeed(SyncScope[] scopes, EventListener<UserDataFeed, Void> listener) {
    UserAccount[] accounts = AccountProviderBroker.getSignInHelper().getUserAccounts();
    if (accounts.length <= 0) {
        // notify the user that sign-in is required
        return null;
    }

    // use the initialized Platform instance, along with the cross-device app ID.
    UserDataFeed feed = UserDataFeed.getForAccount(accounts[0], PlatformBroker.getPlatform(), Secrets.APP_HOST_NAME);
    feed.addSyncStatusChangedListener(listener);
    feed.addSyncScopes(scopes);
    // sync data with the server
    feed.startSync();
    return feed;
}

// use the UserDataFeed reference to create a UserActivityChannel
@Nullable
private UserNotificationChannel getUserNotificationChannel() {
    UserNotificationChannel channel = null;
    try {
        // create a UserNotificationChannel for the signed in account
        channel = new UserNotificationChannel(mUserDataFeed);
    } catch (Exception e) {
        e.printStackTrace();
        // handle exception
    }
    return channel;
}
此时,mNotificationChannel 中应该包含一个 UserNotificationChannel 引用。
创建 UserNotificationReader 用于接收传入的 UserNotifications 和访问 UserNotification 历史记录
如前所示,抵达应用客户端的初始 Google Cloud Messaging 通知仅包含一个肩带 (shoulder tap),你需要将该肩带有效负载(其中包含应用服务器发布的所有 UserNotification)传递到互联设备平台,才能触发 SDK 来执行与互联设备服务器的完全同步。 这会提取应用服务器发布的、对应于此肩带的完整通知有效负载(如果前面的任何通知已发布,但由于设备连接或其他问题而未在此应用客户端上接收,则也会提取这些有效负载)。 凭借 SDK 不断执行的这种实时同步,应用客户端可以访问此登录用户的 UserNotification 数据源的本地缓存。 在这种情况下,UserNotificationReader 可让应用客户端访问此数据源 – 以通过事件侦听器接收最新的通知有效负载,或者访问可用作用户通知历史记录视图模型的完整 UserNotification 集合。
接收 UserNotification
首先需要实例化 UserNotificationReader,如果你想要对尝试启用的体验使用该信息,则还需要获取读取器中所有现有的 UserNotification。 如果此特定的设备终结点可能不是用户将你的应用安装到的唯一一个或第一个终结点,始终可以安全地假设应用服务器已将通知发布到此登录用户。
private static UserNotificationReader mReader;
private static final ArrayList<UserNotification> mHistoricalNotifications = new ArrayList<>();
// Instantiate UserNotificationReader
UserNotificationReaderOptions options = new UserNotificationReaderOptions();
mReader = mNotificationChannel.createReaderWithOptions(options);
// Read any previously published UserNotifications that have not expired yet
mReader.readBatchAsync(Long.MAX_VALUE).thenAccept(new AsyncOperation.ResultConsumer<UserNotification[]>() {
    @Override
    public void accept(UserNotification[] userNotifications) throws Throwable {
        synchronized (mHistoricalNotifications) {
            for (UserNotification notification : userNotifications) {
                if (notification.getReadState() == UserNotificationReadState.UNREAD) {
                    mHistoricalNotifications.add(notification);
                }
            }
        }

        if (RunnableManager.getHistoryUpdated() != null) {
            activity.runOnUiThread(RunnableManager.getHistoryUpdated());
        }
    }
});
现在请添加一个事件侦听器,当互联设备平台完成同步并且有需要通知你的新更改时,将触发该侦听器。 对于 Graph 通知,新的更改可能是应用服务器发布的新传入 UserNotification,或者同一用户登录到的服务器或其他已注册终结点中发生的 UserNotifcation 更新、删除和过期。
提示
你将在此事件侦听器中处理主要业务逻辑,以及根据自己的方案“使用”通知有效负载的内容。 如果你当前使用 Google Cloud Messaging 的数据消息在 OS 级别的通知托盘中构造可视通知,或者使用通知中的内容来更新某些应用内 UI,则需要在此侦听器中执行这些操作。
mReader.addDataChangedListener(new EventListener<UserNotificationReader, Void>() {
    @Override
    public void onEvent(UserNotificationReader userNotificationReader, Void aVoid) {
        userNotificationReader.readBatchAsync(Long.MAX_VALUE).thenAccept(new AsyncOperation.ResultConsumer<UserNotification[]>() {
        @Override
        public void accept(UserNotification[] userNotifications) throws Throwable {
            boolean updatedNew = false;
            boolean updatedHistorical = false;
            synchronized (sHistoricalNotifications) {
                for (final UserNotification notification : userNotifications) {
                    if (notification.getStatus() == UserNotificationStatus.ACTIVE && notification.getReadState() == UserNotificationReadState.UNREAD) {
                        switch (notification.getUserActionState()) {
                            case NO_INTERACTION:
                                // Brand new notification
                                // Insert business logic to construct a new visual notification in Android notification tray for the user to see
                                // ...
                            case DISMISSED:
                                // Existing notification that is marked as dismissed
                                // An app client receive this type of changes because another app client logged in by the same user has marked the notification as dismissed and the change is fanned-out to everywhere
                                // This state sync across app clients on different devices enable universal dismiss of notifications and other scenarios across multiple devices owned by the same user
                                // Insert business logic to dismiss the corresponding visual notification inside Android system notification tray, to make sure users don’t have to deal with redundant information across devices, and potentially insert this notification in your app’s notification history view
                                // ...
                            default:
                                // Unexpected
                        }
                    } else {
                        // ...
                    }
                }
            }
        }
    });
}
});
更新现有 UserNotification 的状态
上一部分提到,通过读取器接收的 UserNotification 更改有时可能是对现有 UserNotification 的状态更新 – 不管它是标记为已消除还是标记为已阅读。 在这种情况下,应用客户端可以选择要执行哪种操作,例如,通过删除此特定设备上的相应可视通知来启用全局消除。 退一步讲,应用客户端通常从不同的设备发起此 UserNotification 更改更新作为操作起点的一方。 可以选择更新 UserNotification 状态的时间,但是,当该设备上的用户处理了相应的可视通知,或者启用的某些应用内体验中的用户进一步处理了通知时,通常就会更新 UserNotification。 这是流呈现效果的一个示例:应用服务器发布一条面向用户 A 的通知。用户 A 在安装了应用客户端的电脑和手机上接收此通知。 该用户在电脑上单击该通知,并观察应用如何处理相应的任务。 然后,此电脑上的应用客户端将调用互联设备平台 SDK 来更新相应 UserNotification 的状态,使此项更新在此用户的所有设备之间同步。 其他应用客户端在实时收到此状态更新后,会从设备的通知中心/通知托盘/操作中心删除相应的可视警报/消息/toast 通知。 通知就是以这种方式在各个用户设备上全局消除的。
提示
UserNotification 类目前提供两种类型的状态更新 – 可以修改 UserNotificationReadState 或 UserNotificationUserActionState,并根据更新通知时要发生的情况定义自己的逻辑。 例如,可将 UserActionState 标记为 Activated(已激活)或 Dismissed(已消除),并依据该值实现全局消除。 或者,可以同时将 ReadState 标记为 Read(已阅读)或 Unread(未阅读),并根据该值确定要在应用内通知历史记录视图中显示哪些通知。 以下代码片段演示如何将通知的 UserNotificationUserActionState 标记为 Dismissed。
public void dismissNotification(int position) {
    final UserNotification notification = mNewNotifications.get(position);

    notification.setUserActionState(UserNotificationUserActionState.DISMISSED);
    notification.saveAsync();
}
反馈
即将发布:在整个 2024 年,我们将逐步淘汰作为内容反馈机制的“GitHub 问题”,并将其取代为新的反馈系统。 有关详细信息,请参阅:https://aka.ms/ContentUserFeedback。
提交和查看相关反馈