发送本地磁贴通知
在 Windows 10 中,主要应用磁贴在应用清单中定义,而辅助磁贴由应用代码以编程方式创建和定义。 本文介绍了如何使用自适应磁贴模板将本地磁贴通知发送到主要磁贴和辅助磁贴。 (本地通知是从应用代码发送的通知,而不是从 Web 服务器推送或拉取的通知。)
安装 NuGet 包
我们建议安装通知库 NuGet 程序包,它可以通过生成带有对象而不是原始 XML 的磁贴负载来简化一些操作流程。
在本文中的内联代码示例适用于使用通知库的 C#。 (如果希望创建自己的 XML,可以在本文末尾找到不包含通知库的代码示例。)
添加命名空间声明
若要访问磁贴 API,请包含 Windows.UI.Notifications 命名空间。 我们还建议包含 Microsoft.Toolkit.Uwp.Notifications 命名空间,以便可以利用磁贴帮助程序 API(必须安装通知库 NuGet 程序包才能访问这些 API)。
using Windows.UI.Notifications;
using Microsoft.Toolkit.Uwp.Notifications; // Notifications library
创建通知内容
在 Windows 10 中,使用自适应磁贴模板定义磁贴负载,通过这种方式可以为通知创建自定义视觉布局。 (若要了解自适应磁贴的功能,请参阅创建自适应磁贴。)
此代码示例会为中型磁贴和宽磁贴创建自适应磁贴内容。
// In a real app, these would be initialized with actual data
string from = "Jennifer Parker";
string subject = "Photos from our trip";
string body = "Check out these awesome photos I took while in New Zealand!";


// Construct the tile content
TileContent content = new TileContent()
{
    Visual = new TileVisual()
    {
        TileMedium = new TileBinding()
        {
            Content = new TileBindingContentAdaptive()
            {
                Children =
                {
                    new AdaptiveText()
                    {
                        Text = from
                    },

                    new AdaptiveText()
                    {
                        Text = subject,
                        HintStyle = AdaptiveTextStyle.CaptionSubtle
                    },

                    new AdaptiveText()
                    {
                        Text = body,
                        HintStyle = AdaptiveTextStyle.CaptionSubtle
                    }
                }
            }
        },

        TileWide = new TileBinding()
        {
            Content = new TileBindingContentAdaptive()
            {
                Children =
                {
                    new AdaptiveText()
                    {
                        Text = from,
                        HintStyle = AdaptiveTextStyle.Subtitle
                    },

                    new AdaptiveText()
                    {
                        Text = subject,
                        HintStyle = AdaptiveTextStyle.CaptionSubtle
                    },

                    new AdaptiveText()
                    {
                        Text = body,
                        HintStyle = AdaptiveTextStyle.CaptionSubtle
                    }
                }
            }
        }
    }
};
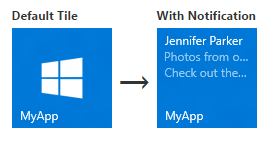
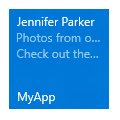
通知内容在中磁贴上显示时如下所示:
创建通知
在拥有通知内容之后,你将需要创建一个新的 TileNotification。 TileNotification 构造函数会采用一个 Windows 运行时 XmlDocument 对象,如果你使用的是通知库,则可以通过 TileContent.GetXml 方法获取该对象。
此代码示例会为新磁贴创建一个通知。
// Create the tile notification
var notification = new TileNotification(content.GetXml());
设置通知的过期时间(可选)
默认情况下,本地磁贴和锁屏提醒通知不会过期,而推送通知、定期通知和计划通知会在三天之后过期。 因为磁贴内容的保留时间不应超过必要时间,因此最佳做法是设置对于你的应用合理的到期时间,对于本地磁贴和锁屏提醒通知尤其如此。
此代码示例创建了会在十分钟后到期并从磁贴中删除的通知。
tileNotification.ExpirationTime = DateTimeOffset.UtcNow.AddMinutes(10);
发送通知
尽管本地发送磁贴通知比较简单,但将通知发送到主要磁贴或辅助磁贴略有不同。
主要磁贴
若要将通知发送到主要磁贴,请使用 TileUpdateManager 为主要磁贴创建磁贴更新程序,并通过调用“更新”发送通知。 无论是否可见,你的应用的主要磁贴始终存在,因此你可以向其发送通知,即使它没有固定。 如果用户稍后固定你的主要磁贴,你发送的通知也将随后显示。
此代码示例将通知发送到主要磁贴。
// Send the notification to the primary tile
TileUpdateManager.CreateTileUpdaterForApplication().Update(notification);
辅助磁贴
若要将通知发送到辅助磁贴,请首先确保该辅助磁贴存在。 如果你尝试为不存在的辅助磁贴创建磁贴更新程序(例如,如果用户取消固定辅助磁贴),将引发异常。 你可以使用 SecondaryTile.Exists(tileId) 来查看你的辅助磁贴是否已固定,然后为辅助磁贴创建磁贴更新程序并发送通知。
此代码示例将通知发送到辅助磁贴。
// If the secondary tile is pinned
if (SecondaryTile.Exists("MySecondaryTile"))
{
    // Get its updater
    var updater = TileUpdateManager.CreateTileUpdaterForSecondaryTile("MySecondaryTile");

    // And send the notification
    updater.Update(notification);
}
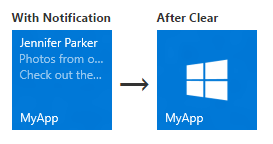
清除磁贴上的通知(可选)
在大多数情况下,你应当在用户与该内容进行交互后清除通知。 例如,当用户启动你的应用时,你可能需要清除磁贴中的所有通知。 如果你的通知有时间限制,我们建议你对通知设置到期时间,而不是将其显式清除。
此代码示例会为主要磁贴清除磁贴通知。 你可以通过为辅助磁贴创建磁贴更新程序来为辅助磁贴执行相同操作。
TileUpdateManager.CreateTileUpdaterForApplication().Clear();
对于启用通知队列且在队列中有通知的磁贴,调用 Clear 方法可清空队列。 但是,你无法通过应用的服务器清除通知;只有本地应用代码才能清除通知。
定期或推送通知只能添加新的通知或替换现有通知。 本地调用 Clear 方法会清除磁贴,不管它们自身附带的是推送通知、定期通知还是本地通知。 此方法不会清除尚未显示的计划通知。
后续步骤
使用通知队列
在执行了第一次磁贴更新之后,你可以通过启用通知队列来扩展磁贴的功能。
其他通知传送方法
本文将向你介绍如何将磁贴更新作为一个通知发送。 若要了解其他通知传送方法(包括计划通知、定期通知和推送通知),请参阅传送通知。
XmlEncode 传送方法
如果你使用的不是通知库,则此通知传送方法为备用方法。
public string XmlEncode(string text)
{
    StringBuilder builder = new StringBuilder();
    using (var writer = XmlWriter.Create(builder))
    {
        writer.WriteString(text);
    }

    return builder.ToString();
}
不包含通知库的代码示例
如果你希望使用原始 XML,而不是通知库 NuGet 程序包,请使用本文提供的前三个示例的备用代码示例。 其余的代码示例可以与通知库或原始 XML 结合使用。
添加命名空间声明
using Windows.UI.Notifications;
using Windows.Data.Xml.Dom;
创建通知内容
// In a real app, these would be initialized with actual data
string from = "Jennifer Parker";
string subject = "Photos from our trip";
string body = "Check out these awesome photos I took while in New Zealand!";


// TODO - all values need to be XML escaped


// Construct the tile content as a string
string content = $@"
<tile>
    <visual>

        <binding template='TileMedium'>
            <text>{from}</text>
            <text hint-style='captionSubtle'>{subject}</text>
            <text hint-style='captionSubtle'>{body}</text>
        </binding>

        <binding template='TileWide'>
            <text hint-style='subtitle'>{from}</text>
            <text hint-style='captionSubtle'>{subject}</text>
            <text hint-style='captionSubtle'>{body}</text>
        </binding>

    </visual>
</tile>";
创建通知
// Load the string into an XmlDocument
XmlDocument doc = new XmlDocument();
doc.LoadXml(content);

// Then create the tile notification
var notification = new TileNotification(doc);
相关主题

反馈
即将发布:在整个 2024 年,我们将逐步淘汰作为内容反馈机制的“GitHub 问题”,并将其取代为新的反馈系统。 有关详细信息,请参阅:https://aka.ms/ContentUserFeedback。
提交和查看相关反馈