设置 UWP 应用的自动生成
可以使用 Azure Pipelines 为 UWP 项目创建自动化生成。 在本文中,我们将讨论执行该操作的方法。 我们还将介绍如何使用命令行执行这些任务,以便可与任何其他生成系统相集成。
创建新的 Azure 管道
首先注册 Azure Pipelines(如果尚未这样做)。
接下来,创建一个可用于生成源代码的管道。 有关生成一个用于生成 GitHub 存储库的管道的教程,请参阅创建第一个管道。 Azure Pipelines 支持此文中列出的存储库类型。
设置自动生成
首先,我们将使用 Azure Dev Ops 中提供的默认 UWP 生成定义,并演示如何配置管道。
在生成定义模板列表中,选择“通用 Windows 平台” 模板。

此模板包含用于生成 UWP 项目的基本配置:
trigger:
- master

pool:
  vmImage: 'windows-latest'

variables:
  solution: '**/*.sln'
  buildPlatform: 'x86|x64|ARM'
  buildConfiguration: 'Release'
  appxPackageDir: '$(build.artifactStagingDirectory)\AppxPackages\\'

steps:
- task: NuGetToolInstaller@1

- task: NuGetCommand@2
  inputs:
    restoreSolution: '$(solution)'

- task: VSBuild@1
  inputs:
    platform: 'x86'
    solution: '$(solution)'
    configuration: '$(buildConfiguration)'
    msbuildArgs: '/p:AppxBundlePlatforms="$(buildPlatform)" /p:AppxPackageDir="$(appxPackageDir)" /p:AppxBundle=Always /p:UapAppxPackageBuildMode=StoreUpload'
默认模板尝试用 .csproj 文件中指定的证书对包进行签名。 如果要在生成过程中对包进行签名,必须有权访问私钥。 否则,可以在 YAML 文件中将参数 /p:AppxPackageSigningEnabled=false 添加到 msbuildArgs 部分,以禁用签名。
将项目证书添加到安全文件库
应尽量避免将证书提交到存储库,Git 默认会忽略这些证书。 为了管理敏感文件(例如证书)的安全处理,Azure DevOps 支持安全文件功能。
若要为自动生成上传证书:
在 Azure Pipelines 中,展开导航窗格中的“管道”并单击“库”。
依次单击“安全文件”选项卡、“+ 安全文件”。
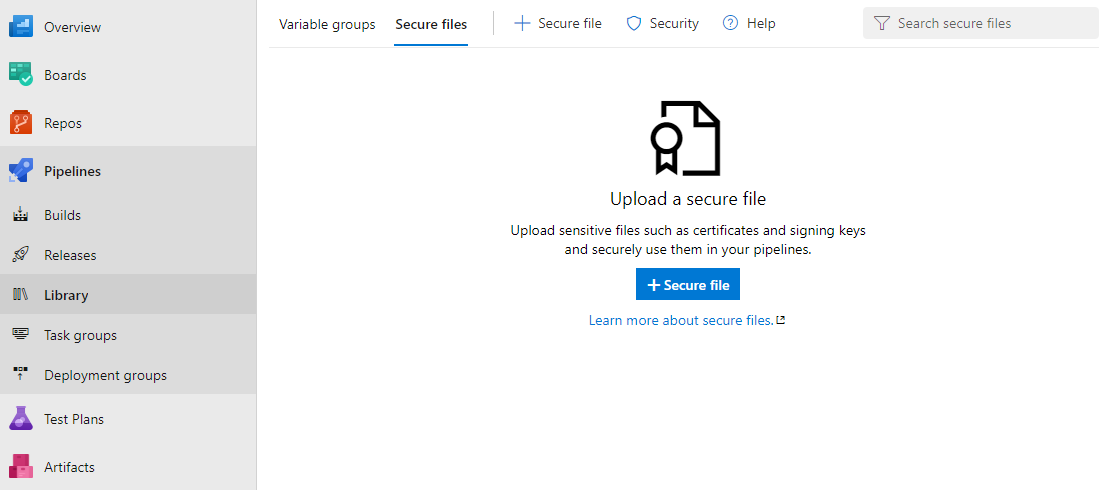
浏览到证书文件并单击“确定”。
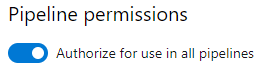
上传证书后,选择该证书以查看其属性。 在“管道权限”下,将“授权在所有管道中使用”切换开关置于启用状态。
如果证书中的私钥包含密码,则我们建议将密码存储在 Azure Key Vault 中,然后将密码链接到某个变量组。 可以使用该变量来从管道访问密码。 请注意,只有私钥支持密码;当前不支持使用本身受密码保护的证书文件。
注意
从 Visual Studio 2019 开始,不再在 UWP 项目中生成临时证书。 若要创建或导出证书,请使用此文中所述的 PowerShell cmdlet。
配置生成解决方案生成任务
此任务将工作文件夹中的任何解决方案编译为二进制文件,并生成输出应用包文件。 此任务使用 MSBuild 参数。 必须指定这些参数的值。 使用下表作为指南。
| MSBuild 参数 | 值 | 描述 |
|---|---|---|
| AppxPackageDir | $(Build.ArtifactStagingDirectory)\AppxPackages | 定义要存储生成的项目的文件夹。 |
| AppxBundlePlatforms | $(Build.BuildPlatform) | 用于定义要包含在捆绑包中的平台。 |
| AppxBundle | 始终 | 使用 .msix/.appx 文件为指定的平台创建 .msixbundle/.appxbundle。 |
| UapAppxPackageBuildMode | StoreUpload | 生成要旁加载的 .msixupload/.appxupload 文件和 _Test 文件夹。 |
| UapAppxPackageBuildMode | CI | 仅生成 .msixupload/.appxupload 文件。 |
| UapAppxPackageBuildMode | SideloadOnly | 仅生成要旁加载的 _Test 文件夹。 |
| AppxPackageSigningEnabled | true | 启用包签名。 |
| PackageCertificateThumbprint | 证书指纹 | 此值必须与签名证书中的指纹匹配,或者为空字符串。 |
| PackageCertificateKeyFile | 路径 | 要使用的证书的路径。 此值是从安全文件元数据中检索的。 |
| PackageCertificatePassword | 密码 | 证书中私钥的密码。 建议将密码存储在 Azure Key Vault 中,并将密码链接到变量组。 可将变量传递到此参数。 |
配置生成
如果需要通过使用命令行或使用任何其他生成系统生成解决方案,请使用这些参数运行 MSBuild。
/p:AppxPackageDir="$(Build.ArtifactStagingDirectory)\AppxPackages\\"
/p:UapAppxPackageBuildMode=StoreUpload
/p:AppxBundlePlatforms="$(Build.BuildPlatform)"
/p:AppxBundle=Always
配置包签名
若要为 MSIX(或 .appx)包签名,管道需要检索签名证书。 为此,请在 VSBuild 任务的前面添加 DownloadSecureFile 任务。
这样,就可以通过 signingCert 访问签名证书。
- task: DownloadSecureFile@1
  name: signingCert
  displayName: 'Download CA certificate'
  inputs:
    secureFile: '[Your_Pfx].pfx'
接下来,更新 VSBuild 任务以引用签名证书:
- task: VSBuild@1
  inputs:
    platform: 'x86'
    solution: '$(solution)'
    configuration: '$(buildConfiguration)'
    msbuildArgs: '/p:AppxBundlePlatforms="$(buildPlatform)"
                  /p:AppxPackageDir="$(appxPackageDir)"
                  /p:AppxBundle=Always
                  /p:UapAppxPackageBuildMode=StoreUpload
                  /p:AppxPackageSigningEnabled=true
                  /p:PackageCertificateThumbprint=""
                  /p:PackageCertificateKeyFile="$(signingCert.secureFilePath)"'
注意
PackageCertificateThumbprint 参数被有意设置为空字符串,目的是引以注意。 如果在项目中设置指纹,但该指纹与签名证书不匹配,则生成将会失败并出现错误:Certificate does not match supplied signing thumbprint。
查看参数
使用 $() 语法定义的参数是在生成定义中定义的变量,在其他生成系统中将会更改。

若要查看所有预定义的变量,请参阅预定义的生成变量。
配置“发布生成项目”任务
默认的 UWP 管道不会保存生成的项目。 若要将发布功能添加到 YAML 定义,请添加以下任务。
- task: CopyFiles@2
  displayName: 'Copy Files to: $(build.artifactstagingdirectory)'
  inputs:
    SourceFolder: '$(system.defaultworkingdirectory)'
    Contents: '**\bin\$(BuildConfiguration)\**'
    TargetFolder: '$(build.artifactstagingdirectory)'

- task: PublishBuildArtifacts@1
  displayName: 'Publish Artifact: drop'
  inputs:
    PathtoPublish: '$(build.artifactstagingdirectory)'
可以在生成结果页的“项目”选项中查看生成的项目。
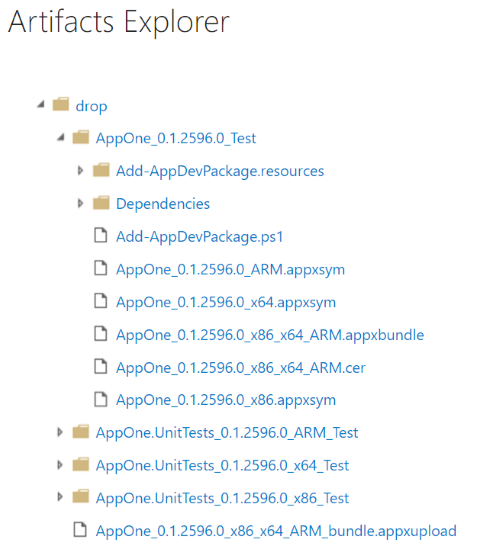
由于我们已将 UapAppxPackageBuildMode 属性设置为 StoreUpload,项目文件夹将包含提交到应用商店的程序包 (.msixupload/.appxupload)。 请注意,还可以将常规应用包 (.msix/.appx) 或应用程序包 (.msixbundle/.appxbundle/) 提交到应用商店。 在本文中,我们将使用 .appxupload 文件。
地址绑定错误
如果将多个 UWP 项目添加到解决方案,然后尝试创建程序包,则可能收到如下错误。
MakeAppx(0,0): Error : Error info: error 80080204: The package with file name "AppOne.UnitTests_0.1.2595.0_x86.appx" and package full name "8ef641d1-4557-4e33-957f-6895b122f1e6_0.1.2595.0_x86__scrj5wvaadcy6" is not valid in the bundle because it has a different package family name than other packages in the bundle
出现此错误是因为,在解决方案级别上,哪个应用应出现在程序包中不明确。 若要解决此问题,请打开每个项目文件,并在第一个 <PropertyGroup> 元素的末尾添加以下属性。
| 项目 | 属性 |
|---|---|
| 应用 | <AppxBundle>Always</AppxBundle> |
| UnitTests | <AppxBundle>Never</AppxBundle> |
然后,从生成步骤中删除 AppxBundle MSBuild 参数。
相关主题
反馈
即将发布:在整个 2024 年,我们将逐步淘汰作为内容反馈机制的“GitHub 问题”,并将其取代为新的反馈系统。 有关详细信息,请参阅:https://aka.ms/ContentUserFeedback。
提交和查看相关反馈