自定义文件夹的 Web 视图
[此功能仅在 Windows XP 或更早版本中受支持。 ]
Web 视图是使用 Windows 资源管理器显示有关 Shell 文件夹内容信息的一种强大而灵活的方法。
简介
Windows 为用户提供了两种查看和导航 Shell 命名空间的主要方法。 其中最熟悉的经典样式类似于熟悉的 Windows 文件管理器。 右窗格以以下五种格式之一列出当前所选文件夹的内容:大图标、小图标、列表、详细信息和缩略图。 与 Windows 文件管理器的主要区别在于左窗格,它看起来与 Windows Internet Explorer 的资源管理器栏非常相似。 它可以调整大小或删除,并且除了熟悉的文件系统树(如搜索窗格)外,还可以显示多个窗格。
注意
本文档中的信息不适用于 Windows XP,讨论的技术仅适用于早期版本的 Windows。
下图显示了经典样式的“打印机”文件夹。
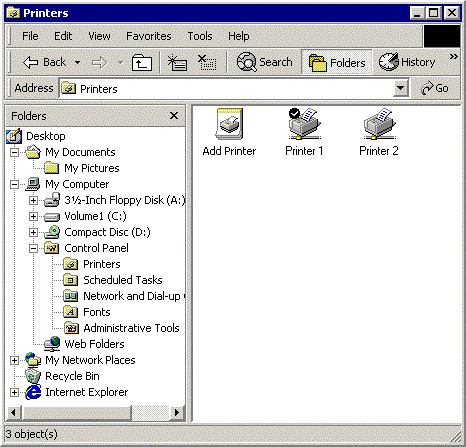
经典样式非常适用于普通文件系统文件夹和文件。 但是,随着 Windows 95 的引入,文件系统已演变为 命名空间。 命名空间允许创建 虚拟文件夹(如打印机或网络邻里),这些文件夹可以表示与普通文件系统文件夹非常不同的信息类型。
Web 样式(也称为 Web 视图)提供比经典样式更灵活、更强大的信息呈现方式。 在 Web 视图中,用户基本上使用 Internet Explorer 查看和导航命名空间。 Web 视图的基本布局类似于经典样式。 资源管理器栏保持不变。 但是,文件列表占用的区域将成为一个常规用途的显示区域,该显示区域实际上是一个网页。 Web 视图仍用于显示有关文件夹内容的信息,但对显示哪些信息或显示方式几乎没有限制。 每个文件夹都可以有自己的 Web 视图,根据特定的功能进行自定义。
下图显示了先前在经典样式) 中显示的“打印机”文件夹 (Web 视图。

与传统网页非常类似,Web 视图由基于 HTML 的模板控制。 创作 Web 视图模板几乎与创作网页相同,在内容和信息布局方面提供相同的灵活性。 Web 视图模板可以使用动态 HTML (DHTML) 和脚本来响应事件,例如用户单击项。 它们还可以托管对象,允许它们从文件夹或其内容获取和显示信息。
用户可以通过以下方式选择 Web 视图:启动 Windows 资源管理器,单击“视图”菜单上的“文件夹选项”,然后选择此选项:在文件夹中启用 Web 内容。 但是,用户还可以通过单击“ 视图 ”菜单、指向资源管理器 栏并单击“ 文件夹”来启动 Internet Explorer 并将浏览器指向文件系统。 在 Web 视图中,Internet Explorer 和 Windows Explorer 之间几乎没有区别。
在右窗格的左侧,“打印机 Web”视图显示一个横幅,其中包含文件夹的名称和图标,后跟有关该文件夹的信息块。 通常的文件列表占据页面右侧。
当用户单击某个项时,有关该项的详细信息将显示在信息块中。 “打印机”Web 视图实际上显示的信息与经典样式中可用的信息大致相同,但它以更易用的格式显示。 但是,Web 视图不仅仅是显示经典样式信息的不同方式。 例如,指向有用网站的链接可以显示在信息块下方,这是经典样式中不可用的功能。 如果用户单击该链接,将显示该网站。
上图中显示的打印机 Web 视图类似于经典样式,因为基础 Web 视图模板 (.htt 文件) 是以这种方式编写的。 例如,文件列表不是由 Web 视图模板直接生成的。 它由 Web 视图模板托管的 WebViewFolderContents 对象创建和显示。 对象的方法和属性允许 Web 视图控制其布局并获取有关特定项的信息。 横幅和信息块的内容和布局在 Web 视图模板中指定。
由于 Web 视图支持 DHTML,因此该模板还可用于处理用户交互。 例如,当用户单击其中一个打印机图标时, WebViewFolderIcon 对象将触发 SelectionChanged 事件。 该模板使用以脚本编写的 DHTML 事件处理程序来检索请求的信息并将其显示在信息块中。
打印机文件夹的这个简单示例绝不是使用 Web 视图的唯一方法。 通过编写自己的模板和对象(如有必要),可以使用 Web 视图以你认为最有效的任何方式显示信息并与用户交互。 请注意,目前,Web 视图模板仅显示系统定义的虚拟文件夹。 尽管开发人员可以通过实现命名空间扩展来创建虚拟文件夹,但他们必须使用 命名空间扩展 中所述的技术来显示它。
使用 Web 视图模板
可以通过修改文件夹的 Desktop.ini 文件,以有限的方式自定义数据在 Web 视图中的显示方式。 有关详细信息 ,请参阅使用Desktop.ini自定义文件夹 。 自定义 Web 视图的一种更灵活、更强大的方法是创建自定义 Web 视图模板。
Web 视图模板控制 Web 视图中显示的内容和显示方式。 它使用标准 HTML、DHTML 和脚本技术来获取和显示信息并与用户交互。 本部分讨论如何通过检查简单的模板-Generic.htt 来创建 Web 视图。
<html>
    <style>
    <!-- This section defines a variety of styles that can be used
     when displaying the document -->
        body        {font: 8pt/10pt verdana; margin: 0}
        #Banner     {position: absolute; width: 100%; height: 88px; background: URL(res://webvw.dll/folder.gif) no-repeat top left}
        #MiniBanner {position: absolute; width: 100%; height: 32px; background: window}
        #Icon       {position: absolute; left: 11px; top: 12px; width: 64px; height: 64px}
        #FileList   {position: absolute; left: 30%; top: 88px; width: 1px; height: 1px}
        #Info       {position: absolute; top: 88px; width: 30%; background: window; overflow: auto}
        p       {margin-left: 20px; margin-right: 8px}
        p.Title     {font: 16pt/16pt verdana; font-weight: bold; color: #0099FF}
        a:link      {color: #FF6633}
        a:visited   {color: #0099FF}
        a:active    {color: black}
    </style>

    <head>
        <!-- allow references to any resources you might add to the
         folder -->
        <base href="%THISDIRPATH%\">

        <script language="JavaScript">

        <!-- This section defines a number of JavaScript utilities -->
            var L_Intro_Text    = "This folder contains a variety of interesting stuff.<br><br>To get information about any of them, click the items icon.<br><br>";
            var L_Multiple_Text = " objects selected.";

            function FixSize() {
            // this function handles layout issues not covered by the style sheet

                var hideTop = 200;
                var hideLeft    = 400;
                var miniHeight  = 32;

                if (200 > document.body.clientHeight) {
                //A short window. Use the minibanner
                    document.all.Banner.style.visibility = "hidden";
                    document.all.MiniBanner.style.visibility = "visible";
                    document.all.FileList.style.top = 32;
                    document.all.Info.style.top = 32;
                }

                else {
                //A normal window. Use the normal banner
                    document.all.Banner.style.visibility = "visible";
                    document.all.MiniBanner.style.visibility = "hidden";
                    document.all.FileList.style.top = (document.all.Banner.offsetHeight - 32) + "px";
                    document.all.Info.style.top = (document.all.Banner.offsetHeight) + "px";
                    document.all.Rule.style.width = (document.body.clientWidth > 84 ? document.body.clientWidth - 84 : 0) + "px";
                }
                if (400 > document.body.clientWidth) {
                //A narrow window. Hide the Info region and expand the file list region
                    document.all.Info.style.visibility = "hidden";
                    document.all.FileList.style.pixelLeft = 0;
                    document.all.FileList.style.pixelTop = document.all.Info.style.pixelTop;
                }

                else {
                //Normal width
                    document.all.Info.style.visibility = "visible";
                    document.all.FileList.style.pixelLeft = document.all.Info.style.pixelWidth;
                }
                document.all.FileList.style.pixelWidth = document.body.clientWidth - document.all.FileList.style.pixelLeft;
                document.all.FileList.style.pixelHeight = document.body.clientHeight - document.all.FileList.style.pixelTop;
                document.all.Info.style.pixelHeight = document.body.clientHeight - document.all.Info.style.pixelTop;
            }

            function Init() {
                /* Set the initial layout and have FixSize() called whenever the window is resized*/
                window.onresize = FixSize;
                FixSize();
                TextBlock.innerHTML = L_Intro_Text;
            }
        </script>

        <script language="JavaScript" for="FileList" event="SelectionChanged">
            // Updates the TextBlock region when an item is selected
            var data;
            var text;

            // name
            text = "<b>" + FileList.FocusedItem.Name + "</b>";

            // comment
            data = FileList.Folder.GetDetailsOf(FileList.FocusedItem, 3);
            if (data)
                text += "<br>" + data;

            // documents
            data = FileList.Folder.GetDetailsOf(FileList.FocusedItem, 1);
            if (data)
                text += "<br><br>" + FileList.Folder.GetDetailsOf(null, 1) + ": " + data;

            // status
            data = FileList.Folder.GetDetailsOf(FileList.FocusedItem, 2);
            if (data)
                text += "<br><br><b><font color=red>" + data + "</font></b>";

            // tip?
            data = FileList.Folder.GetDetailsOf(FileList.FocusedItem, -1);
            if (data != "" && data != FileList.FocusedItem.Name)
                text += "<br><br>" + data;

            TextBlock.innerHTML = text;
        </script>
    </head>
<!-- The body of the document controls the actual data display.
 It uses several scripting objects to communicate with the
 namespace folder, and calls on the JavaScript objects defined
 in the header to handle much of the processing -->
    <body scroll=no onload="Init()">

        <!-- The normal banner. This banner displays the folder
         name and icon at the top of the WebView pane. This banner
         is used if the WebView pane is sufficiently large to
         display the icon and still have room for some information -->
        <div id="Banner" style="visibility: hidden">
            <!-- Display the folder name using a table with nowrap
             to prevent word wrapping. Explorer will replace
              %THISDIRNAME% with the current folder name -->
            <table class="clsStd"><tr><td nowrap>
                <p class=Title style="margin-left: 104px; margin-top: 16px">
                %THISDIRNAME%
            </td></tr></table>
            <!-- this is more efficient than a long graphic, but it has to be adjusted in FixSize() -->
            <hr id="Rule" size=1px color=black style="position: absolute; top: 44px; left: 84px">
            <!-- Load the WebViewFolderIcon object, which extracts the folder's icon -->
            <object id=Icon classid="clsid:e5df9d10-3b52-11d1-83e8-00a0c90dc849">
                <param name="scale" value=200>
            </object>
        </div>

        <!-- The mini banner. This banner is used when the
         WebView pane is too short to display the icon. Instead,
          it displays only the folder name -->
        <div id="MiniBanner" style="visibility: hidden">
            <!-- use a table with nowrap to prevent word wrapping -->
            <table class="clsStd"><tr><td nowrap>
                <p class=Title style="margin-left: 16px; margin-top: 4px">
                %THISDIRNAME%
            </td></tr></table>
        </div>

        <!-- The Info region. This displays the information
         associated with a folder or file. Javascript in the header
         is used to generate the regions contents by assigning
         a text block to TextBlock.innerHTML -->
        <div id="Info">
            <p style="margin-top: 16px");
            <span id="TextBlock">
            </span>
        </div>
        <!-- end left info panel -->

        <!-- Load the WebViewFolderContents object. This object
         returns information on the contents of the folder that
          can be used in the information display.  -->
        <object id="FileList" border=0 tabindex=1 classid="clsid:1820FED0-473E-11D0-A96C-00C04FD705A2"
        </object>

    </body>
</html>
创建自己的 Web 视图模板的一种简单方法是采用 Generic.htt 并对其进行修改。 由于它相当有限,你还应该查看其他更复杂的示例来了解其他想法。 可以通过在系统中搜索所有 Web 视图模板使用的 .htt 扩展来找到它们。 如果要为文件夹创建自定义模板,应从默认 Folder.htt 模板开始,该模板通常存储在 C:\Winnt\Web 或 C:\Windows\Web 中。 请注意,这些文件被定义为隐藏,因此可能需要修改 Windows 资源管理器设置才能查看它们。 创建 .htt 文件后,应将其标记为只读并隐藏。
Web 视图模板使用 .htt 扩展,因为它们与传统.htm文档略有不同。 main差异是 .htt 文件中的几个特殊变量,系统将其替换为当前命名空间值。 %THISDIR% 和 %THISDIRPATH% 变量表示当前所选文件夹的名称和路径。 %TEMPLATEDIR% 变量表示存储 Web 视图样式表的文件夹。
与大多数 HTML 模板一样,.htt 文件有两个基本部分:正文和头部。 模板正文控制 Web 视图的基本布局,并加载用于与命名空间通信和显示信息的对象。 头包含执行诸如处理重设大小和从文件夹获取信息的等任务的脚本和函数。 大多数模板(包括 Generic.htt)还包括样式表。 通常,最好在模板中包含样式表信息。 当 Web 视图与远程命名空间一起使用时,单独的样式表可能无法正常工作。
模板正文
模板的正文指定 Web 视图将呈现的内容。 这也是用于显示信息并与命名空间文件夹进行通信的对象加载的位置。 Generic.htt 定义的布局类似于上一部分中的图中所示的布局。 有三个显示区域:视图左侧的横幅和信息块和右侧的文件列表。
这些区域都是由样式表和 DHTML 分配的标识符。 如下一部分所述,有两个可能的横幅,标识符为“横幅”和“MiniBanner”。 信息块区域的标识符为“Info”。 文件列表对象的标识符为“FileList”。 区域 布局 的详细信息由样式表和 Microsoft JScript 函数 FixSize 处理,本章稍后将对此进行讨论。
横幅区域
横幅位于屏幕顶部,位于 Web 视图的左上角。 普通横幅显示其内容显示在右侧文件列表中的文件夹的名称和图标。 但是,如果窗口太短,图标下方可能没有显示信息的空间。 出于此原因,Generic.htt 还定义了一个仅显示文件夹名称的微型班纳。 这两个横幅最初定义为隐藏。 FixSize 选择要显示哪一个,并将其设置为“可见”。
Generic.htt 的常规横幅由以下项定义:
<div id="Banner" style="visibility: hidden">
    <table class="clsStd"><tr><td nowrap>
    <p class=Title style="margin-left: 104px; margin-top: 16px">
        %THISDIRNAME%
    </td></tr></table>
    <hr id="Rule" size=1px color=black style="position: absolute; top: 44px; left: 84px">
    <object id=Icon classid="clsid:e5df9d10-3b52-11d1-83e8-00a0c90dc849">
        <param name="scale" value=200>
    </object>
</div>
横幅部分的第一部分显示标题,其下方有一个水平规则。 表标记用于控制其位置。 nowrap 属性设置为 用于防止换行的 标记。 系统将 %THISDIRNAME% 替换为当前文件夹的名称。 为简单起见,将加载标识符为“Icon”的 WebViewFolderIcon 对象,以提取并显示文件夹的图标。
小班纳部分类似于普通横幅。 标题的格式稍高一些,没有规则。 由于没有图标,因此不会加载 WebViewFolderIcon 对象。
<div id="MiniBanner" style="visibility: hidden">
    <table class="clsStd"><tr><td nowrap>
        <p class=Title style="margin-left: 16px; margin-top: 4px">
        %THISDIRNAME%
    </td></tr></table>
</div>
信息区域
横幅下方的 Web 视图部分用于显示有关所选项目的详细信息。 如果未选择任何项,则显示默认消息。 由于 Generic.htt 仅显示单个文本块,因此此部分非常简单。
<div id="Info">
    <p style="margin-top: 16px");
        <span id="TextBlock">
        </span>
</div>
收集信息的大部分工作都由 一个文件夹信息脚本 处理,该脚本将在本章的后面部分讨论。 它通过将文本分配给 TextBlock.innerHTML 来显示信息。
可以通过修改这些元素或包括其他元素来轻松自定义信息显示。 可以使用可以放在网页上的任何内容。 例如,若要显示指向网站的链接,可以在 Generic.htt 中的文本块后面添加定位点元素。
<div id="Info">
    <p style="margin-top: 16px");
        <span id="TextBlock">
        </span>
        <span>
        <p> Click on <a href="https://your.address"></a>
        </span>
</div>
FileList 区域
最后,Generic.htt 为 FileList 区域加载 WebViewFolderContents 对象。 由于其标识符设置为“FileList”,因此从现在起,它将称为 FileList 对象。
<object id="FileList" border=0 tabindex=1 classid="clsid:1820FED0-473E-11D0-A96C-00C04FD705A2"
        </object>
FileList 对象在大多数 Web 视图中找到,并有多种用途。 FileList 显示所选文件夹包含的项目列表,其选项和外观与经典样式的文件列表相同。 选择某个项后,FileList 将通过触发 SelectionChanged 事件来通知 Web 视图。 FileList 还公开可用于检索有关各个项的信息和控制其显示区域的位置和大小的方法和属性。
尽管 FileList 对象非常有用,但它只返回标准文件系统信息,例如文件大小或属性。 若要从 Shell 文件夹中检索其他类型的信息,必须加载和处理其他对象。 网页可以承载的任何对象都可以与 Web 视图一起使用。
模板头
Web 视图模板的头包含执行大部分实际工作的脚本和函数。 需要处理两个基本任务。 一个是 Web 视图显示器的布局,需要调整该布局以适应不同的显示区域。 另一个是检索和显示选定项目时文件夹中的信息。 与样式表一样,最好将所有脚本和函数包含在模板中,而不是将它们引用为单独的文件。
控制 Web 视图布局
Web 视图的可用区域取决于 Web 视图窗口的大小以及 Windows 资源管理器栏占用的面积。 每当调整窗口或 Windows 资源管理器栏的大小时,此区域都会更改。 因此,当加载 Web 视图时,布局需要与可用区域匹配,并在调整其大小时进行相应更改。 大部分布局是在样式表中指定的。 例如,信息区域被定义为占据 Web 视图最左侧的 30%。
#Info       {position: absolute; top: 88px; width: 30%; background: window;
    overflow: auto}
调整 Web 视图的大小后,信息区域的宽度将更改以保持该百分比。 FixSize 管理样式表无法处理的布局问题。
加载和初始化 Web 视图
加载 Web 视图时,需要调整布局以适应可用的显示区域。 由于尚未选择任何项目,因此 Web 视图通常显示适用于整个文件夹的一些默认信息。 为了处理初始化,Generic.htt 的 <BODY> 标记将检测 onload 事件并调用 Init 函数。
<body scroll=no onload="Init">
Init 是一个简单的 JScript 函数。
function Init() {
    window.onresize = FixSize;
    FixSize();
    TextBlock.innerHTML = L_Intro_Text;
}
Init 将 FixSize 绑定到 window.onresize 事件,以便在 Web 视图显示区域更改时调用它。 然后,它运行 FixSize 以设置初始布局,并将L_Intro_Text分配给信息区域。 L_Intro_Text是在样式表部分定义的介绍性文本块。
var L_Intro_Text    = "This folder contains a variety of interesting stuff.<br>
<br>To get information about any of them, click the items icon.<br><br>";
使用 FixSize 函数调整布局
FixSize 函数用于指定样式表无法处理的布局的多个方面。
可以使用两个可能横幅,具体取决于 Web 视图的高度。
if (200 > document.body.clientHeight) {
    //A short window. Use the minibanner.
    document.all.Banner.style.visibility = "hidden";
    document.all.MiniBanner.style.visibility = "visible";
    document.all.FileList.style.top = 32;
    document.all.Info.style.top = 32;
}
else {
    //A normal window. Use the normal banner.
    document.all.Banner.style.visibility = "visible";
    document.all.MiniBanner.style.visibility = "hidden";
    document.all.FileList.style.top = (document.all.Banner.offsetHeight - 32) + "px";
    document.all.Info.style.top = (document.all.Banner.offsetHeight) + "px";
    document.all.Rule.style.width = (document.body.clientWidth > 84 ?                                    document.body.clientWidth - 84 : 0) + "px";
}
Generic.htt 使用 200 像素的高度作为普通和微型班机之间的分隔线。 它将所选横幅的样式设置为可见,将另一个设置为隐藏。 它还为 Info 和 FileList 区域设置多个布局属性,以便它们适合所选横幅。
如果 Web 视图变得太窄, 则 FixSize 使用显示区域的完整宽度来显示 FileList。
if (400 > document.body.clientWidth) {
    //A narrow window. Hide the Info region, and expand the file list region.
    document.all.Info.style.visibility = "hidden";
    document.all.FileList.style.pixelLeft = 0;
    document.all.FileList.style.pixelTop = document.all.Info.style.pixelTop;
}

else {
    //Normal width.
    document.all.Info.style.visibility = "visible";
    document.all.FileList.style.pixelLeft = document.all.Info.style.pixelWidth;
}
Generic.htt 使用 400 像素作为窄屏和宽屏之间的分隔线。 如果 Web 视图太窄, FixSize 会隐藏信息区域并修改 FileList pixelLeft 属性,使其填充横幅下方的整个区域。
FixSize 的最后几行根据上述代码的结果调整多个布局属性。 调整 FileList 区域的宽度,以便完全填充“信息”区域未占用的 Web 视图部分。 信息区域的高度调整为适合横幅和 Web 视图底部之间的大小。
document.all.FileList.style.pixelWidth = document.body.clientWidth
    document.all.FileList.style.pixelLeft;
document.all.FileList.style.pixelHeight = document.body.clientHeight
    document.all.FileList.style.pixelTop;
document.all.Info.style.pixelHeight = document.body.clientHeight
    document.all.Info.style.pixelTop;
检索和显示文件夹信息
当用户选择项时,FileList 对象会触发 SelectionChanged 事件。 此事件由 JScript 脚本处理。 为简单起见,Generic.htt 中的脚本假定一次只能选择一项。
<script language="JavaScript" for="FileList" event="SelectionChanged">
    // Updates the TextBlock region when an item is selected.
    var data;
    var text;

    // Name
    text = "<b>" + FileList.FocusedItem.Name + "</b>";

    // Comment
    data = FileList.Folder.GetDetailsOf(FileList.FocusedItem, 3);
    if (data)
        text += "<br>" + data;

    // Documents
    data = FileList.Folder.GetDetailsOf(FileList.FocusedItem, 1);
    if (data)
        text += "<br><br>" + FileList.Folder.GetDetailsOf(null, 1) + ": " + data;

    // Status
    data = FileList.Folder.GetDetailsOf(FileList.FocusedItem, 2);
    if (data)
        text += "<br><br><b><font color=red>" + data + "</font></b>";

    // Tip
    data = FileList.Folder.GetDetailsOf(FileList.FocusedItem, -1);
    if (data != "" && data != FileList.FocusedItem.Name)
        text += "<br><br>" + data;

    TextBlock.innerHTML = text;
</script>
该脚本使用两个 FileList 属性 FileList.FocusedItem和 FileList.Folder 来获取有关该项目的信息。 FileList.FocusedItem 使用 FileList.FocusedItem.Name 提供的项名称标识所选项。 FileList.Folder 实际上是指向 Folder 对象的指针。 Folder 对象的 GetDetailsOf 方法用于检索有关该项的剩余信息。
所有信息都串联成一个文本字符串,并用
标记用于提高可读性。 然后,通过将文本分配给 TextBlock.innerHTML 来显示该文本。
总结
本章概述了一些可用于自定义 Windows 资源管理器显示 Shell 文件夹信息的方法的技术。 创建Desktop.ini文件可以执行一些简单的自定义,例如显示自定义图标来代替标准文件夹图标。 当文件夹出现在 Web 视图中时,其布局和显示由基于 HTML 的模板控制,该模板确定显示哪些信息以及如何显示。 可以使用标准 HTML、DHTML 和脚本技术创建自定义模板,对文件夹的 Web 视图进行高度控制。
反馈
即将发布:在整个 2024 年,我们将逐步淘汰作为内容反馈机制的“GitHub 问题”,并将其取代为新的反馈系统。 有关详细信息,请参阅:https://aka.ms/ContentUserFeedback。
提交和查看相关反馈