iOS 11 上的 MapKit 中的新功能
iOS 11 向 MapKit 添加了以下新功能:
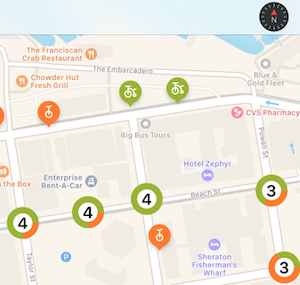
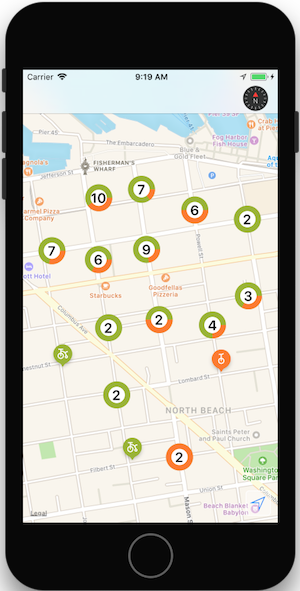
缩放时自动对标记进行分组
示例 MapKit 示例“Tandm”演示如何实现新的 iOS 11 批注聚类分析功能。
1.创建 MKPointAnnotation 子类
点注释类表示地图上的每个标记。 可以单独使用 MapView.AddAnnotation(),或使用 MapView.AddAnnotations() 从数组添加它们。
点注释类没有可视表示形式,它们只需要表示与标记关联的数据(最重要的是,地图上的纬度和经度 Coordinate 属性),以及任何自定义属性:
public class Bike : MKPointAnnotation
{
  public BikeType Type { get; set; } = BikeType.Tricycle;
  public Bike(){}
  public Bike(NSNumber lat, NSNumber lgn, NSNumber type)
  {
    Coordinate = new CLLocationCoordinate2D(lat.NFloatValue, lgn.NFloatValue);
    switch(type.NUIntValue) {
      case 0:
        Type = BikeType.Unicycle;
        break;
      case 1:
        Type = BikeType.Tricycle;
        break;
    }
  }
}
2.为单个标记创建 MKMarkerAnnotationView 子类
标记批注视图是每个批注的可视表示形式,并使用如下属性进行样式设置:
- MarkerTintColor–标记的颜色。
- GlyphText–标记中显示的文本。
- GlyphImage–设置标记中显示的图像。
- DisplayPriority–当地图挤满标记时,确定 z-顺序(堆叠行为)。 使用
Required、DefaultHigh或DefaultLow之一。
若要支持自动聚类分析,还必须设置:
- ClusteringIdentifier–此控件控制哪些标记聚集在一起。 可以对所有标记使用相同的标识符,也可以使用不同的标识符来控制它们组合在一起的方式。
[Register("BikeView")]
public class BikeView : MKMarkerAnnotationView
{
  public static UIColor UnicycleColor = UIColor.FromRGB(254, 122, 36);
  public static UIColor TricycleColor = UIColor.FromRGB(153, 180, 44);
  public override IMKAnnotation Annotation
  {
    get {
      return base.Annotation;
    }
    set {
      base.Annotation = value;

      var bike = value as Bike;
      if (bike != null){
        ClusteringIdentifier = "bike";
        switch(bike.Type){
          case BikeType.Unicycle:
            MarkerTintColor = UnicycleColor;
            GlyphImage = UIImage.FromBundle("Unicycle");
            DisplayPriority = MKFeatureDisplayPriority.DefaultLow;
            break;
          case BikeType.Tricycle:
            MarkerTintColor = TricycleColor;
            GlyphImage = UIImage.FromBundle("Tricycle");
            DisplayPriority = MKFeatureDisplayPriority.DefaultHigh;
            break;
        }
      }
    }
  }
3.创建表示标记群集的 MKAnnotationView
虽然表示标记群集的批注视图可能是一个简单的图像,但用户希望应用提供关于已组合在一起的标记数的视觉提示。
示例代码使用 CoreGraphics 呈现群集中的标记数,以及每种标记类型所占比例的圆图。
还应设置:
- DisplayPriority–当地图挤满标记时,确定 z-顺序(堆叠行为)。 使用
Required、DefaultHigh或DefaultLow之一。 - CollisionMode -
Circle或Rectangle。
[Register("ClusterView")]
public class ClusterView : MKAnnotationView
{
  public static UIColor ClusterColor = UIColor.FromRGB(202, 150, 38);
  public override IMKAnnotation Annotation
  {
    get {
      return base.Annotation;
    }
    set {
      base.Annotation = value;
      var cluster = MKAnnotationWrapperExtensions.UnwrapClusterAnnotation(value);
      if (cluster != null)
      {
        var renderer = new UIGraphicsImageRenderer(new CGSize(40, 40));
        var count = cluster.MemberAnnotations.Length;
        var unicycleCount = CountBikeType(cluster.MemberAnnotations, BikeType.Unicycle);

        Image = renderer.CreateImage((context) => {
          // Fill full circle with tricycle color
          BikeView.TricycleColor.SetFill();
          UIBezierPath.FromOval(new CGRect(0, 0, 40, 40)).Fill();
          // Fill pie with unicycle color
          BikeView.UnicycleColor.SetFill();
          var piePath = new UIBezierPath();
          piePath.AddArc(new CGPoint(20,20), 20, 0, (nfloat)(Math.PI * 2.0 * unicycleCount / count), true);
          piePath.AddLineTo(new CGPoint(20, 20));
          piePath.ClosePath();
          piePath.Fill();
          // Fill inner circle with white color
          UIColor.White.SetFill();
          UIBezierPath.FromOval(new CGRect(8, 8, 24, 24)).Fill();
          // Finally draw count text vertically and horizontally centered
          var attributes = new UIStringAttributes() {
            ForegroundColor = UIColor.Black,
            Font = UIFont.BoldSystemFontOfSize(20)
          };
          var text = new NSString($"{count}");
          var size = text.GetSizeUsingAttributes(attributes);
          var rect = new CGRect(20 - size.Width / 2, 20 - size.Height / 2, size.Width, size.Height);
          text.DrawString(rect, attributes);
        });
      }
    }
  }
  public ClusterView(){}
  public ClusterView(MKAnnotation annotation, string reuseIdentifier) : base(annotation, reuseIdentifier)
  {
    DisplayPriority = MKFeatureDisplayPriority.DefaultHigh;
    CollisionMode = MKAnnotationViewCollisionMode.Circle;
    // Offset center point to animate better with marker annotations
    CenterOffset = new CoreGraphics.CGPoint(0, -10);
  }
  private nuint CountBikeType(IMKAnnotation[] members, BikeType type) {
    nuint count = 0;
    foreach(Bike member in members){
      if (member.Type == type) ++count;
    }
    return count;
  }
}
4.注册视图类
在向视图创建并添加地图视图控件时,注册批注视图类型以随着地图放大和缩小启用自动聚类分析行为:
MapView.Register(typeof(BikeView), MKMapViewDefault.AnnotationViewReuseIdentifier);
MapView.Register(typeof(ClusterView), MKMapViewDefault.ClusterAnnotationViewReuseIdentifier);
5.呈现地图!
对地图进行呈现时,批注标记将得到聚集或呈现,具体取决于缩放级别。 随着缩放级别的变化,标记会在聚类中以动画形式显示和隐藏。
有关使用 MapKit 显示数据的详细信息,请参阅“地图部分”。
指南针按钮
iOS 11 增加了从地图中弹出指南针并在视图中其他地方呈现指南针的功能。 有关示例,请参阅 Tandm 示例应用。
创建类似于指南针的按钮(包括地图方向更改时的实时动画),并将其呈现在另一个控件上。

下面的代码会创建指南针按钮并在导航栏上呈现它:
var compass = MKCompassButton.FromMapView(MapView);
compass.CompassVisibility = MKFeatureVisibility.Visible;
NavigationItem.RightBarButtonItem = new UIBarButtonItem(compass);
MapView.ShowsCompass = false; // so we don't have two compasses!
ShowsCompass 属性可用于控制地图视图中默认指南针的可见性。
缩放视图
使用 MKScaleView.FromMapView() 方法在视图中的其他位置添加缩放,以获取缩放视图的实例,并将其添加到视图层次结构的其他位置。
var scale = MKScaleView.FromMapView(MapView);
scale.LegendAlignment = MKScaleViewAlignment.Trailing;
scale.TranslatesAutoresizingMaskIntoConstraints = false;
View.AddSubview(scale); // constraints omitted for simplicity
MapView.ShowsScale = false; // so we don't have two scale displays!
ShowsScale 属性可用于控制地图视图中默认指南针的可见性。
用户跟踪按钮
用户跟踪按钮会将地图居中位于用户的当前位置。 使用 MKUserTrackingButton.FromMapView() 方法获取按钮的实例、应用格式更改并在视图层次结构中的其他位置进行添加。

var button = MKUserTrackingButton.FromMapView(MapView);
button.Layer.BackgroundColor = UIColor.FromRGBA(255,255,255,80).CGColor;
button.Layer.BorderColor = UIColor.White.CGColor;
button.Layer.BorderWidth = 1;
button.Layer.CornerRadius = 5;
button.TranslatesAutoresizingMaskIntoConstraints = false;
View.AddSubview(button); // constraints omitted for simplicity