结合使用自定义控件和 iOS 设计器
警告
iOS Designer 在 Visual Studio 2019 版本 16.8 和 Visual Studio 2019 for Mac 版本 8.8 中已经弃用,并且已从 Visual Studio 2019 版本 16.9 和 Visual Studio for Mac 版本 8.9 中移除。 要生成 iOS 用户界面,建议直接在运行 Xcode 的 Mac 上操作。 有关详细信息,请参阅用 Xcode 设计用户界面。
要求
Xamarin Designer for iOS 在 Visual Studio for Mac 和 Windows 上的 Visual Studio 2017 及更高版本中可用。
此指南假设读者熟悉入门指南中介绍的内容。
演练
重要
从 Xamarin.Studio 5.5 开始,创建自定义控件的方式与早期版本略有不同。 若要创建自定义控件,IComponent 接口是必需的(以及关联的实现方法),或者可使用 [DesignTimeVisible(true)] 对该类进行批注。 在下面的演练示例中使用了后一种方法。
从“iOS”>“应用”>“单一视图应用程序”>“C#”模板,创建一个新解决方案,将其命名为
ScratchTicket,然后继续完成“新建项目”向导:创建一个名为
ScratchTicketView的新空类文件:为
ScratchTicketView类添加以下代码:using System; using System.ComponentModel; using CoreGraphics; using Foundation; using UIKit; namespace ScratchTicket { [Register("ScratchTicketView"), DesignTimeVisible(true)] public class ScratchTicketView : UIView { CGPath path; CGPoint initialPoint; CGPoint latestPoint; bool startNewPath = false; UIImage image; [Export("Image"), Browsable(true)] public UIImage Image { get { return image; } set { image = value; SetNeedsDisplay(); } } public ScratchTicketView(IntPtr p) : base(p) { Initialize(); } public ScratchTicketView() { Initialize(); } void Initialize() { initialPoint = CGPoint.Empty; latestPoint = CGPoint.Empty; BackgroundColor = UIColor.Clear; Opaque = false; path = new CGPath(); SetNeedsDisplay(); } public override void TouchesBegan(NSSet touches, UIEvent evt) { base.TouchesBegan(touches, evt); var touch = touches.AnyObject as UITouch; if (touch != null) { initialPoint = touch.LocationInView(this); } } public override void TouchesMoved(NSSet touches, UIEvent evt) { base.TouchesMoved(touches, evt); var touch = touches.AnyObject as UITouch; if (touch != null) { latestPoint = touch.LocationInView(this); SetNeedsDisplay(); } } public override void TouchesEnded(NSSet touches, UIEvent evt) { base.TouchesEnded(touches, evt); startNewPath = true; } public override void Draw(CGRect rect) { base.Draw(rect); using (var g = UIGraphics.GetCurrentContext()) { if (image != null) g.SetFillColor((UIColor.FromPatternImage(image).CGColor)); else g.SetFillColor(UIColor.LightGray.CGColor); g.FillRect(rect); if (!initialPoint.IsEmpty) { g.SetLineWidth(20); g.SetBlendMode(CGBlendMode.Clear); UIColor.Clear.SetColor(); if (path.IsEmpty || startNewPath) { path.AddLines(new CGPoint[] { initialPoint, latestPoint }); startNewPath = false; } else { path.AddLineToPoint(latestPoint); } g.SetLineCap(CGLineCap.Round); g.AddPath(path); g.DrawPath(CGPathDrawingMode.Stroke); } } } } }将
FillTexture.png、FillTexture2.png和Monkey.png文件(GitHub 中提供)添加到“资源”文件夹中。双击
Main.storyboard文件以在设计器中将其打开:将一个图像视图从“工具箱”拖放到情节提要中的视图中。
选择该图像视图,并将其“图像”属性更改为
Monkey.png。由于使用的是大小类,因此需要限制此图像视图。 单击该图像两次,将其置于限制模式。 通过单击中心固定图柄将其限制到中心,并将其垂直和水平对齐:
若要限制高度和宽度,请单击大小固定图柄(“骨”形状的图柄)并分别选择宽度和高度:
通过单击工具栏中的更新按钮,根据限制更新框架:
接下来,生成项目,使“刮刮卡视图”显示在工具箱中的“自定义组件”下:
拖放一个刮刮卡视图,使其显示在猴子图像上。 调整拖动图柄,使刮刮卡视图完全覆盖猴子,如下所示:
通过绘制范围框以选择这两个视图,将刮刮卡视图限制为图像视图。 选择这些选项以将其限制到相应宽度、高度、中心和中间,并根据限制更新框架,如下所示:
运行应用程序并“刮掉”图像以显示猴子。
添加设计时属性
设计器还包括对 numeric、enumeration、string、bool、CGSize、UIColor 和 UIImage 属性类型的自定义控件的设计时支持。 为了演示,将一个属性添加到 ScratchTicketView 以设置“刮掉”的图像。
将以下代码添加到属性的 ScratchTicketView 类:
[Export("Image"), Browsable(true)]
public UIImage Image
{
    get { return image; }
    set {
            image = value;
              SetNeedsDisplay ();
        }
}
可能还需要向 Draw 方法添加 null 检查,如下所示:
public override void Draw(CGRect rect)
{
    base.Draw(rect);

    using (var g = UIGraphics.GetCurrentContext())
    {
        if (image != null)
            g.SetFillColor ((UIColor.FromPatternImage (image).CGColor));
        else
            g.SetFillColor (UIColor.LightGray.CGColor);

        g.FillRect(rect);

        if (!initialPoint.IsEmpty)
        {
             g.SetLineWidth(20);
             g.SetBlendMode(CGBlendMode.Clear);
             UIColor.Clear.SetColor();

             if (path.IsEmpty || startNewPath)
             {
                 path.AddLines(new CGPoint[] { initialPoint, latestPoint });
                 startNewPath = false;
             }
             else
             {
                 path.AddLineToPoint(latestPoint);
             }

             g.SetLineCap(CGLineCap.Round);
             g.AddPath(path);
             g.DrawPath(CGPathDrawingMode.Stroke);
        }
    }
}
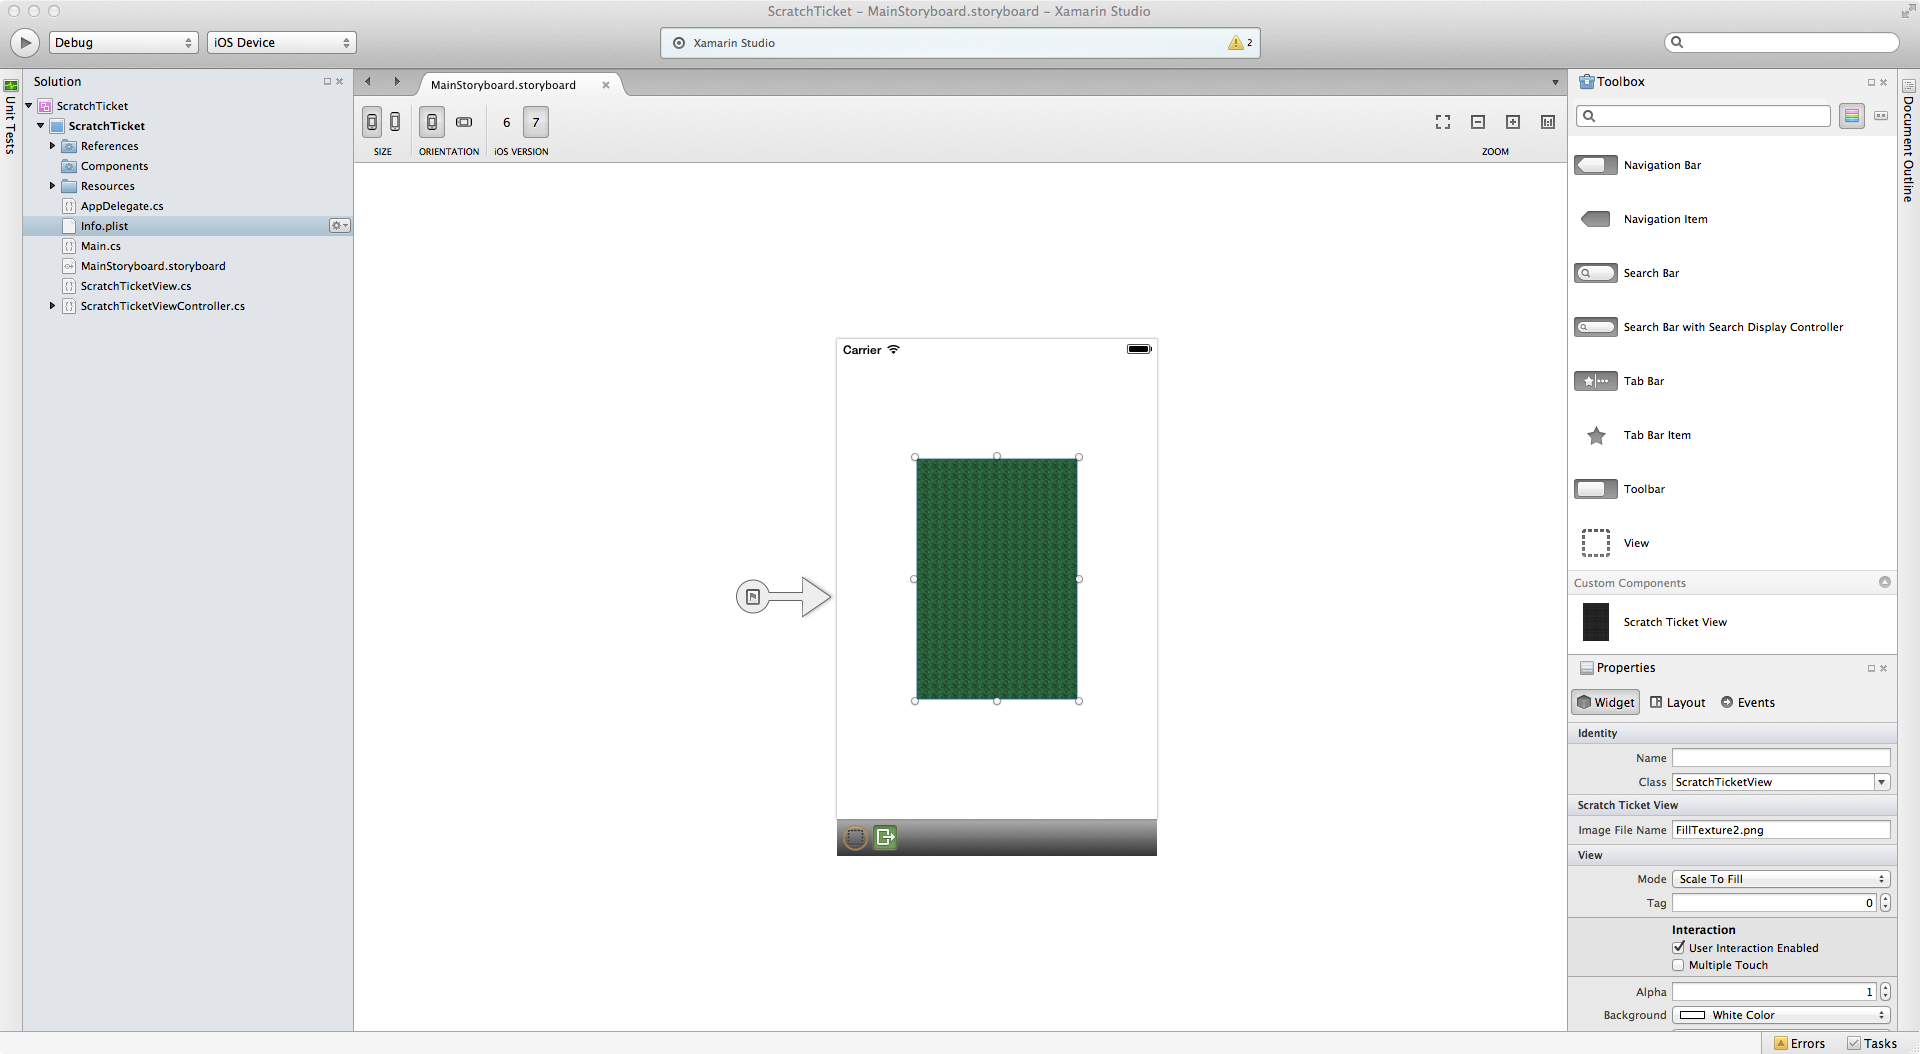
包含一个 ExportAttribute 和 BrowsableAttribute 且参数设置为 true 会导致该属性显示在设计器的“属性”面板中。 将属性更改为项目附带的另一个图像(如 FillTexture2.png)会导致该控件在设计时更新,如下所示:
总结
在本文中,我们演练了如何创建自定义控件,以及如何使用 iOS 设计器在 iOS 应用程序中使用该控件。 我们了解了如何创建和生成该控件,使其可用于设计器的工具箱中的应用程序。 此外,我们还研究了如何实现该控件,使其在设计时和运行时都能正确呈现,以及如何在设计器中公开自定义控件属性。


