第 4 部分: 数据绑定基础知识
数据绑定允许链接两个对象的属性,使得一个对象中的更改会导致另一个对象发生更改。 数据绑定是非常有用的工具,可在代码中完整定义,同时 XAML 也提供了快捷方式和便利性。 因此,Xamarin.Forms 中最重要的标记扩展之一是绑定。
数据绑定
数据绑定连接两个对象的属性,即源和目标。 在代码中,需要执行两个步骤:目标对象的 BindingContext 属性必须设置为源对象,并且必须在目标对象上调用 SetBinding 方法(通常与 Binding 类一起使用),这样才能将该对象的属性绑定到源对象的属性。
目标属性必须是可绑定属性,这意味着目标对象必须派生自 BindableObject。 在线 Xamarin.Forms 文档指示哪些属性是可绑定属性。 Label 的属性(如 Text)与可绑定属性 TextProperty 相关联。
在标记中,你还必须执行代码中所需的两个相同的步骤,但不一样的是,Binding 标记扩展须取代 SetBinding 调用和 Binding 类。
但是,在 XAML 中定义数据绑定时,可通过多种方式设置目标对象的 BindingContext。 有时通过代码隐藏文件设置,有时使用 StaticResource 或 x:Static 标记扩展设置,有时设置为 BindingContext 属性元素标记的内容。
绑定最常用于将程序的视觉对象与基础数据模型相连接,这通常用于实现 MVVM (Model-View-ViewModel) 应用程序体系结构,如第 5 部分:从数据绑定到 MVVM中所述,但可能也会采用其他方案。
视图到视图绑定
可以定义数据绑定来链接同一页面上两个视图的属性。 在本例中,使用 x:Reference 标记扩展设置目标对象的 BindingContext。
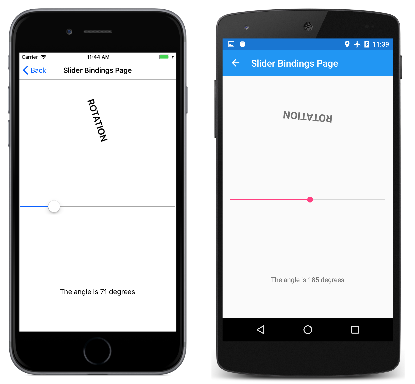
下面是一个 XAML 文件,其中包含一个 Slider 和两个 Label 视图,其中一个由 Slider 值旋转,另一个显示 Slider 值:
<ContentPage xmlns="http://xamarin.com/schemas/2014/forms"
             xmlns:x="http://schemas.microsoft.com/winfx/2009/xaml"
             x:Class="XamlSamples.SliderBindingsPage"
             Title="Slider Bindings Page">

    <StackLayout>
        <Label Text="ROTATION"
               BindingContext="{x:Reference Name=slider}"
               Rotation="{Binding Path=Value}"
               FontAttributes="Bold"
               FontSize="Large"
               HorizontalOptions="Center"
               VerticalOptions="CenterAndExpand" />

        <Slider x:Name="slider"
                Maximum="360"
                VerticalOptions="CenterAndExpand" />

        <Label BindingContext="{x:Reference slider}"
               Text="{Binding Value, StringFormat='The angle is {0:F0} degrees'}"
               FontAttributes="Bold"
               FontSize="Large"
               HorizontalOptions="Center"
               VerticalOptions="CenterAndExpand" />
    </StackLayout>
</ContentPage>
Slider 包含一个 x:Name 属性,该属性由两个使用 x:Reference 标记扩展的 Label 视图引用。
x:Reference 绑定扩展定义一个名为 Name 的属性,用于设置所引用元素的名称,在本例中为 slider。 但是,定义 x:Reference 标记扩展的 ReferenceExtension 类也为 Name 定义了 ContentProperty 属性,这意味着它不是显式必需的。 仅为了多样性,第一个 x:Reference 包含“Name=”,而第二个不包含:
BindingContext="{x:Reference Name=slider}"
…
BindingContext="{x:Reference slider}"
与 Binding 和 BindingBase 类一样,Binding 标记扩展本身也可以有多个属性。 Binding 的 ContentProperty 为 Path,但如果路径是 Binding 标记扩展中的第一个项,则可以省略标记扩展的“Path=”部分。 第一个示例包含“Path=”,而第二个示例省略它:
Rotation="{Binding Path=Value}"
…
Text="{Binding Value, StringFormat='The angle is {0:F0} degrees'}"
这些属性可以全部位于一行或分隔成多个行:
Text="{Binding Value,
               StringFormat='The angle is {0:F0} degrees'}"
做任何方便的事情。
请注意第二个 Binding 标记扩展中的 StringFormat 属性。 在 Xamarin.Forms 中,绑定不执行任何隐式类型转换,如果需要将非字符串对象显示为字符串,则必须提供类型转换器或使用 StringFormat。 在后台,静态 String.Format 方法用于实现 StringFormat。 这可能是个问题,因为 .NET 格式规范涉及大括号,而大括号也用于分隔标记扩展。 这有可能导致 XAML 分析程序混乱。 为了避免这种情况,请将整个格式字符串放在单引号中:
Text="{Binding Value, StringFormat='The angle is {0:F0} degrees'}"
下面是正在运行的程序:
绑定模式
单个视图可在其多个属性上创建数据绑定。 但每个视图只能有一个 BindingContext,因此视图上的所有数据绑定须引用同一对象的属性。
解决此问题和其他问题的方法涉及到 Mode 属性,该属性设置为 BindingMode 枚举的成员:
DefaultOneWay- 值从源传输到目标OneWayToSource- 值从目标传输到源TwoWay- 值在源和目标之间双向传输OneTime- 只有在BindingContext更改时,数据才从源传输到目标
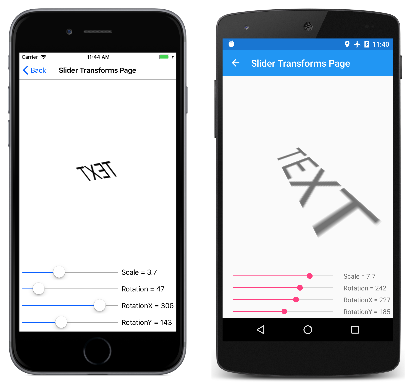
以下程序演示了一种常见的使用 OneWayToSource 和 TwoWay 绑定模式的方法。 四个 Slider 视图用于控制 Label 的 Scale、Rotate、RotateX、RotateY 属性。 最初似乎 Label 的四个属性应为数据绑定目标,因为每个属性均由 Slider 设置。 但 Label 的 BindingContext 只能是一个对象,并且有四个不同的滑块。
因此,所有绑定都以看似向后的方式设置:四个滑块中每一个的 BindingContext 都设置为 Label,且绑定设置在滑块的 Value 属性上。 通过使用 OneWayToSource 和 TwoWay 模式,这些 Value 属性可以设置源属性,它们是 Label 的 Scale、Rotate、RotateX、RotateY 属性:
<ContentPage xmlns="http://xamarin.com/schemas/2014/forms"
             xmlns:x="http://schemas.microsoft.com/winfx/2009/xaml"
             x:Class="XamlSamples.SliderTransformsPage"
             Padding="5"
             Title="Slider Transforms Page">
    <Grid>
        <Grid.RowDefinitions>
            <RowDefinition Height="*" />
            <RowDefinition Height="Auto" />
            <RowDefinition Height="Auto" />
            <RowDefinition Height="Auto" />
            <RowDefinition Height="Auto" />
        </Grid.RowDefinitions>

        <Grid.ColumnDefinitions>
            <ColumnDefinition Width="*" />
            <ColumnDefinition Width="Auto" />
        </Grid.ColumnDefinitions>

        <!-- Scaled and rotated Label -->
        <Label x:Name="label"
               Text="TEXT"
               HorizontalOptions="Center"
               VerticalOptions="CenterAndExpand" />

        <!-- Slider and identifying Label for Scale -->
        <Slider x:Name="scaleSlider"
                BindingContext="{x:Reference label}"
                Grid.Row="1" Grid.Column="0"
                Maximum="10"
                Value="{Binding Scale, Mode=TwoWay}" />

        <Label BindingContext="{x:Reference scaleSlider}"
               Text="{Binding Value, StringFormat='Scale = {0:F1}'}"
               Grid.Row="1" Grid.Column="1"
               VerticalTextAlignment="Center" />

        <!-- Slider and identifying Label for Rotation -->
        <Slider x:Name="rotationSlider"
                BindingContext="{x:Reference label}"
                Grid.Row="2" Grid.Column="0"
                Maximum="360"
                Value="{Binding Rotation, Mode=OneWayToSource}" />

        <Label BindingContext="{x:Reference rotationSlider}"
               Text="{Binding Value, StringFormat='Rotation = {0:F0}'}"
               Grid.Row="2" Grid.Column="1"
               VerticalTextAlignment="Center" />

        <!-- Slider and identifying Label for RotationX -->
        <Slider x:Name="rotationXSlider"
                BindingContext="{x:Reference label}"
                Grid.Row="3" Grid.Column="0"
                Maximum="360"
                Value="{Binding RotationX, Mode=OneWayToSource}" />

        <Label BindingContext="{x:Reference rotationXSlider}"
               Text="{Binding Value, StringFormat='RotationX = {0:F0}'}"
               Grid.Row="3" Grid.Column="1"
               VerticalTextAlignment="Center" />

        <!-- Slider and identifying Label for RotationY -->
        <Slider x:Name="rotationYSlider"
                BindingContext="{x:Reference label}"
                Grid.Row="4" Grid.Column="0"
                Maximum="360"
                Value="{Binding RotationY, Mode=OneWayToSource}" />

        <Label BindingContext="{x:Reference rotationYSlider}"
               Text="{Binding Value, StringFormat='RotationY = {0:F0}'}"
               Grid.Row="4" Grid.Column="1"
               VerticalTextAlignment="Center" />
    </Grid>
</ContentPage>
三个 Slider 视图上的绑定为 OneWayToSource,意味着 Slider 值导致其 BindingContext 的属性发生更改,即名为 label 的 Label。 这三个 Slider 视图会导致更改 Label 的 Rotate、RotateX、RotateY 属性。
但 Scale 属性的绑定是 TwoWay。 这是因为 Scale 属性的默认值为 1,并且使用 TwoWay 绑定会导致 Slider 初始值设置为 1,而不是 0。 如果该绑定为 OneWayToSource,那么 Scale 属性将从 Slider 默认值初始化为 0。 Label 不可见,这可能会给用户带来一些困惑。
注意
VisualElement 类还具有 ScaleX 和 ScaleY 属性,它们分别在 x 轴和 y 轴上缩放 VisualElement。
绑定和集合
没有什么比模板化的 ListView 更能展示 XAML 和数据绑定的强大功能。
ListView 定义 IEnumerable 类型的 ItemsSource 属性,并显示该集合中的项。 这些项可以是任何类型的对象。 默认情况下,ListView 使用每个项的 ToString 方法来显示该项。 有时这正是你需要的,但在许多情况下,ToString 只返回对象的完全限定类名。
但是,可通过使用模板以任何方式显示 ListView 集合中的项,该模板涉及派生自 Cell 的类。 会为 ListView 中的每个项克隆模板,并将模板上设置的数据绑定传输到每个克隆。
通常,你需要使用 ViewCell 类为这些项创建自定义单元格。 此过程在代码中有些麻烦,但在 XAML 中,它变得非常简单。
XamlSamples 项目中包含了一个名为 NamedColor 的类。 每个 NamedColor 对象都具有 string 类型的 Name 和 FriendlyName 属性,以及 Color 类型的 Color 属性。 此外,NamedColor 具有 Color 类型的 141 个静态只读字段,与 Xamarin.FormsColor 类中定义的颜色对应。 静态构造函数会创建一个 IEnumerable<NamedColor> 集合,它包含对应于这些静态字段的 NamedColor 对象,并会将其分配给其公共静态 All 属性。
使用 x:Static 标记扩展将静态 NamedColor.All 属性设置为 ListView 的 ItemsSource 是容易的:
<ContentPage xmlns="http://xamarin.com/schemas/2014/forms"
             xmlns:x="http://schemas.microsoft.com/winfx/2009/xaml"
             xmlns:local="clr-namespace:XamlSamples;assembly=XamlSamples"
             x:Class="XamlSamples.ListViewDemoPage"
             Title="ListView Demo Page">

    <ListView ItemsSource="{x:Static local:NamedColor.All}" />

</ContentPage>
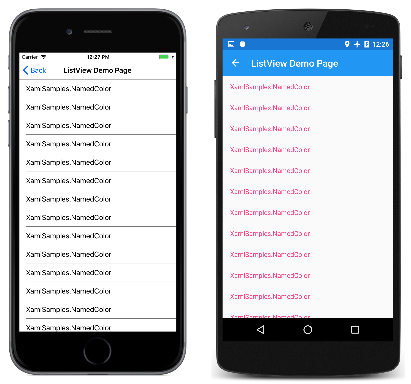
生成的显示会确定项的类型确实为 XamlSamples.NamedColor:
信息不多,但 ListView 可滚动且可选择。
若要为项定义模板,需要将 ItemTemplate 属性拆分为属性元素,并将其设置为 DataTemplate,然后它会引用 ViewCell。 对于 ViewCell 的 View 属性,可以定义一个或多个视图的布局以显示每个项。 下面是一个简单的示例:
<ListView ItemsSource="{x:Static local:NamedColor.All}">
    <ListView.ItemTemplate>
        <DataTemplate>
            <ViewCell>
                <ViewCell.View>
                    <Label Text="{Binding FriendlyName}" />
                </ViewCell.View>
            </ViewCell>
        </DataTemplate>
    </ListView.ItemTemplate>
</ListView>
注意
单元格和单元格子级的绑定源是 ListView.ItemsSource 集合。
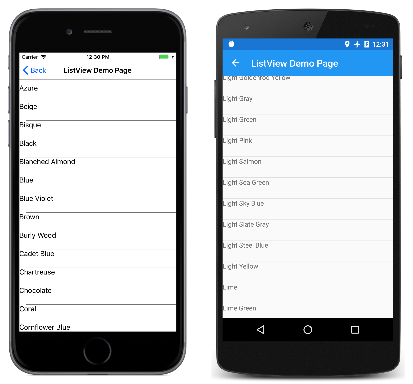
元素 Label 设置为 ViewCell 的 View 属性。 (不需要 ViewCell.View 标记,因为 View 属性是 ViewCell 的内容属性。)此标记显示每个 NamedColor 对象的 FriendlyName 属性:
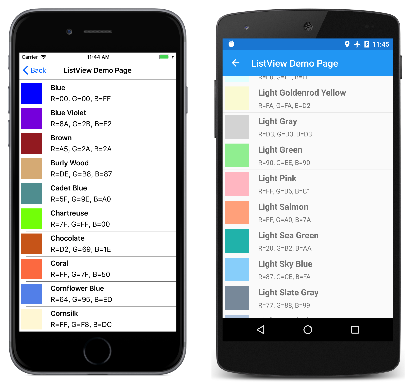
好多了。 现在只需在项模板上添加更多信息和实际颜色即可。 为了支持此模板,页面的资源字典中定义了一些值和对象:
<ContentPage xmlns="http://xamarin.com/schemas/2014/forms"
             xmlns:x="http://schemas.microsoft.com/winfx/2009/xaml"
             xmlns:local="clr-namespace:XamlSamples"
             x:Class="XamlSamples.ListViewDemoPage"
             Title="ListView Demo Page">

    <ContentPage.Resources>
        <ResourceDictionary>
            <OnPlatform x:Key="boxSize"
                        x:TypeArguments="x:Double">
                <On Platform="iOS, Android, UWP" Value="50" />
            </OnPlatform>

            <OnPlatform x:Key="rowHeight"
                        x:TypeArguments="x:Int32">
                <On Platform="iOS, Android, UWP" Value="60" />
            </OnPlatform>

            <local:DoubleToIntConverter x:Key="intConverter" />

        </ResourceDictionary>
    </ContentPage.Resources>

    <ListView ItemsSource="{x:Static local:NamedColor.All}"
              RowHeight="{StaticResource rowHeight}">
        <ListView.ItemTemplate>
            <DataTemplate>
                <ViewCell>
                    <StackLayout Padding="5, 5, 0, 5"
                                 Orientation="Horizontal"
                                 Spacing="15">

                        <BoxView WidthRequest="{StaticResource boxSize}"
                                 HeightRequest="{StaticResource boxSize}"
                                 Color="{Binding Color}" />

                        <StackLayout Padding="5, 0, 0, 0"
                                     VerticalOptions="Center">

                            <Label Text="{Binding FriendlyName}"
                                   FontAttributes="Bold"
                                   FontSize="Medium" />

                            <StackLayout Orientation="Horizontal"
                                         Spacing="0">
                                <Label Text="{Binding Color.R,
                                       Converter={StaticResource intConverter},
                                       ConverterParameter=255,
                                       StringFormat='R={0:X2}'}" />

                                <Label Text="{Binding Color.G,
                                       Converter={StaticResource intConverter},
                                       ConverterParameter=255,
                                       StringFormat=', G={0:X2}'}" />

                                <Label Text="{Binding Color.B,
                                       Converter={StaticResource intConverter},
                                       ConverterParameter=255,
                                       StringFormat=', B={0:X2}'}" />
                            </StackLayout>
                        </StackLayout>
                    </StackLayout>
                </ViewCell>
            </DataTemplate>
        </ListView.ItemTemplate>
    </ListView>
</ContentPage>
请注意,OnPlatform 用于定义 BoxView 的大小和 ListView 行的高度。 尽管所有平台的值都相同,但可以为其他值轻松调整标记,以便微调显示。
绑定值转换器
上一个 ListView 演示 XAML 文件显示了 Xamarin.FormsColor 结构的 R、G、B 属性。 这些属性为 double 类型,范围为 0 到 1。 如果要显示十六进制值,则不能简单地以“X2”格式规范使用 StringFormat。 这仅适用于整数,而且 double 值需要乘以 255。
这个小问题通过值转换器(也称为绑定转换器)解决了。 这是一个实现 IValueConverter 接口的类,这意味着它具有两个方法,分别名为 Convert 和 ConvertBack。 将值从源传输到目标时会调用 Convert 方法;ConvertBack 方法用于从目标传输到 OneWayToSource 或 TwoWay 绑定中的源:
using System;
using System.Globalization;
using Xamarin.Forms;

namespace XamlSamples
{
    class DoubleToIntConverter : IValueConverter
    {
        public object Convert(object value, Type targetType,
                              object parameter, CultureInfo culture)
        {
            double multiplier;

            if (!Double.TryParse(parameter as string, out multiplier))
                multiplier = 1;

            return (int)Math.Round(multiplier * (double)value);
        }

        public object ConvertBack(object value, Type targetType,
                                  object parameter, CultureInfo culture)
        {
            double divider;

            if (!Double.TryParse(parameter as string, out divider))
                divider = 1;

            return ((double)(int)value) / divider;
        }
    }
}
ConvertBack 方法不在此程序中发挥作用,因为绑定只是从源到目标的一种方式。
绑定使用 Converter 属性引用绑定转换器。 绑定转换器还可以接受使用 ConverterParameter 属性指定的参数。 在某些多适应性场景中,会以此方式指定乘数。 绑定转换器会检查转换器参数是否为有效的 double 值。
转换器在资源字典中实例化,以便可以在多个绑定之间共享:
<local:DoubleToIntConverter x:Key="intConverter" />
三个数据绑定引用此单个实例。 请注意,Binding 标记扩展包含嵌入的 StaticResource 标记扩展:
<Label Text="{Binding Color.R,
                      Converter={StaticResource intConverter},
                      ConverterParameter=255,
                      StringFormat='R={0:X2}'}" />
结果如下:
在处理基础数据中可能动态发生的更改时,ListView 非常复杂,但前提是你采取了某些步骤。 如果在运行时期间分配给 ListView 更改的 ItemsSource 属性的项集合(即如果可以在集合中添加或移除项)对这些项使用 ObservableCollection 类。 ObservableCollection 实现 INotifyCollectionChanged 接口,ListView 会安装用于 CollectionChanged 事件的处理程序。
如果项自身的属性在运行时发生更改,则集合中的项需实现 INotifyPropertyChanged 接口,并使用 PropertyChanged 事件指示属性值的更改。 此系列的下一部分对此进行了演示:第 5 部分:从数据绑定到 MVVM。
总结
数据绑定提供了一种强大的机制,用于将一个页面内两个对象之间的属性链接在一起,也可将视觉对象和基础数据之间的属性链接在一起。 但是,当应用程序开始使用数据源时,一种常用的应用程序体系结构模式会开始作为一种实用的范例出现。 该内容在此处有介绍:第 5 部分:从数据绑定到 MVVM。
 下载示例
下载示例