使用 Docker Compose 設定建立多容器 (預覽) 應用程式
注意
Sidecar 容器 (預覽) 將會在 App Service 中成功多容器應用程式。 若要開始使用,請參閱教學課程:在 Azure App 服務 中設定自定義容器的 Sidecar 容器(預覽版)。
適用於容器的 Web 應用程式提供彈性的 Docker 映像使用方式。 本快速入門說明如何使用 Docker Compose 組態,在 Cloud Shell 中將多容器應用程式 (預覽) 部署至用於容器的 Web App。
如果您沒有 Azure 訂閱,請在開始之前,先建立 Azure 免費帳戶。
必要條件
在 Azure Cloud Shell 中使用 Bash 環境。 如需詳細資訊,請參閱 Azure Cloud Shell 中的 Bash 快速入門。

若要在本地執行 CLI 參考命令,請安裝 Azure CLI。 若您在 Windows 或 macOS 上執行,請考慮在 Docker 容器中執行 Azure CLI。 如需詳細資訊,請參閱〈如何在 Docker 容器中執行 Azure CLI〉。
如果您使用的是本機安裝,請使用 az login 命令,透過 Azure CLI 來登入。 請遵循您終端機上顯示的步驟,完成驗證程序。 如需其他登入選項,請參閱使用 Azure CLI 登入。
出現提示時,請在第一次使用時安裝 Azure CLI 延伸模組。 如需擴充功能詳細資訊,請參閱使用 Azure CLI 擴充功能。
執行 az version 以尋找已安裝的版本和相依程式庫。 若要升級至最新版本,請執行 az upgrade。
本文需要 2.0.32 版或更新版本的 Azure CLI。 如果您是使用 Azure Cloud Shell,就已安裝最新版本。
下載範例
在本快速入門中,您會使用從 Docker 取得的 Compose 檔案。 組態檔位於 Azure 範例中。
version: '3.3'

services:
   db:
     image: mysql:5.7
     volumes:
       - db_data:/var/lib/mysql
     restart: always
     environment:
       MYSQL_ROOT_PASSWORD: somewordpress
       MYSQL_DATABASE: wordpress
       MYSQL_USER: wordpress
       MYSQL_PASSWORD: wordpress

   wordpress:
     depends_on:
       - db
     image: wordpress:latest
     ports:
       - "8000:80"
     restart: always
     environment:
       WORDPRESS_DB_HOST: db:3306
       WORDPRESS_DB_USER: wordpress
       WORDPRESS_DB_PASSWORD: wordpress
volumes:
    db_data:
在 Cloud Shell 中,建立快速入門目錄並變更為此目錄。
mkdir quickstart

cd $HOME/quickstart
下一步,執行下列命令,將範例應用程式存放庫複製到您的快速入門目錄。 然後,變更為 multicontainerwordpress 目錄。
git clone https://github.com/Azure-Samples/multicontainerwordpress

cd multicontainerwordpress
建立資源群組
資源群組是一個邏輯容器,可在其中部署與管理 Azure 資源 (例如 Web 應用程式、資料庫和儲存體帳戶)。 例如,您可以選擇在稍候透過一個簡單的步驟刪除整個資源群組。
在 Cloud Shell 中,使用 az group create 命令來建立資源群組。 下列範例會在美國中南部位置中建立名為 myResourceGroup 的資源群組。 若要查看標準層中 Linux 上之 App Service 的所有支援位置,請執行 az appservice list-locations --sku S1 --linux-workers-enabled 命令。
az group create --name myResourceGroup --location "South Central US"
您通常會在附近的區域中建立資源群組和資源。
當命令完成時,JSON 輸出會顯示資源群組屬性。
建立 Azure App Service 方案
在 Cloud Shell 中,使用 az appservice plan create 命令在資源群組中建立 App Service 方案。
下列範例會在標準定價層 (--sku S1) 和 Linux 容器 (--is-linux) 中,建立名為 myAppServicePlan 的 App Service 方案。
az appservice plan create --name myAppServicePlan --resource-group myResourceGroup --sku S1 --is-linux
建立 App Service 方案後,Azure CLI 會顯示類似下列範例的資訊:
{
  "adminSiteName": null,
  "appServicePlanName": "myAppServicePlan",
  "geoRegion": "South Central US",
  "hostingEnvironmentProfile": null,
  "id": "/subscriptions/0000-0000/resourceGroups/myResourceGroup/providers/Microsoft.Web/serverfarms/myAppServicePlan",
  "kind": "linux",
  "location": "South Central US",
  "maximumNumberOfWorkers": 1,
  "name": "myAppServicePlan",
  < JSON data removed for brevity. >
  "targetWorkerSizeId": 0,
  "type": "Microsoft.Web/serverfarms",
  "workerTierName": null
}
建立 Docker Compose 應用程式
注意
Azure App Service 上的 Docker Compose 目前在轉換成 Base64 時有 4,000 個字元的限制。
在 Cloud Shell 終端機中,使用 az webapp create 命令,在 myAppServicePlan App Service 方案中建立多容器 Web 應用程式。 別忘了將 <app_name> 取代為唯一的應用程式名稱 (有效字元為 a-z、0-9 及 -)。
az webapp create --resource-group myResourceGroup --plan myAppServicePlan --name <app_name> --multicontainer-config-type compose --multicontainer-config-file compose-wordpress.yml
建立 Web 應用程式後,Azure CLI 會顯示類似下列範例的輸出:
{
  "additionalProperties": {},
  "availabilityState": "Normal",
  "clientAffinityEnabled": true,
  "clientCertEnabled": false,
  "cloningInfo": null,
  "containerSize": 0,
  "dailyMemoryTimeQuota": 0,
  "defaultHostName": "<app_name>.azurewebsites.net",
  "enabled": true,
  < JSON data removed for brevity. >
}
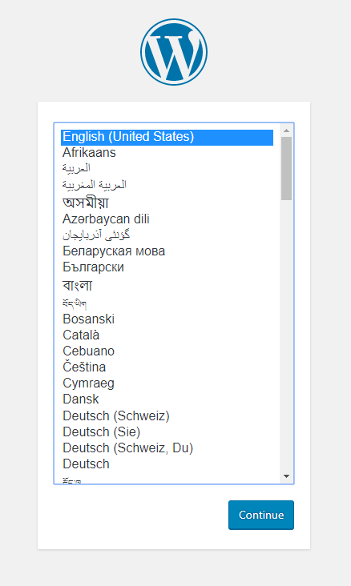
瀏覽至應用程式
瀏覽至已部署的應用程式 (位於 http://<app_name>.azurewebsites.net)。 此應用程式可能需要數分鐘才能載入。 如果發生錯誤,請再等待數分鐘,然後重新整理瀏覽器。
恭喜,您已在適用於容器的 Web 應用程式中建立多容器應用程式。
清除部署
在執行過範例指令碼之後,您可以使用下列命令來移除資源群組和所有與其相關聯的資源。
az group delete --name myResourceGroup