針對目標受眾啟用分段推出功能
目標是功能管理策略,可讓開發人員逐漸向使用者群推出新功能。 此策略是以以一組稱為目標對象的用戶為目標的概念為基礎。 物件是由特定使用者、群組和整個使用者群的指定百分比所組成。
使用者可以是實際的用戶帳戶,但它們也可以是計算機、裝置或任何您想要推出功能的唯一可識別實體。
群組會由您的應用程式決定。 例如,以使用者帳戶為目標時,您可以使用 Microsoft Entra 群組或群組來表示使用者位置。 以計算機為目標時,您可以根據推出階段將它們分組。 群組可以是您想要根據物件分類的任何常見屬性。
在本文中,您將了解如何對於 Azure 應用程式組態使用 TargetingFilter,在 ASP.NET Core Web 應用程式中推出新功能給指定的使用者和群組。
必要條件
- 完成快速入門: 將功能旗標新增至 ASP.NET Core 應用程式。
- 將
Microsoft.FeatureManagement.AspNetCore套件更新為 3.0.0 版或更新版本。
建立具有驗證和功能旗標的 Web 應用程式
在本節中,您將建立 Web 應用程式,讓用戶能夠登入並使用您之前建立的 Beta 功能旗標。 大部分的步驟都與您在快速入門中所做的非常類似。
使用下列命令建立 Web 應用程式,以針對本地資料庫進行驗證。
dotnet new mvc --auth Individual -o TestFeatureFlags新增下列 NuGet 套件的參考。
dotnet add package Microsoft.Azure.AppConfiguration.AspNetCore
dotnet add package Microsoft.FeatureManagement.AspNetCore
儲存 應用程式組態 存放區的 連接字串。
dotnet user-secrets init
dotnet user-secrets set ConnectionStrings:AppConfig "<your_connection_string>"
使用下列程式碼更新 Program.cs。
// Existing code in Program.cs
// ... ...

var builder = WebApplication.CreateBuilder(args);

// Retrieve the App Config connection string
string AppConfigConnectionString = builder.Configuration.GetConnectionString("AppConfig");

// Load configuration from Azure App Configuration
builder.Configuration.AddAzureAppConfiguration(options =>
{
    options.Connect(AppConfigConnectionString);
    options.UseFeatureFlags();
});

// Add Azure App Configuration middleware to the container of services
builder.Services.AddAzureAppConfiguration();

// Add feature management to the container of services
builder.Services.AddFeatureManagement();

// The rest of existing code in Program.cs
// ... ...
// Existing code in Program.cs // ... ... var app = builder.Build(); // Use Azure App Configuration middleware for dynamic configuration refresh app.UseAzureAppConfiguration(); // The rest of existing code in Program.cs // ... ...在 Views\Home 目錄下新增 Beta.cshtml,並使用下列標記加以更新。
@{
    ViewData["Title"] = "Beta Page";
}

<h1>This is the beta website.</h1>
在 Controllers 目錄下開啟HomeController.cs,並使用下列程式代碼加以更新。
public IActionResult Beta()
{
    return View();
}
開啟 _ViewImports.cshtml,並使用
@addTagHelper指示詞註冊功能管理員標籤協助程式:@addTagHelper *, Microsoft.FeatureManagement.AspNetCore在 Views\Shared 目錄中開啟 _Layout.cshtml 。 在 [首頁] 和 [隱私權] 導覽列項目之間插入新的
<feature>標籤。<div class="navbar-collapse collapse d-sm-inline-flex justify-content-between"> <ul class="navbar-nav flex-grow-1"> <li class="nav-item"> <a class="nav-link text-dark" asp-area="" asp-controller="Home" asp-action="Index">Home</a> </li> <feature name="Beta"> <li class="nav-item"> <a class="nav-link text-dark" asp-area="" asp-controller="Home" asp-action="Beta">Beta</a> </li> </feature> <li class="nav-item"> <a class="nav-link text-dark" asp-area="" asp-controller="Home" asp-action="Privacy">Privacy</a> </li> </ul> <partial name="_LoginPartial" /> </div>建置並執行。 然後選取右上角的 [註冊] 連結,以建立新的使用者帳戶。 使用
test@contoso.com的電子郵件地址。 在 [註冊確認] 畫面上,選取 [按一下這裡以確認您的帳戶]。在 [應用程式組態] 中切換功能旗標。 驗證此動作可控制導覽列上 Beta 項目的可見度。
更新 Web 應用程式程式代碼以使用 TargetingFilter
此時,您可以使用功能旗標來啟用或停用所有使用者的 Beta 功能。 若要為某些使用者啟用功能旗標,同時為其他人停用此功能旗標,請更新您的程式碼以使用 TargetingFilter。 在此範例中,您將使用登入使用者的電子郵件地址做為使用者識別碼,以及電子郵件地址的功能變數名稱部分做為群組。 您會將使用者與群組新增到 TargetingContext。 TargetingFilter 會使用此內容來判斷每個要求的功能旗標狀態。
新增 ExampleTargetingContextAccessor.cs 檔案。
using Microsoft.AspNetCore.Http;
using Microsoft.FeatureManagement.FeatureFilters;
using System;
using System.Collections.Generic;
using System.Threading.Tasks;

namespace TestFeatureFlags
{
    public class ExampleTargetingContextAccessor : ITargetingContextAccessor
    {
        private const string TargetingContextLookup = "ExampleTargetingContextAccessor.TargetingContext";
        private readonly IHttpContextAccessor _httpContextAccessor;

        public ExampleTargetingContextAccessor(IHttpContextAccessor httpContextAccessor)
        {
            _httpContextAccessor = httpContextAccessor ?? throw new ArgumentNullException(nameof(httpContextAccessor));
        }

        public ValueTask<TargetingContext> GetContextAsync()
        {
            HttpContext httpContext = _httpContextAccessor.HttpContext;
            if (httpContext.Items.TryGetValue(TargetingContextLookup, out object value))
            {
                return new ValueTask<TargetingContext>((TargetingContext)value);
            }
            List<string> groups = new List<string>();
            if (httpContext.User.Identity.Name != null)
            {
                groups.Add(httpContext.User.Identity.Name.Split("@", StringSplitOptions.None)[1]);
            }
            TargetingContext targetingContext = new TargetingContext
            {
                UserId = httpContext.User.Identity.Name,
                Groups = groups
            };
            httpContext.Items[TargetingContextLookup] = targetingContext;
            return new ValueTask<TargetingContext>(targetingContext);
        }
    }
}
開啟
Program.cs並新增ExampleTargetingContextAccessor在先前步驟中建立的 ,並在TargetingFilter現有行之後呼叫 方法,將 建立WithTargeting的AddFeatureManagement新增至服務集合。TargetingFilter會使用ExampleTargetingContextAccessor來判斷每次評估功能旗標的目標內容。// Existing code in Program.cs // ... ... // Add feature management to the container of services builder.Services.AddFeatureManagement() .WithTargeting<ExampleTargetingContextAccessor>(); // The rest of existing code in Program.cs // ... ...注意
針對 Blazor 應用程式,請參閱 將功能管理啟用為範圍服務的指示。
更新功能旗標以使用 TargetingFilter
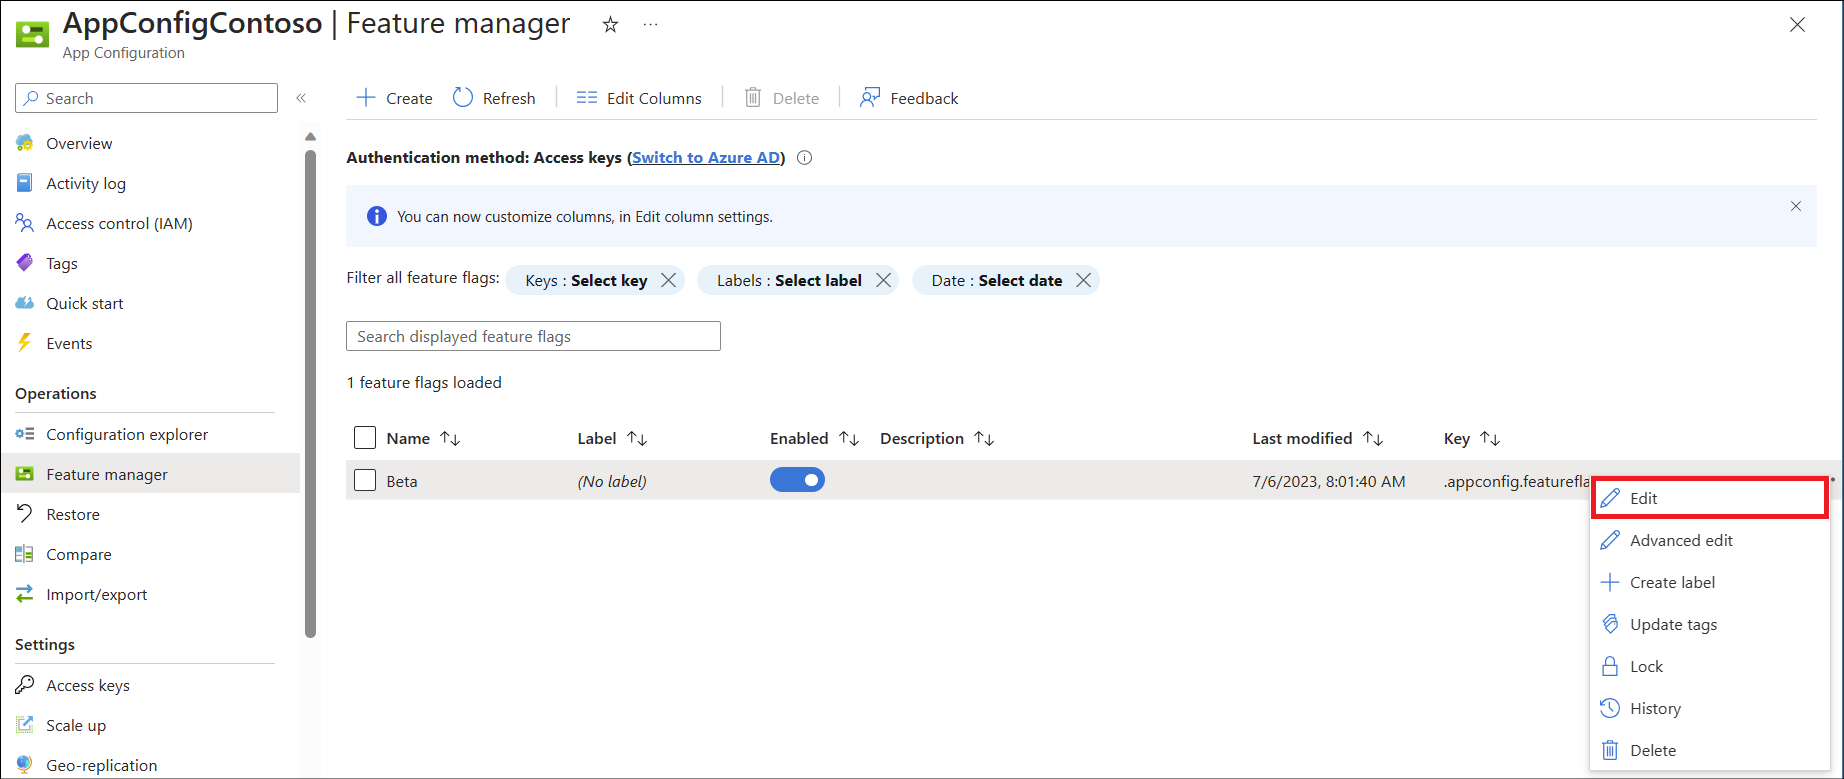
在 Azure 入口網站中,移至您的應用程式組態存放區,然後選取 [功能管理員]。
選取您在快速入門中建立的 Beta 功能旗標操作功能表。 選取編輯。
在 [編輯] 畫面中,如果尚未選取功能旗標,請選取 [啟用功能旗標] 核取方塊。 然後選取 [使用功能篩選] 核取方塊。
選取建立按鈕。
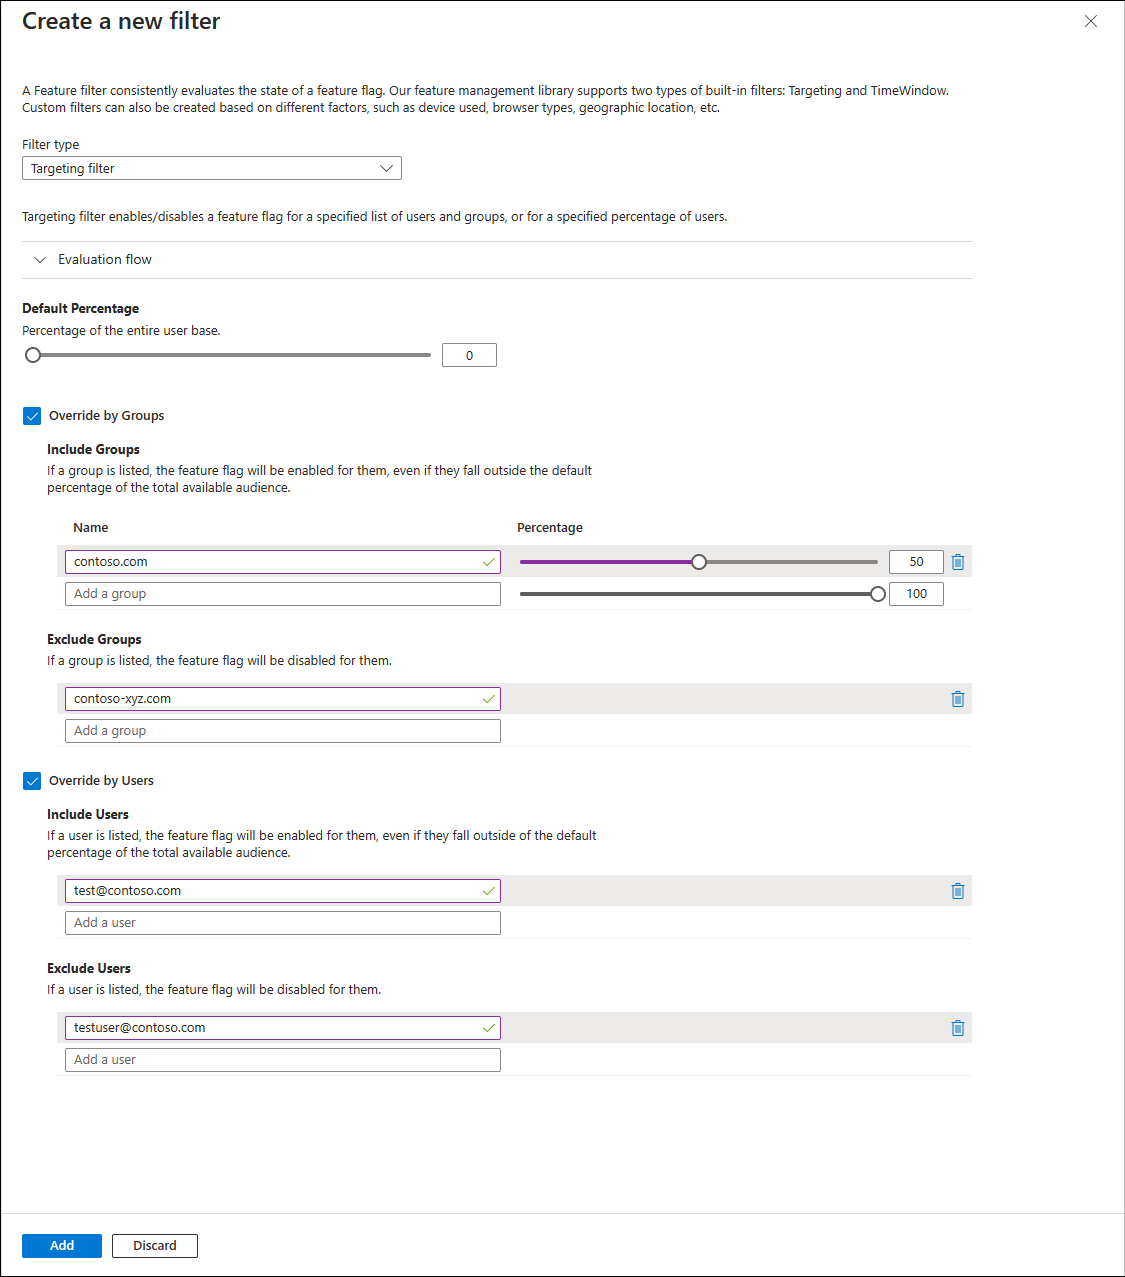
在篩選類型下拉式清單中選取 [目標篩選條件]。
勾選 [依群組覆寫] 和 [依使用者覆寫] 核取方塊。
選取下列選項。
- 預設百分比:0
- 包含群組:輸入 contoso.com 的名稱以及 50 的百分比。
- 排除群組:
contoso-xyz.com - 包含使用者:
test@contoso.com - 排除使用者:
testuser@contoso.com
功能篩選畫面看起來如下所示。
這些設定會導致下列行為。
- 使用者
testuser@contoso.com一律會停用功能旗標,因為testuser@contoso.com會列在 [排除使用者] 區段中。 contoso-xyz.com中的使用者一律會停用功能旗標,因為contoso-xyz.com會列在 [排除群組] 區段中。- 使用者
test@contoso.com一律會啟用功能旗標,因為test@contoso.com會列在 [包含使用者] 區段中。 - 功能旗標會針對 contoso.com 群組中的使用者啟用 50%,因為 contoso.com 列在 [包含群組] 區段中,且其百分比為 50。
- 所有其他使用者一律停用此功能,因為 [預設百分比] 設定為 0。
選取 [新增] 儲存目標篩選條件。
選取 [套用] 以儲存這些設定,並返回 [功能管理員] 畫面。
功能旗標的 [功能篩選] 現在會顯示為目標。 此狀態會根據目標功能篩選條件強制執行的準則,根據每個要求啟用或停用功能旗標。
TargetingFilter 運作中
若要查看此功能旗標的效果,請建置並執行應用程式。 一開始,Beta 項目不會出現在工具列上,因為 [預設百分比] 選項設定為 0。
現在,使用您在註冊時設定的密碼,登入為 test@contoso.com。 Beta 項目現在會出現在工具列上,因為將 test@contoso.com 指定為目標使用者。
現在,使用您在註冊時設定的密碼,登入為 testuser@contoso.com。 Beta 項目不會出現在工具列上,因為將 testuser@contoso.com 指定為排除的使用者。
下列影片顯示此行為的運作情況。

您可以使用 @contoso.com 和 @contoso-xyz.com 電子郵件地址建立更多使用者,以查看群組設定的行為。
使用 contoso-xyz.com 電子郵件地址的使用者不會看到 Beta 項目。 雖然使用 @contoso.com 電子郵件位址的 50% 使用者會看到 Beta 項目,但其他 50% 的使用者看不到 Beta 項目。