教學課程:使用 ARM 範本匯入 SQL BACPAC 檔案
了解如何使用 Azure SQL Database 擴充功能透過 Azure Resource Manager 範本 (ARM 範本) 匯入 BACPAC 檔案。 除了完成部署所需的主要範本檔案以外,部署成品可以是任何檔案。 BACPAC 檔案是成品。
在本教學課程中,您將建立一個範本來部署邏輯 SQL 伺服器和單一資料庫並匯入 BACPAC 檔案。 如需有關使用 ARM 範本部署 Azure 虛擬機器擴充功能的詳細資訊,請參閱教學課程:使用 ARM 範本部署虛擬機器擴充功能。
本教學課程涵蓋下列工作:
- 準備 BACPAC 檔案。
- 開啟快速入門範本。
- 編輯範本。
- 部署範本。
- 驗證部署。
如果您沒有 Azure 訂用帳戶,請在開始前建立免費帳戶。
必要條件
若要完成本文,您需要:
Visual Studio Cod 搭配 Resource Manager Tools 擴充功能。 請參閱快速入門:使用 Visual Studio Code 建立 ARM 範本。
為了提高安全性,請使用為伺服器系統管理員帳戶產生的密碼。 在 PowerShell 或 Bash 中,您可以使用 Azure Cloud Shell 執行下列命令:
openssl rand -base64 32若要深入了解,請執行
man openssl rand以開啟手動頁面。Azure Key Vault 的設計訴求是保護加密金鑰和其他祕密。 如需詳細資訊,請參閱教學課程:在 ARM 範本部署中整合 Azure Key Vault。 我們也建議您每三個月更新一次密碼。
準備 BACPAC 檔案
已在 GitHub 中分享 BACPAC 檔案。 若要自行建立,請參閱將 Azure SQL Database 中的資料庫匯出到 BACPAC 檔案。 如果您選擇將檔案發佈到自己的位置,您稍後必須在本教學課程中更新範本。
必須將 BACPAC 檔案儲存在 Azure 儲存體帳戶中,然後才能透過 ARM 範本將其匯入。 下列 PowerShell 指令碼會使用這些步驟來準備 BACPAC 檔案:
- 下載 BACPAC 檔案。
- 建立 Azure 儲存體帳戶。
- 建立儲存體帳戶 Blob 容器。
- 將 BACPAC 檔案上傳至容器。
- 顯示儲存體帳戶金鑰、blob URL、資源群組名稱和位置。
選取 [試試看] 以開啟 Cloud Shell。 然後複製以下 PowerShell 指令碼,並將其貼至殼層視窗中。
$projectName = Read-Host -Prompt "Enter a project name that is used to generate Azure resource names"
$location = Read-Host -Prompt "Enter the location (i.e. centralus)"

$resourceGroupName = "${projectName}rg"
$storageAccountName = "${projectName}store"
$containerName = "bacpacfiles"
$bacpacFileName = "SQLDatabaseExtension.bacpac"
$bacpacUrl = "https://github.com/Azure/azure-docs-json-samples/raw/master/tutorial-sql-extension/SQLDatabaseExtension.bacpac"

# Download the bacpac file
Invoke-WebRequest -Uri $bacpacUrl -OutFile "$HOME/$bacpacFileName"

# Create a resource group
New-AzResourceGroup -Name $resourceGroupName -Location $location

# Create a storage account
$storageAccount = New-AzStorageAccount -ResourceGroupName $resourceGroupName `
                                       -Name $storageAccountName `
                                       -SkuName Standard_LRS `
                                       -Location $location
$storageAccountKey = (Get-AzStorageAccountKey -ResourceGroupName $resourceGroupName `
                                              -Name $storageAccountName).Value[0]

# Create a container
New-AzStorageContainer -Name $containerName -Context $storageAccount.Context

# Upload the BACPAC file to the container
Set-AzStorageBlobContent -File $HOME/$bacpacFileName `
                         -Container $containerName `
                         -Blob $bacpacFileName `
                         -Context $storageAccount.Context

Write-Host "The project name:        $projectName `
  The location:            $location `
  The storage account key: $storageAccountKey `
  The BACPAC file URL:     https://$storageAccountName.blob.core.windows.net/$containerName/$bacpacFileName `
  "

Write-Host "Press [ENTER] to continue ..."
儲存儲存體帳戶金鑰、BACPAC 檔案 URL、專案名稱和位置。 您稍後在本教學課程中部署範本時,將會使用到這些值。
開啟快速入門範本
此教學課程中使用的範本會儲存在 GitHub 中。
在 Visual Studio Code 中,選取 [檔案]>[開啟檔案]。
在 [檔案名稱] 中,貼上下列 URL:
https://raw.githubusercontent.com/Azure/azure-docs-json-samples/master/tutorial-sql-extension/azuredeploy.json選取 [開啟] 以開啟檔案。
範本中定義了兩項資源:
選取 [檔案]>[另存新檔],以名稱 azuredeploy.json 將檔案的複本儲存至您的本機電腦。
編輯範本
在
parameters區段的結尾新增兩個參數,以集合儲存體帳戶金鑰和 BACPAC URL。"storageAccountKey": { "type":"string", "metadata":{ "description": "Specifies the key of the storage account where the BACPAC file is stored." } }, "bacpacUrl": { "type":"string", "metadata":{ "description": "Specifies the URL of the BACPAC file." } }在
adminPassword屬性的右大括弧 (}) 後面加上逗號。 若要從 Visual Studio Code 將 JSON 檔案格式化,請選取 Shift + Alt + F。添加兩個資源至範本。
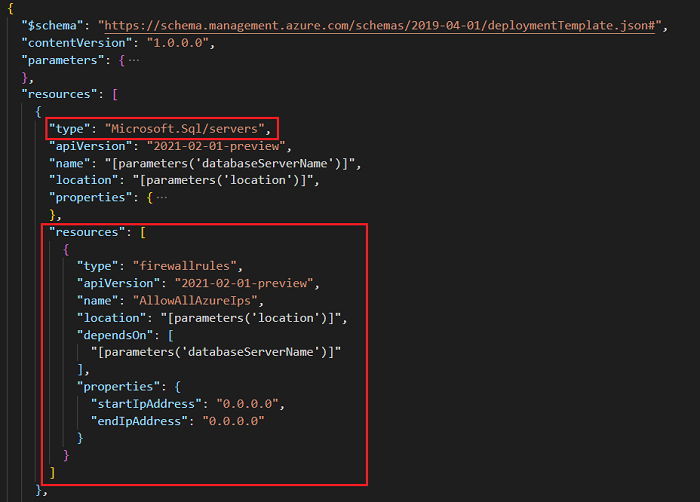
您必須允許 Azure 服務的流量,SQL Database 擴充功能才能匯入 BACPAC 檔案。 部署 SQL 伺服器時,防火牆規則會開啟允許 Azure 服務和資源存取此伺服器的設定。
在伺服器定義底下新增下列防火牆規則:
"resources": [
  {
    "type": "firewallrules",
    "apiVersion": "2021-02-01-preview",
    "name": "AllowAllAzureIps",
    "location": "[parameters('location')]",
    "dependsOn": [
      "[parameters('databaseServerName')]"
    ],
    "properties": {
      "startIpAddress": "0.0.0.0",
      "endIpAddress": "0.0.0.0"
    }
  }
]
下列範例顯示更新的範本:
使用下列 JSON,將 SQL Database 擴充功能資源新增至資料庫定義:
"resources": [
  {
    "type": "extensions",
    "apiVersion": "2014-04-01",
    "name": "Import",
    "dependsOn": [
      "[resourceId('Microsoft.Sql/servers/databases', parameters('databaseServerName'), parameters('databaseName'))]"
    ],
    "properties": {
      "storageKeyType": "StorageAccessKey",
      "storageKey": "[parameters('storageAccountKey')]",
      "storageUri": "[parameters('bacpacUrl')]",
      "administratorLogin": "[parameters('adminUser')]",
      "administratorLoginPassword": "[parameters('adminPassword')]",
      "operationMode": "Import"
    }
  }
]
下列範例顯示更新的範本:

若要了解資源的定義,請參閱 API 版本的 SQL Database 擴充功能參考。 以下是部分重要元素:
dependsOn:在資料庫建立後,才可建立延伸模組資源。storageKeyType:指定要使用的儲存體金鑰類型。 這個值可以是StorageAccessKey或SharedAccessKey。 在本教學課程中使用StorageAccessKey。storageKey:為 BACPAC 檔案儲存所在的儲存體帳戶指定金鑰。 如果儲存體金鑰類型為SharedAccessKey,則前面必須加上 "?"。storageUri:指定儲存體帳戶中所儲存 BACPAC 檔案的 URL。administratorLogin:SQL 管理員的帳戶名稱。administratorLoginPassword:SQL 管理員的密碼。 若要使用產生的密碼,請參閱必要條件。
下列範例顯示完成的範本:
{
  "$schema": "https://schema.management.azure.com/schemas/2019-04-01/deploymentTemplate.json#",
  "contentVersion": "1.0.0.0",
  "parameters": {
    "databaseServerName": {
      "type": "string",
      "defaultValue": "[concat('server-', uniqueString(resourceGroup().id, deployment().name))]",
      "metadata": {
        "description": "Specifies the name for the SQL server"
      }
    },
    "databaseName": {
      "type": "string",
      "defaultValue": "[concat('db-', uniqueString(resourceGroup().id, deployment().name), '-1')]",
      "metadata": {
        "description": "Specifies the name for the SQL database under the SQL server"
      }
    },
    "location": {
      "type": "string",
      "defaultValue": "[resourceGroup().location]",
      "metadata": {
        "description": "Specifies the location for server and database"
      }
    },
    "adminUser": {
      "type": "string",
      "metadata": {
        "description": "Specifies the username for admin"
      }
    },
    "adminPassword": {
      "type": "securestring",
      "metadata": {
        "description": "Specifies the password for admin"
      }
    },
    "storageAccountKey": {
      "type": "string",
      "metadata": {
        "description": "Specifies the key of the storage account where the BACPAC file is stored."
      }
    },
    "bacpacUrl": {
      "type": "string",
      "metadata": {
        "description": "Specifies the URL of the BACPAC file."
      }
    }
  },
  "resources": [
    {
      "type": "Microsoft.Sql/servers",
      "apiVersion": "2021-02-01-preview",
      "name": "[parameters('databaseServerName')]",
      "location": "[parameters('location')]",
      "properties": {
        "administratorLogin": "[parameters('adminUser')]",
        "administratorLoginPassword": "[parameters('adminPassword')]",
        "version": "12.0"
      },
      "resources": [
        {
          "type": "firewallrules",
          "apiVersion": "2021-02-01-preview",
          "name": "AllowAllAzureIps",
          "location": "[parameters('location')]",
          "dependsOn": [
            "[parameters('databaseServerName')]"
          ],
          "properties": {
            "startIpAddress": "0.0.0.0",
            "endIpAddress": "0.0.0.0"
          }
        }
      ]
    },
    {
      "type": "Microsoft.Sql/servers/databases",
      "apiVersion": "2021-02-01-preview",
      "name": "[concat(string(parameters('databaseServerName')), '/', string(parameters('databaseName')))]",
      "location": "[parameters('location')]",
      "dependsOn": [
        "[concat('Microsoft.Sql/servers/', parameters('databaseServerName'))]"
      ],
      "resources": [
        {
          "type": "extensions",
          "apiVersion": "2014-04-01",
          "name": "Import",
          "dependsOn": [
            "[resourceId('Microsoft.Sql/servers/databases', parameters('databaseServerName'), parameters('databaseName'))]"
          ],
          "properties": {
            "storageKeyType": "StorageAccessKey",
            "storageKey": "[parameters('storageAccountKey')]",
            "storageUri": "[parameters('bacpacUrl')]",
            "administratorLogin": "[parameters('adminUser')]",
            "administratorLoginPassword": "[parameters('adminPassword')]",
            "operationMode": "Import"
          }
        }
      ]
    }
  ]
}
部署範本
使用您在準備 BACPAC 檔案時所使用的專案名稱和位置。 此動作會將所有資源放在相同的資源群組中,在您刪除資源時會很有幫助。
登入 Cloud Shell。
在左上角選取 [PowerShell]。
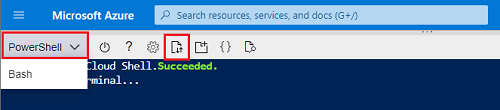
選取 [上傳/下載檔案],然後上傳您的 azuredeploy.json 檔案。
若要部署範本,請複製下列指令碼並將其貼上至殼層視窗中。
$projectName = Read-Host -Prompt "Enter the same project name that is used earlier"
$adminUsername = Read-Host -Prompt "Enter the SQL admin username"
$adminPassword = Read-Host -Prompt "Enter the admin password" -AsSecureString
$storageAccountKey = Read-Host -Prompt "Enter the storage account key"
$bacpacUrl = Read-Host -Prompt "Enter the URL of the BACPAC file"
$resourceGroupName = "${projectName}rg"

New-AzResourceGroupDeployment `
    -ResourceGroupName $resourceGroupName `
    -adminUser $adminUsername `
    -adminPassword $adminPassword `
    -TemplateFile "$HOME/azuredeploy.json" `
    -storageAccountKey $storageAccountKey `
    -bacpacUrl $bacpacUrl

Write-Host "Press [ENTER] to continue ..."
檢查部署
您需要先新增防火牆規則,才能從您的用戶端電腦存取伺服器。 您用戶端的 IP 位址以及連線到伺服器的 IP 位址,可能會因為網路位址轉譯 (NAT) 而有所不同。 如需詳細資訊,請參閱建立和管理 IP 防火牆規則。
例如,當您登入 [查詢編輯器] 時,會出現一則訊息,顯示不允許此 IP 位址。 因為 NAT 的關係,此位址與您用戶端的 IP 位址不相同。 透過選取訊息的連結來新增 IP 位址的防火牆規則。 完成以後,您可以從伺服器的 [防火牆和虛擬網路] 設定中刪除 IP 位址。
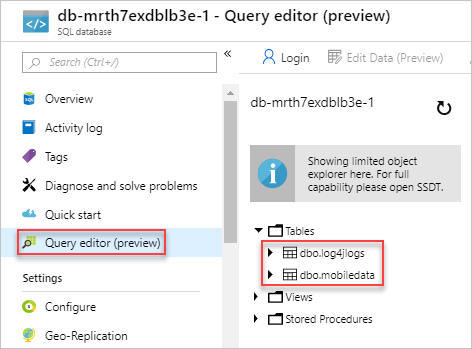
在 Azure 入口網站中的資源群組中選取資料庫。 選取 [查詢編輯器 (預覽)],然後輸入管理員登入資訊。 您會在資料庫中看到兩個匯入的資料表。
清除資源
當不再需要您部署的 Azure 資源時,請刪除資源群組。 系統會刪除資源群組、儲存體帳戶、SQL 伺服器和 SQL 資料庫。
- 在 Azure 入口網站的搜尋方塊中輸入 [資源群組]。
- 在 [依名稱篩選] 欄位中,輸入資源群組名稱。
- 選取資源群組名稱。
- 選取 [刪除資源群組]。
- 若要確認刪除,請輸入資源群組名稱,然後選取 [刪除]。
下一步
在本教學課程中,您已部署伺服器和資料庫並匯入 BACPAC 檔案。 若要了解如何針對範本部署進行疑難排解,請參閱: