使用百度開始使用通知中樞
百度雲端推送是一種中國雲端服務,可用來將推播通知傳送至行動裝置。
由於Google Play和 FCM(Firebase 雲端通訊)在中國無法使用,因此必須使用不同的App Store和推播服務。 百度是其中之一,也是通知中樞目前使用的百度。
必要條件
本教學課程需要:
- Android SDK (我們假設您使用 Android Studio),您可以從 Android 網站下載
- 百度推送 Android SDK
注意
若要完成本教學課程,您必須擁有作用中的 Azure 帳戶。 如果您沒有帳戶,只要幾分鐘就能建立免費試用帳戶。 如需詳細資料,請參閱 Azure 免費試用。
若要開始,請執行下列動作:
- 建立百度帳戶。
- 建立百度雲端推送專案,並記下 API 金鑰和秘密密鑰。
設定新的通知中樞
登入 Azure 入口網站。
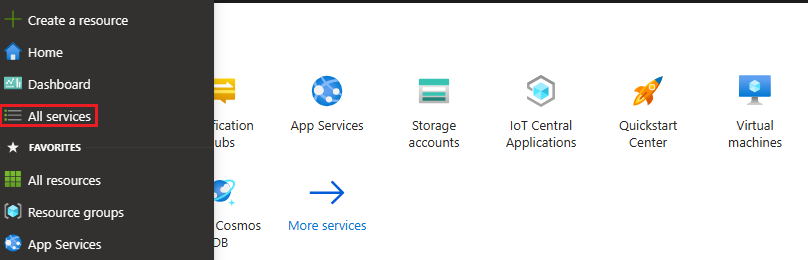
選取 左側功能表上的 [所有服務 ]。
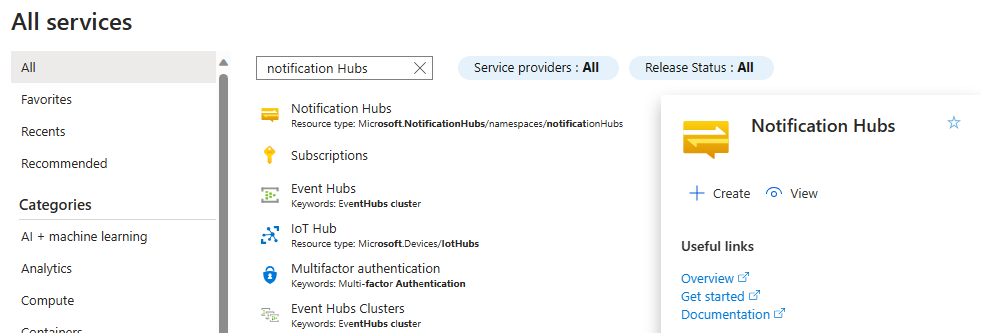
在 [篩選服務] 文本框中輸入通知中樞。 選取服務名稱旁的星號圖示,將服務新增至左側功能表上的 [我的最愛] 區段。 選取 [ 通知中樞]。
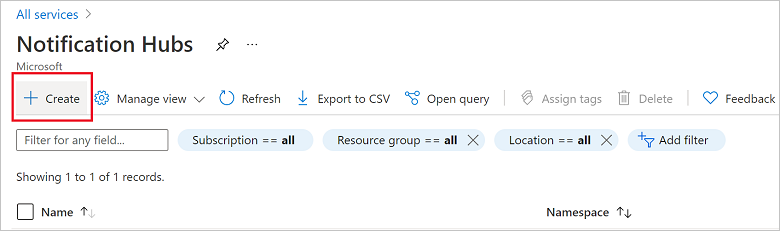
在 [通知中 樞] 頁面上,選取 工具欄上的 [建立 ]。
在 [通知中樞] 頁面上的 [基本] 索引標籤中,執行下列步驟:
在 [訂用帳戶] 中,選取您想要使用的 Azure 訂用帳戶名稱,然後選取現有的資源群組,或建立新的資源群組。
在命名空間詳細數據中輸入新命名空間的唯一名稱。
命名空間包含一或多個通知中樞,因此請在通知中樞詳細數據中輸入中樞的名稱。
從 [ 位置 ] 下拉式清單框中選取值。 這個值會指定您要在其中建立中樞的位置。

檢閱 [可用性區域] 選項。 如果您選擇具有可用性區域的區域,預設會選取複選框。 可用性區域 是付費功能,因此會將額外的費用新增至您的階層。
選擇災害復原選項:無、配對的復原區域或彈性復原區域。 如果您選擇 [配對復原區域],則會顯示故障轉移區域。 如果您選取 [ 彈性復原區域],請使用下拉式清單從復原區域清單中選擇。

選取 建立。
部署完成時,請選取 [移至資源]。


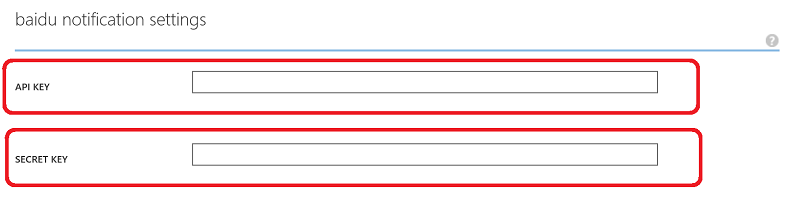
6. 在您的通知中樞中,選取 [通知服務],然後選取 [百度][Android 中國]。
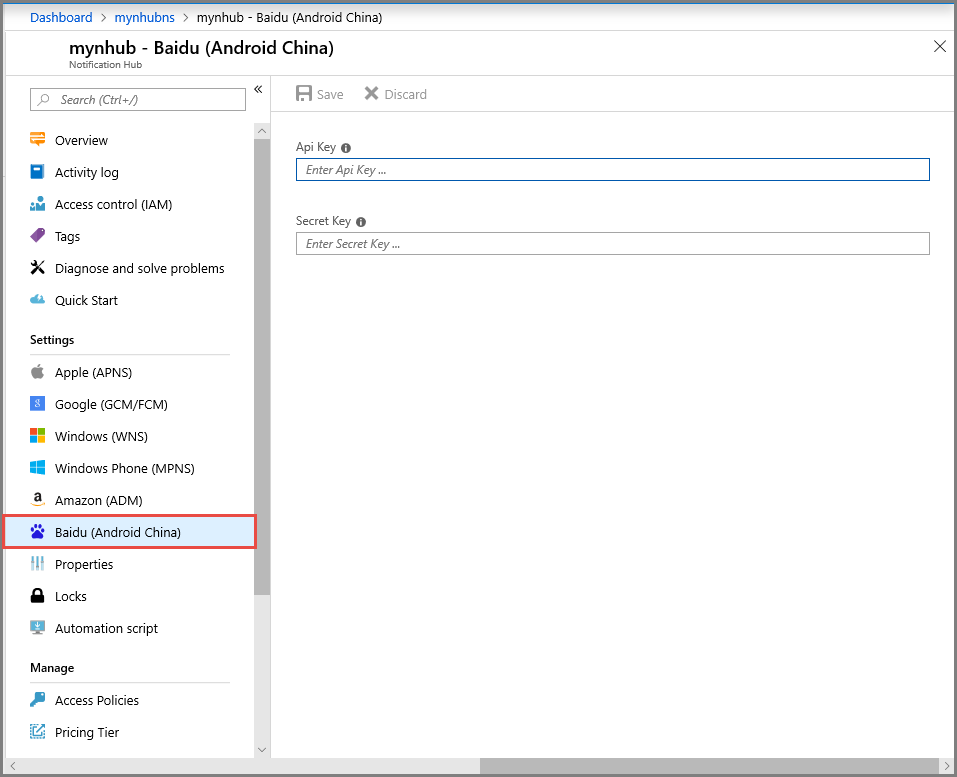
7. 向下捲動至百度通知設定區段。 在百度雲端推送專案中,輸入您從百度控制台取得的 API 金鑰和秘密金鑰。 然後按一下 [儲存] 。
您的通知中樞現在已設定為使用百度。 您也有 連接字串 來註冊應用程式以傳送和接收推播通知。
記下 DefaultListenSharedAccessSignatureDefaultFullSharedAccessSignature 和 從 [存取連接資訊] 視窗。
將您的應用程式 連線 至通知中樞
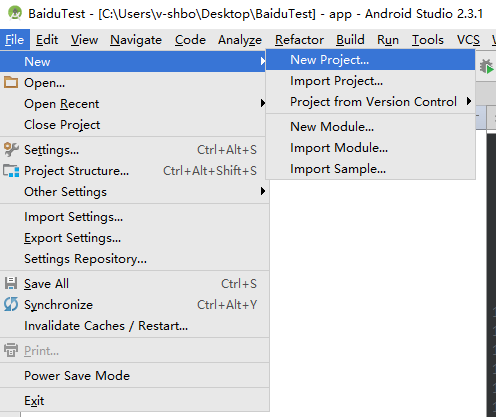
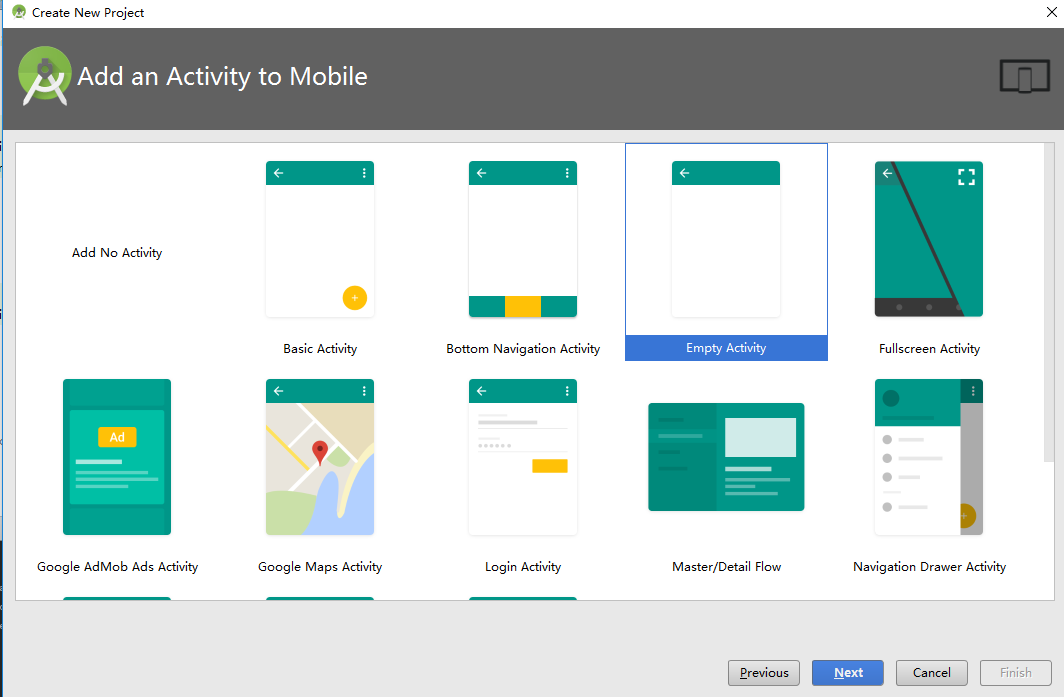
在 Android Studio 中,建立新的 Android 專案(檔案 > 新 > 專案)。
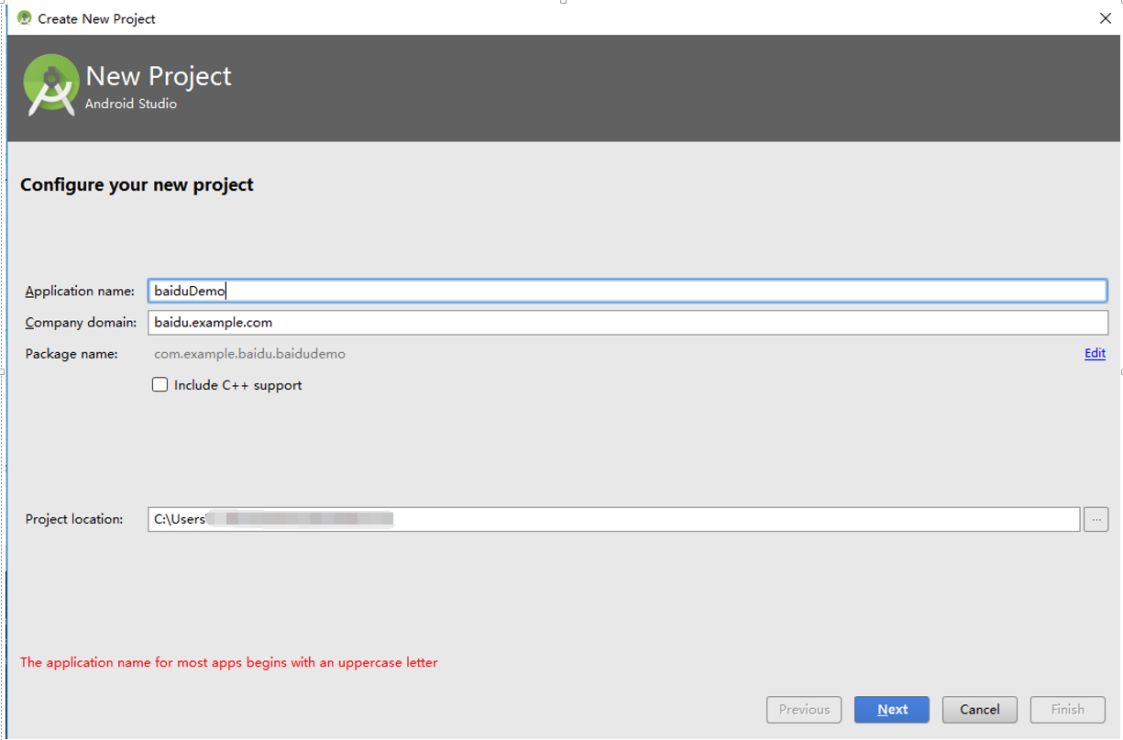
輸入應用程式名稱,並確定 [最低必要 SDK 版本] 設定為 [API 16:Android 4.1]。 此外,請確定您的套件名稱 (應用包名) 與百度雲端推送入口網站中的相同
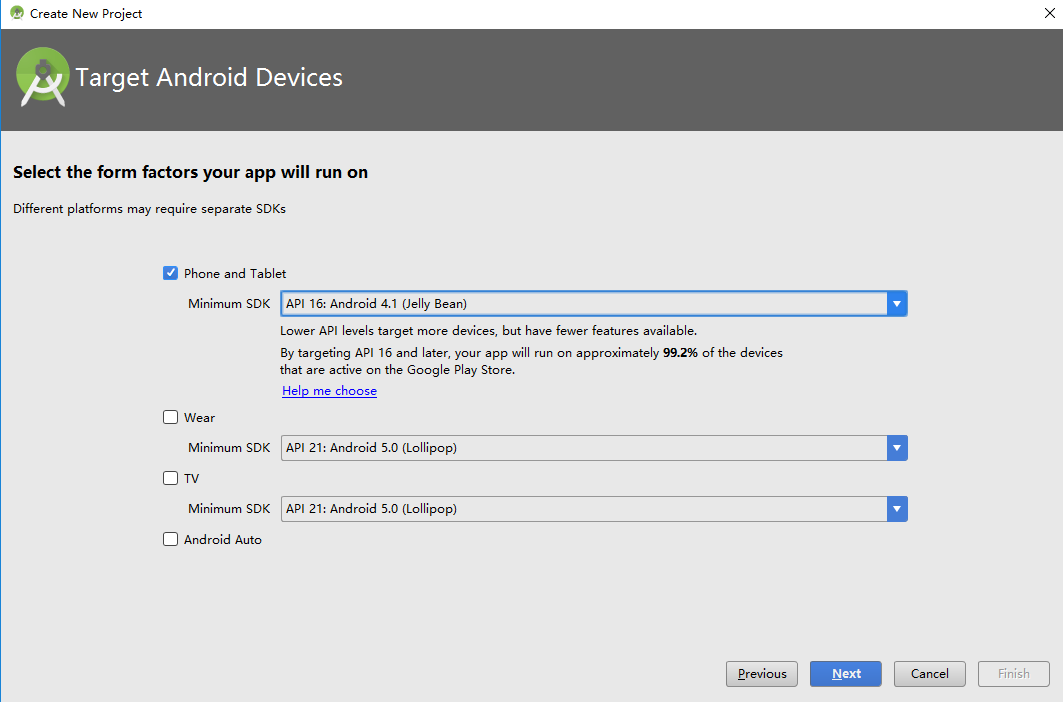
按 [下一步],繼續遵循精靈,直到 [建立活動] 窗口出現為止。 請確定已選取 [空白活動],最後選取 [完成] 以建立新的 Android 應用程式。
請確定已正確設定專案建置目標。
然後新增 Azure 通知中樞連結庫。 在
Build.Gradle應用程式的 檔案中,在 [相依性] 區段中新增下列幾行。implementation 'com.microsoft.azure:notification-hubs-android-sdk:0.6@aar' implementation 'com.microsoft.azure:azure-notifications-handler:1.0.1@aar'在 [相依性] 區段之後新增下列存放庫。
repositories {
    maven {
        url "https://dl.bintray.com/microsoftazuremobile/SDK"
    }
}
若要避免清單衝突,請在專案的
Manifest.xml檔案中新增下列程序代碼:<manifest package="YOUR.PACKAGE.NAME" xmlns:tools="http://schemas.android.com/tools" xmlns:android="http://schemas.android.com/apk/res/android">與標籤的 :
<application/><application tools:replace="android:allowBackup,icon,theme,label">下載並解壓縮 百度推播 Android SDK。
pushservice-x.y.z jar複製 libs 資料夾中的檔案。 然後複製.soAndroid 應用程式的 [建立新資料夾] 資料夾中的檔案src/main/jniLibs。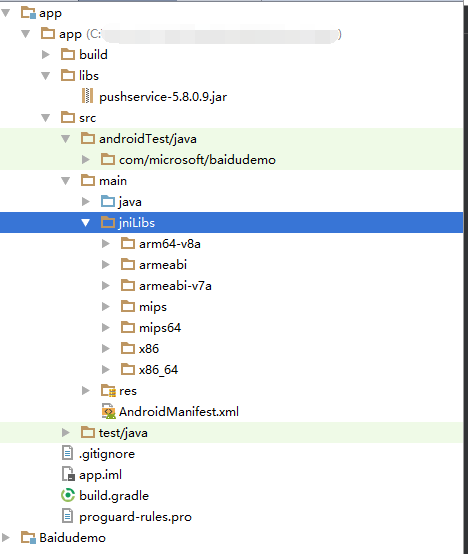
在項目的
libs資料夾中,以滑鼠右鍵按下pushervice-x.y.z.jar檔案;選取 [新增為連結庫],將這個連結庫 包含在專案中。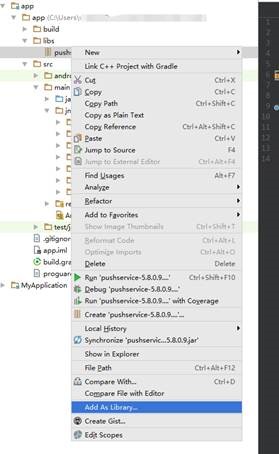
開啟 Android 項目的
AndroidManifest.xml檔案,並新增百度 SDK 所需的許可權。 將取代YOURPACKAGENAME為您的套件名稱。<uses-permission android:name="android.permission.INTERNET" /> <uses-permission android:name="android.permission.READ_PHONE_STATE" /> <uses-permission android:name="android.permission.ACCESS_NETWORK_STATE" /> <uses-permission android:name="android.permission.RECEIVE_BOOT_COMPLETED" /> <uses-permission android:name="android.permission.WRITE_SETTINGS" /> <uses-permission android:name="android.permission.VIBRATE" /> <uses-permission android:name="android.permission.WRITE_EXTERNAL_STORAGE" /> <uses-permission android:name="android.permission.DISABLE_KEYGUARD" /> <uses-permission android:name="android.permission.ACCESS_COARSE_LOCATION" /> <uses-permission android:name="android.permission.ACCESS_WIFI_STATE" /> <uses-permission android:name="android.permission.ACCESS_DOWNLOAD_MANAGER" /> <uses-permission android:name="android.permission.DOWNLOAD_WITHOUT_NOTIFICATION" /> <uses-permission android:name="android.permission.EXPAND_STATUS_BAR" /> !! <uses-permission android:name="baidu.push.permission.WRITE_PUSHINFOPROVIDER.YOURPACKAGENAME" /> !!<permission android:name="baidu.push.permission.WRITE_PUSHINFOPROVIDER.YOURPACKAGENAME" android:protectionLevel="normal" />在活動項目之後
.MainActivity,在應用程式元素內新增下列組態,並 取代yourprojectname (例如,com.example.BaiduTest):<activity android:name="com.baidu.android.pushservice.richmedia.MediaViewActivity" android:configChanges="orientation|keyboardHidden" android:label="MediaViewActivity" /> <activity android:name="com.baidu.android.pushservice.richmedia.MediaListActivity" android:configChanges="orientation|keyboardHidden" android:label="MediaListActivity" android:launchMode="singleTask" /> <!-- Push application definition message --> <receiver android:name=".MyPushMessageReceiver"> <intent-filter> <!-- receive push message--> <action android:name="com.baidu.android.pushservice.action.MESSAGE" /> <!-- receive bind,unbind,fetch,delete.. message--> <action android:name="com.baidu.android.pushservice.action.RECEIVE" /> <action android:name="com.baidu.android.pushservice.action.notification.CLICK" /> </intent-filter> </receiver> <receiver android:name="com.baidu.android.pushservice.PushServiceReceiver" android:process=":bdservice_v1"> <intent-filter> <action android:name="android.intent.action.BOOT_COMPLETED" /> <action android:name="android.net.conn.CONNECTIVITY_CHANGE" /> <action android:name="com.baidu.android.pushservice.action.notification.SHOW" /> <action android:name="com.baidu.android.pushservice.action.media.CLICK" /> <action android:name="android.intent.action.MEDIA_MOUNTED" /> <action android:name="android.intent.action.USER_PRESENT" /> <action android:name="android.intent.action.ACTION_POWER_CONNECTED" /> <action android:name="android.intent.action.ACTION_POWER_DISCONNECTED" /> </intent-filter> </receiver> <receiver android:name="com.baidu.android.pushservice.RegistrationReceiver" android:process=":bdservice_v1"> <intent-filter> <action android:name="com.baidu.android.pushservice.action.METHOD" /> <action android:name="com.baidu.android.pushservice.action.BIND_SYNC" /> </intent-filter> <intent-filter> <action android:name="android.intent.action.PACKAGE_REMOVED" /> <data android:scheme="package" /> </intent-filter> </receiver> <service android:name="com.baidu.android.pushservice.PushService" android:exported="true" android:process=":bdservice_v1"> <intent-filter> <action android:name="com.baidu.android.pushservice.action.PUSH_SERVICE" /> </intent-filter> </service> <service android:name="com.baidu.android.pushservice.CommandService" android:exported="true" /> <!-- Adapt the ContentProvider declaration required for the Android N system, and the write permissions include the application package name--> <provider android:name="com.baidu.android.pushservice.PushInfoProvider" android:authorities="com.baidu.push.example.bdpush" android:exported="true" android:protectionLevel="signature" android:writePermission="baidu.push.permission.WRITE_PUSHINFOPROVIDER. yourprojectname " /> <!-- API Key of the Baidu application --> <meta-data android:name="api_key" !! android:value="api_key" /> </application>將名為
ConfigurationSettings.java的新類別新增至專案。public class ConfigurationSettings { public static String API_KEY = "..."; public static String NotificationHubName = "..."; public static String NotificationHubConnectionString = "..."; }使用百度雲端專案的API_KEY來設定字串的值
API_KEY。使用 Azure 入口網站 的通知中樞名稱,然後
NotificationHubConnectionString從 Azure 入口網站 設定DefaultListenSharedAccessSignature字串的值NotificationHubName。開啟MainActivity.java,並將下列內容新增至 onCreate 方法:
PushManager.startWork(this, PushConstants.LOGIN_TYPE_API_KEY, API_KEY );新增名為
MyPushMessageReceiver.java的新類別,並將下列程式代碼新增至其中。 這是處理從百度推播伺服器接收的推播通知的類別。package your.package.name; import android.content.Context; import android.content.Intent; import android.os.AsyncTask; import android.text.TextUtils; import android.util.Log; import com.baidu.android.pushservice.PushMessageReceiver; import com.microsoft.windowsazure.messaging.NotificationHub; import org.json.JSONException; import org.json.JSONObject; import java.util.List; public class MyPushMessageReceiver extends PushMessageReceiver { public static final String TAG = MyPushMessageReceiver.class .getSimpleName(); public static NotificationHub hub = null; public static String mChannelId, mUserId; @Override public void onBind(Context context, int errorCode, String appid, String userId, String channelId, String requestId) { String responseString = "onBind errorCode=" + errorCode + " appid=" + appid + " userId=" + userId + " channelId=" + channelId + " requestId=" + requestId; Log.d(TAG, responseString); if (errorCode == 0) { // Binding successful Log.d(TAG, " Binding successful"); } try { if (hub == null) { hub = new NotificationHub( ConfigurationSettings.NotificationHubName, ConfigurationSettings.NotificationHubConnectionString, context); Log.i(TAG, "Notification hub initialized"); } } catch (Exception e) { Log.e(TAG, e.getMessage()); } mChannelId = channelId; mUserId = userId; registerWithNotificationHubs(); } private void registerWithNotificationHubs() { new AsyncTask<Void, Void, Void>() { @Override protected Void doInBackground(Void... params) { try { hub.registerBaidu(mUserId, mChannelId); Log.i(TAG, "Registered with Notification Hub - '" + ConfigurationSettings.NotificationHubName + "'" + " with UserId - '" + mUserId + "' and Channel Id - '" + mChannelId + "'"); } catch (Exception e) { Log.e(TAG, e.getMessage()); } return null; } }.execute(null, null, null); } @Override public void onMessage(Context context, String message, String customContentString) { String messageString = " onMessage=\"" + message + "\" customContentString=" + customContentString; Log.d(TAG, messageString); if (!TextUtils.isEmpty(customContentString)) { JSONObject customJson = null; try { customJson = new JSONObject(customContentString); String myvalue = null; if (!customJson.isNull("mykey")) { myvalue = customJson.getString("mykey"); } } catch (JSONException e) { e.printStackTrace(); } } } @Override public void onNotificationArrived(Context context, String title, String description, String customContentString) { String notifyString = " Notice Arrives onNotificationArrived title=\"" + title + "\" description=\"" + description + "\" customContent=" + customContentString; Log.d(TAG, notifyString); if (!TextUtils.isEmpty(customContentString)) { JSONObject customJson = null; try { customJson = new JSONObject(customContentString); String myvalue = null; if (!customJson.isNull("mykey")) { myvalue = customJson.getString("mykey"); } } catch (JSONException e) { // TODO Auto-generated catch block e.printStackTrace(); } } } @Override public void onNotificationClicked(Context context, String title, String description, String customContentString) { String notifyString = " onNotificationClicked title=\"" + title + "\" description=\"" + description + "\" customContent=" + customContentString; Log.d(TAG, notifyString); Intent intent = new Intent(context.getApplicationContext(),MainActivity.class); intent.putExtra("title",title); intent.putExtra("description",description); intent.putExtra("isFromNotify",true); intent.addFlags(Intent.FLAG_ACTIVITY_NEW_TASK); context.getApplicationContext().startActivity(intent); } @Override public void onSetTags(Context context, int errorCode, List<String> successTags, List<String> failTags, String requestId) { String responseString = "onSetTags errorCode=" + errorCode + " successTags=" + successTags + " failTags=" + failTags + " requestId=" + requestId; Log.d(TAG, responseString); } @Override public void onDelTags(Context context, int errorCode, List<String> successTags, List<String> failTags, String requestId) { String responseString = "onDelTags errorCode=" + errorCode + " successTags=" + successTags + " failTags=" + failTags + " requestId=" + requestId; Log.d(TAG, responseString); } @Override public void onListTags(Context context, int errorCode, List<String> tags, String requestId) { String responseString = "onListTags errorCode=" + errorCode + " tags=" + tags; Log.d(TAG, responseString); } @Override public void onUnbind(Context context, int errorCode, String requestId) { String responseString = "onUnbind errorCode=" + errorCode + " requestId = " + requestId; Log.d(TAG, responseString); if (errorCode == 0) { // Unbinding is successful Log.d(TAG, " Unbinding is successful "); } } }
將通知傳送至您的應用程式
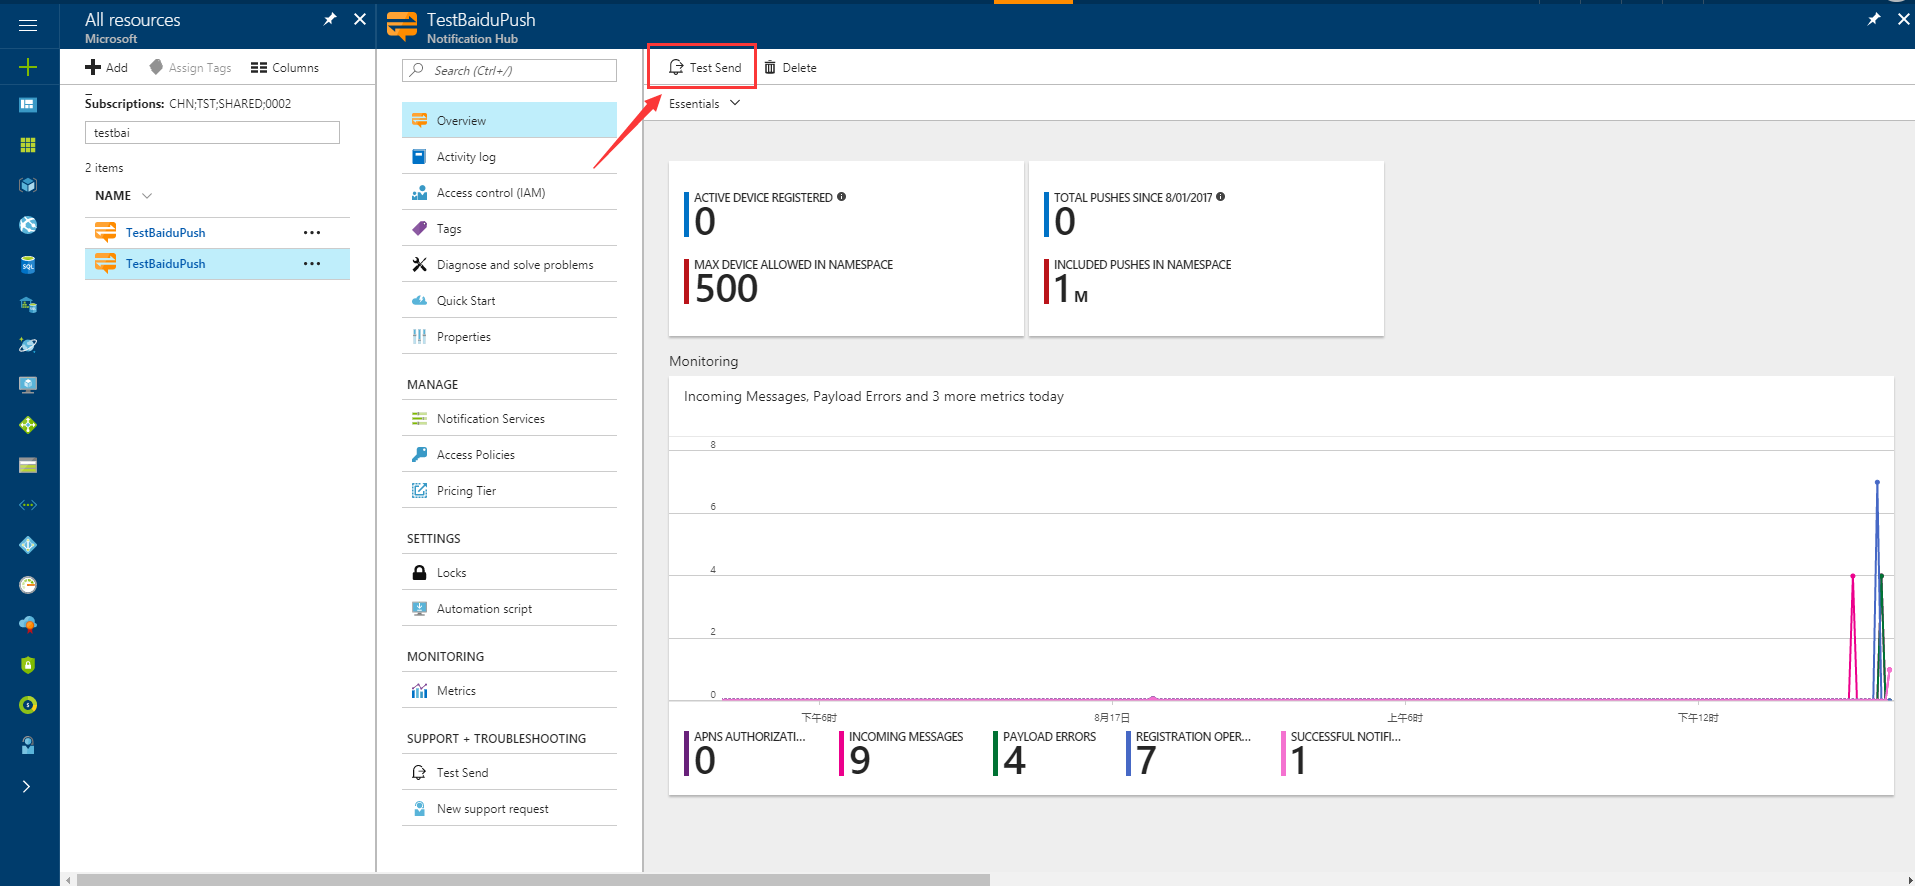
您可以透過通知中樞設定畫面中的 [傳送] 按鈕,快速測試從 Azure 入口網站接收通知,如下列畫面所示:
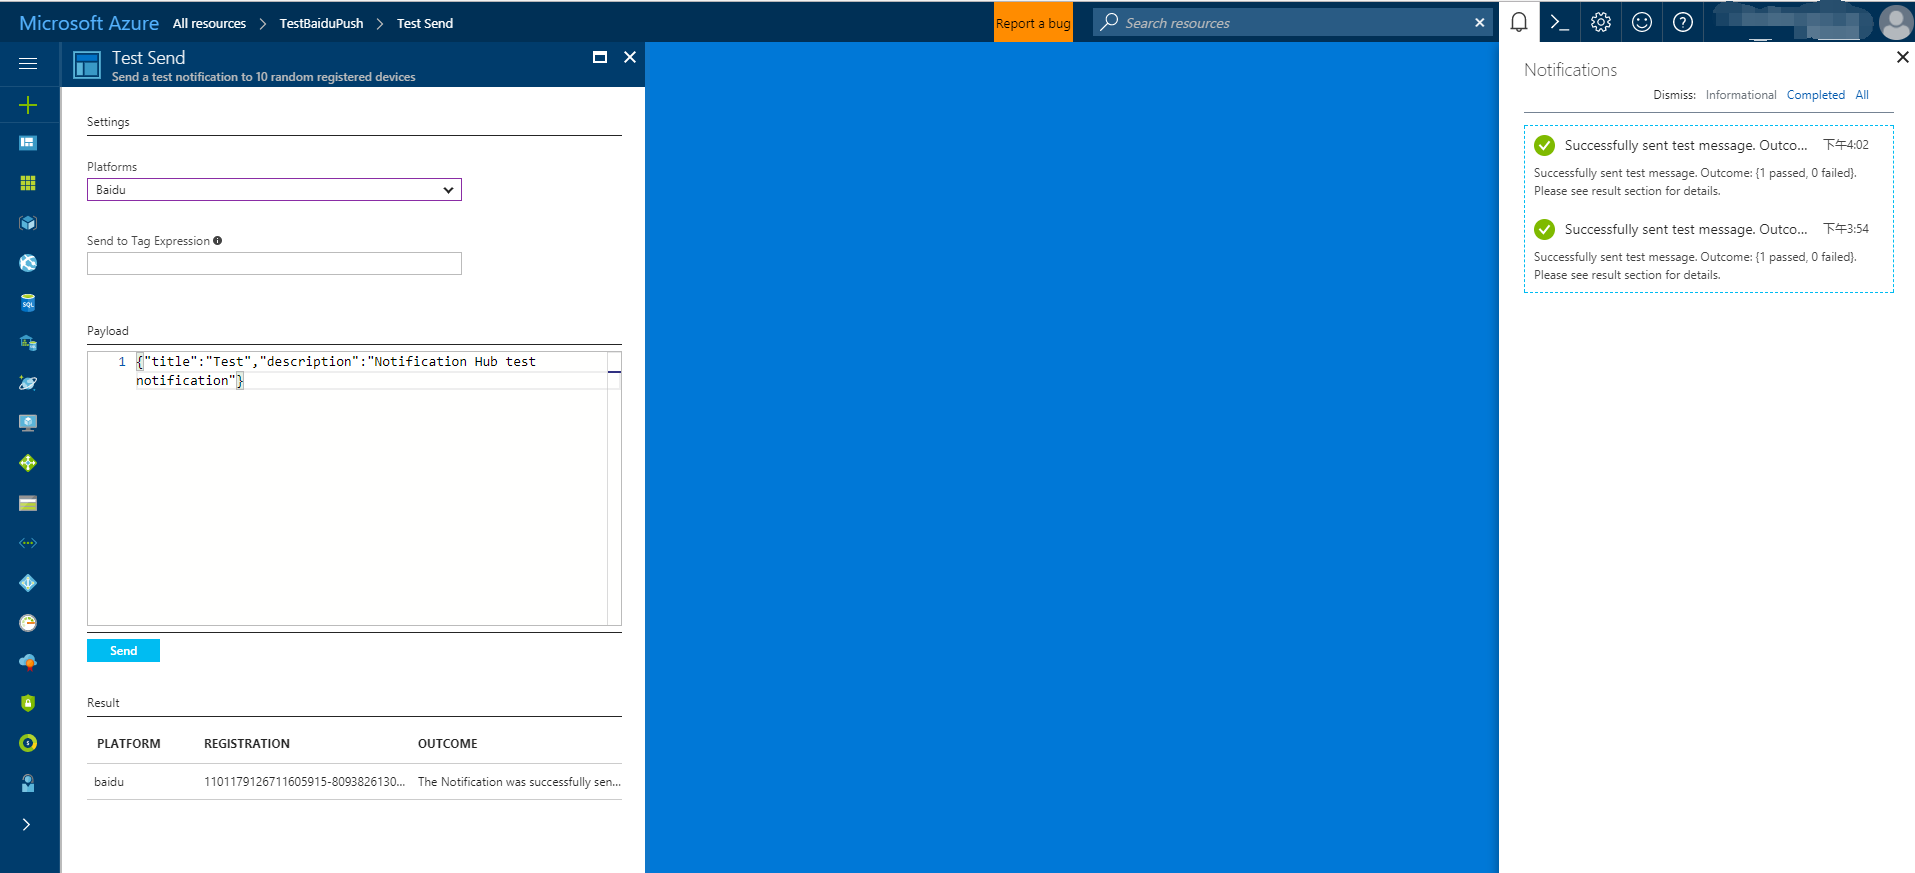
推播通知通常會在後端服務中傳送,例如使用相容的連結庫 流動服務 或 ASP.NET。 如果後端無法使用連結庫,您可以使用 REST API 直接傳送通知訊息。
為了簡單起見,本教學課程會使用控制台應用程式作為如何使用 .NET SDK 傳送通知的示範。 不過,我們建議 使用通知中樞將通知推播給使用者 教學課程,作為從 ASP.NET 後端傳送通知的下一個步驟。
以下是傳送通知的不同方法:
- REST 介面:您可以使用 REST 介面在任何後端平台上支援通知。
- Microsoft Azure 通知中樞 .NET SDK:在適用於 Visual Studio 的 Nuget 封裝管理員 中,執行 Install-Package Microsoft.Azure.NotificationHubs。
- Node.js:如何使用來自Node.js的通知中樞。
- Mobile Apps:如需如何從與通知中樞整合的 Azure App 服務Mobile Apps 後端傳送通知的範例,請參閱將推播通知新增至行動應用程式。
- Java / PHP:如需如何使用 REST API 傳送通知的範例,請參閱<如何從 Java/PHP 使用通知中樞>(Java | PHP)。
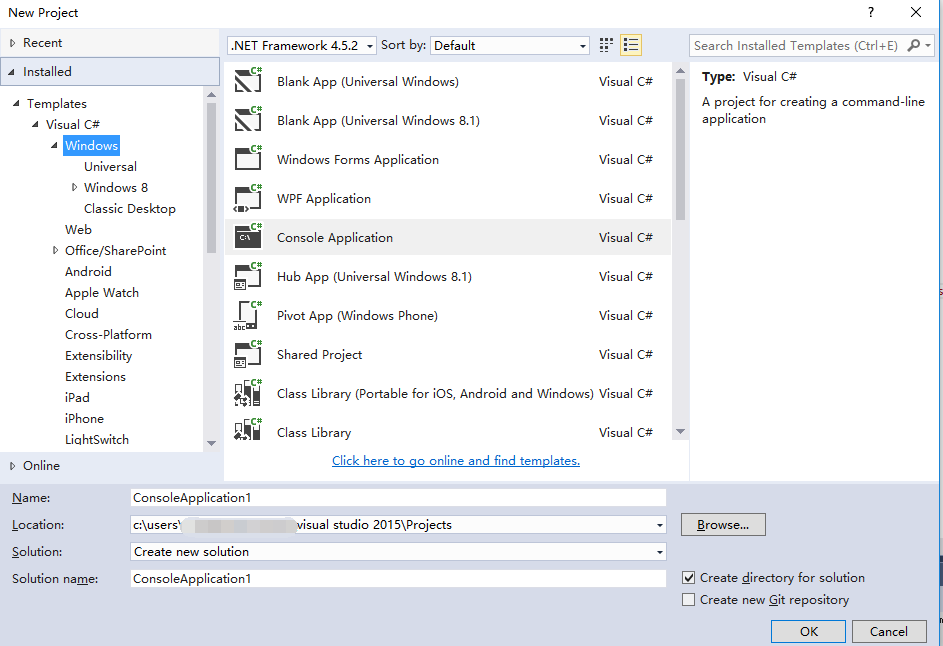
(選擇性)從 .NET 控制台應用程式傳送通知。
在本節中,我們會示範使用 .NET 控制台應用程式傳送通知。
建立新的 Visual C# 主控台應用程式:
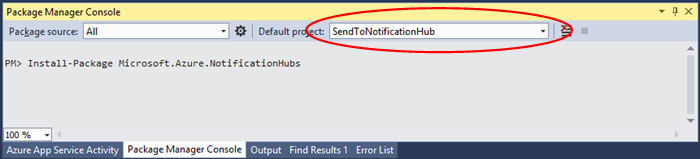
在 [封裝管理員 控制台] 視窗中,將 [預設] 專案設定為新的控制台應用程式專案,然後在控制台視窗中執行下列命令:
Install-Package Microsoft.Azure.NotificationHubs此指示會使用 Microsoft.Azure.Notification Hubs NuGet 套件,新增 Azure 通知中樞 SDK 的參考。
開啟 檔案
Program.cs,並新增下列 using 語句:using Microsoft.Azure.NotificationHubs;在您的
Program類別中,新增下列方法,並將和NotificationHubName取代DefaultFullSharedAccessSignatureSASConnectionString為您擁有的值。private static async void SendNotificationAsync() { NotificationHubClient hub = NotificationHubClient.CreateClientFromConnectionString("DefaultFullSharedAccessSignatureSASConnectionString", "NotificationHubName"); string message = "{\"title\":\"((Notification title))\",\"description\":\"Hello from Azure\"}"; var result = await hub.SendBaiduNativeNotificationAsync(message); }在您的 方法中
Main新增下列幾行:SendNotificationAsync(); Console.ReadLine();
測試您的應用程式
若要使用實際手機測試此應用程式,只要使用USB纜線將手機連線到您的電腦即可。 此動作會將您的應用程式載入附加電話。
若要使用模擬器測試此應用程式,請在 Android Studio 頂端工具列上按兩下 [執行],然後選取您的應用程式:它會啟動模擬器、載入和執行應用程式。
應用程式會 userId 從百度推播通知服務擷取 和 channelId ,並在通知中樞註冊。
若要傳送測試通知,您可以使用 Azure 入口網站 的 [偵錯] 索引標籤。 如果您為 Visual Studio 建置 .NET 控制台應用程式,只要在 Visual Studio 中按 F5 鍵來執行應用程式即可。 應用程式會傳送出現在裝置或模擬器頂端通知區域中的通知。