教學課程:保護 Azure 遠端轉譯和模型儲存體
在本教學課程中,您會了解如何:
- 保護包含 Azure 遠端轉譯模型的 Azure Blob 儲存體
- 使用 Microsoft Entra ID 進行驗證,以存取您的 Azure 遠端轉譯執行個體
- 使用 azure 認證進行 Azure 遠端轉譯驗證
必要條件
- 本教學課程以教學課程:調整材質、光源和效果為基礎。
為何需要額外的安全性
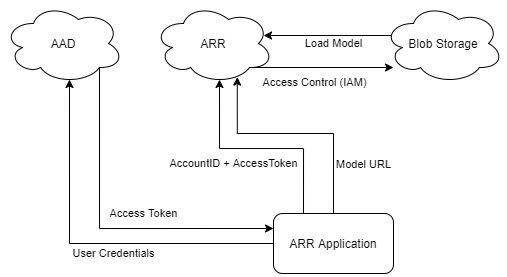
目前的應用程式狀態和您的 Azure 資源存取權看起來如下所示:
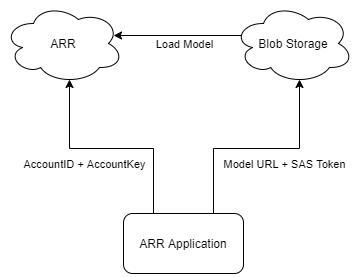
「AccountID + AccountKey」和「URL + SAS 權杖」兩者基本上都會同時儲存使用者名稱和密碼。 例如,如果公開了「AccountID + AccountKey」,攻擊者在無需您允許的情況下使用您的 ARR 資源,而且費用由您支付。
保護 Azure Blob 儲存體中的內容
Azure 遠端轉譯可使用正確的設定,安全地存取您 Azure Blob 儲存體的內容。 請參閱操作說明:連結儲存體帳戶以使用您的 Blob 儲存體帳戶來設定 Azure 遠端轉譯執行個體。
使用連結的 Blob 儲存體時,您會使用稍微不同的方法來載入模型:
var loadModelParams = new LoadModelFromSasOptions(modelPath, modelEntity);
var task = ARRSessionService.CurrentActiveSession.Connection.LoadModelFromSasAsync(loadModelParams);
上述幾行使用參數和工作階段動作的 FromSas 版本。 這些程式碼行必須轉換成非 SAS 版本:
var loadModelParams = LoadModelOptions.CreateForBlobStorage(storageAccountPath, blobName, modelPath, modelEntity);
var task = ARRSessionService.CurrentActiveSession.Connection.LoadModelAsync(loadModelParams);
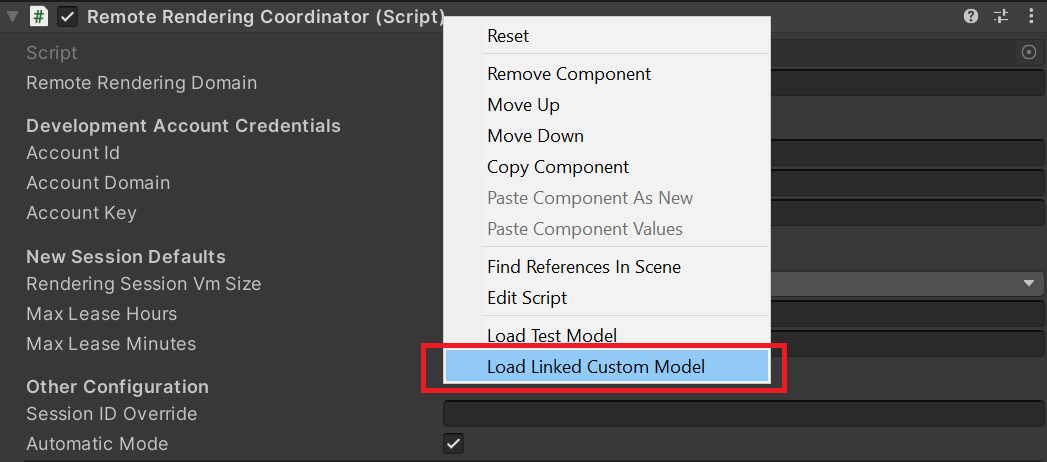
讓我們從連結的 Blob 儲存體帳戶修改 RemoteRenderingCoordinator,以載入自訂模型。
如果您尚未完成操作說明:連結儲存體帳戶授與您的 ARR 執行個體權限,以存取您的 Blob 儲存體執行個體。
將下列修改過的 LoadModel 方法加入至目前 LoadModel 方法下的 RemoteRenderingCoordinator:
/// <summary>
/// Loads a model from blob storage that has been linked to the ARR instance
/// </summary>
/// <param name="storageAccountName">The storage account name, this contains the blob containers </param>
/// <param name="blobName">The blob container name, i.e. arroutput</param>
/// <param name="modelPath">The relative path inside the container to the model, i.e. test/MyCustomModel.arrAsset</param>
/// <param name="parent">The parent Transform for this remote entity</param>
/// <param name="progress">A call back method that accepts a float progress value [0->1]</param>
/// <returns></returns>
public async Task<Entity> LoadModel(string storageAccountName, string blobName, string modelPath, UnityEngine.Transform parent = null, Action<float> progress = null)
{
    //Create a root object to parent a loaded model to
    var modelEntity = ARRSessionService.CurrentActiveSession.Connection.CreateEntity();

    //Get the game object representation of this entity
    var modelGameObject = modelEntity.GetOrCreateGameObject(UnityCreationMode.DoNotCreateUnityComponents);

    //Ensure the entity will sync its transform with the server
    var sync = modelGameObject.GetComponent<RemoteEntitySyncObject>();
    sync.SyncEveryFrame = true;

    //Parent the new object under the defined parent
    if (parent != null)
    {
        modelGameObject.transform.SetParent(parent, false);
        modelGameObject.name = parent.name + "_Entity";
    }

    //Load a model that will be parented to the entity
    var loadModelParams = LoadModelOptions.CreateForBlobStorage($"{storageAccountName}.blob.core.windows.net", blobName, modelPath, modelEntity);
    var loadModelAsync = ARRSessionService.CurrentActiveSession.Connection.LoadModelAsync(loadModelParams, progress);
    var result = await loadModelAsync;
    return modelEntity;
}
此程式碼與原始的
LoadModel方法完全相同,不過我們已使用非 SAS 版本取代方法呼叫的 SAS 版本。額外的輸入
storageAccountName和blobName也已加入引數中。 我們會從另一個方法 (類似於第一個教學課程中建立的第一個 LoadTestModel 方法) 呼叫這個新的 LoadModel 方法。在 LoadTestModel 之後,將下列方法新增至 RemoteRenderingCoordinator
private bool loadingLinkedCustomModel = false;

[SerializeField]
private string storageAccountName;
public string StorageAccountName {
    get => storageAccountName.Trim();
    set => storageAccountName = value;
}

[SerializeField]
private string blobContainerName;
public string BlobContainerName {
    get => blobContainerName.Trim();
    set => blobContainerName = value;
}

[SerializeField]
private string modelPath;
public string ModelPath {
    get => modelPath.Trim();
    set => modelPath = value;
}

[ContextMenu("Load Linked Custom Model")]
public async void LoadLinkedCustomModel()
{
    if (CurrentCoordinatorState != RemoteRenderingState.RuntimeConnected)
    {
        Debug.LogError("Please wait for the runtime to connect before loading the test model. Try again later.");
        return;
    }
    if (loadingLinkedCustomModel)
    {
        Debug.Log("Linked Test model already loading or loaded!");
        return;
    }
    loadingLinkedCustomModel = true;

    // Create a parent object to use for positioning
    GameObject testParent = new GameObject("LinkedCustomModel");
    testParent.transform.position = new Vector3(0f, 0f, 3f);

    await LoadModel(StorageAccountName, BlobContainerName, ModelPath, testParent.transform, (progressValue) => Debug.Log($"Loading Test Model progress: {Math.Round(progressValue * 100, 2)}%"));
}
這段程式碼會將三個額外的字串變數新增至您的 RemoteRenderingCoordinator 元件。

將您的值新增至 RemoteRenderingCoordinator 元件。 遵循模型轉換快速入門後,您的值應該是:
- 儲存體帳戶名稱:您的儲存體帳戶名稱,這是您為儲存體帳戶選擇的全域唯一名稱。 在此快速入門中為 arrtutorialstorage,您的值會有所不同。
- Blob 容器名稱:arroutput,Blob 儲存體容器
- 模型路徑:在 arrconfig.json 檔案中定義的 "outputFolderPath" 和 "outputAssetFileName" 組合。 在快速入門中是 "outputFolderPath":"converted/robot","outputAssetFileName": "robot.arrAsset"。 這會產生 "converted/robot/robot.arrAsset" 的模型路徑值,您的值會有所不同。
提示
如果您 執行 Conversion.ps1 指令碼,但不含 "-UseContainerSas" 引數,則指令碼會針對您的權杖而非 SAS 權杖輸出所有上述值。

在這段時間內,請移除或停用 GameObject TestModel,以便保留足夠空間載入您的自訂模型。
播放場景並連線到遠端工作階段。
開啟 RemoteRenderingCoordinator 上的捷徑功能表,然後選取 [載入連結的自訂模型]。
這些步驟從本機應用程式移除了 SAS 權杖,如此可提升應用程式的安全性。
目前的應用程式狀態和對您 Azure 資源存取權看起來如下所示:
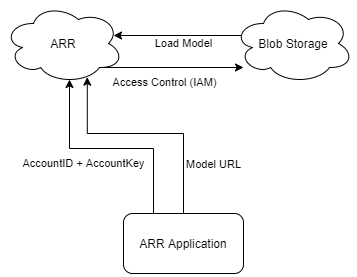
我們還可從本機應用程式中移除一個「密碼」,也就是 AccountKey。 這可以使用 Microsoft Entra 驗證來完成。
Microsoft Entra 驗證
Microsoft Entra 驗證可讓您以更受控制的方式判斷使用 ARR 的個人或群組。 ARR 內建接受存取權杖,而不是使用帳戶金鑰的支援。 您可以將存取權杖視為具有時間限制的使用者特定金鑰,只會解除鎖定所要求之特定資源的特定部分。
RemoteRenderingCoordinator 指令碼具有名為 ARRCredentialGetter 的委派,其會保存一個方法來傳回 SessionConfiguration 物件,用來設定遠端工作階段管理。 我們可以針對 ARRCredentialGetter 指派不同的方式以便使用 Azure 登入流程,產生包含 Azure 存取權杖的 SessionConfiguration 物件。 此存取權杖專屬於登入的使用者。
遵循操作說明:設定驗證 - 針對已部署的應用程式進行驗證,這牽涉到註冊新的 Microsoft Entra 應用程式,以及設定 ARR 執行個體的存取權。
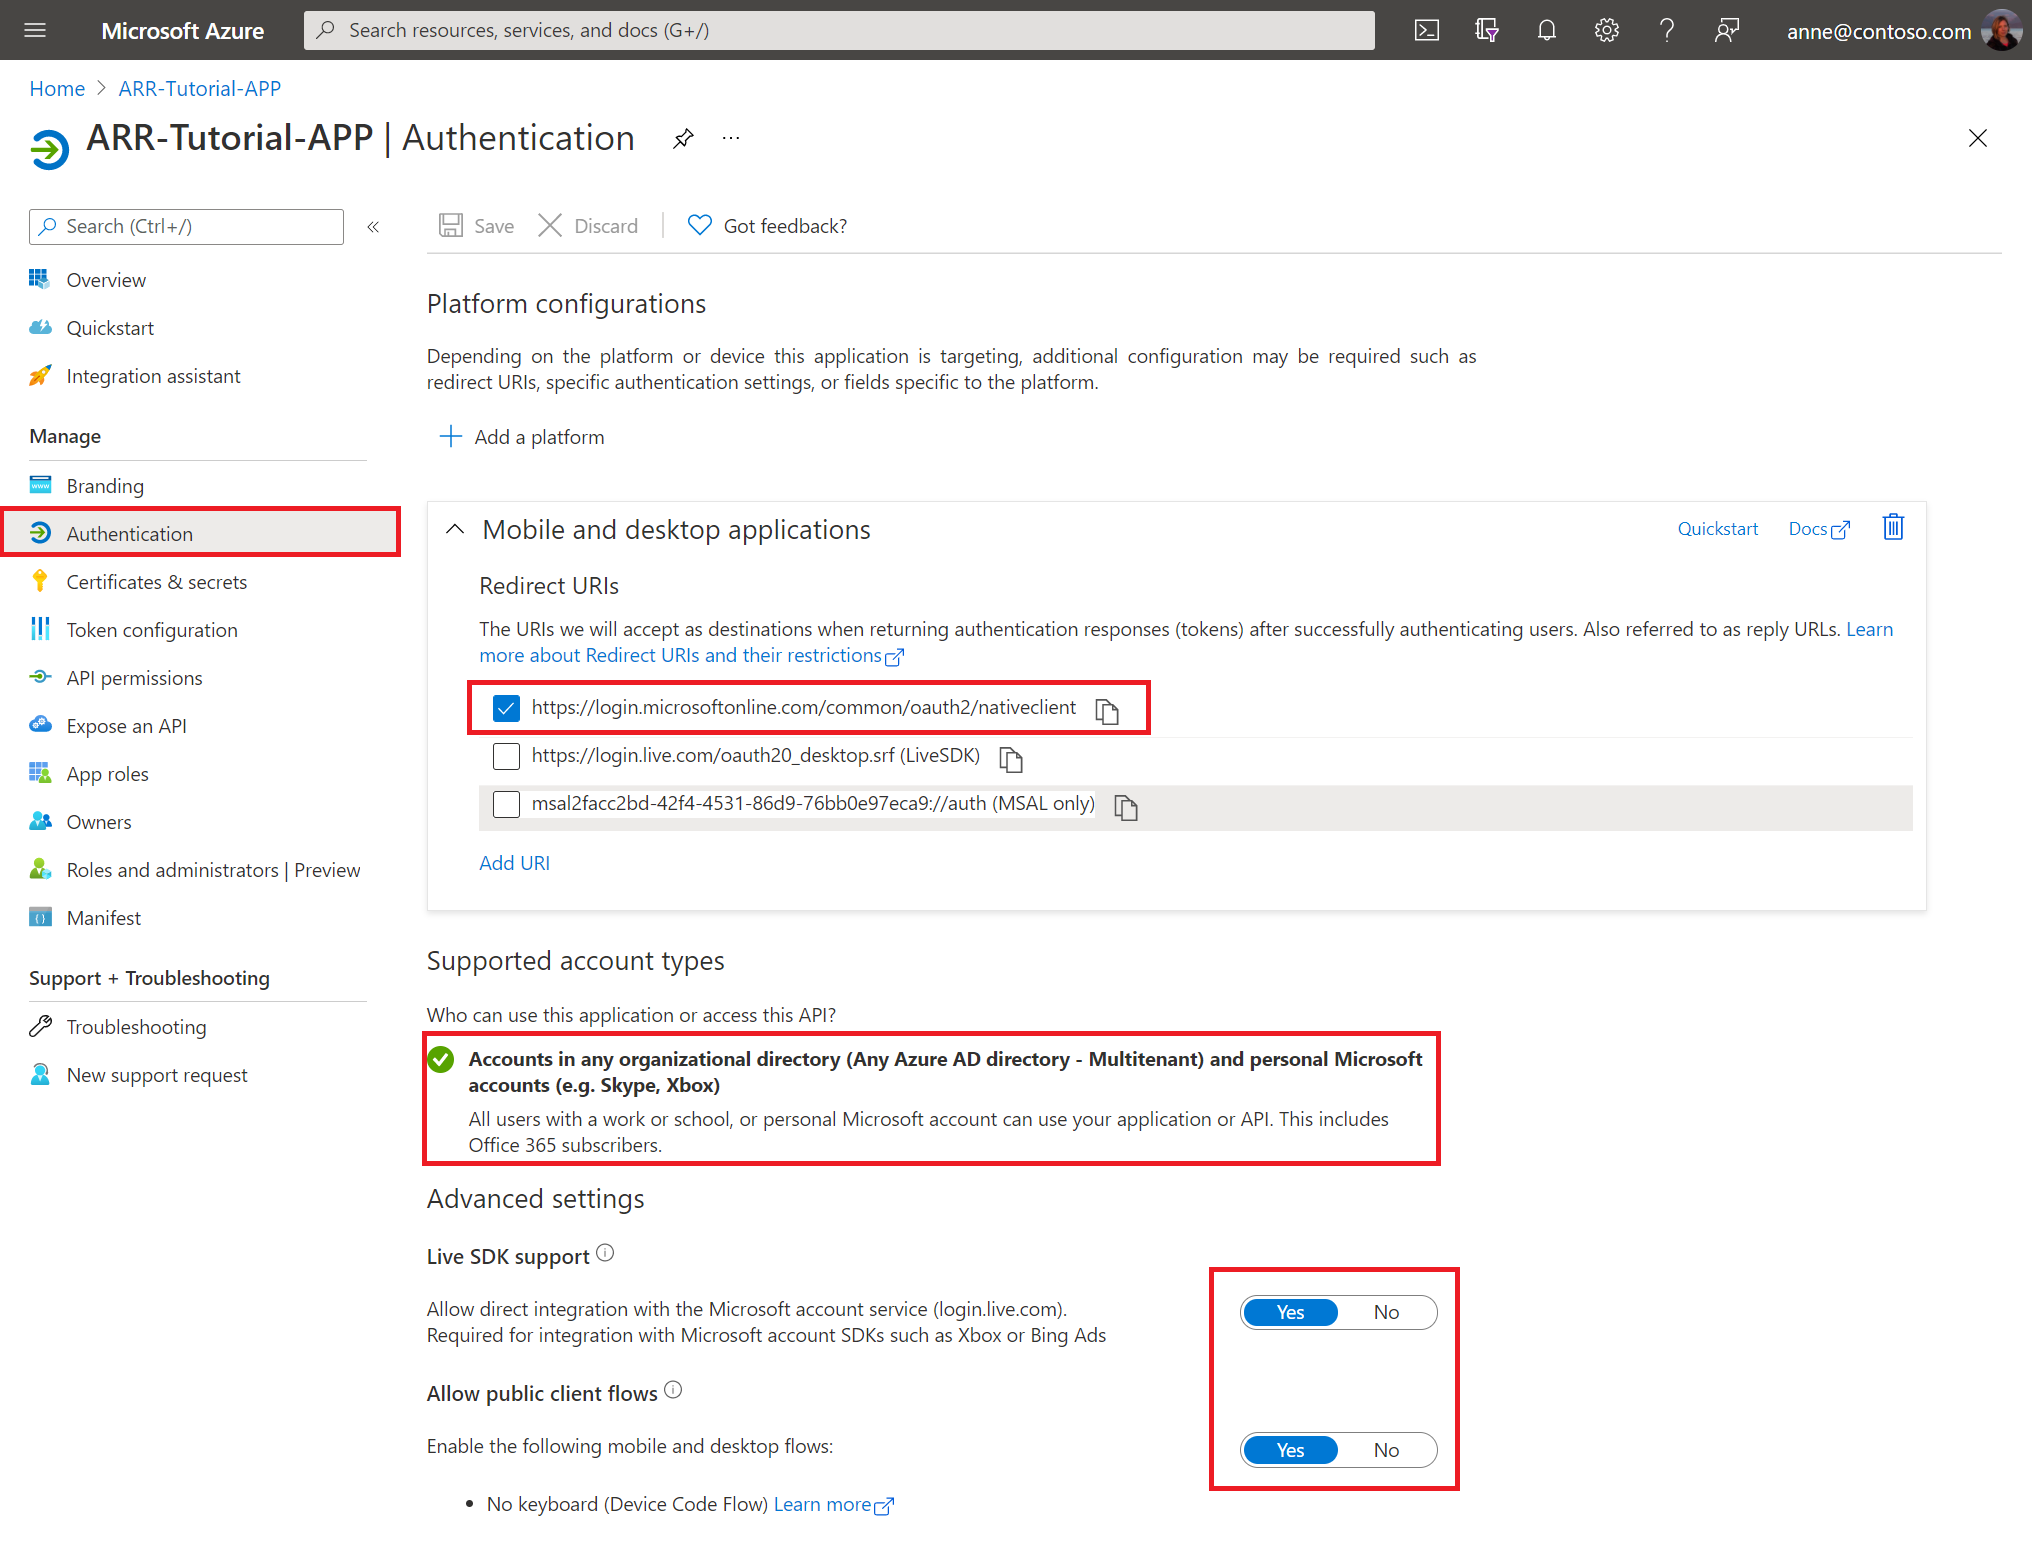
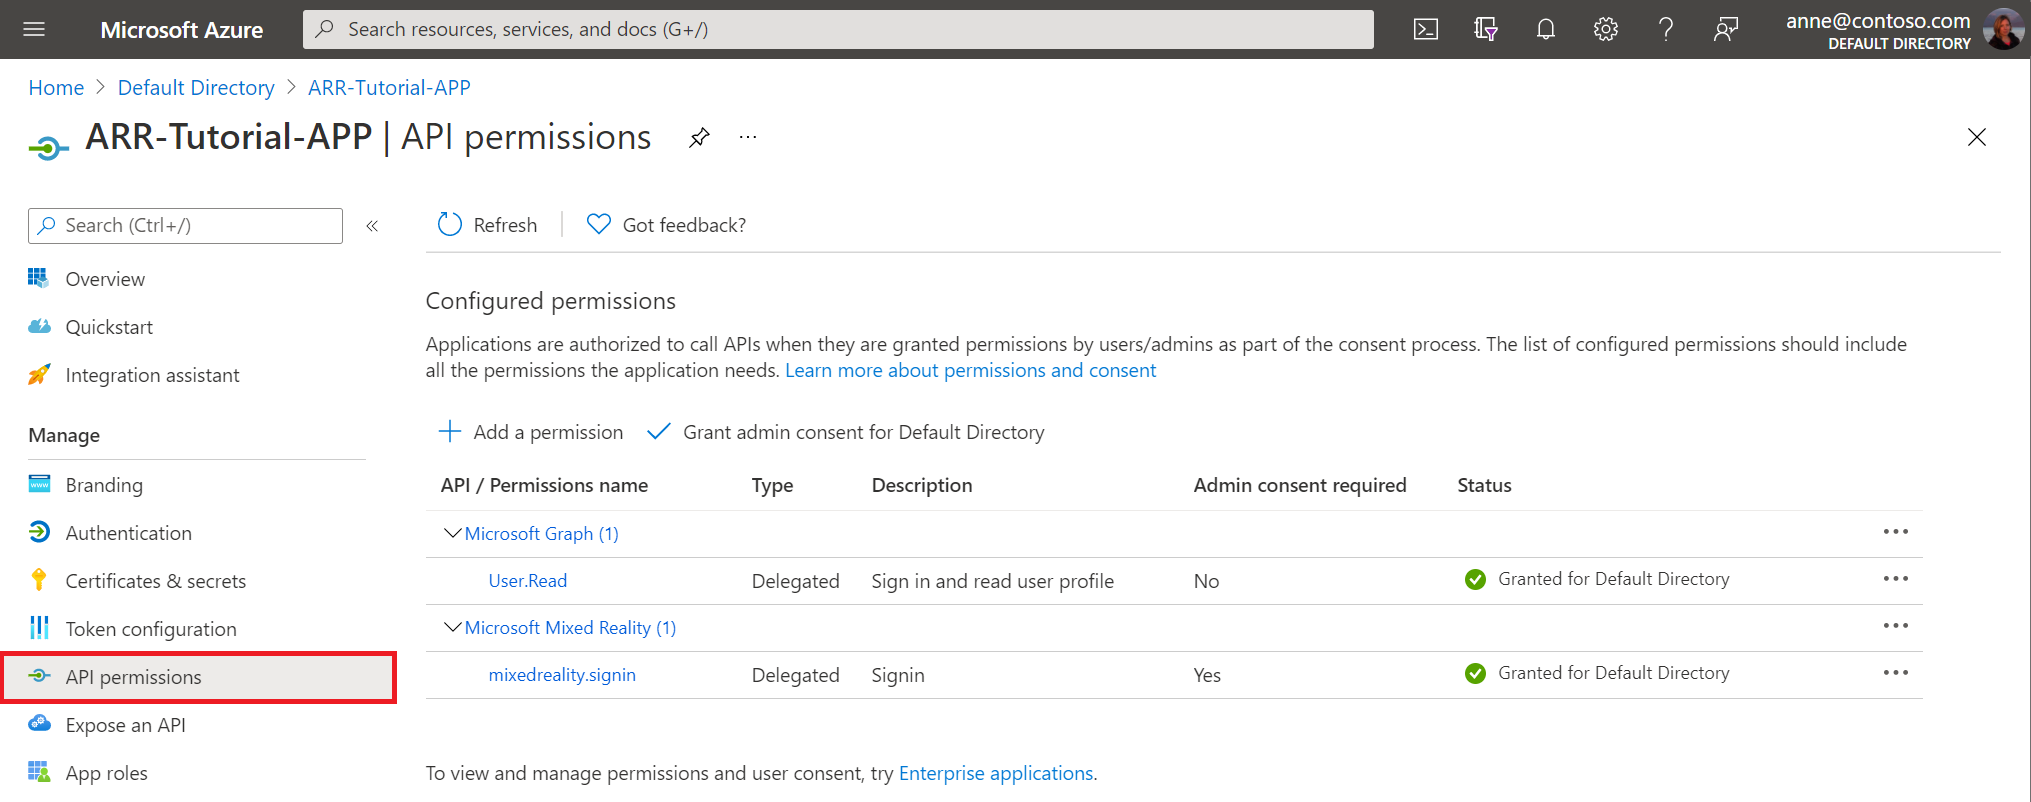
設定新的 Microsoft Entra 應用程式後,請檢查您的 Microsoft Entra 應用程式是否看起來像下列映像:
Microsoft Entra 應用程式 -> 驗證
Microsoft Entra 應用程式 -> API 權限
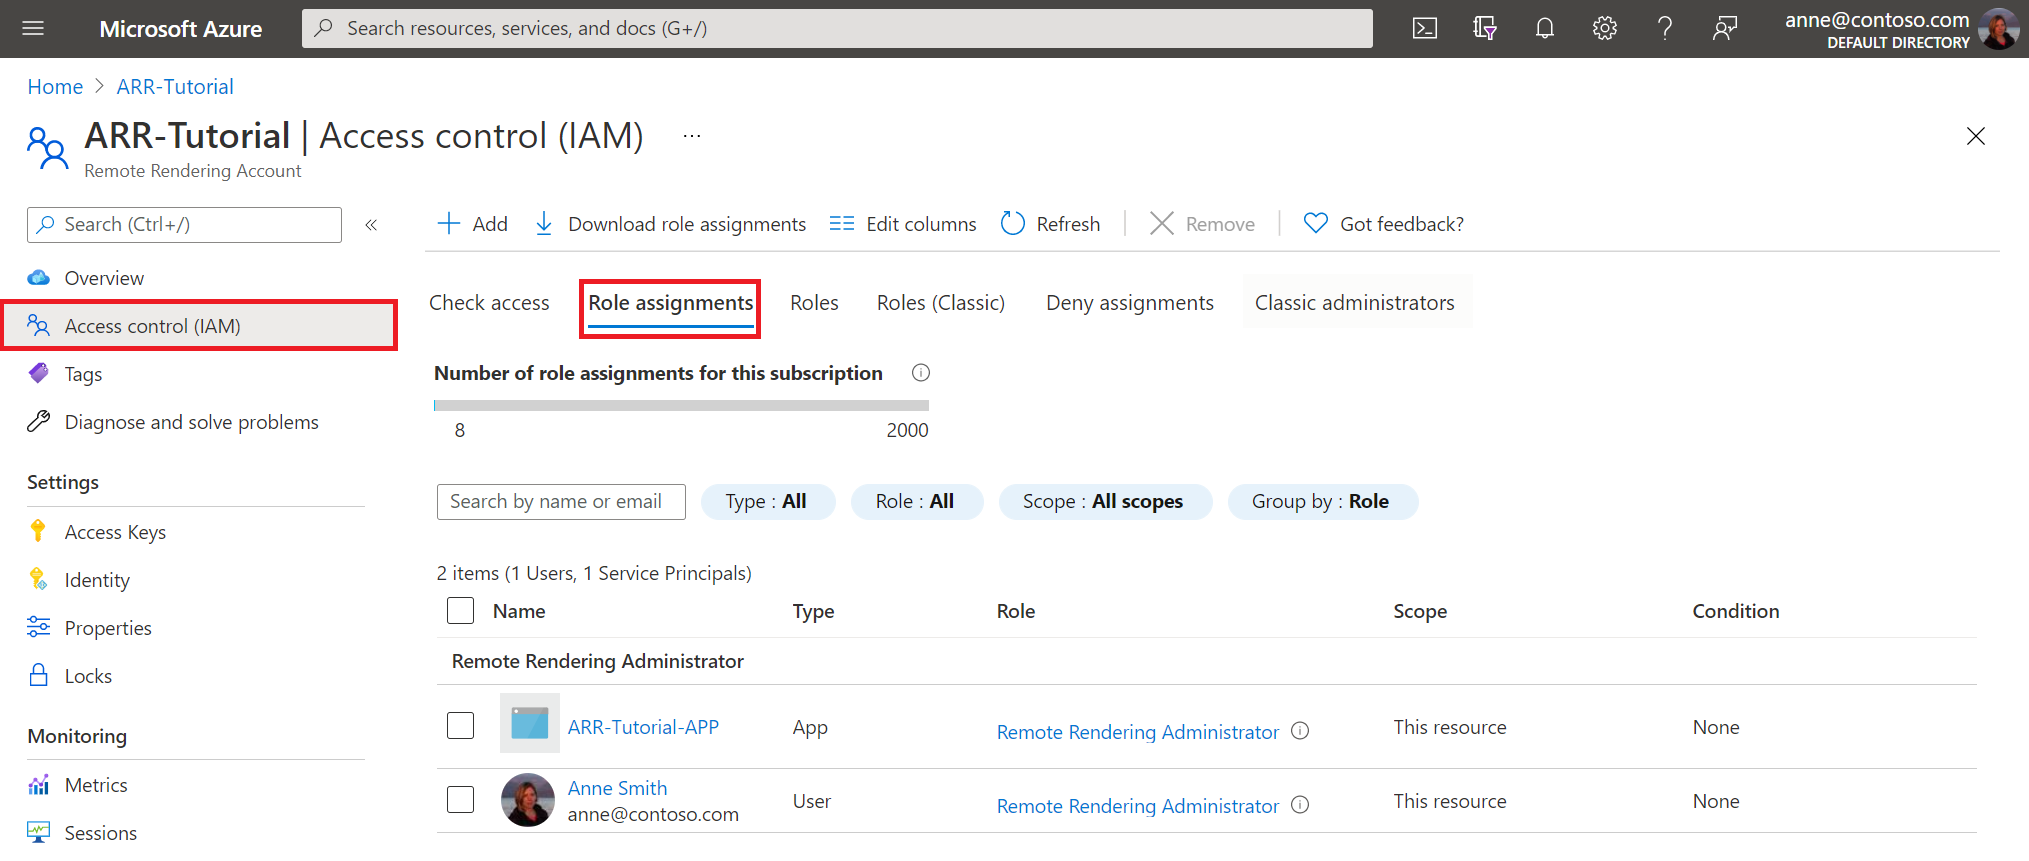
設定遠端轉譯帳戶後,請檢查您的設定是否看起來如下圖所示:
ARR -> AccessControl (IAM)
注意
「擁有者」 角色不足透過用戶端應用程式來管理工作階段。 針對您想要授與管理工作階段功能的每個使用者,您必須提供遠端轉譯用戶端角色。 針對您想要管理工作階段和轉換模型的每個使用者,您必須提供遠端轉譯管理員角色。
有了 Azure 的加持,我們現在需要修改程式碼與 ARR 服務連線的方式。 我們可藉由實作 BaseARRAuthentication 的執行個體來達到此目的,這會傳回新的 SessionConfiguration 物件。 在本教學課程中,會使用 Azure 存取權杖來設定帳戶資訊。
建立名為 AADAuthentication 的新指令碼,並將其程式碼取代為下列內容:
// Copyright (c) Microsoft Corporation. All rights reserved.
// Licensed under the MIT License. See LICENSE in the project root for license information.

using Microsoft.Azure.RemoteRendering;
using Microsoft.Identity.Client;
using System;
using System.Linq;
using System.Threading;
using System.Threading.Tasks;
using UnityEngine;

public class AADAuthentication : BaseARRAuthentication
{
    [SerializeField]
    private string activeDirectoryApplicationClientID;
    public string ActiveDirectoryApplicationClientID
    {
        get => activeDirectoryApplicationClientID.Trim();
        set => activeDirectoryApplicationClientID = value;
    }

    [SerializeField]
    private string azureTenantID;
    public string AzureTenantID
    {
        get => azureTenantID.Trim();
        set => azureTenantID = value;
    }

    [SerializeField]
    private string azureRemoteRenderingDomain;
    public string AzureRemoteRenderingDomain
    {
        get => azureRemoteRenderingDomain.Trim();
        set => azureRemoteRenderingDomain = value;
    }

    [SerializeField]
    private string azureRemoteRenderingAccountID;
    public string AzureRemoteRenderingAccountID
    {
        get => azureRemoteRenderingAccountID.Trim();
        set => azureRemoteRenderingAccountID = value;
    }

    [SerializeField]
    private string azureRemoteRenderingAccountDomain;
    public string AzureRemoteRenderingAccountDomain
    {
        get => azureRemoteRenderingAccountDomain.Trim();
        set => azureRemoteRenderingAccountDomain = value;
    }

    public override event Action<string> AuthenticationInstructions;

    string authority => "https://login.microsoftonline.com/" + AzureTenantID;

    string redirect_uri = "https://login.microsoftonline.com/common/oauth2/nativeclient";

    string[] scopes => new string[] { "https://sts.mixedreality.azure.com//.default" };

    public void OnEnable()
    {
        RemoteRenderingCoordinator.ARRCredentialGetter = GetARRCredentials;
        this.gameObject.AddComponent<ExecuteOnUnityThread>();
    }

    public async override Task<SessionConfiguration> GetARRCredentials()
    {
        var result = await TryLogin();
        if (result != null)
        {
            Debug.Log("Account signin successful " + result.Account.Username);

            var AD_Token = result.AccessToken;

            return await Task.FromResult(new SessionConfiguration(AzureRemoteRenderingAccountDomain, AzureRemoteRenderingDomain, AzureRemoteRenderingAccountID, "", AD_Token, ""));
        }
        else
        {
            Debug.LogError("Error logging in");
        }
        return default;
    }

    private Task DeviceCodeReturned(DeviceCodeResult deviceCodeDetails)
    {
        //Since everything in this task can happen on a different thread, invoke responses on the main Unity thread
        ExecuteOnUnityThread.Enqueue(() =>
        {
            // Display instructions to the user for how to authenticate in the browser
            Debug.Log(deviceCodeDetails.Message);
            AuthenticationInstructions?.Invoke(deviceCodeDetails.Message);
        });

        return Task.FromResult(0);
    }

    public override async Task<AuthenticationResult> TryLogin()
    {
        var clientApplication = PublicClientApplicationBuilder.Create(ActiveDirectoryApplicationClientID).WithAuthority(authority).WithRedirectUri(redirect_uri).Build();
        AuthenticationResult result = null;
        try
        {
            var accounts = await clientApplication.GetAccountsAsync();

            if (accounts.Any())
            {
                result = await clientApplication.AcquireTokenSilent(scopes, accounts.First()).ExecuteAsync();

                return result;
            }
            else
            {
                try
                {
                    result = await clientApplication.AcquireTokenWithDeviceCode(scopes, DeviceCodeReturned).ExecuteAsync(CancellationToken.None);
                    return result;
                }
                catch (MsalUiRequiredException ex)
                {
                    Debug.LogError("MsalUiRequiredException");
                    Debug.LogException(ex);
                }
                catch (MsalServiceException ex)
                {
                    Debug.LogError("MsalServiceException");
                    Debug.LogException(ex);
                }
                catch (MsalClientException ex)
                {
                    Debug.LogError("MsalClientException");
                    Debug.LogException(ex);
                    // Mitigation: Use interactive authentication
                }
                catch (Exception ex)
                {
                    Debug.LogError("Exception");
                    Debug.LogException(ex);
                }
            }
        }
        catch (Exception ex)
        {
            Debug.LogError("GetAccountsAsync");
            Debug.LogException(ex);
        }

        return null;
    }
}
注意
我們有意不提供完整的程式碼,而且此程式碼尚無法用於商業應用程式。 例如,您至少會想要加入登出的功能。 您可以使用用戶端應用程式所提供的 Task RemoveAsync(IAccount account) 方法來完成這項作業。 此程式碼僅供教學課程使用,您的實僅供您的應用程式專用。
程式碼會先嘗試使用 AquireTokenSilent 以無訊息方式取得權杖。 如果使用者先前已驗證過此應用程式,此作業會成功。 如果不成功,請繼續進行其他需要使用者操作的策略。
在此程式碼中,我們會使用裝置程式碼流程來取得存取權杖。 此流程可讓使用者在電腦或行動裝置上登入其 Azure 帳戶,並將產生的權杖傳送回 HoloLens 應用程式。
從 ARR 觀點來看,這個類別最重要的部分就是這一行:
return await Task.FromResult(new SessionConfiguration(AzureRemoteRenderingAccountDomain, AzureRemoteRenderingDomain, AzureRemoteRenderingAccountID, "", AD_Token, ""));
在這裡,我們會使用遠端轉譯網域、帳戶識別碼、帳戶網域和存取權杖來建立新的 SessionConfiguration 物件。 只要使用者已根據稍早設定的角色型權限獲得授權,ARR 服務就會使用此權杖來查詢、建立和加入遠端轉譯工作階段。
透過此變更,目前的應用程式狀態和對您 Azure 資源存取權應該看起來如下所示:
由於使用者認證不會儲存在裝置上 (或在此情況下,甚至不會在裝置上輸入),因此其暴露風險較低。 現在,裝置會使用使用者特定且限時的存取權杖來存取 ARR,這會使用存取控制 (IAM) 來存取 Blob 儲存體。 這兩個步驟已移除原始程式碼中的「密碼」,並大幅提高安全性。 不過,這並不是最安全的方式,將模型和工作階段管理移至 Web 服務會更進一步提升安全性。 商業就緒一章中會討論額外的安全性考量。
測試 Microsoft Entra 驗證
在 Unity 編輯器中,當 Microsoft Entra 驗證處於作用中狀態時,您必須在每次啟動應用程式時進行驗證。 在裝置上第一次使用時需要驗證步驟,而且只有在權杖過期或失效時才需要再次執行。
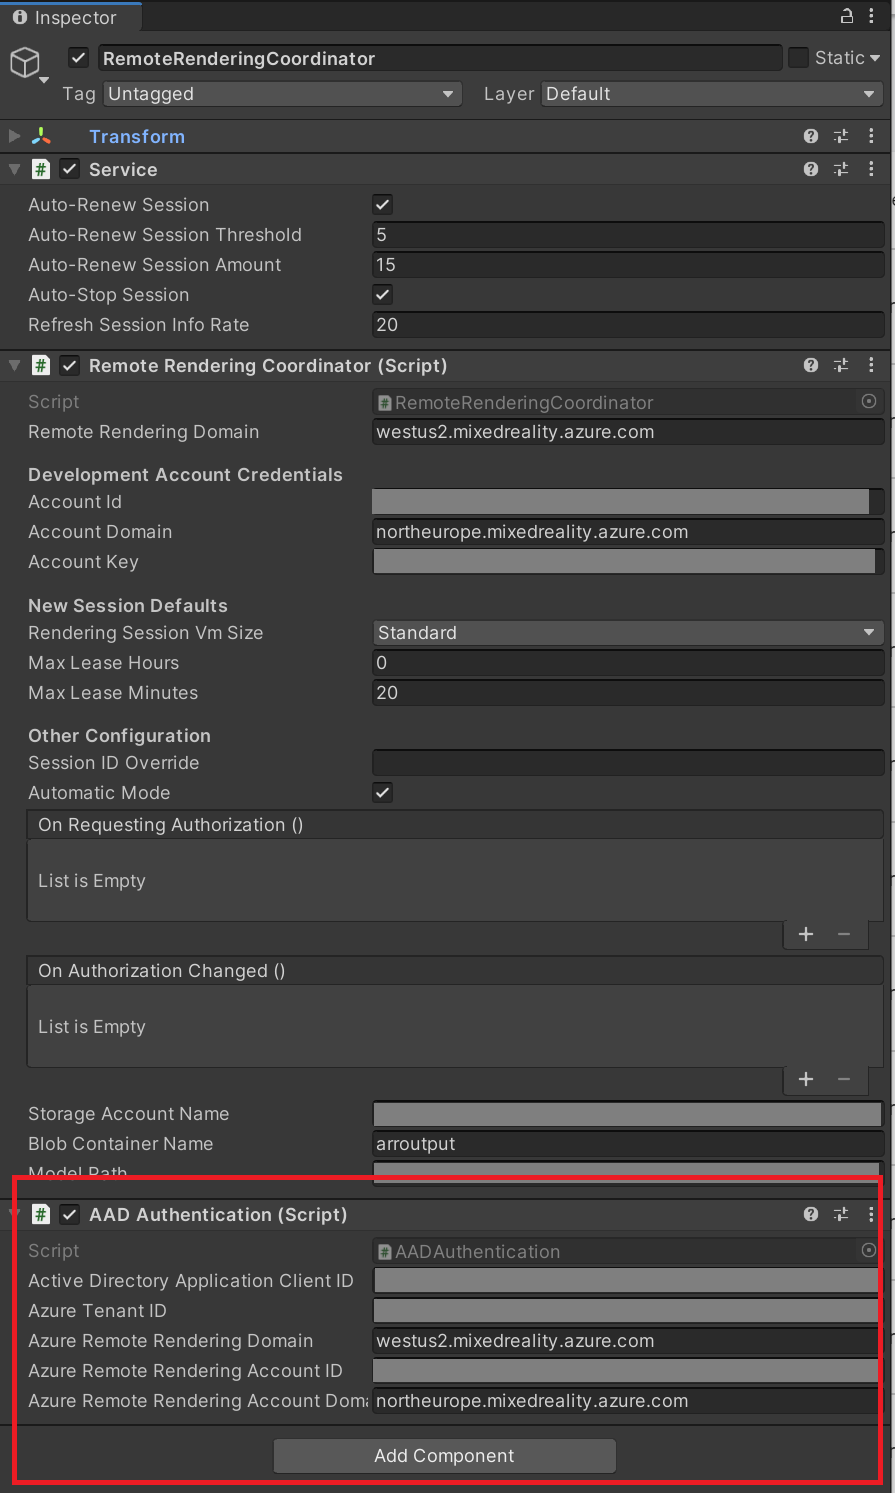
將 Microsoft Entra 驗證元件新增至 RemoteRenderingCoordinator GameObject。
注意
如果您使用 ARR 範例存放庫中已完成的專案,請務必按一下其標題旁的核取方塊來啟用 Microsoft Entra 驗證元件。
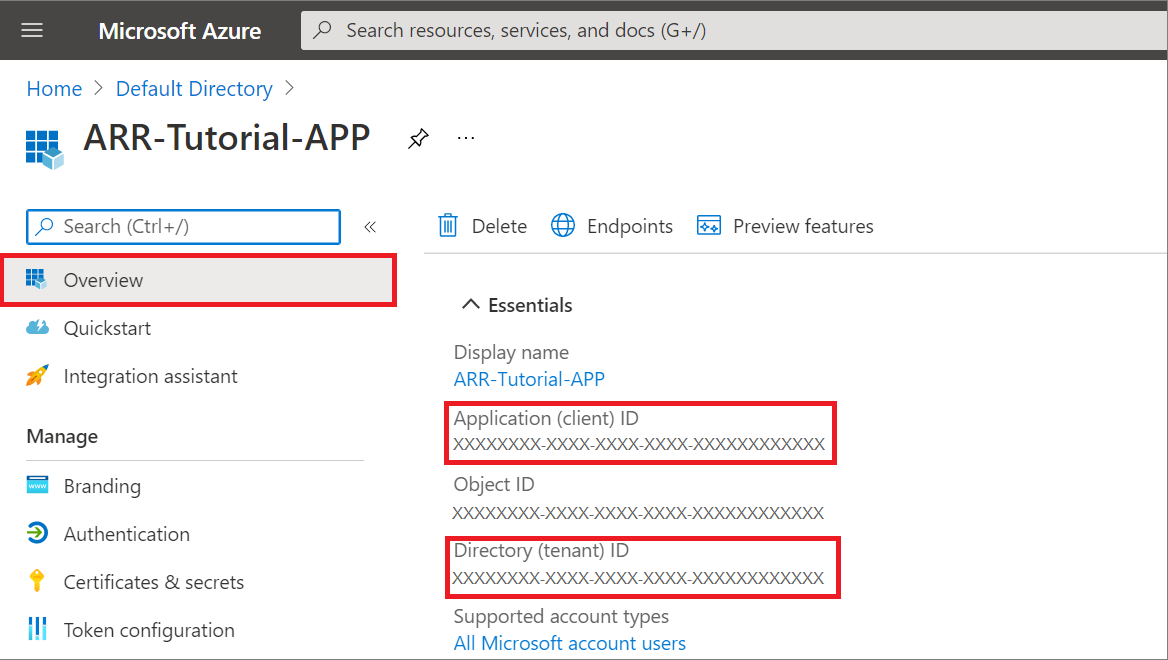
填入您的 [用戶端識別碼] 和 [租用戶識別碼] 值。 您可以在應用程式註冊的概觀頁面中找到這些值:
- Active Directory 應用程式用戶端識別碼是在 Microsoft Entra 應用程式註冊中找到的「應用程式 (用戶端) 識別碼」 (請參閱下圖)。
- Azure 租用戶識別碼是在 Microsoft Entra 應用程式註冊中找到的「目錄 (租用戶) 識別碼 (請參閱下圖)。
- Azure 遠端轉譯網域與您在 RemoteRenderingCoordinator 的遠端轉譯網域中所使用的網域相同。
- Azure 遠端轉譯帳戶識別碼與您針對 RemoteRenderingCoordinator 使用的帳戶識別碼相同。
- Azure 遠端轉譯帳戶網域是您在 RemoteRenderingCoordinator 中使用的相同帳戶網域。
在 Unity 編輯器中按下 [播放],並同意執行工作階段。 由於 Microsoft Entra 驗證元件具有檢視控制器,因此會自動連結,以在工作階段授權強制回應面板之後顯示提示。
依照 AppMenu 右側面板中找到的指示進行。 您應該會看到類似如下的內容:
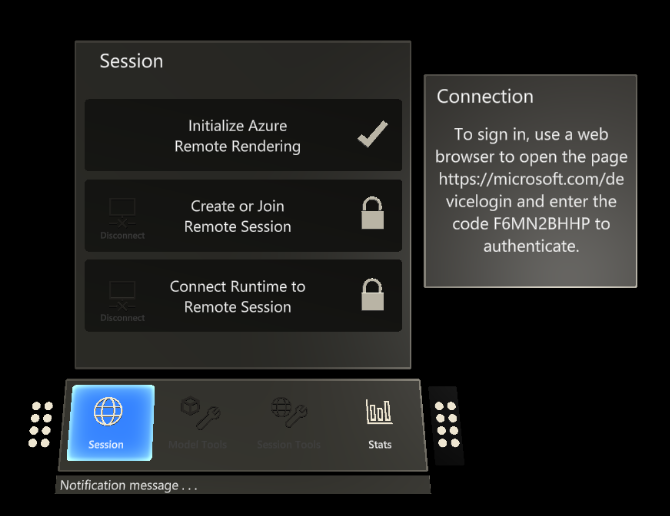
在您的次要裝置 (或相同裝置上的瀏覽器) 上輸入所提供的程式碼,並使用您的認證登入之後,存取權杖將會傳回給要求的應用程式,在此案例中是 Unity 編輯器。
在這之後,應用程式中的所有項目都應該正常進行。 如果您各階段的進度並未如預期,請檢查 Unity 主控台是否有任何錯誤。
建置至裝置
如果您使用 MSAL 將應用程式建置至裝置,您必須在專案的資產資料夾中納入一個檔案。 這可協助編譯器使用 教學課程資產中所包含的 Microsoft.Identity.Client.dll 正確地建置應用程式。
在名為 link.xml 的資產中新增檔案
將下列項目新增至該檔案:
<linker>
    <assembly fullname="Microsoft.Identity.Client" preserve="all"/>
    <assembly fullname="System.Runtime.Serialization" preserve="all"/>
    <assembly fullname="System.Core">
        <type fullname="System.Linq.Expressions.Interpreter.LightLambda" preserve="all" />
    </assembly>
</linker>
儲存變更
請遵循快速入門:將 Unity 範例部署至 HoloLens - 建置範例專案中的步驟,建置至 HoloLens。
下一步
本教學課程的其餘部分會包含概念文章,以建立可使用 Azure 遠端轉譯的生產環境就緒應用程式。