C# 教學課程:使用技能集在 Azure AI 搜尋服務中產生可搜尋的內容
在本教學課程中,瞭解如何使用 Azure SDK for .NET 在編製索引期間建立 內容擷取和轉換的 AI 擴充管線 。
技能集會將 AI 處理新增至原始內容,讓該內容更加統一且可搜尋。 一旦您知道技能集的運作方式,您就可以支援廣泛的轉換:從影像分析到自然語言處理,到您從外部提供的自定義處理。
本教學課程可協助您瞭解如何:
- 在擴充管線中定義物件。
- 建置技能集。 叫用 OCR、語言偵測、實體辨識和關鍵片語擷取。
- 執行管線。 建立並載入搜尋索引。
- 使用全文搜索檢查結果。
如果您沒有 Azure 訂用帳戶,請在開始之前先開啟 免費帳戶 。
概觀
本教學課程使用 C# 和 Azure.Search.Documents 用戶端連結庫來建立數據源、索引器、索引器和技能集。
索引器會驅動管線中的每個步驟,從 Azure 儲存體 上 Blob 容器中範例數據的內容擷取(非結構化文字和影像)開始。
擷取內容之後, 技能集 會從 Microsoft 執行內建技能,以尋找和擷取資訊。 這些技能包括影像上的光學字元辨識(OCR)、文字的語言偵測、關鍵片語擷取和實體辨識(組織)。 技能集所建立的新資訊會傳送至索引中的欄位。 填入索引之後,您就可以在查詢、Facet 和篩選中使用字段。
必要條件
注意
您可以針對本教學課程使用免費的搜尋服務。 免費層會將您限制為三個索引、三個索引器和三個數據源。 本教學課程會各建立一個。 開始之前,請確定您的服務有空間可接受新的資源。
下載檔案
下載範例數據存放庫的 ZIP 檔案,並擷取內容。 瞭解做法。
將範例數據上傳至 Azure 儲存體
在 Azure 儲存體 中,建立新的容器,並將其命名為cog-search-demo。
取得記憶體 連接字串,讓您可以在 Azure AI 搜尋中制定連線。
在左側,選取 [ 存取金鑰]。
複製金鑰一或兩個金鑰的 連接字串。 連接字串 類似下列範例:
DefaultEndpointsProtocol=https;AccountName=<your account name>;AccountKey=<your account key>;EndpointSuffix=core.windows.net
Azure AI 服務
內建 AI 擴充是由 Azure AI 服務所支援,包括語言服務和適用於自然語言和影像處理的 Azure AI 視覺。 針對本教學課程之類的小型工作負載,您可以使用每個索引器 20 筆交易的免費配置。 針對較大的工作負載, 將 Azure AI Services 多區域資源附加至隨用隨付定價的技能集 。
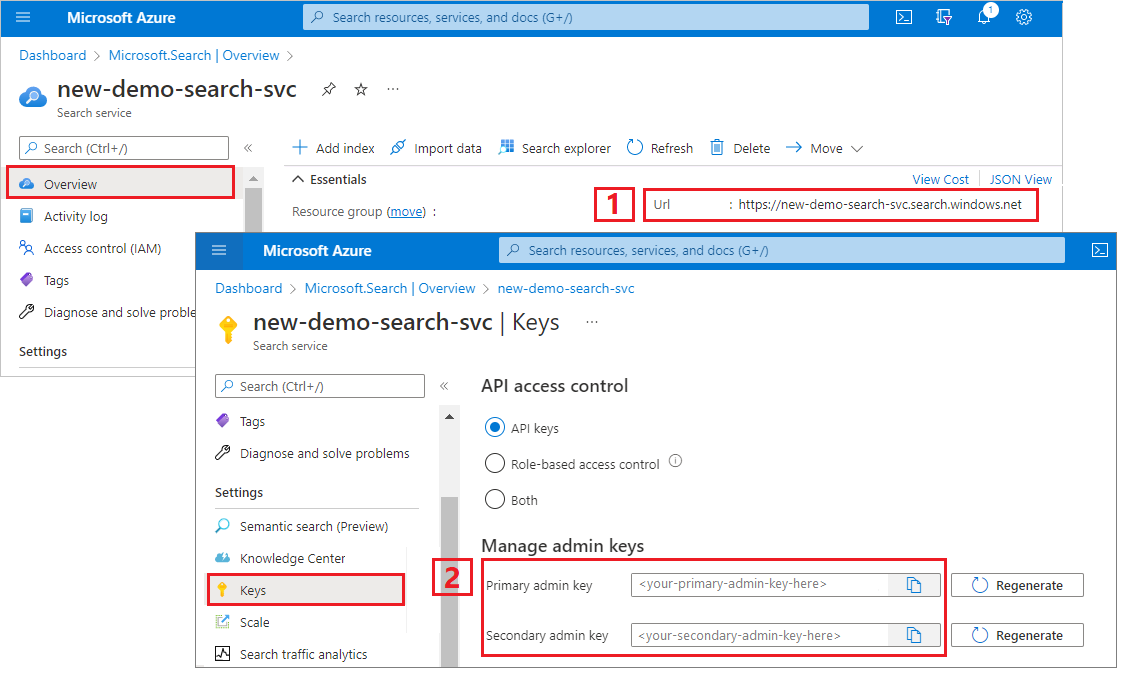
複製搜尋服務 URL 和 API 金鑰
在本教學課程中,Azure AI 搜尋的連線需要端點和 API 金鑰。 您可以從 Azure 入口網站 取得這些值。
登入 Azure 入口網站,流覽至搜尋服務 [概觀] 頁面,然後複製 URL。 範例端點看起來會像是
https://mydemo.search.windows.net。在 [設定> Keys] 底下,複製系統管理員密鑰。 管理員 索引鍵可用來新增、修改和刪除物件。 有兩個可交換的系統管理密鑰。 複製任一個。
設定您的環境
從開啟 Visual Studio 開始,並建立可在 .NET Core 上執行的新控制台應用程式專案。
安裝 Azure.Search.Documents
Azure AI 搜尋 .NET SDK 包含一個用戶端連結庫,可讓您管理索引、數據源、索引器和技能集,以及上傳和管理文件及執行查詢,而不需要處理 HTTP 和 JSON 的詳細數據。 此用戶端連結庫會以 NuGet 套件的形式散發。
針對此專案,安裝 版本 11 或更新Azure.Search.Documents版本的 和 最新版本。Microsoft.Extensions.Configuration
在 Visual Studio 中,選取 [工具>][NuGet 封裝管理員> 管理解決方案的 NuGet 套件...
選取最新版本,然後選取 [ 安裝]。
重複上述步驟以安裝 Microsoft.Extensions.Configuration 和 Microsoft.Extensions.Configuration.Json。
新增服務連線資訊
以滑鼠右鍵按兩下 方案總管中的項目,然後選取 [新增>專案...]。
命名檔案
appsettings.json,並選取 [新增]。將此檔案包含在輸出目錄中。
- 以滑鼠右鍵按下
appsettings.json並選取 [ 屬性]。 - 如果更新版本,請將 [複製到輸出目錄] 的值變更為 [複製]。
- 以滑鼠右鍵按下
將下列 JSON 複製到新的 JSON 檔案。
{
  "SearchServiceUri": "<YourSearchServiceUri>",
  "SearchServiceAdminApiKey": "<YourSearchServiceAdminApiKey>",
  "SearchServiceQueryApiKey": "<YourSearchServiceQueryApiKey>",
  "AzureAIServicesKey": "<YourMultiRegionAzureAIServicesKey>",
  "AzureBlobConnectionString": "<YourAzureBlobConnectionString>"
}
新增您的搜尋服務和 Blob 記憶體帳戶資訊。 回想一下,您可以從上一節所述的服務布建步驟取得這項資訊。
針對 SearchServiceUri,輸入完整的 URL。
新增命名空間
在 中 Program.cs,新增下列命名空間。
using Azure;
using Azure.Search.Documents.Indexes;
using Azure.Search.Documents.Indexes.Models;
using Microsoft.Extensions.Configuration;
using System;
using System.Collections.Generic;
using System.Linq;

namespace EnrichwithAI
建立 用戶端
在下Main建立和 SearchIndexerClient 的SearchIndexClient實例。
public static void Main(string[] args)
{
    // Create service client
    IConfigurationBuilder builder = new ConfigurationBuilder().AddJsonFile("appsettings.json");
    IConfigurationRoot configuration = builder.Build();

    string searchServiceUri = configuration["SearchServiceUri"];
    string adminApiKey = configuration["SearchServiceAdminApiKey"];
    string azureAiServicesKey = configuration["AzureAIServicesKey"];

    SearchIndexClient indexClient = new SearchIndexClient(new Uri(searchServiceUri), new AzureKeyCredential(adminApiKey));
    SearchIndexerClient indexerClient = new SearchIndexerClient(new Uri(searchServiceUri), new AzureKeyCredential(adminApiKey));
}
注意
用戶端會連線到您的搜尋服務。 為了避免開啟太多連線,您應該儘可能嘗試在應用程式中共用單一實例。 方法是安全線程,可啟用這類共用。
新增函式以在失敗期間結束程式
本教學課程旨在協助您了解索引管線的每個步驟。 如果發生嚴重問題,導致程式無法建立數據源、技能集、索引或索引器,程式將會輸出錯誤訊息並結束,以便瞭解並解決問題。
新增 ExitProgram 至 Main 以處理需要程序結束的案例。
private static void ExitProgram(string message)
{
    Console.WriteLine("{0}", message);
    Console.WriteLine("Press any key to exit the program...");
    Console.ReadKey();
    Environment.Exit(0);
}
建立管線
在 Azure AI 搜尋中,AI 處理會在索引編製期間發生(或數據擷取)。 本逐步解說的這個部分會建立四個物件:數據源、索引定義、技能集、索引器。
步驟 1:建立資料來源
SearchIndexerClientDataSourceName具有屬性,您可以設定為 SearchIndexerDataSourceConnection 物件。 此物件提供建立、列出、更新或刪除 Azure AI 搜尋服務數據源所需的所有方法。
藉由呼叫 indexerClient.CreateOrUpdateDataSourceConnection(dataSource)來建立新的SearchIndexerDataSourceConnection實例。 下列程式代碼會建立 類型的 AzureBlob數據源。
private static SearchIndexerDataSourceConnection CreateOrUpdateDataSource(SearchIndexerClient indexerClient, IConfigurationRoot configuration)
{
    SearchIndexerDataSourceConnection dataSource = new SearchIndexerDataSourceConnection(
        name: "demodata",
        type: SearchIndexerDataSourceType.AzureBlob,
        connectionString: configuration["AzureBlobConnectionString"],
        container: new SearchIndexerDataContainer("cog-search-demo"))
    {
        Description = "Demo files to demonstrate Azure AI Search capabilities."
    };

    // The data source does not need to be deleted if it was already created
    // since we are using the CreateOrUpdate method
    try
    {
        indexerClient.CreateOrUpdateDataSourceConnection(dataSource);
    }
    catch (Exception ex)
    {
        Console.WriteLine("Failed to create or update the data source\n Exception message: {0}\n", ex.Message);
        ExitProgram("Cannot continue without a data source");
    }

    return dataSource;
}
針對成功的要求,方法會傳回已建立的數據源。 如果要求發生問題,例如無效的參數,此方法會擲回例外狀況。
現在,在 中 Main 新增一行,以呼叫您剛才新增的 CreateOrUpdateDataSource 函式。
// Create or Update the data source
Console.WriteLine("Creating or updating the data source...");
SearchIndexerDataSourceConnection dataSource = CreateOrUpdateDataSource(indexerClient, configuration);
建置並執行方案。 因為這是您的第一個要求,請檢查 Azure 入口網站 以確認已在 Azure AI 搜尋服務中建立數據源。 在搜尋服務概觀頁面上,確認 [數據源] 清單有新的專案。 您可能需要等候幾分鐘,入口網站頁面才能重新整理。

步驟 2:建立技能集
在本節中,您會定義一組您想要套用至數據的擴充步驟。 每個擴充步驟稱為 技能 ,以及一組擴充步驟,也就是 技能集。 本教學課程使用 技能集的內建技能 :
光學字元辨識 可辨識圖像檔案中的印刷和手寫文字。
文字合併 可將欄位集合中的文字合併成單一「合併內容」欄位。
文字分割 以在呼叫關鍵片語擷取技能和實體辨識技能之前,將大型內容分成較小的區塊。 關鍵片語擷取和實體辨識接受 50,000 個字元以下的輸入。 其中一些範例檔案需要分割以符合此限制。
關鍵片語擷取 以提取最上層關鍵片語。
在初始處理期間,Azure AI 搜尋會破解每個檔,以從不同的檔格式擷取內容。 原始程序檔中的文字會放入產生的 content 欄位,每個檔各一個。 因此,將輸入設定為 "/document/content" 以使用此文字。 影像內容會放在產生的 normalized_images 欄位中,在技能集中指定為 /document/normalized_images/*。
輸出可以對應至索引、做為下游技能的輸入,或兩者與語言程式代碼的情況一樣。 在索引中,語言程式代碼適用於篩選。 作為輸入,文字分析技能會使用語言程式代碼來通知有關斷詞的語言規則。
如需技能集基本概念的詳細資訊,請參閱 如何定義技能集。
OCR 技能
會 OcrSkill 從影像擷取文字。 此技能假設normalized_images欄位存在。 若要產生此欄位,稍後在本教學課程中,我們會將索引器定義中的組態設定設為 "imageAction""generateNormalizedImages"。
private static OcrSkill CreateOcrSkill()
{
    List<InputFieldMappingEntry> inputMappings = new List<InputFieldMappingEntry>();
    inputMappings.Add(new InputFieldMappingEntry("image")
    {
        Source = "/document/normalized_images/*"
    });

    List<OutputFieldMappingEntry> outputMappings = new List<OutputFieldMappingEntry>();
    outputMappings.Add(new OutputFieldMappingEntry("text")
    {
        TargetName = "text"
    });

    OcrSkill ocrSkill = new OcrSkill(inputMappings, outputMappings)
    {
        Description = "Extract text (plain and structured) from image",
        Context = "/document/normalized_images/*",
        DefaultLanguageCode = OcrSkillLanguage.En,
        ShouldDetectOrientation = true
    };

    return ocrSkill;
}
合併技能
在本節中,您會建立 , MergeSkill 將文件內容欄位與 OCR 技能所產生的文字合併。
private static MergeSkill CreateMergeSkill()
{
    List<InputFieldMappingEntry> inputMappings = new List<InputFieldMappingEntry>();
    inputMappings.Add(new InputFieldMappingEntry("text")
    {
        Source = "/document/content"
    });
    inputMappings.Add(new InputFieldMappingEntry("itemsToInsert")
    {
        Source = "/document/normalized_images/*/text"
    });
    inputMappings.Add(new InputFieldMappingEntry("offsets")
    {
        Source = "/document/normalized_images/*/contentOffset"
    });

    List<OutputFieldMappingEntry> outputMappings = new List<OutputFieldMappingEntry>();
    outputMappings.Add(new OutputFieldMappingEntry("mergedText")
    {
        TargetName = "merged_text"
    });

    MergeSkill mergeSkill = new MergeSkill(inputMappings, outputMappings)
    {
        Description = "Create merged_text which includes all the textual representation of each image inserted at the right location in the content field.",
        Context = "/document",
        InsertPreTag = " ",
        InsertPostTag = " "
    };

    return mergeSkill;
}
語言偵測技能
會 LanguageDetectionSkill 偵測輸入文字的語言,並針對要求提交的每個文件報告單一語言代碼。 我們會使用語言偵測技能的輸出做為文字分割技能輸入的一部分。
private static LanguageDetectionSkill CreateLanguageDetectionSkill()
{
    List<InputFieldMappingEntry> inputMappings = new List<InputFieldMappingEntry>();
    inputMappings.Add(new InputFieldMappingEntry("text")
    {
        Source = "/document/merged_text"
    });

    List<OutputFieldMappingEntry> outputMappings = new List<OutputFieldMappingEntry>();
    outputMappings.Add(new OutputFieldMappingEntry("languageCode")
    {
        TargetName = "languageCode"
    });

    LanguageDetectionSkill languageDetectionSkill = new LanguageDetectionSkill(inputMappings, outputMappings)
    {
        Description = "Detect the language used in the document",
        Context = "/document"
    };

    return languageDetectionSkill;
}
文字分割技能
下列SplitSkill會依頁面分割文字,並將頁面長度限製為4,000個字元,如所測量。String.Length 演算法會嘗試將文字分割成大小上限的 maximumPageLength 區塊。 在此情況下,演算法會盡最大努力打破句子界限上的句子,因此區塊的大小可能稍微小於 maximumPageLength。
private static SplitSkill CreateSplitSkill()
{
    List<InputFieldMappingEntry> inputMappings = new List<InputFieldMappingEntry>();
    inputMappings.Add(new InputFieldMappingEntry("text")
    {
        Source = "/document/merged_text"
    });
    inputMappings.Add(new InputFieldMappingEntry("languageCode")
    {
        Source = "/document/languageCode"
    });

    List<OutputFieldMappingEntry> outputMappings = new List<OutputFieldMappingEntry>();
    outputMappings.Add(new OutputFieldMappingEntry("textItems")
    {
        TargetName = "pages",
    });

    SplitSkill splitSkill = new SplitSkill(inputMappings, outputMappings)
    {
        Description = "Split content into pages",
        Context = "/document",
        TextSplitMode = TextSplitMode.Pages,
        MaximumPageLength = 4000,
        DefaultLanguageCode = SplitSkillLanguage.En
    };

    return splitSkill;
}
實體辨識技能
這個 EntityRecognitionSkill 實體設定為辨識類別類型 organization。 EntityRecognitionSkill也可以辨識類別類型和 personlocation。
請注意,[內容] 字段是使用星號設定為 "/document/pages/*" ,這表示會針對 下 "/document/pages"的每個頁面呼叫擴充步驟。
private static EntityRecognitionSkill CreateEntityRecognitionSkill()
{
    List<InputFieldMappingEntry> inputMappings = new List<InputFieldMappingEntry>();
    inputMappings.Add(new InputFieldMappingEntry("text")
    {
        Source = "/document/pages/*"
    });

    List<OutputFieldMappingEntry> outputMappings = new List<OutputFieldMappingEntry>();
    outputMappings.Add(new OutputFieldMappingEntry("organizations")
    {
        TargetName = "organizations"
    });

    EntityRecognitionSkill entityRecognitionSkill = new EntityRecognitionSkill(inputMappings, outputMappings)
    {
        Description = "Recognize organizations",
        Context = "/document/pages/*",
        DefaultLanguageCode = EntityRecognitionSkillLanguage.En
    };
    entityRecognitionSkill.Categories.Add(EntityCategory.Organization);

    return entityRecognitionSkill;
}
關鍵片語擷取技能
EntityRecognitionSkill如同剛才建立的實例,KeyPhraseExtractionSkill會針對檔的每個頁面呼叫 。
private static KeyPhraseExtractionSkill CreateKeyPhraseExtractionSkill()
{
    List<InputFieldMappingEntry> inputMappings = new List<InputFieldMappingEntry>();
    inputMappings.Add(new InputFieldMappingEntry("text")
    {
        Source = "/document/pages/*"
    });
    inputMappings.Add(new InputFieldMappingEntry("languageCode")
    {
        Source = "/document/languageCode"
    });

    List<OutputFieldMappingEntry> outputMappings = new List<OutputFieldMappingEntry>();
    outputMappings.Add(new OutputFieldMappingEntry("keyPhrases")
    {
        TargetName = "keyPhrases"
    });

    KeyPhraseExtractionSkill keyPhraseExtractionSkill = new KeyPhraseExtractionSkill(inputMappings, outputMappings)
    {
        Description = "Extract the key phrases",
        Context = "/document/pages/*",
        DefaultLanguageCode = KeyPhraseExtractionSkillLanguage.En
    };

    return keyPhraseExtractionSkill;
}
建置及建立技能集
SearchIndexerSkillset使用您建立的技能來建置 。
private static SearchIndexerSkillset CreateOrUpdateDemoSkillSet(SearchIndexerClient indexerClient, IList<SearchIndexerSkill> skills,string azureAiServicesKey)
{
    SearchIndexerSkillset skillset = new SearchIndexerSkillset("demoskillset", skills)
    {
        // Azure AI services was formerly known as Cognitive Services.
        // The APIs still use the old name, so we need to create a CognitiveServicesAccountKey object.
        Description = "Demo skillset",
        CognitiveServicesAccount = new CognitiveServicesAccountKey(azureAiServicesKey)
    };

    // Create the skillset in your search service.
    // The skillset does not need to be deleted if it was already created
    // since we are using the CreateOrUpdate method
    try
    {
        indexerClient.CreateOrUpdateSkillset(skillset);
    }
    catch (RequestFailedException ex)
    {
        Console.WriteLine("Failed to create the skillset\n Exception message: {0}\n", ex.Message);
        ExitProgram("Cannot continue without a skillset");
    }

    return skillset;
}
將下列幾行新增至 Main。
// Create the skills
Console.WriteLine("Creating the skills...");
OcrSkill ocrSkill = CreateOcrSkill();
MergeSkill mergeSkill = CreateMergeSkill();
EntityRecognitionSkill entityRecognitionSkill = CreateEntityRecognitionSkill();
LanguageDetectionSkill languageDetectionSkill = CreateLanguageDetectionSkill();
SplitSkill splitSkill = CreateSplitSkill();
KeyPhraseExtractionSkill keyPhraseExtractionSkill = CreateKeyPhraseExtractionSkill();

// Create the skillset
Console.WriteLine("Creating or updating the skillset...");
List<SearchIndexerSkill> skills = new List<SearchIndexerSkill>();
skills.Add(ocrSkill);
skills.Add(mergeSkill);
skills.Add(languageDetectionSkill);
skills.Add(splitSkill);
skills.Add(entityRecognitionSkill);
skills.Add(keyPhraseExtractionSkill);

SearchIndexerSkillset skillset = CreateOrUpdateDemoSkillSet(indexerClient, skills, azureAiServicesKey);
步驟 3:建立索引
在本節中,您會指定要包含在可搜尋索引中的欄位,以及每個欄位的搜尋屬性,來定義索引架構。 欄位具有類型,而且可以採用屬性,以決定欄位的使用方式(可搜尋、可排序等等)。 索引中的功能變數名稱不需要與來源中的功能變數名稱相同。 在稍後的步驟中,您會在索引器中新增欄位對應,以連接來源目的地欄位。 針對此步驟,請使用與搜尋應用程式相關的欄位命名慣例來定義索引。
本練習使用下列欄位和欄位型態:
| 欄位名稱 | 欄位類型 |
|---|---|
id |
Edm.String |
content |
Edm.String |
languageCode |
Edm.String |
keyPhrases |
列出<Edm.String> |
organizations |
列出<Edm.String> |
建立DemoIndex類別
此索引的欄位是使用模型類別來定義。 模型類別的每個屬性都有屬性,可決定對應索引字段的搜尋相關行為。
我們會將模型類別新增至新的 C# 檔案。 以滑鼠右鍵按下您的項目,然後選取 [新增>專案...],選取 [類別],並將檔案DemoIndex.cs命名為 ,然後選取 [新增]。
請務必指出您想要使用 和 System.Text.Json.Serialization 命名空間中的Azure.Search.Documents.Indexes型別。
將下列模型類別定義新增至 DemoIndex.cs ,並將其包含在您建立索引的相同命名空間中。
using Azure.Search.Documents.Indexes;
using System.Text.Json.Serialization;

namespace EnrichwithAI
{
    // The SerializePropertyNamesAsCamelCase is currently unsupported as of this writing.
    // Replace it with JsonPropertyName
    public class DemoIndex
    {
        [SearchableField(IsSortable = true, IsKey = true)]
        [JsonPropertyName("id")]
        public string Id { get; set; }

        [SearchableField]
        [JsonPropertyName("content")]
        public string Content { get; set; }

        [SearchableField]
        [JsonPropertyName("languageCode")]
        public string LanguageCode { get; set; }

        [SearchableField]
        [JsonPropertyName("keyPhrases")]
        public string[] KeyPhrases { get; set; }

        [SearchableField]
        [JsonPropertyName("organizations")]
        public string[] Organizations { get; set; }
    }
}
既然您已定義模型類別, Program.cs 您可以相當輕鬆地建立索引定義。 此索引的名稱將會是 demoindex。 如果已有該名稱的索引存在,則會將其刪除。
private static SearchIndex CreateDemoIndex(SearchIndexClient indexClient)
{
    FieldBuilder builder = new FieldBuilder();
    var index = new SearchIndex("demoindex")
    {
        Fields = builder.Build(typeof(DemoIndex))
    };

    try
    {
        indexClient.GetIndex(index.Name);
        indexClient.DeleteIndex(index.Name);
    }
    catch (RequestFailedException ex) when (ex.Status == 404)
    {
        //if the specified index not exist, 404 will be thrown.
    }

    try
    {
        indexClient.CreateIndex(index);
    }
    catch (RequestFailedException ex)
    {
        Console.WriteLine("Failed to create the index\n Exception message: {0}\n", ex.Message);
        ExitProgram("Cannot continue without an index");
    }

    return index;
}
在測試期間,您可能會發現您嘗試建立索引多次。 因此,請檢查您是否即將建立的索引已經存在,然後再嘗試建立索引。
將下列幾行新增至 Main。
// Create the index
Console.WriteLine("Creating the index...");
SearchIndex demoIndex = CreateDemoIndex(indexClient);
新增下列 using 語句,以解析已釐清的參考。
using Index = Azure.Search.Documents.Indexes.Models;
若要深入瞭解索引概念,請參閱建立索引(REST API)。
步驟 4:建立和執行索引器
到目前為止,您已建立數據源、技能集和索引。 這三個 元件會成為索引器 一部分,將每個元件一起提取到單一多階段作業。 若要在索引器中將這些系結在一起,您必須定義欄位對應。
fieldMappings 會在技能集之前處理,將數據源的來源欄位對應至索引中的目標欄位。 如果兩端的功能變數名稱和類型都相同,則不需要對應。
outputFieldMappings 會在技能集之後處理,並參考在檔破解或擴充建立它們之前不存在的sourceFieldNames。 targetFieldName 是索引中的欄位。
除了將輸入連結至輸出之外,您也可以使用字段對應來壓平數據結構。 如需詳細資訊,請參閱 如何將擴充字段對應至可搜尋的索引。
private static SearchIndexer CreateDemoIndexer(SearchIndexerClient indexerClient, SearchIndexerDataSourceConnection dataSource, SearchIndexerSkillset skillSet, SearchIndex index)
{
    IndexingParameters indexingParameters = new IndexingParameters()
    {
        MaxFailedItems = -1,
        MaxFailedItemsPerBatch = -1,
    };
    indexingParameters.Configuration.Add("dataToExtract", "contentAndMetadata");
    indexingParameters.Configuration.Add("imageAction", "generateNormalizedImages");

    SearchIndexer indexer = new SearchIndexer("demoindexer", dataSource.Name, index.Name)
    {
        Description = "Demo Indexer",
        SkillsetName = skillSet.Name,
        Parameters = indexingParameters
    };

    FieldMappingFunction mappingFunction = new FieldMappingFunction("base64Encode");
    mappingFunction.Parameters.Add("useHttpServerUtilityUrlTokenEncode", true);

    indexer.FieldMappings.Add(new FieldMapping("metadata_storage_path")
    {
        TargetFieldName = "id",
        MappingFunction = mappingFunction

    });
    indexer.FieldMappings.Add(new FieldMapping("content")
    {
        TargetFieldName = "content"
    });

    indexer.OutputFieldMappings.Add(new FieldMapping("/document/pages/*/organizations/*")
    {
        TargetFieldName = "organizations"
    });
    indexer.OutputFieldMappings.Add(new FieldMapping("/document/pages/*/keyPhrases/*")
    {
        TargetFieldName = "keyPhrases"
    });
    indexer.OutputFieldMappings.Add(new FieldMapping("/document/languageCode")
    {
        TargetFieldName = "languageCode"
    });

    try
    {
        indexerClient.GetIndexer(indexer.Name);
        indexerClient.DeleteIndexer(indexer.Name);
    }
    catch (RequestFailedException ex) when (ex.Status == 404)
    {
        //if the specified indexer not exist, 404 will be thrown.
    }

    try
    {
        indexerClient.CreateIndexer(indexer);
    }
    catch (RequestFailedException ex)
    {
        Console.WriteLine("Failed to create the indexer\n Exception message: {0}\n", ex.Message);
        ExitProgram("Cannot continue without creating an indexer");
    }

    return indexer;
}
將下列幾行新增至 Main。
// Create the indexer, map fields, and execute transformations
Console.WriteLine("Creating the indexer and executing the pipeline...");
SearchIndexer demoIndexer = CreateDemoIndexer(indexerClient, dataSource, skillset, demoIndex);
預期索引器處理需要一些時間才能完成。 即使數據集很小,分析技能還是需要大量計算。 某些技能,例如影像分析,是長時間執行的。
提示
建立索引器會叫用管線。 如果遇到數據、對應輸入和輸出或作業順序的問題,它們就會出現在這個階段。
探索建立索引器
程序代碼會將 設定 "maxFailedItems" 為 -1,指示索引引擎在數據匯入期間忽略錯誤。 這非常有用,因為示範數據源中檔很少。 對於較大的數據源,您會將值設定為大於 0。
請注意, "dataToExtract" 會設定為 "contentAndMetadata"。 此語句會告知索引器自動從不同的檔格式擷取內容,以及與每個檔案相關的元數據。
擷取內容時,您可以將 設定 imageAction 為從數據源中找到的影像擷取文字。 "imageAction"設定為"generateNormalizedImages"組態,結合 OCR 技能與文字合併技能,會告訴索引器從影像擷取文字(例如,流量停止符號中的「停止」一詞),並將其內嵌為內容字段的一部分。 此行為適用於內嵌在檔中的影像(請思考 PDF 中的影像),以及數據源中找到的影像,例如 JPG 檔案。
監視索引編製
定義索引器之後,它會在提交要求時自動執行。 根據您定義的技能而定,索引編製可能需要比預期更長的時間。 若要了解索引器是否仍在執行中,請使用 GetStatus 方法。
private static void CheckIndexerOverallStatus(SearchIndexerClient indexerClient, SearchIndexer indexer)
{
    try
    {
        var demoIndexerExecutionInfo = indexerClient.GetIndexerStatus(indexer.Name);

        switch (demoIndexerExecutionInfo.Value.Status)
        {
            case IndexerStatus.Error:
                ExitProgram("Indexer has error status. Check the Azure Portal to further understand the error.");
                break;
            case IndexerStatus.Running:
                Console.WriteLine("Indexer is running");
                break;
            case IndexerStatus.Unknown:
                Console.WriteLine("Indexer status is unknown");
                break;
            default:
                Console.WriteLine("No indexer information");
                break;
        }
    }
    catch (RequestFailedException ex)
    {
        Console.WriteLine("Failed to get indexer overall status\n Exception message: {0}\n", ex.Message);
    }
}
demoIndexerExecutionInfo 表示索引器目前的狀態和執行歷程記錄。
某些來源檔案和技能組合通常會出現警告,而且不一定表示問題。 在本教學課程中,警告是良性的(例如,JPEG 檔案中沒有任何文字輸入)。
將下列幾行新增至 Main。
// Check indexer overall status
Console.WriteLine("Check the indexer overall status...");
CheckIndexerOverallStatus(indexerClient, demoIndexer);
Search
在 Azure AI 搜尋教學課程主控台應用程式中,我們通常會在執行傳回結果的查詢之前新增 2 秒的延遲,但由於擴充需要幾分鐘的時間才能完成,因此我們會關閉控制台應用程式,並改用另一種方法。
最簡單的選項是 入口網站中的 [搜尋總管 ]。 您可以先執行傳回所有檔的空白查詢,或傳回管線所建立之新欄位內容的更目標搜尋。
在 [Azure 入口網站] 的搜尋 [概觀] 頁面中,選取 [索引]。
在清單中尋找
demoindex。 它應該有14份檔。 如果檔計數為零,索引器仍在執行中,或頁面尚未重新整理。選取
demoindex。 搜尋總管是第一個索引標籤。載入第一份檔后,內容即可供搜尋。 若要驗證內容是否存在,請按兩下 [ 搜尋] 以執行未指定的查詢。 此查詢會傳回所有目前編製索引的檔,讓您了解索引包含的內容。
接下來,貼上下列字串以取得更容易管理的結果:
search=*&$select=id, languageCode, organizations
重設並重新執行
在開發的早期實驗階段中,設計反覆項目最實用的方法是從 Azure AI 搜尋服務中刪除物件,並讓您的程式碼重建它們。 資源名稱是唯一的。 刪除物件可讓您使用相同的名稱加以重新建立。
本教學課程的範例程式碼會檢查是否有現有的物件,並將其刪除,以便您重新執行程式碼。 您也可以使用入口網站來刪除索引、索引器、數據源和技能集。
重要心得
本教學課程示範透過建立元件元件元件來建置擴充索引管線的基本步驟:數據源、技能集、索引和索引器。
引進了內建技能 ,以及技能集定義,以及透過輸入和輸出將技能鏈結在一起的機制。 您也瞭解到,outputFieldMappings在索引器定義中,需要從管線將擴充值路由傳送至 Azure AI 搜尋服務 上的可搜尋索引。
最後,您已瞭解如何測試結果,並重設系統以進行進一步的反覆專案。 您已瞭解針對索引發出查詢會傳回擴充索引管線所建立的輸出。 您也已瞭解如何檢查索引器狀態,以及重新執行管線之前要刪除的物件。
清除資源
如果您使用自己的訂用帳戶,當專案結束時,建議您移除不再需要的資源。 資源若繼續執行,將需付費。 您可以個別刪除資源,或刪除資源群組以刪除整組資源。
您可以使用左導覽窗格中的 [所有資源] 或 [資源群組] 連結,在入口網站中尋找和管理資源。
下一步
現在您已熟悉 AI 擴充管線中的所有物件,讓我們進一步瞭解技能集定義和個別技能。