Create and deploy a Flask Python web app to Azure with system-assigned managed identity
In this tutorial, you deploy Python Flask code to create and deploy a web app running in Azure App Service. The web app uses its system-assigned managed identity (passwordless connections) with Azure role-based access control to access Azure Storage and Azure Database for PostgreSQL - Flexible Server resources. The code uses the DefaultAzureCredential class of the Azure Identity client library for Python. The DefaultAzureCredential class automatically detects that a managed identity exists for the App Service and uses it to access other Azure resources.
You can configure passwordless connections to Azure services using Service Connector or you can configure them manually. This tutorial shows how to use Service Connector. For more information about passwordless connections, see Passwordless connections for Azure services. For information about Service Connector, see the Service Connector documentation.
This tutorial shows you how to create and deploy a Python web app using the Azure CLI. The commands in this tutorial are written to be run in a Bash shell. You can run the tutorial commands in any Bash environment with the CLI installed, such as your local environment or the Azure Cloud Shell. With some modification -- for example, setting and using environment variables -- you can run these commands in other environments like Windows command shell. For examples of using a user-assigned managed identity, see Create and deploy a Django web app to Azure with a user-assigned managed identity.
Get the sample app
A sample Python application using the Flask framework are available to help you follow along with this tutorial. Download or clone one of the sample applications to your local workstation.
Clone the sample in an Azure Cloud Shell session.
git clone https://github.com/Azure-Samples/msdocs-flask-web-app-managed-identity.gitNavigate to the application folder.
cd msdocs-flask-web-app-managed-identity
Create an Azure PostgreSQL server
Set up the environment variables needed for the tutorial.
LOCATION="eastus"
RAND_ID=$RANDOM
RESOURCE_GROUP_NAME="msdocs-mi-web-app"
APP_SERVICE_NAME="msdocs-mi-web-$RAND_ID"
DB_SERVER_NAME="msdocs-mi-postgres-$RAND_ID"
ADMIN_USER="demoadmin"
ADMIN_PW="ChAnG33#ThsPssWD$RAND_ID"
Important
The
ADMIN_PWmust contain 8 to 128 characters from three of the following categories: English uppercase letters, English lowercase letters, numbers, and nonalphanumeric characters. When creating usernames or passwords do not use the$character. Later you create environment variables with these values where the$character has special meaning within the Linux container used to run Python apps.Create a resource group with the az group create command.
az group create --location $LOCATION --name $RESOURCE_GROUP_NAMECreate a PostgreSQL server with the az postgres flexible-server create command. (This and subsequent commands use the line continuation character for Bash Shell ('\'). Change the line continuation character for your shell if needed.)
az postgres flexible-server create \
  --resource-group $RESOURCE_GROUP_NAME \
  --name $DB_SERVER_NAME \
  --location $LOCATION \
  --admin-user $ADMIN_USER \
  --admin-password $ADMIN_PW \
  --sku-name Standard_D2ds_v4
The sku-name is the name of the pricing tier and compute configuration. For more information, see Azure Database for PostgreSQL pricing. To list available SKUs, use
az postgres flexible-server list-skus --location $LOCATION.Create a database named
restaurantusing the az postgres flexible-server execute command.az postgres flexible-server execute \ --name $DB_SERVER_NAME \ --admin-user $ADMIN_USER \ --admin-password $ADMIN_PW \ --database-name postgres \ --querytext 'create database restaurant;'
Create an Azure App Service and deploy the code
Create an app service using the az webapp up command.
az webapp up \
  --resource-group $RESOURCE_GROUP_NAME \
  --name $APP_SERVICE_NAME \
  --runtime PYTHON:3.9 \
  --sku B1
The sku defines the size (CPU, memory) and cost of the app service plan. The B1 (Basic) service plan incurs a small cost in your Azure subscription. For a full list of App Service plans, view the App Service pricing page.
Configure App Service to use the start.sh in the repo with the az webapp config set command.
az webapp config set \
  --resource-group $RESOURCE_GROUP_NAME \
  --name $APP_SERVICE_NAME \
  --startup-file "start.sh"
Create passwordless connectors to Azure resources
The Service Connector commands configure Azure Storage and Azure Database for PostgreSQL resources to use managed identity and Azure role-based access control. The commands create app settings in the App Service that connect your web app to these resources. The output from the commands lists the service connector actions taken to enable passwordless capability.
Add a PostgreSQL service connector with the az webapp connection create postgres-flexible command. The system-assigned managed identity is used to authenticate the web app to the target resource, PostgreSQL in this case.
az webapp connection create postgres-flexible \
  --resource-group $RESOURCE_GROUP_NAME \
  --name $APP_SERVICE_NAME \
  --target-resource-group $RESOURCE_GROUP_NAME \
  --server $DB_SERVER_NAME \
  --database restaurant \
  --client-type python \
  --system-identity
Add a storage service connector with the az webapp connection create storage-blob command.
This command also adds a storage account and adds the web app with role Storage Blob Data Contributor to the storage account.
STORAGE_ACCOUNT_URL=$(az webapp connection create storage-blob \
  --new true \
  --resource-group $RESOURCE_GROUP_NAME \
  --name $APP_SERVICE_NAME \
  --target-resource-group $RESOURCE_GROUP_NAME \
  --client-type python \
  --system-identity \
  --query configurations[].value \
  --output tsv)
STORAGE_ACCOUNT_NAME=$(cut -d . -f1 <<< $(cut -d / -f3 <<< $STORAGE_ACCOUNT_URL))
Create a container in the storage account
The sample Python app stores photos submitted by reviewers as blobs in a container in your storage account.
When a user submits a photo with their review, the sample app writes the image to the container using its system-assigned managed identity for authentication and authorization. You configured this functionality in the last section.
When a user views the reviews for a restaurant, the app returns a link to the photo in blob storage for each review that has one associated with it. For the browser to display the photo, it must be able to access it in your storage account. The blob data must be available for read publicly through anonymous (unauthenticated) access.
To enhance security, storage accounts are created with anonymous access to blob data disabled by default. In this section, you enable anonymous read access on your storage account and then create a container named photos that provides public (anonymous) access to its blobs.
Update the storage account to allow anonymous read access to blobs with the az storage account update command.
az storage account update \
  --name $STORAGE_ACCOUNT_NAME \
  --resource-group $RESOURCE_GROUP_NAME \
  --allow-blob-public-access true
Enabling anonymous access on the storage account doesn't affect access for individual blobs. You must explicitly enable public access to blobs at the container-level.
Create a container called photos in the storage account with the az storage container create command. Allow anonymous read (public) access to blobs in the newly created container.
az storage container create \
  --account-name $STORAGE_ACCOUNT_NAME \
  --name photos \
  --public-access blob \
  --account-key $(az storage account keys list --account-name $STORAGE_ACCOUNT_NAME \
      --query [0].value --output tsv)
Note
For brevity, this command uses the storage account key to authorize with the storage account. For most scenarios, Microsoft's recommended approach is to use Microsoft Entra ID and Azure (RBAC) roles. For a quick set of instructions, see Quickstart: Create, download, and list blobs with Azure CLI. Note that several Azure roles permit you to create containers in a storage account, including "Owner", "Contributor", "Storage Blob Data Owner", and "Storage Blob Data Contributor".
To learn more about anonymous read access to blob data, see Configure anonymous read access for containers and blobs.
Test the Python web app in Azure
The sample Python app uses the azure.identity package and its DefaultAzureCredential class. When the app is running in Azure, DefaultAzureCredential automatically detects if a managed identity exists for the App Service and, if so, uses it to access other Azure resources (storage and PostgreSQL in this case). There's no need to provide storage keys, certificates, or credentials to the App Service to access these resources.
Browse to the deployed application at the URL
http://$APP_SERVICE_NAME.azurewebsites.net.It can take a minute or two for the app to start. If you see a default app page that isn't the default sample app page, wait a minute and refresh the browser.
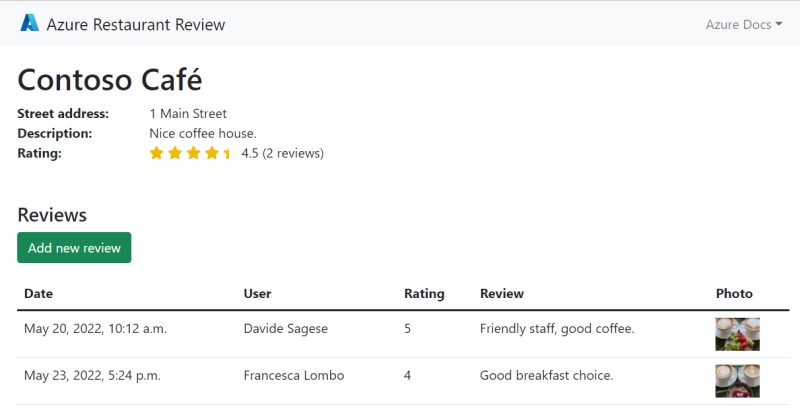
Test the functionality of the sample app by adding a restaurant and some reviews with photos for the restaurant.
The restaurant and review information is stored in Azure Database for PostgreSQL and the photos are stored in Azure Storage. Here's an example screenshot:

Clean up
In this tutorial, all the Azure resources were created in the same resource group. Removing the resource group removes with the az group delete command removes all resources in the resource group and is the fastest way to remove all Azure resources used for your app.
az group delete --name $RESOURCE_GROUP_NAME
You can optionally add the --no-wait argument to allow the command to return before the operation is complete.
Next steps
Feedback
Coming soon: Throughout 2024 we will be phasing out GitHub Issues as the feedback mechanism for content and replacing it with a new feedback system. For more information see: https://aka.ms/ContentUserFeedback.
Submit and view feedback for